AWS Partner Network (APN) Blog
AWS IoT on Mongoose OS – Part 2
Editor’s note: This is the second of a popular two-part series by Tim Mattison. Read Part 1 >>
By Tim Mattison, Partner Solutions Architect at AWS focused on IoT

Our previous post, AWS IoT on Mongoose OS – Part 1, described how Mongoose OS can connect an Espressif ESP8266 or ESP32 to AWS IoT. It explained how AWS IoT sets the bar very high for security with Transport Layer Security (TLS) mutual authentication that assures both the client and server that they’re communicating with the correct system.
How can continue to optimize? In this post, I will explain how you can use hardware-based cryptographic functions to improve both security and performance in an IoT deployment.
Dedicated Cryptography
Many microcontrollers have neither dedicated cryptographic instructions nor protected flash or secure elements. Not having the proper cryptographic instructions means that certain cryptographic operations have a significant effect on power consumption and tend to be time-consuming. A lack of protected flash or secure elements means that a microcontroller’s TLS certificates can be extracted from the hardware, copied, and used to impersonate the device, using readily available debugging tools.
The ATECC508A CryptoAuthentication™ device from Microchip Technology combines hardware-based cryptographic functions and secure storage in a design that resists attack through physical, electrical, and software means. The device connects through an I2C interface to a microcontroller. The microcontroller then uses a simple command set to perform cryptographic operations on data with a private key that stays on the ATECC508A. The ATECC508A can internally generate private keys, or can store private keys generated by an external system. During product development, this external system might be a developer’s computer. At full production volumes, this external system is typically a high-speed hardware security module (HSM) installed in a secure manufacturing facility.
By eliminating the need for the host processor to handle cryptographic operations, the ATECC508A can help enhance security and performance. Microcontroller-based designs using the ATECC508A can establish TLS connections faster than software-only TLS implementations.
AWS has worked closely with Microchip and Cesanta to provide a way to use Microchip’s ATECC508A device with the ESP8266 and ESP32 on Cesanta’s Mongoose OS platform. In this post, we’ll walk through this process step by step. At the end of this post, you’ll have an inexpensive platform suitable for development, prototyping, and production.
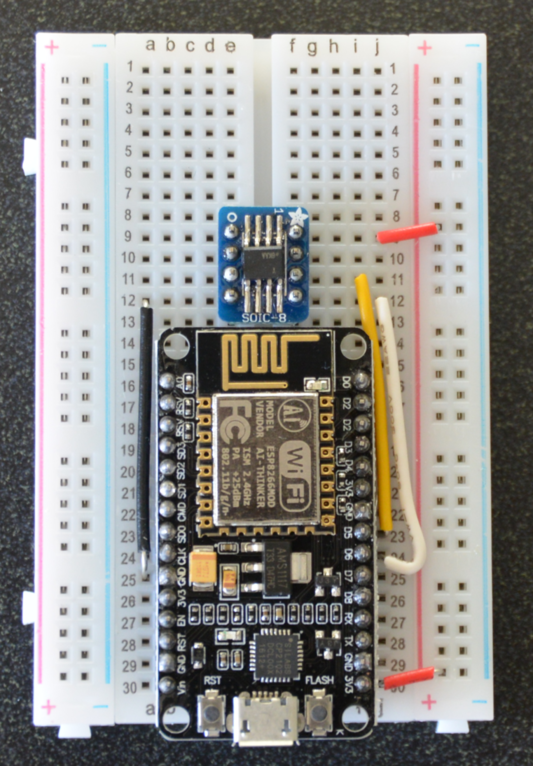
Wiring
You’ll need an ESP8266 NodeMCU device and an ATECC508A chip. The ATECC508A can be obtained either as an ATCRYPTOAUTH-XPRO board, which requires no soldering, or a bare-bones ATECC508A, which requires soldering.
| Function | ATECC508A pin | ESP8266 pin | NodeMCU pin | ATCRYPTOAUTH pin |
|---|---|---|---|---|
| SDA | 5 | 10 (GPIO12) | D6 | 11 (yellow) |
| SCL | 6 | 9 (GPIO14) | D5 | 12 (white) |
| GND | 4 | Any suitable | GND | 19 (black) |
| VCC | 8 | Any suitable | 3V3 | 20 (red) |
Wiring for ATCRYPTOAUTH-XPRO:

Wiring for the bare-bones ATECC508A:
Setup
When the ATECC508A chip is wired, it’s time to configure it.
1. Generate a certificate and key. You can create a self-signed certificate or use your own certificate authority (CA). You’ll need to generate an Elliptic Curve Digital Signature Algorithm (ECDSA) certificate using the P-256 curve, because the ATECC508A supports that certificate type.
2. Flash your device with Mongoose OS, as we described in step 1 of the previous post.
3. Use the Mongoose OS I2C.Scan function to verify that the chip is wired properly and functioning as expected. You should expect the mos tool to respond with [ 96 ], which is the I2C address of the ATECC508A. If it does not, go back and verify your wiring or try another chip if possible.
4. Configure the chip. You can use the sample configuration provided in the Mongoose OS Git repository. Save the configuration as atca-aws-test.yaml and set it with the extended mos commands:
Note: These changes are irreversible: Once zones are locked, they cannot be unlocked. Also, this sample configuration is very permissive and is only suitable for testing; do not use it for production deployments. Please refer to the Microchip manual and other documentation when creating a production configuration.
5. Write the generated key into the secure element. If you used the sample configuration, this is a two-step process:
a. Generate and set the key encryption key in slot 4:
b. Set the ECC key in slot 0:
6. Upload the public signed certificate to the device:
7. Set the HTTP server configuration to use the uploaded certificate and private key from the device’s slot 0:
At startup, you should see the following in the device’s log:
And when connecting with the browser, you should see the following:
Perform AWS IoT Setup and Connect
Follow the MQTT example in the Mongoose OS Git repository. After setting the Wi-Fi credentials, run this command to provision the ESP8266 board in AWS IoT and use the secure element:
What to Expect
At this point, you should be connected to AWS IoT using the secure element. On an ESP8266, the connection negotiation time will drop from 10 seconds or more, to less than one second. Your certificate is now protected in the ATECC508A and will be used to authenticate your device to AWS IoT whenever it needs to reconnect. This platform gets you one step closer to a secure, production deployment.
Are you using the components we discussed in this post? We love to see customer projects, products, and demos. Have questions or feedback? Let us know!