AWS Architecture Blog
Field Notes: Preparing for AWS Outposts: Ordering, Delivery, and Installation
AWS Outposts is a fully managed service that extends AWS infrastructure, services, APIs, and tools to customer premises. By providing local access to AWS managed infrastructure, AWS Outposts enables customers to build and run applications on premises using the same programming interfaces as in AWS Regions, while using local compute and storage resources for lower latency and local data processing needs. This blog post addresses what customers can expect when planning, ordering, and accepting delivery of AWS Outposts. In the following sections, I share details, insights, and example scenarios spanning the six stages for getting your own AWS Outposts.
Walkthrough
The end-to-end process for consuming the AWS Outposts service involves six stages:
- Sizing an Outpost configuration for your use case
- Order submission
- Site validation
- Order approval
- Delivery and installation
- Activation
The following figure provides an overview of these stages:
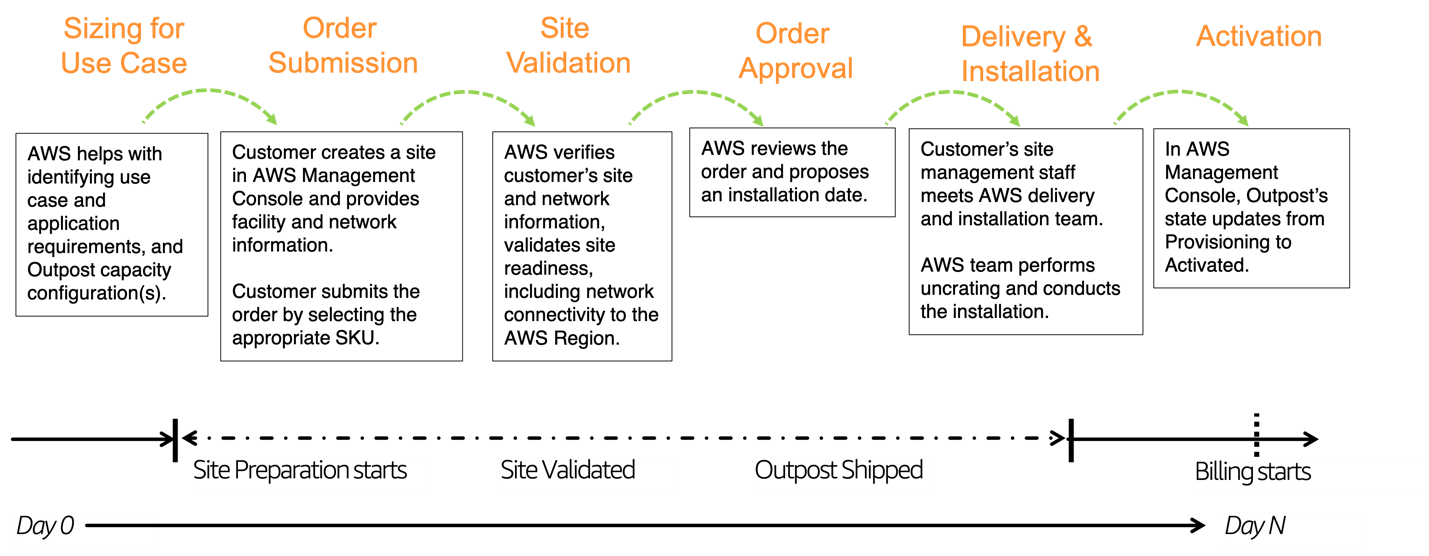
Figure 1 – End-to-end view from sizing to consumption
In the following sections, I provide more details on each stage and describe how AWS partners with you to help make each of them successful.
Stage 1: Sizing your Outposts for your Use Case
AWS Outposts are available in 19 pre-defined configurations, which are a combination of Amazon EC2 instance capacity and Amazon EBS storage volumes. These configurations span six categories: development & test, general purpose, compute optimized, storage optimized, graphics optimized, and memory optimized. Your account team can help identify the best configuration and Outposts capacity for your use case and application requirements. If these pre-defined configurations do not fit your use case, you can work with your account team to create a custom configuration that is uniquely designed for your application needs. When you have sized the Outposts for your use case, you select the configuration in the Outposts catalog. The Outposts catalog is accessible through the AWS Outposts service in the AWS Management Console.
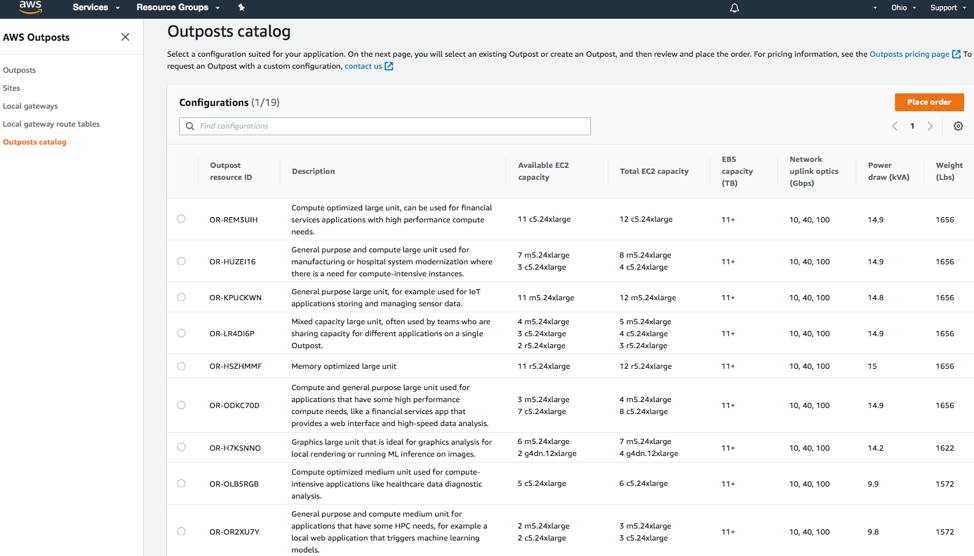
Figure 2 – Outposts catalog as seen in the Outposts Console.
Example Use Cases and Sizing
Example 1: Machine Learning or Virtual Desktops
For example, suppose that you want to use Outposts for development and testing of Machine Learning (ML) inference or you want to run virtual desktop applications in your datacenters. Graphics optimized EC2 instances are the best fit for these types of graphics and AI/ML workloads due to presence of NVMe storage, custom CPUs, NVIDIA T4 GPUs, and fast networking throughput capabilities.
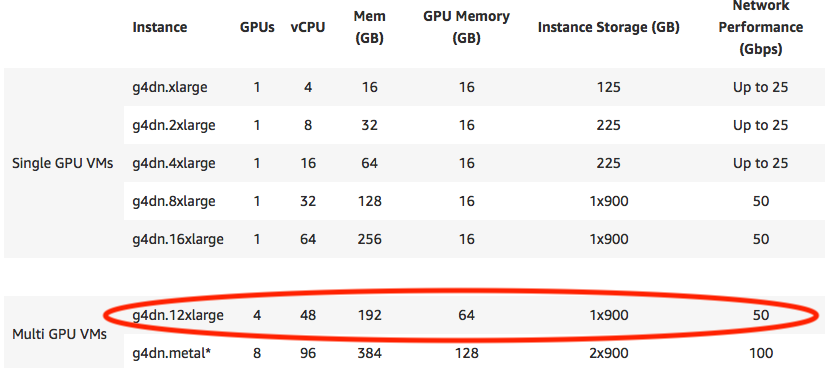
Figure 3 – g4dn features
Browsing the Outposts catalog, the configuration most closely aligned to g4dn.12xlarge instance type is OR-LMF5LJ1. This Outposts resource is graphics optimized and is most suitable for AI/ML and graphics workloads. It has the following attributes:
- EC2 capacity: 2 g4dn.12xlarge
- EBS capacity: 11+ TB
- Uplink optics: 10/40/100 Gbps
- Power draw: 6.6 kVA
- Weight: 1350 lbs
The OR-LMF5LJ1 Outposts resource comprises two g4dn.12xlarge instances, resulting in an aggregate EC2 capacity of 8 GPUs, 96 vCPUs. It has 394GB of memory, 128GB of GPU memory, and a minimum EBS storage of 11TB. You must ensure that you can support the power, networking requirements, and the weight of the rack at your desired site.
Example 2: Migrating Virtual Machines to Outposts
Now, take a look at another scenario. Suppose that you want to modernize your applications running in your data centers and are looking to migrate hundreds of virtual machines (VMs) onto an Outpost. The OR-HUZEI16 Outpost resource is a good fit because of its mixed types (and quantities) of compute capacity.
It has the following attributes:
- EC2 capacity: 7 m5.24xlarge and 3 c5.24xlarge.
- EBS capacity: 11+ TB
- Uplink optics: 10/40/100 Gbps
- Power draw: 14.9 kVA
- Weight: 1656 lbs
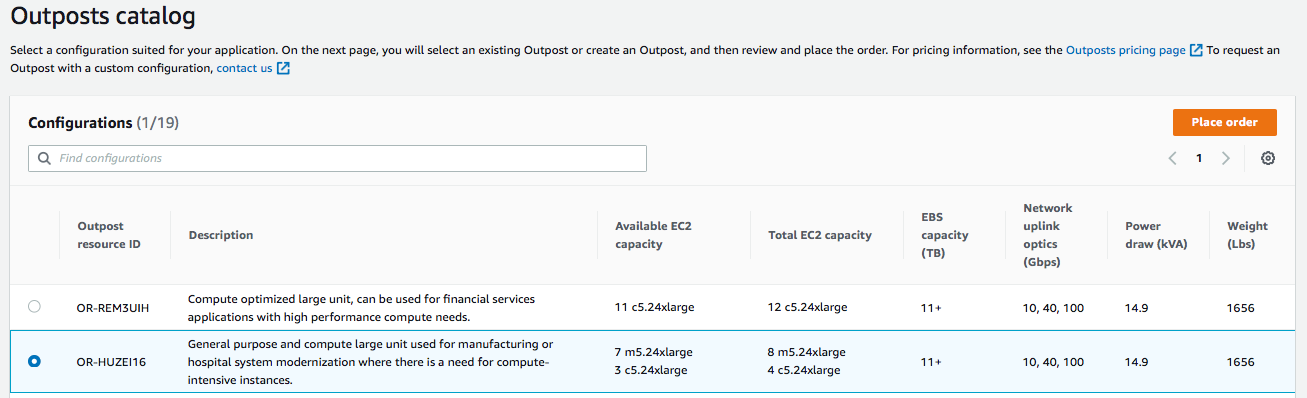
Figure 4 – Outpost catalog view of OR-HUZEI16, as seen via AWS Management Console
The OR-HUZEI16 Outpost resource configuration is the largest, and includes seven m5.24xlarge and three c5.24xlarge EC2 instances, coupled with 11+ TB of Amazon EBS storage. This resource can run computational workloads in manufacturing factory or plant floors, addressing the need to process large compute-intensive workloads on-premises due to latency requirements. The larger compute capacity offered by this configuration helps process data locally, faster, and avoid incurring latencies associated with moving it to the cloud and back. This system is ideal for environments looking to replace aging infrastructure with one that is cloud-ready, enables network segregation, and delivers a managed service. You can run your compute-intensive workloads and balance them between c5 and m5 instances while conducting maintenance updates with minimal disruption.
Note the higher power draw of 14.9 kVA that is required for this configuration. Each Outpost configuration has different requirements. When choosing Outposts for your use case, you need to ensure that your Outpost site can support the requirements of the configuration you choose. For more information, see Outpost site requirements.
Once you have finalized your Outposts configuration and reviewed pricing, you create your Outpost site and then order Outpost capacity through the AWS Management Console. Unlike spinning up other AWS services, ordering AWS Outposts does not start the billing clock at the time of the order. Billing begins after Outposts have been activated on your premises. For more information, see Get started with AWS Outposts.
Stage 2: Order submission
As part of submitting your Outposts order, the AWS team needs to gather site characteristics such as physical security, network connectivity, and power requirements. This information helps to identify any infrastructure dependencies and ensure a successful installation of the Outposts rack. This information is gathered as you submit your order in the AWS Management Console.
These three steps are referred to as:
- creating a physical site,
- creating an Outpost for that site,
- selecting an Outpost configuration from the Outpost catalog
1) Creating a Site:
Provide your facility and network information in this step. You need to coordinate with your network engineering, operations, and data center teams to collect the necessary information per AWS Outposts User Guide. If your facilities staff have a layout of the proposed placement area, please be aware of clearances that are required, such as 4 feet in the front and 2 feet in the rear.
Next, you are prompted for facilities capabilities and network configuration parameters. An excellent set of examples of what Outposts require to interact on the network, and why this information is important, is illustrated in AWS Online Tech Talks – AWS Outposts: Networking Foundations. Details can also be found in the AWS Outposts User Guide.
2) Creating an Outpost for that site:
Once you create a site, select the Site ID and the Region’s Availability Zone to create your Outpost. The Site ID is available in the drop-down box. Depending on the region you’ve selected, you are then presented with a selection of Availability Zones to choose from.
3) Selecting an Outpost configuration:
Once an Outpost is created, you proceed to the Outposts catalog to select one of pre-built configurations. Complete the order process by attaching the configuration to an Outpost created in the previous step.
If the Outpost status reads “Pending capacity”, your order was created successfully. Below is a screen shot of an Outpost order summary, showing “Pending capacity” status.
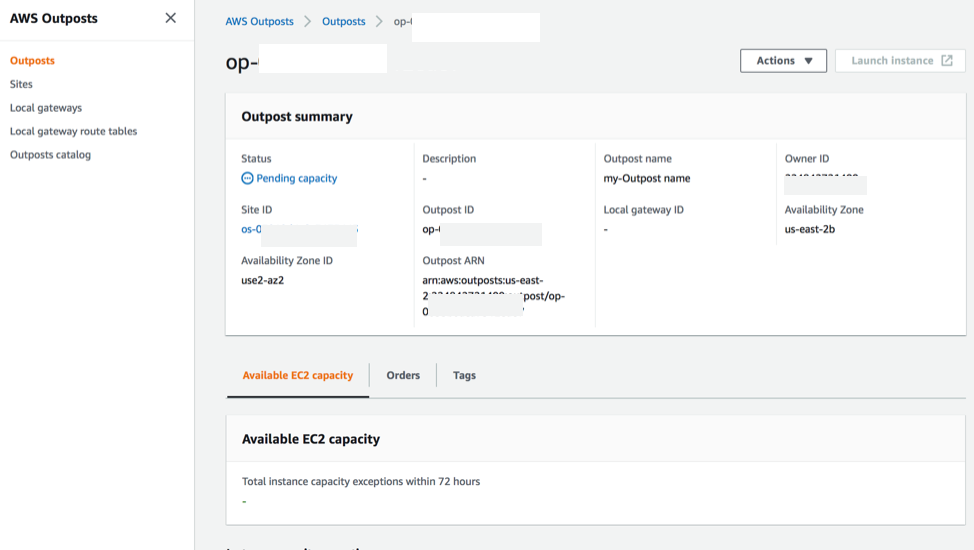
Figure 5 – Checking the status of an order
Stage 3: Site assessment validation
Working backwards, before billing can commence after stage 6, we need to deliver and activate the Outpost, and for that to happen we need to ensure the site is ready to receive it.
To ensure a smooth installation, the AWS installation team validates the site information that you have entered into the AWS Management Console by visiting your site. In preparation for our site visit to your datacenter (or a colocation provider), we request that power and network connections be provisioned to the anticipated rack position. At this site visit, the AWS installation team takes note of specific attributes that help with the installation and identifies issues that may need to be resolved prior to installation. There is no separate charge associated with this activity.
As part of preparation for the visit, the AWS installation team will need to coordinate with your network engineering and data center operations facilities personnel. You will need to provide the AWS installation team with your on-site points of contact and logical network configuration parameters (as outlined in the AWS Outposts network components).
Once AWS receives and reviews your logical network configuration parameters, an on-site visit is planned. On that date, AWS personnel arrive on-site to survey and understand physical facilities and conduct network information readiness. Currently, this assessment involves steps like:
- Inspecting the loading dock. Finding how and where to uncrate the Outposts, and the path it would traverse to its identified location in your data center.
- Speaking with your designated electrician and networking staff regarding your site’s power and networking.
- Validating and testing inbound network policies that are set on your network devices by your network operations team.
As part of this activity, AWS personnel bring network devices that simulate basic connectivity requirements of an Outpost. These are required to allow network connectivity to the AWS Region that your Outpost will be establishing VPN tunnels into. The AWS Region acts as a control domain, communicating with the Outpost through the service link. More information on AWS Outposts connectivity is available in the User Guide.
Additionally, during this phase AWS conducts a profile of the site for seismic analysis to determine whether Outposts will need to be braced. If your facility provider has existing documentation that illustrates that seismic bracing is not required, please share that documentation with the AWS coordinator.
Stage 4: Order approval
After the Site Assessment, AWS reviews the results and reaches out with any items that might require follow-up.
In parallel, AWS operations team builds and pre-configures the Outposts order. After the Outpost configuration completes the manufacturing cycle, it is shipped in accordance with the delivery and installation date that has been arranged with your facilities personnel.
Stage 5: Delivery and Installation
In most circumstances it is better to start the delivery early in the morning, which allows the bulk of the day for physical and logical installation and configuration. The AWS Outposts: Ordering and Installation Overview video provides an overview of the process.
- The activity starts when the AWS team arrives on-site and checks-in with your pre-established point of contact.
- The team delivers the AWS Outpost to your facility’s receiving loading dock area.
- Before uncrating, AWS personnel walk the path from the loading dock to the location in the datacenter one more time, and verify that there’ve been no changes since the initial site assessment.
- AWS then proceed to unload the Outposts onto the loading dock. Once uncrated, it is moved in position. If seismic bracing is required AWS will provide the bracing kit. Please have your operations (or a designated contractor) available to brace the rack.
- Once the rack is delivered into its position and, if required, braced, AWS personnel proceed with the installation.
- During this time, it is important to have the site’s electrician personnel available so they can energize the rack.
- Once the rack is energized, AWS personnel proceed with basic configuration and connectivity to the AWS Region.
AWS personnel validate that the Outposts networking devices are able to establish encrypted connectivity to the AWS Region. Once that happens the rest of the installation and preparation activities continue. This is when the automation framework in the Region provisions test EC2 instances and configures test EBS volumes, running the process through its paces to register and validate the state of all components with AWS Region. Once this begins, AWS delivery team departs the site.
Stage 6: Activation
The next phase is the validation and provisioning process, where AWS automation tools complete the installation of your Outpost by validating preparedness to host EC2 instances and EBS storage services.
You can monitor the state of your AWS Outpost in the AWS Management Console. After AWS has completed provisioning your Outpost, it appears as “Activated” in the AWS Management Console.
Once the state of your Outpost changes to Activated, your Outpost capacity is active and billing of your fulfilled order begins.
Conclusion
In this post, I showed how getting AWS Outposts ordered and deployed is a straight-forward process that involves six stages. Site assessment validation is a critical step to ensure successful installation of your Outpost. As approvals for site access are required, advance coordination between AWS and your points of contact is crucial. Planning and coordination with AWS will ensure knowledge of accurate information about your site and your desired Outpost configuration. AWS personnel become familiar with your site’s physical capabilities to ensure the installation could proceed with minimal surprises. Once the installation completes and the Outpost is subsequently activated, your experience in operating your workloads on AWS expands to include physical resources on your premises.
To learn more or get started, see the AWS Outposts page.
Also, check out this video: How to Order AWS Outposts in 7 Minutes.
If you have comments about this post, please submit them in the “Comments” section below.
Additional Resources:
“Planning an AWS Outposts Implementation” training (for customers and partners)
AWS Outposts Resources (Blogs, Webinars, Videos)
AWS Outposts in a Juniper QFX based datacenter