AWS Big Data Blog
How dynamic data masking support in Amazon Redshift helps achieve data privacy and compliance
Amazon Redshift is a fast, petabyte-scale cloud data warehouse delivering the best price–performance. It makes it fast, simple, and cost-effective to analyze all your data using standard SQL and your existing business intelligence (BI) tools. Today, tens of thousands of customers run business-critical workloads on Amazon Redshift.
Dynamic data masking (DDM) support in Amazon Redshift enables you to simplify the process of protecting sensitive data in your Amazon Redshift data warehouse. You can now use DDM to protect data based on your job role or permission rights and level of data sensitivity through a SQL interface. DDM support in Amazon Redshift enables you to hide, obfuscate, or pseudonymize column values within the tables in your data warehouse without incurring additional storage costs. It is configurable to allow you to define consistent, format-preserving, and irreversible masked data values.
DDM support in Amazon Redshift provides a native feature to support your need to mask data for regulatory or compliance requirements, or to increase internal privacy standards. Compared to static data masking where underlying data at rest gets permanently replaced or redacted, DDM support in Amazon Redshift enables you to temporarily manipulate the display of sensitive data in transit at query time based on user privilege, leaving the original data at rest intact. You control access to data through masking policies that apply custom obfuscation rules to a given user or role. That way, you can respond to changing privacy requirements without altering the underlying data or editing SQL queries.
With DDM support in Amazon Redshift, you can do the following:
- Define masking policies that apply custom obfuscation policies (for example, masking policies to handle credit card, PII entries, HIPAA or GDPR needs, and more)
- Transform the data at query time to apply masking policies
- Attach masking policies to roles or users
- Attach multiple masking policies with varying levels of obfuscation to the same column in a table and assign them to different roles with priorities to avoid conflicts
- Implement cell-level masking by using conditional columns when creating your masking policy
- Use masking policies to partially or completely redact data, or hash it by using user-defined functions (UDFs)
Here’s what our customers have to say on DDM support in Amazon Redshift:
“Baffle delivers data-centric protection for enterprises via a data security platform that is transparent to applications and unique to data security. Our mission is to seamlessly weave data security into every data pipeline. Previously, to apply data masking to an Amazon Redshift data source, we had to stage the data in an Amazon S3 bucket. Now, by utilizing the Amazon Redshift Dynamic Data Masking capability, our customers can protect sensitive data throughout the analytics pipeline, from secure ingestion to responsible consumption reducing the risk of breaches.”
-Ameesh Divatia, CEO & co-founder of Baffle
“EnergyAustralia is a leading Australian energy retailer and generator, with a mission to lead the clean energy transition for customers in a way that is reliable, affordable and sustainable for all. We enable all corners of our business with Data & Analytics capabilities that are used to optimize business processes and enhance our customers’ experience. Keeping our customers’ data safe is a top priority across our teams. In the past, this involved multiple layers of custom built security policies that could make it cumbersome for analysts to find the data they require. The new AWS dynamic data masking feature will significantly simplify our security processes so we continue to keep customer data safe, while also reducing the administrative overhead.”
-William Robson, Data Solutions Design Lead, EnergyAustralia
Use case
For our use case, a retail company wants to control how they show credit card numbers to users based on their privilege. They also don’t want to duplicate the data for this purpose. They have the following requirements:
- Users from Customer Service should be able to view the first six digits and the last four digits of the credit card for customer verification
- Users from Fraud Prevention should be able to view the raw credit card number only if it’s flagged as fraud
- Users from Auditing should be able to view the raw credit card number
- All other users should not be able to view the credit card number
Solution overview
The solution encompasses creating masking policies with varying masking rules and attaching one or more to the same role and table with an assigned priority to remove potential conflicts. These policies may pseudonymize results or selectively nullify results to comply with retailers’ security requirements. We refer to multiple masking policies being attached to a table as a multi-modal masking policy. A multi-modal masking policy consists of three parts:
- A data masking policy that defines the data obfuscation rules
- Roles with different access levels depending on the business case
- The ability to attach multiple masking policies on a user or role and table combination with priority for conflict resolution
The following diagram illustrates how DDM support in Amazon Redshift policies works with roles and users for our retail use case.
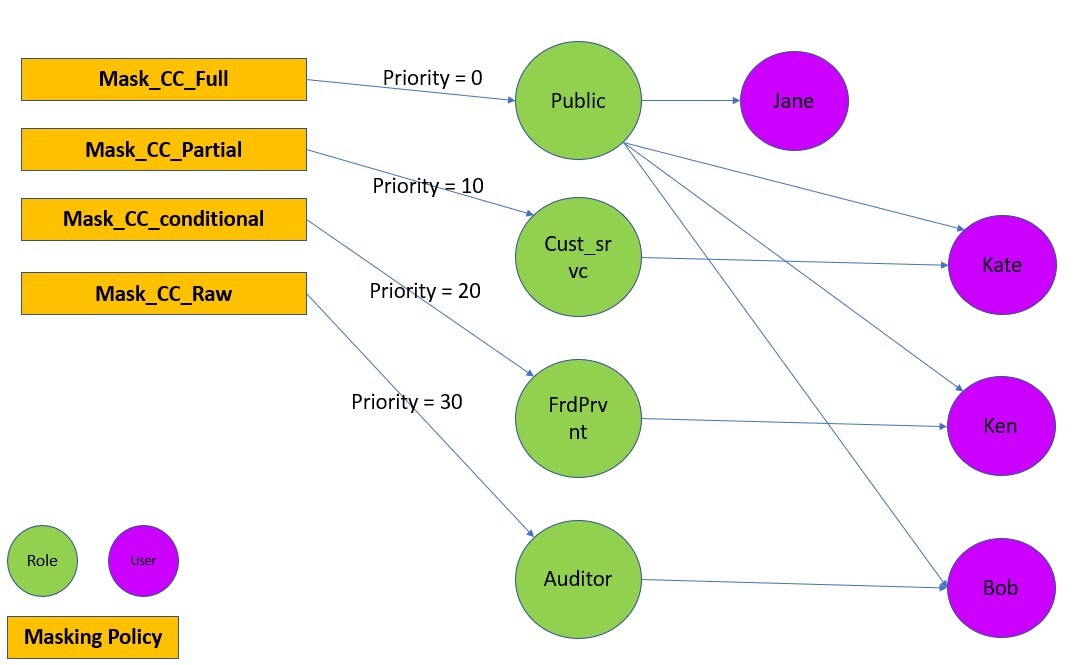
For a user with multiple roles, the masking policy with the highest attachment priority is used. For example, in the following example, Ken is part of the Public and FrdPrvnt role. Because the FrdPrvnt role has a higher attachment priority, card_number_conditional_mask will be applied.

Prerequisites
To implement this solution, you need to complete the following prerequisites:
- Have an AWS account.
- Have an Amazon Redshift cluster provisioned with DDM support track or a serverless workgroup with DDM support track.
- Have Superuser privilege, or the
sys:secadminrole on the Amazon Redshift data warehouse created in step 2.
Preparing the data
To set up our use case, complete the following steps:
- On the Amazon Redshift console, choose Query editor v2 in Explorer.
If you’re familiar with SQL Notebooks, you can download the Jupyter notebook for the demonstration, and import it to quickly get started. - Create the table and populate contents.
- Create users.
Implement the solution
To satisfy the security requirements, we need to make sure that each user sees the same data in different ways based on their granted privileges. To do that, we use user roles combined with masking policies as follows:
- Create user roles and grant different users to different roles:
- Create masking policies:
- Attach the masking policies on the table or column to the user or role:
Test the solution
Let’s confirm that the masking policies are created and attached.
- Check that the masking policies are created with the following code:

- Check that the masking policies are attached:

Now we can test that different users can see the same data masked differently based on their roles.
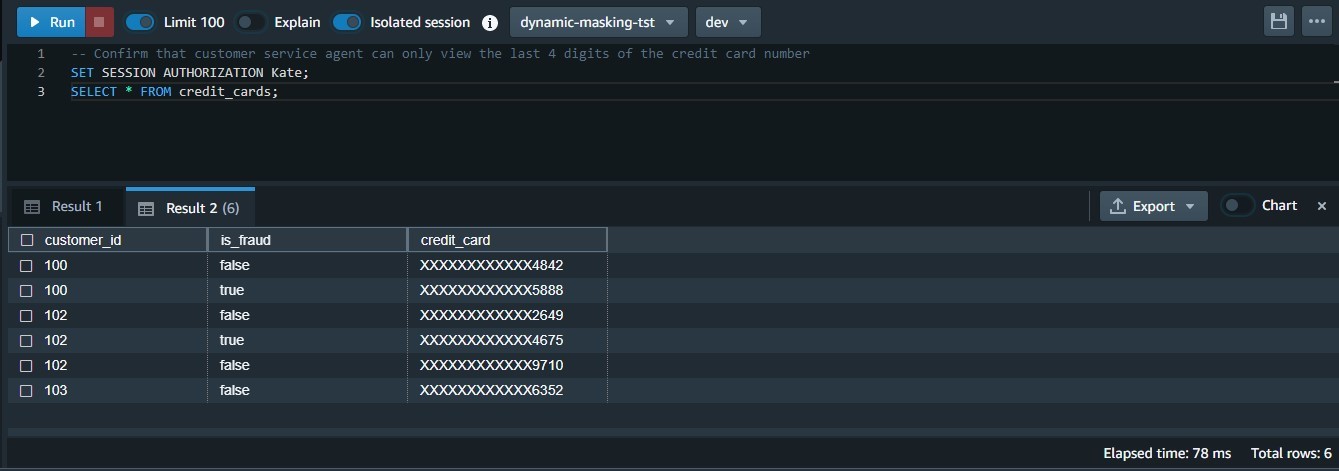
- Test that the Customer Service agents can only view the first six digits and the last four digits of the credit card number:

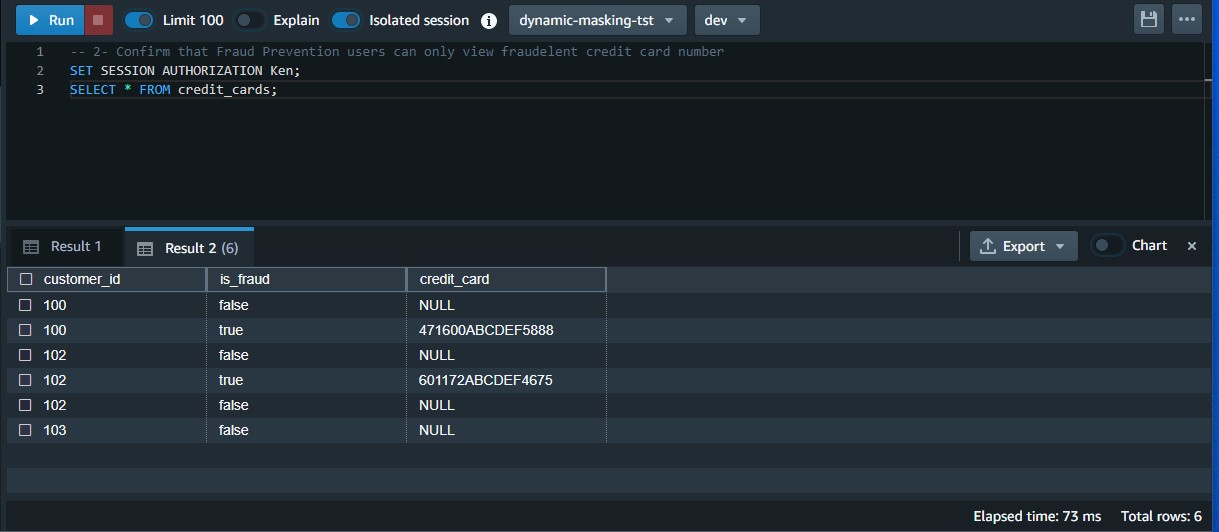
- Test that the Fraud Prevention users can only view the raw credit card number when it’s flagged as fraud:
- Test that Auditor users can view the raw credit card number:

- Test that general users can’t view any digits of the credit card number:

Modify the masking policy
To modify an existing masking policy, you can use ALTER MASKING POLICY statement.
In our use case, the business changed direction and decided that Customer Service agents should only be allowed to view the last four digits of the credit card number as opposed to the existing policy that allowed them to view first 6 & last 4 digits of the credit card number.
- Create a new user defined function that would partially obfuscate the credit card number showing only the last 4 digits.
Note that in this sample code, we created a scalar Python UDF. It’s possible to create a SQL, Python, and Lambda UDF based on your use case.
- Run the ALTER MASKING POLICY statement.
- Test that Customer Service agents can only view the last four digits of the credit card number:
Lookup table based masking policy
If you are presented with a requirement where your masking policy has to be based off of values in a lookup table, you can use lookup table based masking policy creation.
In our fraud prevention use-case, imagine if we did not have is_fraud flag as part of our credit_cards table and all the credit cards flagged for fraudulent activity were ending up in a lookup table named credit_cards_fraud_lookup, the implementation would be done as follows.
- Prepare the lookup table that will be used for conditional masking.
- Create masking policy using the lookup table, and grant select on the lookup table via masking policy (to ensure least privilege access).
- Detach the previous conditional masking policy that was based on
is_fraudflag and instead attach the lookup table based masking policy tofrdprvnt_role. - Test that Fraud prevention role (Ken) can view the 3 credit card numbers present in the lookup table and remaining are displayed as null.

Clean up
When you’re done with the solution, clean up your resources:
- Detach the masking policies from the table:
- Drop the masking policies:
- Revoke and drop each user and role:
- Drop the function and table:
Considerations and best practices
Consider the following:
- Always create a default policy attached to the public user. If you create a new user, they will always have a minimum policy attached. It will enforce the intended security posture.
- Remember that DDM policies in Amazon Redshift always follow invoker permissions convention, not definer (for more information, refer to Security and privileges for stored procedures ). That being said, the masking policies are applicable based on the user or role running it.
- For best performance, create the masking functions using a scalar SQL UDF, if possible. The performance of scalar UDFs typically goes by the order of SQL to Python to Lambda, in that order. Generally, SQL UDF outperforms Python UDFs and the latter outperforms scalar Lambda UDFs.
- DDM policies in Amazon Redshift are applied ahead of any predicate or join operations. For example, if you’re running a join on a masked column (per your access policy) to an unmasked column, the join will lead to a mismatch. That’s an expected behavior.
- Static masking expressions in policies (example,
Mask_CC_Fullabove) requires type casting. - Always detach a masking policy from all users or roles before dropping it.
- As of this writing, the solution has the following limitations:
- You can apply a mask policy on tables and columns and attach it to a user or role, but groups are not supported.
- You can’t create a mask policy on views, materialized views, and external tables.
- Masking policies can attach to lookup tables except following relations, nor use them in the USING clause:
- System tables and catalogs
- External tables
- Datasharing tables
- Views, materialized views, and late binding views
- Cross-DB relations
- Temporary tables
- Correlated queries
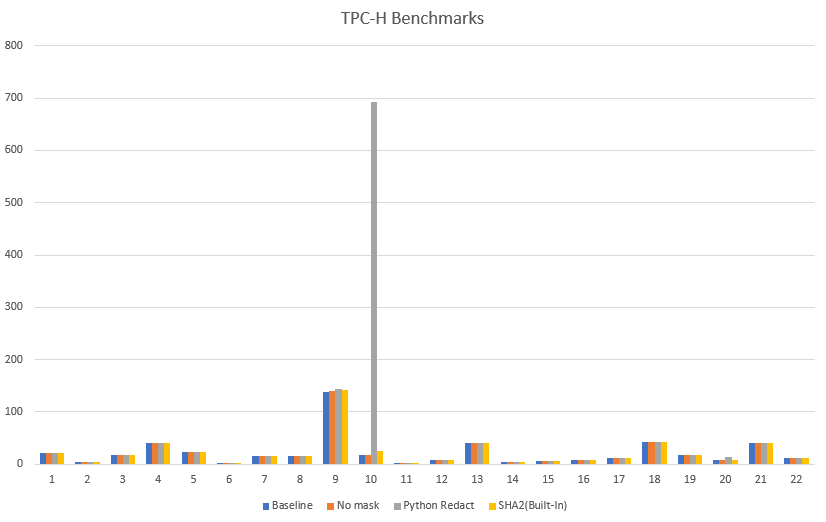
Performance benchmarks
Based on various tests performed on TPC-H datasets, we’ve found built-in functions to be more performant as compared to functions created externally using scalar Python or Lambda UDFs.
Expand the solution
You can take this solution further and set up a masking policy that restricts SSN and email address access as follows:
- Customer Service agents accessing pre-built dashboards may only view the last four digits of SSNs and complete email addresses for correspondence
- Analysts cannot view SSNs or email addresses
- Auditing services may access raw values for SSNs as well as email addresses
For more information, refer to Use DDM support in Amazon Redshift for E-mail & SSN Masking.
Conclusion
In this post, we discussed how to use DDM support in Amazon Redshift to define configuration-driven, consistent, format-preserving, and irreversible masked data values. With DDM support in Amazon Redshift, you can control your data masking approach using familiar SQL language. You can take advantage of the Amazon Redshift role-based access control capability to implement different levels of data masking. You can create a masking policy to identify which column needs to be masked, and you have the flexibility of choosing how to show the masked data. For example, you can completely hide all the information of the data, replace partial real values with wildcard characters, or define your own way to mask the data using SQL expressions, Python, or Lambda UDFs. Additionally, you can apply a conditional masking based on other columns, which selectively protects the column data in a table based on the values in one or more columns.
We encourage you to create your own user defined functions for various use-cases and accomplish desired security posture using dynamic data masking support in Amazon Redshift.
About the Authors
 Rohit Vashishtha is a Senior Analytics Specialist Solutions Architect at AWS based in Dallas, TX. He has more than 16 years of experience architecting, building, leading, and maintaining big data platforms. Rohit helps customers modernize their analytic workloads using the breadth of AWS services and ensures that customers get the best price/performance with the utmost security and data governance.
 Ahmed Shehata is a Senior Analytics Specialist Solutions Architect at AWS based on Toronto. He has more than two decades of experience helping customers modernize their data platforms. Ahmed is passionate about helping customers build efficient, performant, and scalable analytic solutions.
 Variyam Ramesh is a Senior Analytics Specialist Solutions Architect at AWS based in Charlotte, NC. He is an accomplished technology leader helping customers conceptualize, develop, and deliver innovative analytic solutions.
 Yanzhu Ji is a Product Manager in the Amazon Redshift team. She has experience in product vision and strategy in industry-leading data products and platforms. She has outstanding skill in building substantial software products using web development, system design, database, and distributed programming techniques. In her personal life, Yanzhu likes painting, photography, and playing tennis.
 James Moore is a Technical Lead at Amazon Redshift focused on SQL features and security. His work over the last 10 years has spanned distributed systems, machine learning, and databases. He is passionate about building scalable software that enables customers to solve real-world problems.