AWS Big Data Blog
Simplify your data analysis with Amazon Redshift Query Editor v2
August 2023: This post was reviewed and updated to include new features.
Amazon Redshift is a fast, fully managed cloud data warehouse that provides a web-based query editor in addition to supporting connectivity via ODBC/JDBC or the Redshift Data API. Tens of thousands of customers use Amazon Redshift as their analytics platform. Data analysts, database developers, and data scientists use SQL to analyze their data in Amazon Redshift data warehouses. Amazon Redshift Query Editor v2 is a web-based SQL client application that you can use to author and run queries on your Amazon Redshift data warehouse. You can visualize query results with charts and collaborate by sharing queries with members of your team.
Query Editor v2 provides several capabilities, such as the ability to browse and explore multiple databases, external tables, views, stored procedures, and user-defined functions. It provides wizards to create schemas, tables, and user-defined functions. It simplifies the management and collaboration of saved queries. You can also gain faster insights by visualizing the results with a single click.
Query Editor v2 enhances and builds upon the functionality of the prior version of the query editor, such as increased size of queries, the ability to author and run multi-statement queries, support for session variables, and query parameters, to name a few.
You can provide Query Editor v2 to end-users such as data analysts, database developers, and data scientists without providing the privileges required to access the Amazon Redshift console.
In this post, we walk through how to create an AWS Identity and Access Management (IAM) role to provide access to Query Editor v2 for end-users, easily connect to your clusters, run SQL queries, load data in your clusters, create charts, and share queries directly from the console.
Configure Query Editor v2 for your AWS account
As an admin, you must first configure Query Editor v2 before providing access to your end-users.
You can access Query Editor v2 from the Amazon Redshift console from the left navigation section on the console.

You can also do so by selecting a cluster and clicking the option as highlighted in the below screenshot.

If you are using serverless version of Amazon Redshift, you can open the query editor directly using Query Editor v2 interface as highlighted in the below screenshot.

By default, an AWS-owned key is used to encrypt resources. Optionally, you can create a symmetric customer managed key to encrypt Query Editor v2 resources such as saved queries and query results using the AWS Key Management Service (AWS KMS) console or AWS KMS API operations.

Provide access to Query Editor v2 for your end-users
Enterprises want to democratize access to data in the data warehouse securely by providing a web-based query editor to their end-users. You can either use IAM users or integrate the AWS console with your single sign-on (SSO) provider to provide access to end-users. In a future post, we will document all necessary steps to integrate your SSO provider with the query editor.
To enable your users to access Query Editor v2 using IAM, as an administrator, you can attach one of the AWS-managed policies depicted in the following table to the IAM user or role to grant permission. These managed policies also give access to other required services. You can create your custom-managed policy if you want to customize permissions for your end-users.
| Policy | Description |
| AmazonRedshiftQueryEditorV2FullAccess | Grants full access to Query Editor v2 operations and resources. This is primarily intended for administrators. |
| AmazonRedshiftQueryEditorV2NoSharing | Grants the ability to work with Query Editor v2 without sharing resources. Users can’t share their queries with their team members. |
| AmazonRedshiftQueryEditorV2ReadSharing | Grants the ability to work with Query Editor v2 with limited sharing of resources. The granted principal can read the saved queries shared with its team but can’t update them. |
| AmazonRedshiftQueryEditorV2ReadWriteSharing | Grants the ability to work with Query Editor v2 with sharing of resources. The granted principal can read and update the shared resources with its team. |
For example, if you have a group of users as a part of marketing_group, and you want them to collaborate between themselves by sharing their queries, you can create an IAM role for them and assign the AmazonRedshiftQueryEditorV2ReadSharing policy. You can also tag the role with sqlworkbench-team as marketing_group.
You can use the IAM console to attach IAM policies to an IAM user or an IAM role. After you attach a policy to a role, you can attach the role to an IAM user.
To attach the IAM policies to an IAM role, complete the following steps:
- On the IAM console, choose Roles.
- Choose the role that needs access to Query Editor v2. Assume the name of the role as
marketing_role. - Choose Attach policies.
- For Policy names, choose the policies that we described previously based on your requirement.
- Choose Attach policy.
Now you can add the marketing_group tag for an IAM role.
- In the navigation pane, choose Roles and select the name of the role that you want to edit.
- Choose the Tags tab and choose Add tags.
- Add the tag key
sqlworkbench-teamand the valuemarketing_group. - Choose Save changes.
Now the end-users with marketing_role can access Query Editor v2 with limited sharing of resources.
Work with Query Editor v2
You can use Query Editor v2 to author and run queries, visualize results, and share your work with your team. With Query Editor v2, you can create databases, schemas, tables, and user-defined functions (UDFs) with visual wizards. In a tree-view panel, for each of your clusters, you can view its schemas. For each schema, you can view its tables, views, functions (UDFs), and stored procedures.
Open Query Editor v2
After you log in to the console and navigate to Query Editor v2, you see a page like the following screenshot.

Query Editor v2 now provides a more IDE-like experience to its users and offers both dark and light themes. You can switch between themes by choosing the moon icon at the lower left of the page.
The left navigation pane shows the list of clusters that you have access to.
Connect to an Amazon Redshift database
You can connect to a cluster by choosing a cluster and entering your credentials.
You can connect using either a database user name and password or temporary credentials. Query Editor v2 creates a secret on your behalf stored in AWS Secrets Manager. This secret contains credentials to connect to your database. With temporary credentials, Query Editor v2 generates a temporary password to connect to the database.

You can also connect to the Amazon Redshift serverless resource by right clicking on the resource:

And then connect to it using one of the following authentication ways:

Do checkout the following blog posts to know more around authentication using Federated User:
- Federate single sign-on access to Amazon Redshift query editor v2 with Okta
- Federate access to Amazon Redshift query editor V2 with Active Directory Federation Services (AD FS): Part 3
Browse a database
You can browse one or more databases in the cluster that you’re connected to. Within a database, you can manage schemas, tables, views, functions, and stored procedures in the tree-view panel.
After establishing connection to either of the resources for serverless or Redshift cluster, you will notice that it automatically lists down the sample databases on expanding the objects list. We will see more on notebooks in later sections, however for now, let’s see the steps that you can take to access the sample database:
- Click one of the sample databases.

- Create a new one if it does not exist.

- View the sample tables contained in the database.

Amazon Redshift supports automatic mounting of AWS Glue Data Catalog, making it easier for customers to run queries in their data lakes. You no longer have to create an external schema in Amazon Redshift to use the data lake tables cataloged in AWS Glue Data Catalog.

You can find more on this here: Simplify external object access in Amazon Redshift using automatic mounting of the AWS Glue Data Catalog
You can perform an operation on an object choosing it (right-click) and choosing from the menu options.

Author and run queries
Query Editor v2 allows you to run your queries by selecting a specific database. If you have multiple databases, make sure that you choose the correct database.

You can enter a query in the editor or select a saved query from the Queries list and choose Run. The query editor provides several shortcuts for using with your query editor, and you can access that by choosing the content assist option.

By default, Limit 100 is set to limit the results to 100 rows. You can turn off this option to return a more extensive result set. If you turn off this option, you can include the LIMIT option in your SQL statement to avoid very large result sets.
 The query tab is either using an Isolated session or not. With an isolated session, the results of a SQL command, such as creating a temporary table in one editor tab, are not visible in another editor tab. When you open an editor tab in query editor v2, the default is an isolated session.

Watch this video to know more
Use multiple SQL statements in a query
The query editor supports multiple queries, session variables, and temporary tables. If you have multiple SQL statements and you run the query, the results are displayed on various tabs.

Run long queries
You don’t have to wait for long queries to complete to view results. The queries run even if the browser window is closed. You can view the results the next time you log in to Query Editor v2.
Run parameterized queries
You can use parameters with your query instead of hardcoding certain values, as in the following code:
When you run a query with a parameter, you’re prompted with a form. The value entered for this parameter will be replaced in the query for this construct: ${sellerid}

Run the explain plan
You can optimize your queries by turning on the Explain option to display a query plan in the results area. You can choose Save to save the query to the Queries folder.

In the above screenshot, you will also notice a short preview of the selected table on the left bottom, giving more details about the table schema.
Export results
You can export the query results on the current page to a file in JSON or CSV format. To save the file in the format you want, open the context menu (right-click) in the results area, then choose Export current page and either JSON or CSV. You can also select rows and export the results for specific rows.

Visual analysis of your results
You can perform a visual analysis of your results for a query by turning on Chart to display a graphic visualization of the results. Choose Traces to display the results as a chart. For Type, choose the style of chart as Bar, Line, and so on. For Orientation, you can choose Vertical or Horizontal. For X, select the table column that you want to use for the horizontal axis. For Y, choose the table column that you want to use for the vertical axis.
Choose Refresh to update the chart display. Choose Fullscreen to expand the chart display.
To create a chart, complete the following steps:
- Run a query and get results.
- Turn on Chart.
- Choose a chart style from the available options.

- Choose Trace and start to visualize your data.
- Choose Style to customize the appearance, including colors, axes, legend, and annotations.
- Choose Annotations to add text, shapes, and images.

For certain chart types, you can add transforms to filter, spilt, aggregate, and sort the underlying data for the chart.

You can also save or export the charts you created.

And browse the saved charts under the corresponding section as shown in the following screenshot.

Collaborate and share with your team members
You can share queries with others on your team. As we discussed earlier, an administrator sets up a team based on the IAM policy associated with an IAM user or IAM role. For example, if you’re a member of marketing_group, you can share your queries with your team members.
Save, organize and browse queries
Before you can share your query with your team, save your query. You can also view and delete saved queries.
To save your query, choose Save, enter a title, and choose Save again.

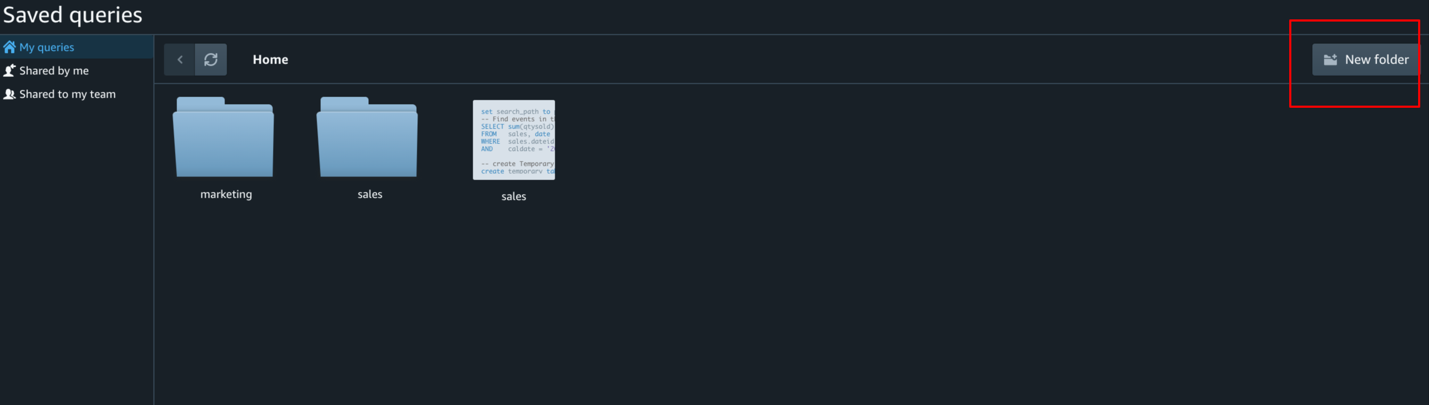
To browse for saved queries, choose Queries from the navigation pane. You can view queries that are My queries, Shared by me, or Shared to my team. These queries can appear as individual queries or within folders you created.

Organize your queries with folders
You can organize your queries by creating folders and dragging and dropping a saved query to a folder.
Schedule Query
Now you can create a schedule to run a SQL statement with Amazon Redshift query editor v2. You create a schedule to run your SQL statement at the time intervals that match your business needs. When it’s time for the scheduled query to run, the query is started by Amazon EventBridge and uses the Amazon Redshift Data API.

You can see the list of all scheduled queries in the console to further manage those. Check out this video to know more:
Share a query
You can share your queries with your team.
- Choose Queries in the navigation pane.
- Open the context menu (right-click) of the query that you want to share.
- Choose Share with my team.

Manage query versions
You can also view the history of saved queries and manage query versions. Every time you save an SQL query, Query Editor v2 saves it as a new version. You can view or store 20 different versions of your query and browse earlier query versions, save a copy of a query, or restore a query.
- Choose Queries in the navigation pane.
- Open the context menu (right-click) for the query that you want to work with.
- Choose Version history to open a list of versions of the query.
- On the Version history page, choose one of the following options:
- Revert to selected – Revert to the selected version and continue your work with this version.
- Save selected as – Create a new query in the editor.

Manage Query History
With Amazon Redshift Query Editor v2, you can see the history of all the queries run where you see the SQL text along with the time when it was started, its status, duration for which it ran and the database, cluster/workgroup that it belongs to.

Authoring and running notebooks
You can use notebooks to organize, annotate, and share multiple SQL queries in a single document. You can add multiple SQL query and Markdown cells to a notebook. Notebooks provide a way to group queries and explanations associated with a data analysis in a single document by using multiple query and Markdown cells. You can add text and format the appearance using Markdown syntax to provide context and additional information for your data analysis tasks.

You can further save and share your notebooks with your team members.

With sample databases that come automatically with Query Editor Version 2, you will also have access to sample notebook. Here is a sample screenshot of one such sample database called tickit database:

Conclusion
In this post, we introduced you to Amazon Redshift Query Editor v2, which has a rich set of features to manage and run your SQL statements securely that provide you with several capabilities, such as ability to browse and explore multiple databases, external tables, views, stored procedures, and user-defined functions. It provides wizards to create schemas, tables, and user-defined functions. Query Editor v2 simplifies management and collaboration of saved queries and improves the ability to analyze and visualize results with a single click.
If you have any questions or suggestions, please leave a comment.
Happy querying!
About the Author
 Srikanth Sopirala is a Principal Analytics Specialist Solutions Architect at AWS. He is a seasoned leader with over 20 years of experience, who is passionate about helping customers build scalable data and analytics solutions to gain timely insights and make critical business decisions. In his spare time, he enjoys reading, spending time with his family, and road cycling.
 Debu Panda, a Principal Product Manager at AWS, is an industry leader in analytics, application platform, and database technologies, and has more than 25 years of experience in the IT world. Debu has published numerous articles on analytics, enterprise Java, and databases and has presented at multiple conferences such as re:Invent, Oracle Open World, and Java One. He is lead author of the EJB 3 in Action (Manning Publications 2007, 2014) and Middleware Management (Packt).
 Eren Baydemir, a Technical Product Manager at AWS, has 15 years of experience in building customer facing products and is currently creating data analytics solutions in the Amazon Redshift team. He was the CEO and co-founder of DataRow which was acquired by Amazon in 2020.
 Erol Murtezaoglu, a Technical Product Manager at AWS, is an inquisitive and enthusiastic thinker with a drive for self improvement and learning. He has a strong and proven technical background in software development and architecture, balanced with a drive to deliver commercially successful products. Erol highly values the process of understanding customer needs and problems, in order to deliver solutions that exceed expectations.
 Anuradha Karlekar is a Solutions Architect at AWS working majorly for Partners and Startups. She has over 15 years of IT experience extensively in full stack development, deployment, building data ETL pipelines and visualizations. She is passionate about data analytics and text search. Outside work – She is a travel enthusiast!