AWS Compute Blog
Using serverless backends to iterate quickly on web apps – part 3
This series is about building flexible backends for web applications. The example is Happy Path, a web app that allows park visitors to upload and share maps and photos, to help replace printed materials.
In part 1, I show how the application works and walk through the backend architecture. In part 2, you deploy a basic image-processing workflow. To do this, you use an AWS Serverless Application Model (AWS SAM) template to create an AWS Step Functions state machine.
In this post, I show how to deploy progressively more complex workflow functionality while using minimal code. This solution in this web app is designed for 100,000 monthly active users. Using this approach, you can introduce more sophisticated workflows without affecting the existing backend application.
The code and instructions for this application are available in the GitHub repo.
Introducing image moderation
In the first version, users could upload any images to parks on the map. One of the most important feature requests is to enable moderation, to prevent inappropriate images from appearing on the app. To handle a large number of uploaded images, using human moderation would be slow and labor-intensive.
In this section, you use Amazon ML services to automate analyzing the images for unsafe content. Amazon Rekognition provides an API to detect if an image contains moderation labels. These labels are categorized into different types of unsafe content that would not be appropriate for this app.
Version 2 of the workflow uses this API to automate the process of checking images. To install version 2:
- From a terminal window, delete the v1 workflow stack:
aws cloudformation delete-stack --stack-name happy-path-workflow-v1 - Change directory to the version 2 AWS SAM template in the repo:
cd .\workflows\templates\v2 - Build and deploy the solution:
sam build
sam deploy --guided - The deploy process prompts you for several parameters. Enter happy-path-workflow-v2 as the Stack Name. The other values are the outputs from the backend deployment process, detailed in the repo’s README. Enter these to complete the deployment.
From VS Code, open the v2 state machine in the repo from workflows/statemachines/v2.asl.json. Choose the Render graph option in the CodeLens to see the workflow visualization.

This new workflow introduces a Moderator step. This invokes a Moderator Lambda function that uses the Amazon Rekognition API. If this API identifies any unsafe content labels, it returns these as part of the function output.
The next step in the workflow is a Moderation result choice state. This evaluates the output of the previous function – if the image passes moderation, the process continues to the Resizer function. If it fails, execution moves to the RecordFailState step.
Step Functions integrates directly with some AWS services so that you can call and pass parameters into the APIs of those services. The RecordFailState uses an Amazon DynamoDB service integration to write the workflow failure to the application table, using the arn:aws:states:::dynamodb:updateItem resource.
Testing the workflow
To test moderation, I use an unsafe image with suggestive content. This is an image that is not considered appropriate for this application. To test the deployed v2 workflow:
- Open the frontend application at https://localhost:8080 in your browser.
- Select a park location, choose Show Details, and then choose Upload images.
- Select an unsafe image to upload.
- Navigate to the Step Functions console. This shows the v2StateMachine with one successful execution:

- Select the state machine, and choose the execution to display more information. Scroll down to the Visual workflow panel.


This shows that the moderation failed and the path continued to log the failed state in the database. If you open the Output resource, this displays more details about why the image is considered unsafe.
Checking the image size and file type
The upload component in the frontend application limits file selection to JPG images but there is no check to reject images that are too small. It’s prudent to check and enforce image types and sizes on the backend API in addition to the frontend. This is because it’s possible to upload images via the API without using the frontend.
The next version of the workflow enforces image sizes and file types. To install version 3:
- From a terminal window, delete the v2 workflow stack:
aws cloudformation delete-stack --stack-name happy-path-workflow-v2 - Change directory to the version 3 AWS SAM template in the repo:
cd .\workflows\templates\v3 - Build and deploy the solution:
sam build
sam deploy --guided - The deploy process prompts you for several parameters. Enter happy-path-workflow-v3 as the Stack Name. The other values are the outputs from the backend deployment process, detailed in the repo’s README. Enter these to complete the deployment.
From VS Code, open the v3 state machine in the repo from workflows/statemachines/v3.asl.json. Choose the Render graph option in the CodeLens to see the workflow visualization.
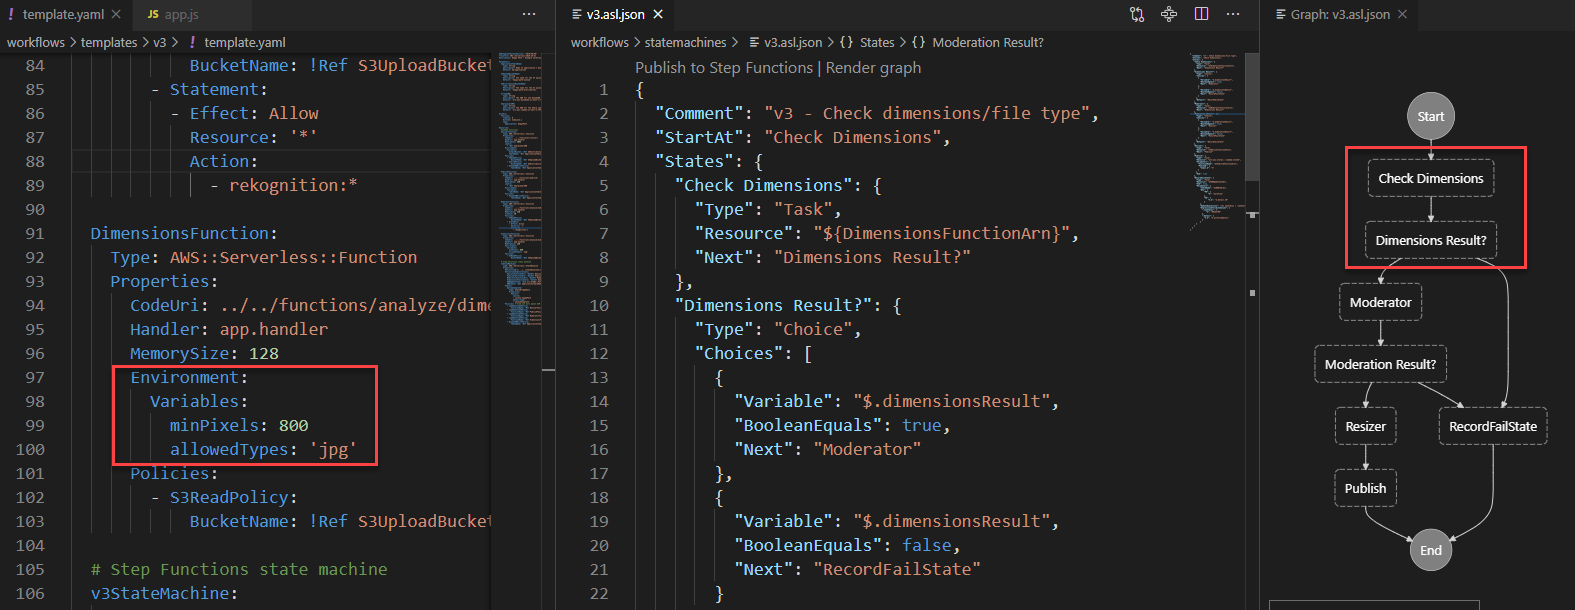
This workflow changes the starting point of the execution, introducing a Check Dimensions step. This invokes a Lambda function that checks the size and types of the Amazon S3 object using the image-size npm package. This function uses environment variables provided by the AWS SAM template to compare against a minimum size and allowed type array.
The output is evaluated by the Dimension Result choice state. If the image is larger than the minimum size allowed, execution continues to the Moderator function as before. If not, it passes to the RecordFailState step to log the result in the database.
Testing the workflow
To test, I use an image that’s narrower than the mixPixels value. To test the deployed v3 workflow:
- Open the frontend application at https://localhost:8080 in your browser.
- Select a park location, choose Show Details, and then choose Upload images.
- Select an image with a width smaller than 800 pixels. After a few seconds, a rejection message appears:

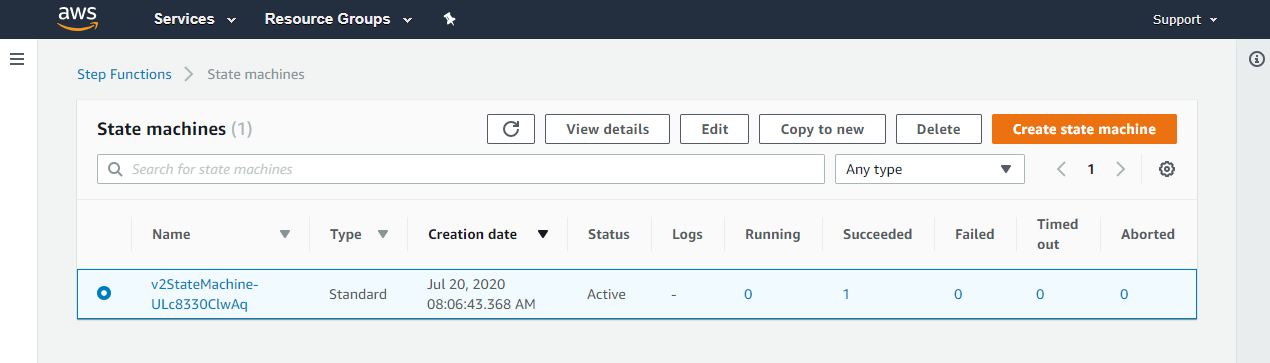
- Navigate to the Step Functions console. This shows the v3StateMachine with one successful execution. Choose the execution to show more detail.


The execution shows that the Check Dimension step added the image dimensions to the event object. Next, the Dimensions Result choice state rejected the image, and logged the result at the RecordFailState step. The application’s DynamoDB table now contains details about the failed upload:

Pivoting the application to a new concept
Until this point, the Happy Path web application is designed to help park visitors share maps and photos. This is the development team’s original idea behind the app. During the product-market fit stage of development, it’s common for applications to pivot substantially from the original idea. For startups, it can be critical to have the agility to modify solutions quickly to meet the needs of customers.
In this scenario, the original idea has been less successful than predicted, and park visitors are not adopting the app as expected. However, the business development team has identified a new opportunity. Restaurants would like an app that allows customers to upload menus and food photos. How can the development team create a new proof-of-concept app for restaurant customers to test this idea?
In this version, you modify the application to work for restaurants. While features continue to be added to the parks workflow, it now supports business logic specifically for the restaurant app.
To create the v4 workflow and update the frontend:
- From a terminal window, delete the v3 workflow stack:
aws cloudformation delete-stack --stack-name happy-path-workflow-v3 - Change directory to the version 4 AWS SAM template in the repo:
cd .\workflows\templates\v4 - Build and deploy the solution:
sam build
sam deploy --guided - The deploy process prompts you for several parameters. Enter happy-path-workflow-v4 as the Stack Name. The other values are the outputs from the backend deployment process, detailed in the repo’s README. Enter these to complete the deployment.
- Open frontend/src/main.js and update the businessType variable on line 63. Set this value to ‘restaurant’.

- Start the local development server:
npm run serve - Open the application at http://localhost:8080. This now shows restaurants in the local area instead of parks.
In the Step Functions console, select the v4StateMachine to see the latest workflow, then open the Definition tab to see the visualization:

This workflow starts with steps that apply to both parks and restaurants – checking the image dimensions. Next, it determines the place type from the placeId record in DynamoDB. Depending on place type, it now follows a different execution path:
- Parks continue to run the automated moderator process, then resizer and publish the result.
- Restaurants now use Amazon Rekognition to determine the labels in the image. Any photos containing people are rejected. Next, the workflow continues to the resizer and publish process.
- Other business types go to the RecordFailState step since they are not supported.
Testing the workflow
To test the deployed v4 workflow:
- Open the frontend application at https://localhost:8080 in your browser.
- Select a restaurant, choose Show Details, and then choose Upload images.
- Select an image from the test photos dataset. After a few seconds, you see a message confirming the photo has been added.
- Next, select an image that contains one or more people. The new restaurant workflow rejects this type of photo:

- In the Step Functions console, select the last execution for the v4StateMachine to see how the Check for people step rejected the image:

If other business types are added later to the application, you can extend the Step Functions workflow accordingly. The cost of Step Functions is based on the number of transitions in a workflow, not the number of total steps. This means you can branch by business type in the Happy Path application. This doesn’t affect the overall cost of running an execution, if the total transitions are the same per execution.
Conclusion
Previously in this series, you deploy a simple workflow for processing image uploads in the Happy Path web application. In this post, you add progressively more complex functionality by deploying new versions of workflows.
The first iteration introduces image moderation using Amazon Rekognition, providing the ability to automate the evaluation of unsafe content. Next, the workflow is modified to check image size and file type. This allows you to reject any images that are too small or do not meet the type requirements. Finally, I show how to expand the logic further to accept other business types with their own custom workflows.
To learn more about building serverless web applications, see the Ask Around Me series.