AWS Compute Blog
Deploy and publish to an Amazon MQ broker using AWS serverless
If you’re managing a broker on premises or in the cloud with a dependent existing infrastructure, Amazon MQ can provide easily deployed, managed ActiveMQ brokers. These support a variety of messaging protocols that can offload operational overhead. That can be useful when deploying a serverless application that communicates with one or more external applications that also communicate with each other.
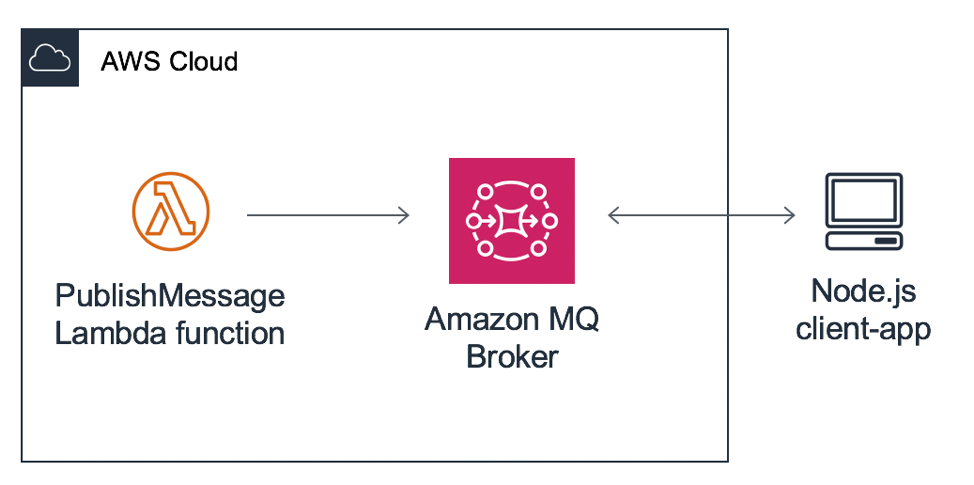
This post walks through deploying a serverless backend and an Amazon MQ broker in one step using the AWS Serverless Application Model (AWS SAM). It shows you how to publish to a topic using AWS Lambda and then how to create a client application to consume messages from the topic, using a supported protocol. As a result, the AWS services and features supported by AWS Lambda can now be delivered to an external application connected to an Amazon MQ broker using STOMP, AMQP, MQTT, OpenWire, or WSS.
Although many protocols are supported by Amazon MQ, this walkthrough focuses on one. MQTT is a lightweight publish–subscribe messaging protocol. It is built to work in a small code footprint and is one of the most well-supported messaging protocols across programming languages. The protocol also introduced quality of service (QoS) to ensure message delivery when a device goes offline. Using QoS features, you can limit failure states in an interdependent network of applications.
To simplify this configuration, I’ve provided an AWS Serverless Application Repository application that deploys AWS resources using AWS CloudFormation. Two resources are deployed, a single instance Amazon MQ broker and a Lambda function. The Lambda function uses Node.js and an MQTT library to act as a producer and publish to a message topic on the Amazon MQ broker. A provided sample Node.js client app can act as an MQTT client and subscribe to the topic to receive messages.
Prerequisites
The following resources are required to complete the walkthrough:
- Node.js 12.x must be installed.
- You must have an Amazon Web Services Free-Tier account.
Required steps
To complete the walkthrough, follow these steps:
- Clone the Aws-sar-lambda-publish-amazonmq GitHub repository.
- Deploy the AWS Serverless Application Repository application.
- Run a Node.js MQTT client application.
- Send a test message from an AWS Lambda function.
- Use composite destinations.
Clone the GitHub repository
Before beginning, clone or download the project repository from GitHub. It contains the sample Node.js client application used later in this walkthrough.
Deploy the AWS Serverless Application Repository application
- Navigate to the page for the lambda-publish-amazonmq AWS Serverless Application Repository application.
- In Application settings, fill the following fields:
– AdminUsername
– AdminPassword
– ClientUsername
– ClientPasswordThese are the credentials for the Amazon MQ broker. The admin credentials are assigned to environment variables used by the Lambda function to publish messages to the Amazon MQ broker. The client credentials are used in the Node.js client application.
- Choose Deploy.
Creation can take up to 10 minutes. When completed, proceed to the next section.
Run a Node.js MQTT client application
The Amazon MQ broker supports OpenWire, AMQP, STOMP, MQTT, and WSS connections. This allows any supported programming language to publish and consume messages from an Amazon MQ queue or topic.
To demonstrate this, you can deploy the sample Node.js MQTT client application included in the GitHub project for the AWS Serverless Application Repository app. The client credentials created in the previous section are used here.
- Open a terminal application and change to the
client-appdirectory in the GitHub project folder by running the following command:
cd ~/some-project-path/aws-sar-lambda-publish-amazonmq/client-app - Install the Node.js dependencies for the client application:
npm install - The app requires a WSS endpoint to create an Amazon MQ broker MQTT WebSocket connection. This can be found on the broker page in the Amazon MQ console, under Connections.

- The node app takes four arguments separated by spaces. Provide the user name and password of the client created on deployment, followed by the WSS endpoint and a topic,
some/topic.
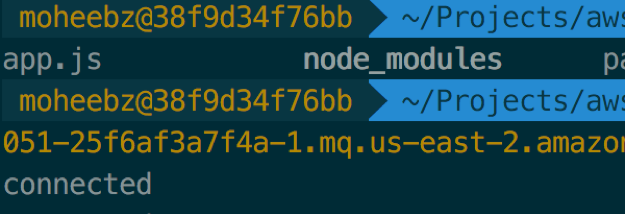
node app.js "username" "password" "wss://endpoint:port" "some/topic" - After
connectedprints in the terminal, leave this app running, and proceed to the next section.
There are three important components run by this code to subscribe and receive messages:
- Connecting to the MQTT broker.
- Subscribing to the topic on a successful connection.
- Creating a handler for any message events.
The following code example shows connecting to the MQTT broker.
const args = process.argv.slice(2)

let options = {
  username: args[0],
  password: args[1],
  clientId: 'mqttLambda_' + uuidv1()
}

let mqEndpoint = args[2]
let topic = args[3]

let client = mqtt.connect( mqEndpoint, options)
The following code example shows subscribing to the topic on a successful connection.
// When connected, subscribe to the topic

client.on('connect', function() {
  console.log("connected")

  client.subscribe(topic, function (err) {
    if(err) console.log(err)
  })
})
The following code example shows creating a handler for any message events.
// Log messages

client.on('message', function (topic, message) {
  console.log(`message received on ${topic}: ${message.toString()}`)
})
Send a test message from an AWS Lambda function
Now that the Amazon MQ broker, PublishMessage Lambda function, and the Node.js client application are running, you can test consuming messages from a serverless application.
- In the Lambda console, select the newly created PublishMessage Lambda function. Its name begins with the name given to the AWS Serverless Application Repository application on deployment.
- Choose Test.
- Give the new test event a name, and optionally modify the message. Choose Create.
- Choose Test to invoke the Lambda function with the test event.
- If the execution is successful, the message appears in the terminal where the Node.js client-app is running.

Using composite destinations
The Amazon MQ broker uses an XML configuration to enable and configure ActiveMQ features. One of these features, composite destinations, makes one-to-many relationships on a single destination possible. This means that a queue or topic can be configured to forward to another queue, topic, or combination.

This is useful when fanning out to a number of clients, some of whom are consuming queues while others are consuming topics. The following steps demonstrate how you can easily modify the broker configuration and define multiple destinations for a topic.
- On the Amazon MQ Configurations page, select the matching configuration from the list. It has the same stack name prefix as your broker.
- Choose Edit configuration.
- After the broker tag, add the following code example. It creates a new virtual composite destination where messages published to
“some/topic”publishes to a queue“A.queue”and a topic“foo.”<?xml version="1.0" encoding="UTF-8" standalone="yes"?> <broker schedulePeriodForDestinationPurge="10000" xmlns="http://activemq.apache.org/schema/core"> <destinationInterceptors> <virtualDestinationInterceptor> <virtualDestinations> <compositeTopic name="some.topic"> <forwardTo> <queue physicalName="A.Queue"/> <topic physicalName="foo" /> </forwardTo> </compositeTopic> </virtualDestinations> </virtualDestinationInterceptor> </destinationInterceptors> <destinationPolicy> - Choose Save, add a description for this revision, and then choose Save.
- In the left navigation pane, choose Brokers, and select the broker with the stack name prefix.
- Under Details, choose Edit.
- Under Configuration, select the latest configuration revision that you just created.
- Choose Schedule modifications, Immediately, Apply.
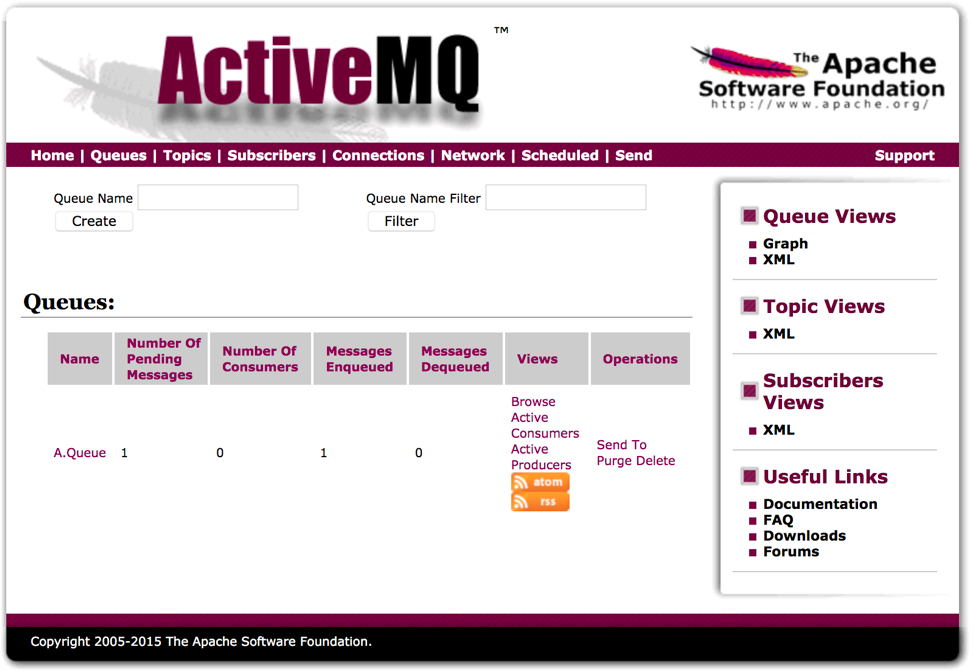
After the reboot is complete, run another test of the Lambda function. Then, open and log in to the ActiveMQ broker web console, which can be found under Connections on the broker page. To log in, use the admin credentials created on deployment.

On the Queues page, a new queue “A.Queue” was generated because you published to some/topic, which has a composite destination configured.
Conclusion
It can be difficult to tackle architecting a solution with multiple client destinations and networked applications. Although there are many ways to go about solving this problem, this post showed you how to deploy a robust solution using ActiveMQ with a serverless workflow. The workflow publishes messages to a client application using MQTT, a well-supported and lightweight messaging protocol.
To accomplish this, you deployed a serverless application and an Amazon MQ broker in one step using the AWS Serverless Application Repository. You also ran a Node.js MQTT client application authenticated as a registered user in the Amazon MQ broker. You then used Lambda to test publishing a message to a topic on the Amazon MQ broker. Finally, you extended functionality by modifying the broker configuration to support a virtual composite destination, allowing delivery to multiple topic and queue destinations.
With the completion of this project, you can take things further by integrating other AWS services and third-party or custom client applications. Amazon MQ provides multiple protocol endpoints that are widely used across the software and platform landscape. Using serverless as an in-between, you can deliver features from services like Amazon EventBridge to your external applications, wherever they might be. You can also explore how to invoke an Lambda function from Amazon MQ.