AWS Compute Blog
Deploying Java Microservices on Amazon Elastic Container Service
This post and accompanying code graciously contributed by:
 |
 |
| Huy Huynh
Sr. Solutions Architect |
Magnus Bjorkman
Solutions Architect |
Java is a popular language used by many enterprises today. To simplify and accelerate Java application development, many companies are moving from a monolithic to microservices architecture. For some, it has become a strategic imperative. Containerization technology, such as Docker, lets enterprises build scalable, robust microservice architectures without major code rewrites.
In this post, I cover how to containerize a monolithic Java application to run on Docker. Then, I show how to deploy it on AWS using Amazon Elastic Container Service (Amazon ECS), a high-performance container management service. Finally, I show how to break the monolith into multiple services, all running in containers on Amazon ECS.
Application Architecture
For this example, I use the Spring Pet Clinic, a monolithic Java application for managing a veterinary practice. It is a simple REST API, which allows the client to manage and view Owners, Pets, Vets, and Visits.

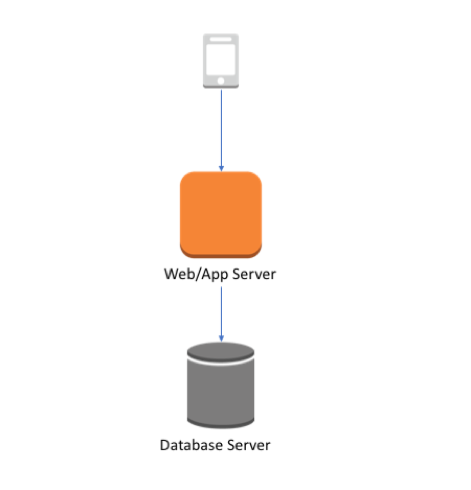
It is a simple three-tier architecture:
- Client
You simulate this by using curl commands. - Web/app server
This is the Java and Spring-based application that you run using the embedded Tomcat. As part of this post, you run this within Docker containers. - Database server
This is the relational database for your application that stores information about owners, pets, vets, and visits. For this post, use MySQL RDS.
I decided to not put the database inside a container as containers were designed for applications and are transient in nature. The choice was made even easier because you have a fully managed database service available with Amazon RDS.
RDS manages the work involved in setting up a relational database, from provisioning the infrastructure capacity that you request to installing the database software. After your database is up and running, RDS automates common administrative tasks, such as performing backups and patching the software that powers your database. With optional Multi-AZ deployments, Amazon RDS also manages synchronous data replication across Availability Zones with automatic failover.
Walkthrough
You can find the code for the example covered in this post at amazon-ecs-java-microservices on GitHub.
Prerequisites
You need the following to walk through this solution:
- An AWS account
- An access key and secret key for a user in the account
- The AWS CLI installed
Also, install the latest versions of the following:
- Java
- Maven
- Python
- Docker
Step 1: Move the existing Java Spring application to a container deployed using Amazon ECS
First, move the existing monolith application to a container and deploy it using Amazon ECS. This is a great first step before breaking the monolith apart because you still get some benefits before breaking apart the monolith:
- An improved pipeline. The container also allows an engineering organization to create a standard pipeline for the application lifecycle.
- No mutations to machines.
You can find the monolith example at 1_ECS_Java_Spring_PetClinic.
Container deployment overview
The following diagram is an overview of what the setup looks like for Amazon ECS and related services:

This setup consists of the following resources:
- The client application that makes a request to the load balancer.
- The load balancer that distributes requests across all available ports and instances registered in the application’s target group using round-robin.
- The target group that is updated by Amazon ECS to always have an up-to-date list of all the service containers in the cluster. This includes the port on which they are accessible.
- One Amazon ECS cluster that hosts the container for the application.
- A VPC network to host the Amazon ECS cluster and associated security groups.
Each container has a single application process that is bound to port 8080 within its namespace. In reality, all the containers are exposed on a different, randomly assigned port on the host.
The architecture is containerized but still monolithic because each container has all the same features of the rest of the containers
The following is also part of the solution but not depicted in the above diagram:
- One Amazon Elastic Container Registry (Amazon ECR) repository for the application.
- A service/task definition that spins up containers on the instances of the Amazon ECS cluster.
- A MySQL RDS instance that hosts the applications schema. The information about the MySQL RDS instance is sent in through environment variables to the containers, so that the application can connect to the MySQL RDS instance.
I have automated setup with the 1_ECS_Java_Spring_PetClinic/ecs-cluster.cf AWS CloudFormation template and a Python script.
The Python script calls the CloudFormation template for the initial setup of the VPC, Amazon ECS cluster, and RDS instance. It then extracts the outputs from the template and uses those for API calls to create Amazon ECR repositories, tasks, services, Application Load Balancer, and target groups.
Environment variables and Spring properties binding
As part of the Python script, you pass in a number of environment variables to the container as part of the task/container definition:
'environment': [
{
'name': 'SPRING_PROFILES_ACTIVE',
'value': 'mysql'
},
{
'name': 'SPRING_DATASOURCE_URL',
'value': my_sql_options['dns_name']
},
{
'name': 'SPRING_DATASOURCE_USERNAME',
'value': my_sql_options['username']
},
{
'name': 'SPRING_DATASOURCE_PASSWORD',
'value': my_sql_options['password']
}
],
The preceding environment variables work in concert with the Spring property system. The value in the variable SPRING_PROFILES_ACTIVE, makes Spring use the MySQL version of the application property file. The other environment files override the following properties in that file:
spring.datasource.urlspring.datasource.usernamespring.datasource.password
Optionally, you can also encrypt sensitive values by using Amazon EC2 Systems Manager Parameter Store. Instead of handing in the password, you pass in a reference to the parameter and fetch the value as part of the container startup. For more information, see Managing Secrets for Amazon ECS Applications Using Parameter Store and IAM Roles for Tasks.
Spotify Docker Maven plugin
Use the Spotify Docker Maven plugin to create the image and push it directly to Amazon ECR. This allows you to do this as part of the regular Maven build. It also integrates the image generation as part of the overall build process. Use an explicit Dockerfile as input to the plugin.
FROM frolvlad/alpine-oraclejdk8:slim
VOLUME /tmp
ADD spring-petclinic-rest-1.7.jar app.jar
RUN sh -c 'touch /app.jar'
ENV JAVA_OPTS=""
ENTRYPOINT [ "sh", "-c", "java $JAVA_OPTS -Djava.security.egd=file:/dev/./urandom -jar /app.jar" ]
The Python script discussed earlier uses the AWS CLI to authenticate you with AWS. The script places the token in the appropriate location so that the plugin can work directly against the Amazon ECR repository.
Test setup
You can test the setup by running the Python script:
python setup.py -m setup -r <your region>
After the script has successfully run, you can test by querying an endpoint:
curl <your endpoint from output above>/owner
You can clean this up before going to the next section:
python setup.py -m cleanup -r <your region>
Step 2: Converting the monolith into microservices running on Amazon ECS
The second step is to convert the monolith into microservices. For a real application, you would likely not do this as one step, but re-architect an application piece by piece. You would continue to run your monolith but it would keep getting smaller for each piece that you are breaking apart.
By migrating microservices, you would get four benefits associated with microservices:
- Isolation of crashes
If one microservice in your application is crashing, then only that part of your application goes down. The rest of your application continues to work properly. - Isolation of security
When microservice best practices are followed, the result is that if an attacker compromises one service, they only gain access to the resources of that service. They can’t horizontally access other resources from other services without breaking into those services as well. - Independent scaling
When features are broken out into microservices, then the amount of infrastructure and number of instances of each microservice class can be scaled up and down independently. - Development velocity
In a monolith, adding a new feature can potentially impact every other feature that the monolith contains. On the other hand, a proper microservice architecture has new code for a new feature going into a new service. You can be confident that any code you write won’t impact the existing code at all, unless you explicitly write a connection between two microservices.
Find the monolith example at 2_ECS_Java_Spring_PetClinic_Microservices.
You break apart the Spring Pet Clinic application by creating a microservice for each REST API operation, as well as creating one for the system services.
Java code changes
Comparing the project structure between the monolith and the microservices version, you can see that each service is now its own separate build.
First, the monolith version:

You can clearly see how each API operation is its own subpackage under the org.springframework.samples.petclinic package, all part of the same monolithic application.
This changes as you break it apart in the microservices version:

Now, each API operation is its own separate build, which you can build independently and deploy. You have also duplicated some code across the different microservices, such as the classes under the model subpackage. This is intentional as you don’t want to introduce artificial dependencies among the microservices and allow these to evolve differently for each microservice.
Also, make the dependencies among the API operations more loosely coupled. In the monolithic version, the components are tightly coupled and use object-based invocation.
Here is an example of this from the OwnerController operation, where the class is directly calling PetRepository to get information about pets. PetRepository is the Repository class (Spring data access layer) to the Pet table in the RDS instance for the Pet API:
@RestController
class OwnerController {

    @Inject
    private PetRepository pets;
    @Inject
    private OwnerRepository owners;
    private static final Logger logger = LoggerFactory.getLogger(OwnerController.class);

    @RequestMapping(value = "/owner/{ownerId}/getVisits", method = RequestMethod.GET)
    public ResponseEntity<List<Visit>> getOwnerVisits(@PathVariable int ownerId){
        List<Pet> petList = this.owners.findById(ownerId).getPets();
        List<Visit> visitList = new ArrayList<Visit>();
        petList.forEach(pet -> visitList.addAll(pet.getVisits()));
        return new ResponseEntity<List<Visit>>(visitList, HttpStatus.OK);
    }
}
In the microservice version, call the Pet API operation and not PetRepository directly. Decouple the components by using interprocess communication; in this case, the Rest API. This provides for fault tolerance and disposability.
@RestController
class OwnerController {

    @Value("#{environment['SERVICE_ENDPOINT'] ?: 'localhost:8080'}")
    private String serviceEndpoint;

    @Inject
    private OwnerRepository owners;
    private static final Logger logger = LoggerFactory.getLogger(OwnerController.class);

    @RequestMapping(value = "/owner/{ownerId}/getVisits", method = RequestMethod.GET)
    public ResponseEntity<List<Visit>> getOwnerVisits(@PathVariable int ownerId){
        List<Pet> petList = this.owners.findById(ownerId).getPets();
        List<Visit> visitList = new ArrayList<Visit>();
        petList.forEach(pet -> {
            logger.info(getPetVisits(pet.getId()).toString());
            visitList.addAll(getPetVisits(pet.getId()));
        });
        return new ResponseEntity<List<Visit>>(visitList, HttpStatus.OK);
    }

    private List<Visit> getPetVisits(int petId){
        List<Visit> visitList = new ArrayList<Visit>();
        RestTemplate restTemplate = new RestTemplate();
        Pet pet = restTemplate.getForObject("http://"+serviceEndpoint+"/pet/"+petId, Pet.class);
        logger.info(pet.getVisits().toString());
        return pet.getVisits();
    }
}
You now have an additional method that calls the API. You are also handing in the service endpoint that should be called, so that you can easily inject dynamic endpoints based on the current deployment.
Container deployment overview
Here is an overview of what the setup looks like for Amazon ECS and the related services:
This setup consists of the following resources:
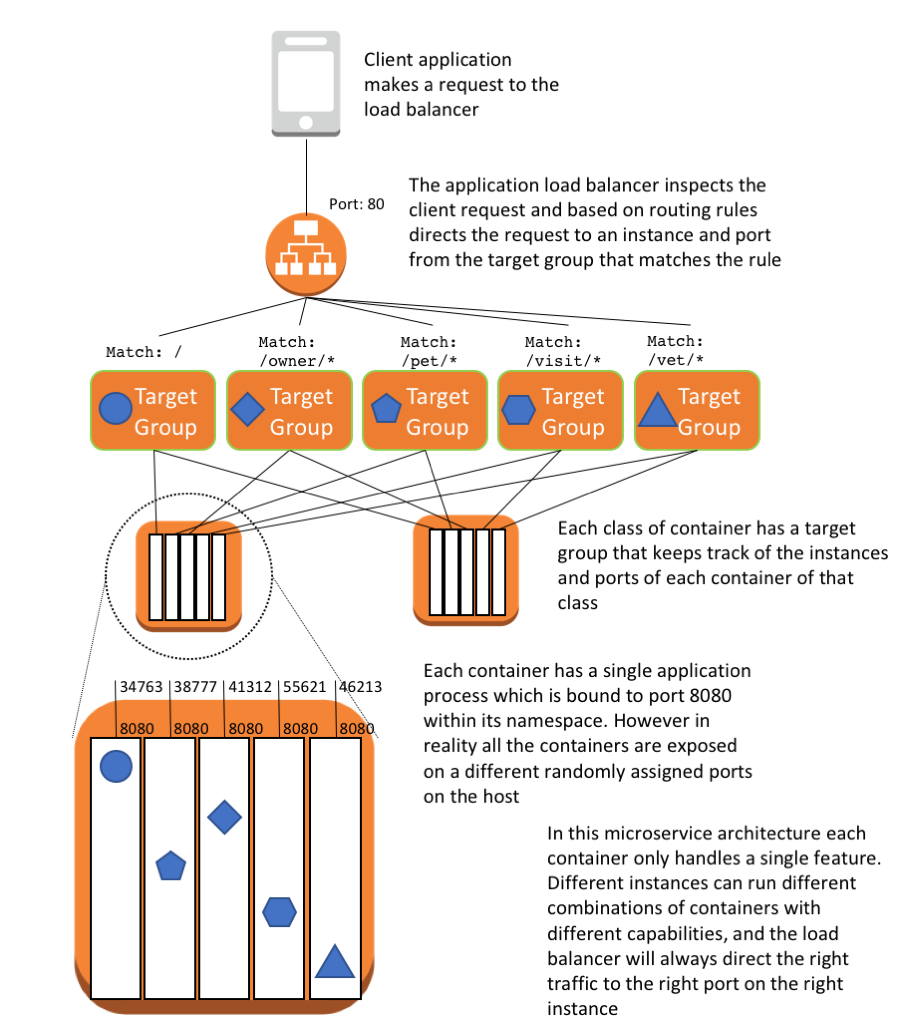
- The client application that makes a request to the load balancer.
- The Application Load Balancer that inspects the client request. Based on routing rules, it directs the request to an instance and port from the target group that matches the rule.
- The Application Load Balancer that has a target group for each microservice. The target groups are used by the corresponding services to register available container instances. Each target group has a path, so when you call the path for a particular microservice, it is mapped to the correct target group. This allows you to use one Application Load Balancer to serve all the different microservices, accessed by the path. For example, https:///owner/* would be mapped and directed to the Owner microservice.
- One Amazon ECS cluster that hosts the containers for each microservice of the application.
- A VPC network to host the Amazon ECS cluster and associated security groups.
Because you are running multiple containers on the same instances, use dynamic port mapping to avoid port clashing. By using dynamic port mapping, the container is allocated an anonymous port on the host to which the container port (8080) is mapped. The anonymous port is registered with the Application Load Balancer and target group so that traffic is routed correctly.
The following is also part of the solution but not depicted in the above diagram:
- One Amazon ECR repository for each microservice.
- A service/task definition per microservice that spins up containers on the instances of the Amazon ECS cluster.
- A MySQL RDS instance that hosts the applications schema. The information about the MySQL RDS instance is sent in through environment variables to the containers. That way, the application can connect to the MySQL RDS instance.
I have again automated setup with the 2_ECS_Java_Spring_PetClinic_Microservices/ecs-cluster.cf CloudFormation template and a Python script.
The CloudFormation template remains the same as in the previous section. In the Python script, you are now building five different Java applications, one for each microservice (also includes a system application). There is a separate Maven POM file for each one. The resulting Docker image gets pushed to its own Amazon ECR repository, and is deployed separately using its own service/task definition. This is critical to get the benefits described earlier for microservices.
Here is an example of the POM file for the Owner microservice:
<?xml version="1.0" encoding="UTF-8"?>
<project xmlns="http://maven.apache.org/POM/4.0.0" xmlns:xsi="http://www.w3.org/2001/XMLSchema-instance"
         xsi:schemaLocation="http://maven.apache.org/POM/4.0.0 http://maven.apache.org/maven-v4_0_0.xsd">
    <modelVersion>4.0.0</modelVersion>
    <groupId>org.springframework.samples</groupId>
    <artifactId>spring-petclinic-rest</artifactId>
    <version>1.7</version>
    <parent>
        <groupId>org.springframework.boot</groupId>
        <artifactId>spring-boot-starter-parent</artifactId>
        <version>1.5.2.RELEASE</version>
    </parent>
    <properties>
        <!-- Generic properties -->
        <java.version>1.8</java.version>
        <docker.registry.host>${env.docker_registry_host}</docker.registry.host>
    </properties>
    <dependencies>
        <dependency>
            <groupId>javax.inject</groupId>
            <artifactId>javax.inject</artifactId>
            <version>1</version>
        </dependency>
        <!-- Spring and Spring Boot dependencies -->
        <dependency>
            <groupId>org.springframework.boot</groupId>
            <artifactId>spring-boot-starter-actuator</artifactId>
        </dependency>
        <dependency>
            <groupId>org.springframework.boot</groupId>
            <artifactId>spring-boot-starter-data-rest</artifactId>
        </dependency>
        <dependency>
            <groupId>org.springframework.boot</groupId>
            <artifactId>spring-boot-starter-cache</artifactId>
        </dependency>
        <dependency>
            <groupId>org.springframework.boot</groupId>
            <artifactId>spring-boot-starter-data-jpa</artifactId>
        </dependency>
        <dependency>
            <groupId>org.springframework.boot</groupId>
            <artifactId>spring-boot-starter-web</artifactId>
        </dependency>
        <dependency>
            <groupId>org.springframework.boot</groupId>
            <artifactId>spring-boot-starter-test</artifactId>
            <scope>test</scope>
        </dependency>
        <!-- Databases - Uses HSQL by default -->
        <dependency>
            <groupId>org.hsqldb</groupId>
            <artifactId>hsqldb</artifactId>
            <scope>runtime</scope>
        </dependency>
        <dependency>
            <groupId>mysql</groupId>
            <artifactId>mysql-connector-java</artifactId>
            <scope>runtime</scope>
        </dependency>
        <!-- caching -->
        <dependency>
            <groupId>javax.cache</groupId>
            <artifactId>cache-api</artifactId>
        </dependency>
        <dependency>
            <groupId>org.ehcache</groupId>
            <artifactId>ehcache</artifactId>
        </dependency>
        <!-- end of webjars -->
        <dependency>
            <groupId>org.springframework.boot</groupId>
            <artifactId>spring-boot-devtools</artifactId>
            <scope>runtime</scope>
        </dependency>
    </dependencies>
    <build>
        <plugins>
            <plugin>
                <groupId>org.springframework.boot</groupId>
                <artifactId>spring-boot-maven-plugin</artifactId>
            </plugin>
            <plugin>
                <groupId>com.spotify</groupId>
                <artifactId>docker-maven-plugin</artifactId>
                <version>0.4.13</version>
                <configuration>
                    <imageName>${env.docker_registry_host}/${project.artifactId}</imageName>
                    <dockerDirectory>src/main/docker</dockerDirectory>
                    <useConfigFile>true</useConfigFile>
                    <registryUrl>${env.docker_registry_host}</registryUrl>
                    <!--dockerHost>https://${docker.registry.host}</dockerHost-->
                    <resources>
                        <resource>
                            <targetPath>/</targetPath>
                            <directory>${project.build.directory}</directory>
                            <include>${project.build.finalName}.jar</include>
                        </resource>
                    </resources>
                    <forceTags>false</forceTags>
                    <imageTags>
                        <imageTag>${project.version}</imageTag>
                    </imageTags>
                </configuration>
            </plugin>
        </plugins>
    </build>
</project>
Test setup
You can test this by running the Python script:
python setup.py -m setup -r <your region>
After the script has successfully run, you can test by querying an endpoint:
curl <your endpoint from output above>/owner
Conclusion
Migrating a monolithic application to a containerized set of microservices can seem like a daunting task. Following the steps outlined in this post, you can begin to containerize monolithic Java apps, taking advantage of the container runtime environment, and beginning the process of re-architecting into microservices. On the whole, containerized microservices are faster to develop, easier to iterate on, and more cost effective to maintain and secure.
This post focused on the first steps of microservice migration. You can learn more about optimizing and scaling your microservices with components such as service discovery, blue/green deployment, circuit breakers, and configuration servers at http://aws.amazon.com/containers.
If you have questions or suggestions, please comment below.