AWS Compute Blog
Protecting your API using Amazon API Gateway and AWS WAF — Part I
This post courtesy of Thiago Morais, AWS Solutions Architect
When you build web applications or expose any data externally, you probably look for a platform where you can build highly scalable, secure, and robust REST APIs. As APIs are publicly exposed, there are a number of best practices for providing a secure mechanism to consumers using your API.
Amazon API Gateway handles all the tasks involved in accepting and processing up to hundreds of thousands of concurrent API calls, including traffic management, authorization and access control, monitoring, and API version management.
In this post, I show you how to take advantage of the regional API endpoint feature in API Gateway, so that you can create your own Amazon CloudFront distribution and secure your API using AWS WAF.
AWS WAF is a web application firewall that helps protect your web applications from common web exploits that could affect application availability, compromise security, or consume excessive resources.
As you make your APIs publicly available, you are exposed to attackers trying to exploit your services in several ways. The AWS security team published a whitepaper solution using AWS WAF, How to Mitigate OWASP’s Top 10 Web Application Vulnerabilities.
Regional API endpoints
Edge-optimized APIs are endpoints that are accessed through a CloudFront distribution created and managed by API Gateway. Before the launch of regional API endpoints, this was the default option when creating APIs using API Gateway. It primarily helped to reduce latency for API consumers that were located in different geographical locations than your API.
When API requests predominantly originate from an Amazon EC2 instance or other services within the same AWS Region as the API is deployed, a regional API endpoint typically lowers the latency of connections. It is recommended for such scenarios.
For better control around caching strategies, customers can use their own CloudFront distribution for regional APIs. They also have the ability to use AWS WAF protection, as I describe in this post.
Edge-optimized API endpoint
The following diagram is an illustrated example of the edge-optimized API endpoint where your API clients access your API through a CloudFront distribution created and managed by API Gateway.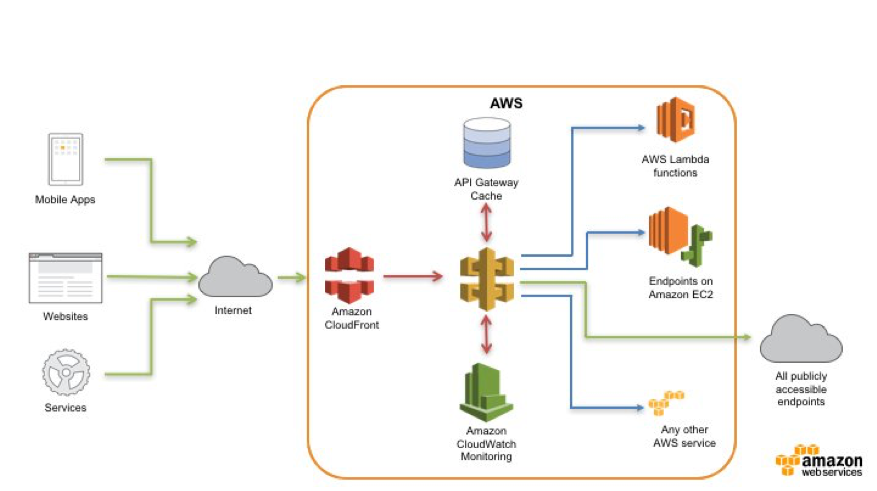
Regional API endpoint
For the regional API endpoint, your customers access your API from the same Region in which your REST API is deployed. This helps you to reduce request latency and particularly allows you to add your own content delivery network, as needed.
Walkthrough
In this section, you implement the following steps:
- Create a regional API using the PetStore sample API.
- Create a CloudFront distribution for the API.
- Test the CloudFront distribution.
- Set up AWS WAF and create a web ACL.
- Attach the web ACL to the CloudFront distribution.
- Test AWS WAF protection.
Create the regional API
For this walkthrough, use an existing PetStore API. All new APIs launch by default as the regional endpoint type. To change the endpoint type for your existing API, choose the cog icon on the top right corner:
After you have created the PetStore API on your account, deploy a stage called “prod” for the PetStore API.
On the API Gateway console, select the PetStore API and choose Actions, Deploy API.
For Stage name, type prod and add a stage description.
Choose Deploy and the new API stage is created.
Use the following AWS CLI command to update your API from edge-optimized to regional:
aws apigateway update-rest-api \
--rest-api-id {rest-api-id} \
--patch-operations op=replace,path=/endpointConfiguration/types/EDGE,value=REGIONAL
A successful response looks like the following:
{
    "description": "Your first API with Amazon API Gateway. This is a sample API that integrates via HTTP with your demo Pet Store endpoints",
    "createdDate": 1511525626,
    "endpointConfiguration": {
        "types": [
            "REGIONAL"
        ]
    },
    "id": "{api-id}",
    "name": "PetStore"
}
After you change your API endpoint to regional, you can now assign your own CloudFront distribution to this API.
Create a CloudFront distribution
To make things easier, I have provided an AWS CloudFormation template to deploy a CloudFront distribution pointing to the API that you just created. Click the button to deploy the template in the us-east-1 Region.
![]()
For Stack name, enter RegionalAPI. For APIGWEndpoint, enter your API FQDN in the following format:
{api-id}.execute-api.us-east-1.amazonaws.com
After you fill out the parameters, choose Next to continue the stack deployment. It takes a couple of minutes to finish the deployment. After it finishes, the Output tab lists the following items:
- A CloudFront domain URL
- An S3 bucket for CloudFront access logs

Output from CloudFormation
Test the CloudFront distribution
To see if the CloudFront distribution was configured correctly, use a web browser and enter the URL from your distribution, with the following parameters:
https://{your-distribution-url}.cloudfront.net/{api-stage}/pets
You should get the following output:
[
  {
    "id": 1,
    "type": "dog",
    "price": 249.99
  },
  {
    "id": 2,
    "type": "cat",
    "price": 124.99
  },
  {
    "id": 3,
    "type": "fish",
    "price": 0.99
  }
]
Set up AWS WAF and create a web ACL
With the new CloudFront distribution in place, you can now start setting up AWS WAF to protect your API.
For this demo, you deploy the AWS WAF Security Automations solution, which provides fine-grained control over the requests attempting to access your API.
For more information about deployment, see Automated Deployment. If you prefer, you can launch the solution directly into your account using the following button.
![]()
For CloudFront Access Log Bucket Name, add the name of the bucket created during the deployment of the CloudFormation stack for your CloudFront distribution.
The solution allows you to adjust thresholds and also choose which automations to enable to protect your API. After you finish configuring these settings, choose Next.
To start the deployment process in your account, follow the creation wizard and choose Create. It takes a few minutes do finish the deployment. You can follow the creation process through the CloudFormation console.
After the deployment finishes, you can see the new web ACL deployed on the AWS WAF console, AWSWAFSecurityAutomations.
Attach the AWS WAF web ACL to the CloudFront distribution
With the solution deployed, you can now attach the AWS WAF web ACL to the CloudFront distribution that you created earlier.
To assign the newly created AWS WAF web ACL, go back to your CloudFront distribution. After you open your distribution for editing, choose General, Edit.
Select the new AWS WAF web ACL that you created earlier, AWSWAFSecurityAutomations.
Save the changes to your CloudFront distribution and wait for the deployment to finish.
Test AWS WAF protection
To validate the AWS WAF Web ACL setup, use Artillery to load test your API and see AWS WAF in action.
To install Artillery on your machine, run the following command:
$ npm install -g artilleryAfter the installation completes, you can check if Artillery installed successfully by running the following command:
$ artillery -V
$ 1.6.0-12
As the time of publication, Artillery is on version 1.6.0-12.
One of the WAF web ACL rules that you have set up is a rate-based rule. By default, it is set up to block any requesters that exceed 2000 requests under 5 minutes. Try this out.
First, use cURL to query your distribution and see the API output:
$ curl -s https://{distribution-name}.cloudfront.net/prod/pets
[
  {
    "id": 1,
    "type": "dog",
    "price": 249.99
  },
  {
    "id": 2,
    "type": "cat",
    "price": 124.99
  },
  {
    "id": 3,
    "type": "fish",
    "price": 0.99
  }
]
Based on the test above, the result looks good. But what if you max out the 2000 requests in under 5 minutes?
Run the following Artillery command:
artillery quick -n 2000 --count 10 https://{distribution-name}.cloudfront.net/prod/petsWhat you are doing is firing 2000 requests to your API from 10 concurrent users. For brevity, I am not posting the Artillery output here.
After Artillery finishes its execution, try to run the cURL request again and see what happens:
$ curl -s https://{distribution-name}.cloudfront.net/prod/pets

<!DOCTYPE HTML PUBLIC "-//W3C//DTD HTML 4.01 Transitional//EN" "http://www.w3.org/TR/html4/loose.dtd">
<HTML><HEAD><META HTTP-EQUIV="Content-Type" CONTENT="text/html; charset=iso-8859-1">
<TITLE>ERROR: The request could not be satisfied</TITLE>
</HEAD><BODY>
<H1>ERROR</H1>
<H2>The request could not be satisfied.</H2>
<HR noshade size="1px">
Request blocked.
<BR clear="all">
<HR noshade size="1px">
<PRE>
Generated by cloudfront (CloudFront)
Request ID: [removed]
</PRE>
<ADDRESS>
</ADDRESS>
</BODY></HTML>
As you can see from the output above, the request was blocked by AWS WAF. Your IP address is removed from the blocked list after it falls below the request limit rate.
Conclusion
In this first part, you saw how to use the new API Gateway regional API endpoint together with Amazon CloudFront and AWS WAF to secure your API from a series of attacks.
In the second part, I will demonstrate some other techniques to protect your API using API keys and Amazon CloudFront custom headers.