AWS Compute Blog
TensorFlow Serving on Kubernetes with Amazon EC2 Spot Instances
This post is contributed by Kinnar Sen – Sr. Specialist Solutions Architect, EC2 Spot
TensorFlow (TF) is a popular choice for machine learning research and application development. It’s a machine learning (ML) platform, which is used to build (train) and deploy (serve) machine learning models. TF Serving is a part of TF framework and is used for deploying ML models in production environments. TF Serving can be containerized using Docker and deployed in a cluster with Kubernetes. It is easy to run production grade workloads on Kubernetes using Amazon Elastic Kubernetes Service (Amazon EKS), a managed service for creating and managing Kubernetes clusters. To cost optimize the TF serving workloads, you can use Amazon EC2 Spot Instances. Spot Instances are spare EC2 capacity available at up to a 90% discount compared to On-Demand Instance prices.
In this post I will illustrate deployment of TensorFlow Serving using Kubernetes via Amazon EKS and Spot Instances to build a scalable, resilient, and cost optimized machine learning inference service.
Overview
About TensorFlow Serving (TF Serving)
TensorFlow Serving is the recommended way to serve TensorFlow models. A flexible and a high-performance system for serving models TF Serving enables users to quickly deploy models to production environments. It provides out-of-box integration with TF models and can be extended to serve other kinds of models and data. TF Serving deploys a model server with gRPC/REST endpoints and can be used to serve multiple models (or versions). There are two ways that the requests can be served, batching individual requests or one-by-one. Batching is often used to unlock the high throughput of hardware accelerators (if used for inference) for offline high volume inference jobs.
Amazon EC2 Spot Instances
Spot Instances are spare Amazon EC2 capacity that enables customers to save up to 90% over On-Demand Instance prices. The price of Spot Instances is determined by long-term trends in supply and demand of spare capacity pools. Capacity pools can be defined as a group of EC2 instances belonging to particular instance family, size, and Availability Zone (AZ). If EC2 needs capacity back for On-Demand usage, Spot Instances can be interrupted by EC2 with a two-minute notification. There are many graceful ways to handle the interruption to ensure that the application is well architected for resilience and fault tolerance. This can be automated via the application and/or infrastructure deployments. Spot Instances are ideal for stateless, fault tolerant, loosely coupled and flexible workloads that can handle interruptions.
TensorFlow Serving (TF Serving) and Kubernetes
Each pod in a Kubernetes cluster runs a TF Docker image with TF Serving-based server and a model. The model contains the architecture of TensorFlow Graph, model weights and assets. This is a deployment setup with configurable number of replicas. The replicas are exposed externally by a service and an External Load Balancer that helps distribute the requests to the service endpoints. To keep up with the demands of service, Kubernetes can help scale the number of replicated pods using Kubernetes Replication Controller.
Architecture
There are a couple of goals that we want to achieve through this solution.
- Cost optimization – By using EC2 Spot Instances
- High throughput – By using Application Load Balancer (ALB) created by Ingress Controller
- Resilience – Ensuring high availability by replenishing nodes and gracefully handling the Spot interruptions
- Elasticity – By using Horizontal Pod Autoscaler, Cluster Autoscaler, and EC2 Auto Scaling
This can be achieved by using the following components.
| Component | Role | Details | Deployment Method |
| Cluster Autoscaler | Scales EC2 instances automatically according to pods running in the cluster | Open source | A deployment on On-Demand Instances |
| EC2 Auto Scaling group | Provisions and maintains EC2 instance capacity | AWS | AWS CloudFormation via eksctl |
| AWS Node Termination Handler | Detects EC2 Spot interruptions and automatically drains nodes | Open source | A DaemonSet on Spot and On-Demand Instances |
| AWS ALB Ingress Controller | Provisions and maintains Application Load Balancer | Open source | A deployment on On-Demand Instances |
You can find more details about each component in this AWS blog. Let’s go through the steps that allow the deployment to be elastic.
- HTTP requests flows in through the ALB and Ingress object.
- Horizontal Pod Autoscaler (HPA) monitors the metrics (CPU / RAM) and once the threshold is breached a Replica (pod) is launched.
- If there are sufficient cluster resources, the pod starts running, else it goes into pending state.
- If one or more pods are in pending state, the Cluster Autoscaler (CA) triggers a scale up request to Auto Scaling group.
- If HPA tries to schedule pods more than the current size of what the cluster can support, CA can add capacity to support that.
- Auto Scaling group provision a new node and the application scales up
- A scale down happens in the reverse fashion when requests start tapering down.
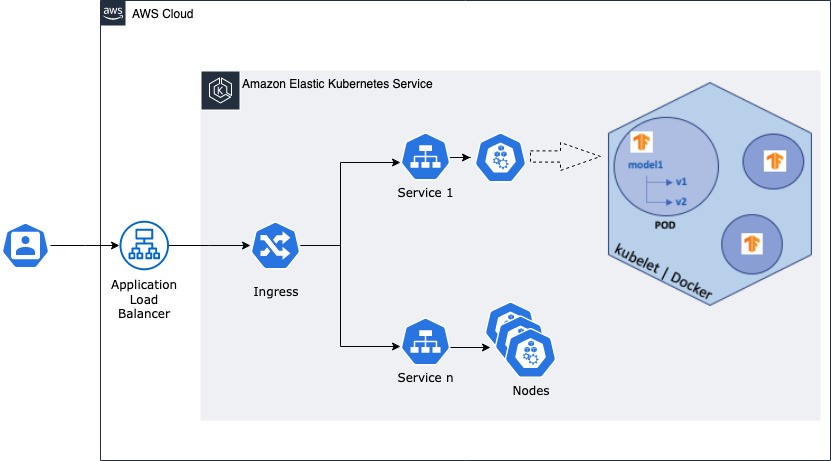
AWS ALB Ingress controller and ALB
We will be using an ALB along with an Ingress resource instead of the default External Load Balancer created by the TF Serving deployment. The open source AWS ALB Ingress controller triggers the creation of an ALB and the necessary supporting AWS resources whenever a Kubernetes user declares an Ingress resource in the cluster. The Ingress resource uses the ALB to route HTTP(S) traffic to different endpoints within the cluster. ALB is ideal for advanced load balancing of HTTP and HTTPS traffic. ALB provides advanced request routing targeted at delivery of modern application architectures, including microservices and container-based applications. This allows the deployment to maintain a high throughput and improve load balancing.
Spot Instance interruptions
To gracefully handle interruptions, we will use the AWS node termination handler. This handler runs a DaemonSet (one pod per node) on each host to perform monitoring and react accordingly. When it receives the Spot Instance 2-minute interruption notification, it uses the Kubernetes API to cordon the node. This is done by tainting it to ensure that no new pods are scheduled there, then it drains it, removing any existing pods from the ALB.
One of the best practices for using Spot is diversification where instances are chosen from across different instance types, sizes, and Availability Zone. The capacity-optimized allocation strategy for EC2 Auto Scaling provisions Spot Instances from the most-available Spot Instance pools by analyzing capacity metrics, thus lowering the chance of interruptions.
Tutorial
Set up the cluster
We are using eksctl to create an Amazon EKS cluster with the name k8-tf-serving in combination with a managed node group. The managed node group has two On-Demand t3.medium nodes and it will bootstrap with the labels lifecycle=OnDemand and intent=control-apps. Be sure to replace <YOUR REGION> with the Region you are launching your cluster into.
Check the nodes provisioned by using kubectl get nodes.
Create the NodeGroups now. You create the eksctl configuration file first. Copy the nodegroup configuration below and create a file named spot_nodegroups.yml. Then run the command using eksctl below to add the new Spot nodes to the cluster.
A few points to note here, for more technical details refer to the EC2 Spot workshop.
- There are two diversified node groups created with a fixed vCPU:Memory ratio. This adheres to the Spot best practice of diversifying instances, and helps the Cluster Autoscaler function properly.
- Capacity-optimized Spot allocation strategy is used in both the node groups.
Once the nodes are created, you can check the number of instances provisioned using the command below. It should display 20 as we configured each of our two node groups with a desired capacity of 10 instances.
The cluster setup is complete.
Install the AWS Node Termination Handler
This installs the Node Termination Handler to both Spot Instance and On-Demand Instance nodes. This helps the handler responds to both EC2 maintenance events and Spot Instance interruptions.
Deploy Cluster Autoscaler
For additional detail, see the Amazon EKS page here. Next, export the Cluster Autoscaler into a configuration file:
Open the file created and edit.
Add AWS Region and the cluster name as depicted in the screenshot below.

Run the commands below to deploy Cluster Autoscaler.
Use this command to see into the Cluster Autoscaler (CA) logs to find NodeGroups auto-discovered. Use Ctrl + C to abort the log view.
Deploy TensorFlow Serving
TensorFlow Model Server is deployed in pods and the model will load from the model stored in Amazon S3.
Amazon S3 access
We are using Kubernetes Secrets to store and manage the AWS Credentials for S3 Access.
Copy the following and create a file called kustomization.yml. Add the AWS_ACCESS_KEY_ID and AWS_SECRET_ACCESS_KEY details in the file.
Create the secret file and deploy.
We recommend to use Sealed Secret for production workloads, Sealed Secret provides a mechanism to encrypt a Secret object thus making it more secure. For further details please take a look at the AWS workshop here.
ALB Ingress Controller
Deploy RBAC Roles and RoleBindings needed by the AWS ALB Ingress controller.
Download the AWS ALB Ingress controller YAML into a local file.
Change the –cluster-name flag to ‘TensorFlowServingCluster’ and add the Region details under – –aws-region. Also add the lines below just before the ‘serviceAccountName’.

Deploy the AWS ALB Ingress controller and verify that it is running.
Deploy the application
Next, download a model as explained in the TF official documentation, then upload in Amazon S3.
Copy the following code and create a file named tf_deployment.yml. Don’t forget to replace <AWS_REGION> with the AWS Region you plan to use.
A few things to note here:
- NodeSelector is used to route the TF Serving replica pods to Spot Instance nodes.
- ServiceType LoadBalancer is used.
- model_base_path is pointed at Amazon S3. Replace the <S3_BUCKET> with the S3_BUCKET name you created in last instruction set.
Deploy the application.
Copy the code below and create a file named ingress.yml.
Deploy the ingress.
Deploy the Metrics Server and Horizontal Pod Autoscaler, which scales up when CPU/Memory exceeds 50% of the allocated container resource.
Load testing
Download the Python helper file written for testing the deployed application.
Get the address of the Ingress using the command below.
Install a Python Virtual Env. and install the library requirements.
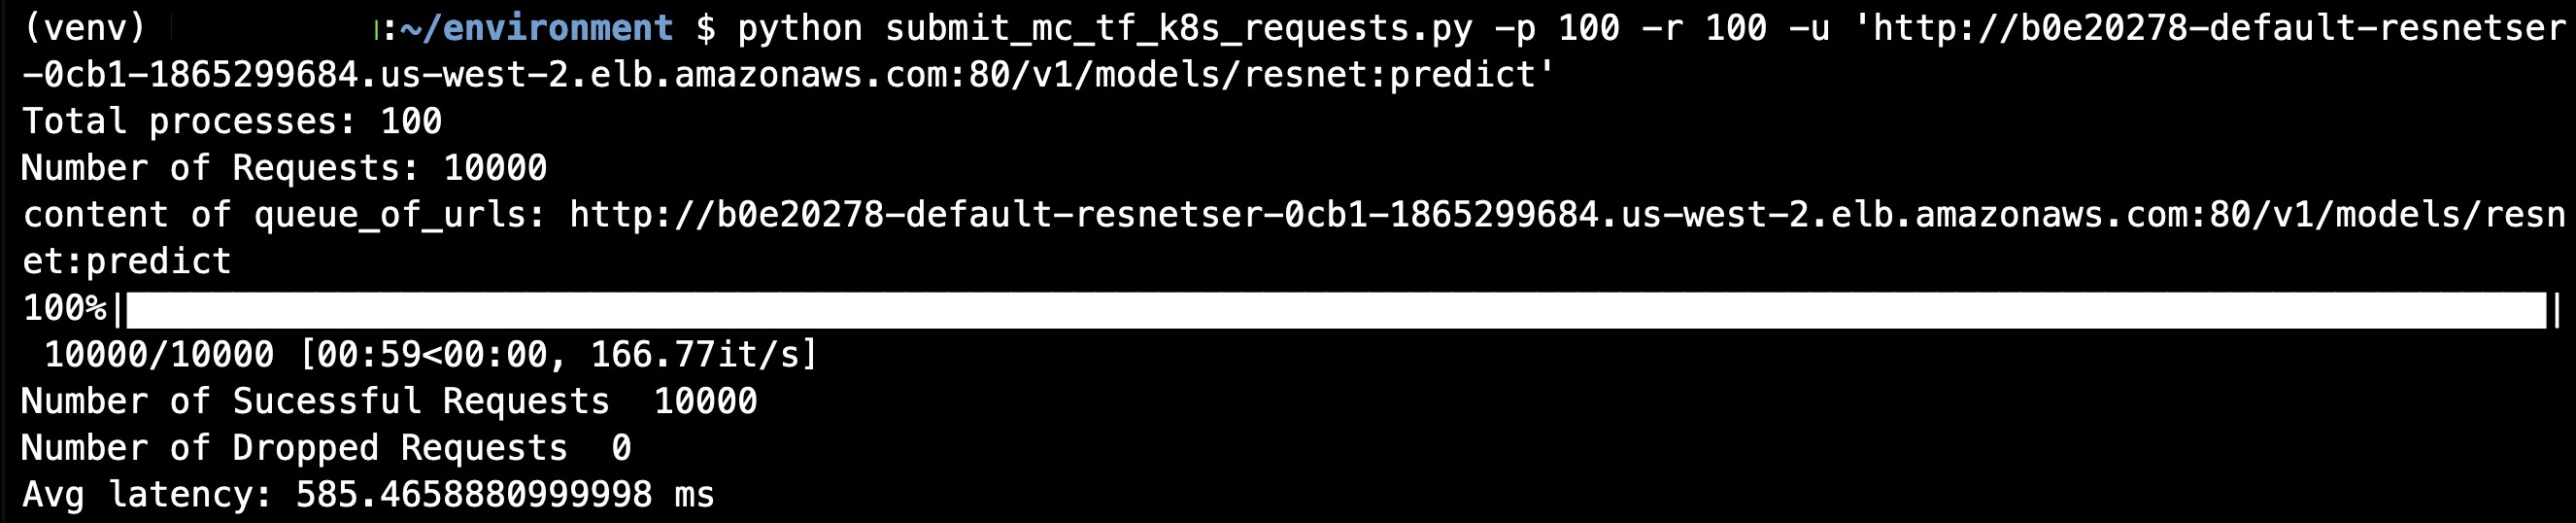
Run the following command to warm up the cluster after replacing the Ingress address. You will be running a Python application for predicting the class of a downloaded image against the ResNet model, which is being served by the TF Serving rest API. You are running multiple parallel processes for that purpose. Here “p” is the number of processes and “r” the number of requests for each process.
You can use the command below to observe the scaling of the cluster.
We ran the above again with 10,000 requests per process as to send 1 million requests to the application. The results are below:
The deployment was able to serve ~400 requests per second with an average latency of ~200 ms per requests.

Cleanup
Now that you’ve successfully deployed and ran TensorFlow Serving using Ec2 Spot it’s time to cleanup your environment. Remove the ingress, deployment, ingress-controller.
Remove the model files from Amazon S3.
Delete the node groups and the cluster.
Conclusion
In this blog, we demonstrated how TensorFlow Serving can be deployed onto Spot Instances based on a Kubernetes cluster, achieving both resilience and cost optimization. There are multiple optimizations that can be implemented on TensorFlow Serving that will further optimize the performance. This deployment can be extended and used for serving multiple models with different versions. We hope you consider running TensorFlow Serving using EC2 Spot Instances to cost optimize the solution.