Containers
Building HTTP API-based services using Amazon API Gateway, AWS PrivateLink and AWS Fargate
Authors: Irshad A. Buchh, Sr. Partner Management Solutions Architect at AWS & Andy Warzon, CTO at Trek10
This post is contributed by Amazon Web Services and Trek10. As an AWS Partner Network (APN) Premier Technology Partner with AWS Competencies in DevOps, IoT, and SaaS Consulting, Trek10 provides consulting and managed services for AWS clients of all sizes, continuously engaging in work with all types of industries and companies ranging from startups to Fortune 100 enterprises.
Introduction
Prior to the availability of AWS PrivateLink, services residing in a single Amazon VPC were connected to multiple Amazon VPCs either (1) through public IP addresses using each VPC’s internet gateway or (2) by private IP addresses using VPC peering.
With AWS PrivateLink, service connectivity over Transmission Control Protocol (TCP) can be established from the service provider’s VPC (producer) to the service consumer’s VPC (consumer) in a secure and scalable manner. Tom Adamski has provided an architecture where he shows one way of using AWS PrivateLink along with ALB and NLBs to publish internet applications at scale. Mani Chandrasekaran provided a solution where he uses API Gateway to expose applications running on AWS Fargate using REST APIs, but it uses NLB since ALB is not yet supported by this architecture.
Our solution leverages the existing applications/APIs running in AWS Fargate behind a Private ALB inside a VPC and proposes an architecture to expose these APIs securely through HTTP APIs using Amazon API Gateway and AWS PrivateLink.
The target audience for this post is developers and architects who want to architect API based services using the existing applications running inside Amazon VPCs.
Overview of concepts
- AWS PrivateLink: AWS PrivateLink provides secure, private connectivity between Amazon VPCs, AWS services, and on-premises applications on the Amazon network. As a result, customers can simply and securely access services on AWS using Amazon’s private network, powering connectivity to AWS services through interface Amazon VPC endpoints. AWS PrivateLink provides three main benefits: uses private IP addresses for traffic, simplifies network management, and facilitates your cloud migration
- HTTP API: HTTP API is a new flavor of API Gateway and it focuses on delivering enhanced features, improved performance, and an easier developer experience for customers building with API Gateway. To create an HTTP API, you must have at least one route, integration, stage, and a deployment.
- AWS Fargate: AWS Fargate makes it easy for you to focus on building your applications. Fargate removes the need to provision and manage servers, lets you specify and pay for resources per application, and improves security through application isolation by design. Fargate works with both Amazon Elastic Container Service (ECS) and Amazon Elastic Kubernetes Service (EKS).
Prerequisites
In order to implement the instructions laid out in this post, you will need the following:
- An AWS account
Architecture

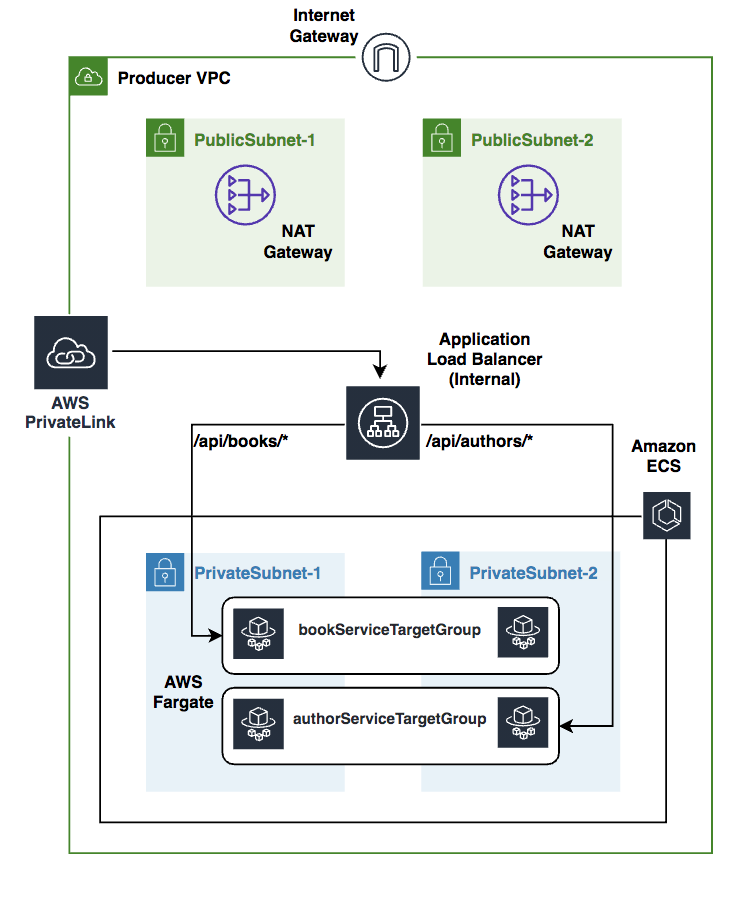
We shall be using AWS Cloud Development Kit (CDK) in TypeScript in this blog post. We shall create one AWS CDK application consisting of two AWS CDK stacks FargateVpclinkStack and HttpApiStack. Inside the FargateVpclinkStack, we deploy two Node.js microservices (book-service and author-service) using AWS Fargate within the Producer VPC. An internal load balancer distributes external incoming application traffic across these two microservices. In order to implement the private integration, we create a Vpclink to encapsulate connections between API Gateway and these microservices. Inside the HttpApiStack, we create an HTTP API that integrates with the Amazon Fargate microservices running inside the FargateVpclinkStack using the Vpclink and internal load balancer listener.
Here are the steps we’ll be following to implement the above architecture:
- Create and configure AWS Cloud9 environment
- Build two sample microservices
- Examine the CDK code
- Provision AWS resources using the CDK
- Test the HTTP API
- Cleanup
- Conclusion
Create and configure AWS Cloud9 environment
You can use a local development machine to set up an environment or use AWS Cloud9. However in this blog post we shall use AWS Cloud9, follow the instructions here to create an AWS Cloud9 environment.
Build two sample microservices
1. Clone the GitHub repository
Open a new terminal inside AWS Cloud9 IDE and run:
git clone https://github.com/aws-samples/http-api-aws-fargate-cdk.git
a) Build and test book-service locally
Replace XXXXXXXXXXX with your AWS account id and using terminal inside AWS Cloud9 IDE run:
cd ~/environment/http-api-aws-fargate-cdk/src/book-service
npm install --save
docker build -t book-service .
docker tag book-service:latest \
       XXXXXXXXXXX.dkr.ecr.us-west2.amazonaws.com/book-service:latest
docker run -p8080:80 book-service
Click “Preview/Preview Running Application” and append api/books/health to the end of the url so that url looks like “https://XXXXXXXXXXXXXXXXXXX.vfs.cloud9.us-west-2.amazonaws.com/api/books/health.” Observe the response from the running book-service service.

Open a new terminal inside AWS Cloud9 IDE and run the following curl command:
curl -s http://localhost:8080/api/books | jqObserve the response from the running book-service service.

In order to avoid the port conflict later on, kill the book-service container by running:
docker psGet the ‘CONTAINER ID’ from the previous command and then run:
docker kill <CONTAINER ID>b) Build and test author-service locally
Replace XXXXXXXXXXX with your AWS account id and using terminal inside AWS Cloud9 IDE run:
cd ~/environment/http-api-aws-fargate-cdk/src/author-service
npm install --save
docker build -t author-service  .
docker tag author-service:latest \
     XXXXXXXXXXX.dkr.ecr.us-west-2.amazonaws.com/author-service:latest
docker run -p8080:80 author-service
Click “Preview/Preview Running Application” and append api/authors/health to the end of the url so that url looks like “https://XXXXXXXXXXXXXXXXXXX.vfs.cloud9.us-west-2.amazonaws.com/api/authors/health.” Observe the response from the running author-service service.

Open a new terminal inside AWS Cloud9 IDE and run the following curl command:
curl -s http://localhost:8080/api/authors | jq
Observe the response from the running author-service service.

2. Create Amazon ECR repositories
Amazon Elastic Container Registry (ECR) is a fully managed container registry that makes it easy to store, manage, share, and deploy container images containing the business logic of the microservices. Amazon ECR repositories host your container images in a highly available and scalable architecture, allowing you to deploy containers reliably for your applications. Each AWS account is provided with a single (default) Amazon ECR registry.
Replace XXXXXXXXXXX with your AWS account id and using terminal inside AWS Cloud9 IDE run:
aws ecr get-login-password --region us-west-2 | docker login  --username AWS   --password-stdin XXXXXXXXXXX.dkr.ecr.us-west-2.amazonaws.com

aws ecr create-repository \
            --repository-name book-service1 \
            --image-scanning-configuration scanOnPush=false \
            --region us-west-2

aws ecr create-repository \
            --repository-name author-service \
            --image-scanning-configuration scanOnPush=false \
            --region us-west-2
3. Push images to Amazon ECR
Replace XXXXXXXXXXX with your AWS account id and using terminal inside AWS Cloud9 IDE run:
docker push XXXXXXXXXXX.dkr.ecr.us-west-2.amazonaws.com/book-service:latest

docker push XXXXXXXXXXX.dkr.ecr.us-west-2.amazonaws.com/author-service:latest
Examine the CDK code
We shall implement this architecture using an AWS CDK application comprising of two individual CDK stacks:
- FargateVpclinkStack — contains the Fargate services and Vpclink.
- HttpApiStack — contains the HTTP API integrated with Fargate services using Vpclink.
Let us discuss these stacks one by one.
FargateVpclinkStack
Under the cdk/singleAccount/lib folder, open the fargate-vpclink-stack.ts file and let us explore the CDK variables and the various CDK constructs.
Export Vpclink and ALB Listener:
public readonly httpVpcLink: cdk.CfnResource;
public readonly httpApiListener: elbv2.ApplicationListener;
These two variables enable us to export the provisioned Vpclink along with the ALB Listener from FargateVpclinkStack stack so as to use these to create the HTTP API in the HttpApiStack stack.
VPC:
This single line of code creates a ProducerVPC with two Public and two Private Subnets.
const vpc = new ec2.Vpc(this, "ProducerVPC");ECS cluster:
This creates an Amazon ECS cluster inside the ProducerVPC, we shall be running the two microservices inside this ECS cluster using AWS Fargate.
const cluster = new ecs.Cluster(this, "Fargate Cluster" , {
        vpc : vpc,
});
Cloud Map namespace:
AWS Cloud Map allows us to register any application resources, such as microservices, and other cloud resources, with custom names. Using AWS Cloud Map, we can define custom names for our application microservices, and it maintains the updated location of these dynamically changing microservices.
const dnsNamespace = new servicediscovery.PrivateDnsNamespace(this,"DnsNamespace",{
            name: "http-api.local",
            vpc: vpc,
            description: "Private DnsNamespace for Microservices",
});
ECS task role:
We need to specify an IAM role that can be used by the containers in a task.
const taskrole = new iam.Role(this, 'ecsTaskExecutionRole', {
            assumedBy: new iam.ServicePrincipal('ecs-tasks.amazonaws.com')
});
taskrole.addManagedPolicy(iam.ManagedPolicy.fromAwsManagedPolicyName('service-role/AmazonECSTaskExecutionRolePolicy'));
Task definitions:
A task definition is required to run Docker containers in Amazon ECS, we shall create the task definitions (bookServiceTaskDefinition and authorServiceTaskDefinition) for the two microservices.
const bookServiceTaskDefinition = new ecs.FargateTaskDefinition(this,
'bookServiceTaskDef', {
            memoryLimitMiB: 512,
            cpu: 256,
            taskRole: taskrole
});
            const authorServiceTaskDefinition = new ecs.FargateTaskDefinition(this,
'authorServiceTaskDef', {
            memoryLimitMiB: 512,
            cpu: 256,
            taskRole: taskrole
});
Log groups:
Let us create two log groups bookServiceLogGroup and authorServiceLogGroup and the two associated log drivers.
const bookServiceLogGroup = new logs.LogGroup(this, "bookServiceLogGroup", {
            logGroupName: "/ecs/BookService",
            removalPolicy: cdk.RemovalPolicy.DESTROY
});

const authorServiceLogGroup = new logs.LogGroup(this, "authorServiceLogGroup", {
            logGroupName: "/ecs/AuthorService",
            removalPolicy: cdk.RemovalPolicy.DESTROY
});

const bookServiceLogDriver = new ecs.AwsLogDriver({
            logGroup: bookServiceLogGroup,
            streamPrefix: "BookService"
});

const authorServiceLogDriver = new ecs.AwsLogDriver({
            logGroup: authorServiceLogGroup,
            streamPrefix: "AuthorService"
});
ECR repositories:
Let us import the two repositories book-service and author-service that we created earlier using AWS CLI.
const bookservicerepo = ecr.Repository.fromRepositoryName(this,
            "bookservice",
            "book-service",
);

const authorservicerepo = ecr.Repository.fromRepositoryName(this,
            "authorservice",
            "author-service",
);
Task containers:
We shall define a single container in each task definition.
const bookServiceContainer = bookServiceTaskDefinition.addContainer("bookServiceContainer", {
            image: ecs.ContainerImage.fromEcrRepository(bookservicerepo),
            logging: bookServiceLogDriver
});

const authorServiceContainer = authorServiceTaskDefinition.addContainer("authorServiceContainer", {
            image: ecs.ContainerImage.fromEcrRepository(authorservicerepo),
            logging: authorServiceLogDriver
});

bookServiceContainer.addPortMappings({
            containerPort: 80
});

authorServiceContainer.addPortMappings({
            containerPort: 80
});
Security groups:
In order to control the inbound and outbound traffic to Fargate tasks, we shall create two security groups that act as a virtual firewall.
const bookServiceSecGrp = new ec2.SecurityGroup(this, "bookServiceSecurityGroup", {
            allowAllOutbound: true,
            securityGroupName: 'bookServiceSecurityGroup',
            vpc: vpc
});

bookServiceSecGrp.connections.allowFromAnyIpv4(ec2.Port.tcp(80));

const authorServiceSecGrp = new ec2.SecurityGroup(this, "authorServiceSecurityGroup", {
            allowAllOutbound: true,
            securityGroupName: 'authorServiceSecurityGroup',
            vpc: vpc
});

authorServiceSecGrp.connections.allowFromAnyIpv4(ec2.Port.tcp(80));
Fargate services:
Let us create two ECS/Fargate services (bookService & authorService) based on the task definitions created above. An Amazon ECS service enables you to run and maintain a specified number of instances of a task definition simultaneously in an Amazon ECS cluster. If any of your tasks should fail or stop for any reason, the Amazon ECS service scheduler launches another instance of your task definition to replace it in order to maintain the desired number of tasks in the service.
const bookService = new ecs.FargateService(this, 'bookService', {
cluster: cluster,
            taskDefinition: bookServiceTaskDefinition,
            assignPublicIp: false,
            desiredCount: 2,
            securityGroup: bookServiceSecGrp,
            cloudMapOptions: {
            name: 'bookService'
            },
});

const authorService = new ecs.FargateService(this, 'authorService', {
            cluster: cluster,
            taskDefinition: authorServiceTaskDefinition,
            assignPublicIp: false,
            desiredCount: 2,
            securityGroup: authorServiceSecGrp,
            cloudMapOptions: {
            name: 'authorService'
            },
});
ALB:
The load balancer distributes incoming application traffic across multiple ECS services, in multiple Availability Zones. This increases the availability of your application. Let’s add an Application Load Balancer.
const httpapiInternalALB = new elbv2.ApplicationLoadBalancer(this, 'httpapiInternalALB', {
            vpc: vpc,
            internetFacing: false,
});
ALB listener:
An ALB listener checks for connection requests from clients, using the protocol and port that we configure.
const httpapiListener = httpapiInternalALB.addListener('httpapiListener', {
            port: 80,
            // Default Target Group
            defaultAction: elbv2.ListenerAction.fixedResponse(200)
});
Target groups:
We shall create two target groups, bookServiceTargetGroup for bookService microservice and authorServiceTargetGroup for authorService microservice.
const bookServiceTargetGroup = httpapiListener.addTargets('bookServiceTargetGroup', {
            port: 80,
            priority: 1,
            healthCheck:{
            path: '/api/books/health',
            interval: cdk.Duration.seconds(30),
            timeout: cdk.Duration.seconds(3)
            },
            targets: [bookService],
            pathPattern: '/api/books*'
});

const authorServiceTargetGroup = httpapiListener.addTargets('authorServiceTargetGroup', {
            port: 80,
            priority: 2,
            healthCheck:{
            path: '/api/authors/health',
            interval : cdk.Duration.seconds(30),
            timeout: cdk.Duration.seconds(3)
            },
            targets: [authorService],
            pathPattern: '/api/authors*'
});
Vpclink:
It is easy to expose our HTTP/HTTPS resources behind an Amazon VPC for access by clients outside of the Producer VPC using the API Gateway private integration. To extend access to our private VPC resources beyond the VPC boundaries, we can create an HTTP API with a private integration for open access or controlled access. The private integration uses an API Gateway resource of VpcLink to encapsulate connections between API Gateway and targeted VPC resources. As an owner of a VPC resource, we are responsible for creating an Application Load Balancer in our Producer VPC and adding a VPC resource as a target of an Application Load Balancer’s listener. As an HTTP API developer, to set up an HTTP API with the private integration, we are responsible for creating a VpcLink targeting the specified Application Load Balancer and then treating the VpcLink as an effective integration endpoint. Let’s create a Vpclink based on the private subnets of the ProducerVPC.
this.httpVpcLink = new cdk.CfnResource(this, "HttpVpcLink", {
            type: "AWS::ApiGatewayV2::VpcLink",
            properties: {
            Name: "http-api-vpclink",
            SubnetIds: vpc.privateSubnets.map((m) => m.subnetId),
            },
});
HttpApiStack
Now let us create an HTTP API based on the Fargate services created in FargateVpclinkStack.

Under the ~/environment/http-api-aws-fargate-cdk/cdk/singleAccount/lib folder, open the httpApi-stack.ts file and let us explore the following different CDK constructs.
Consumer VPC:
This single line of code creates a ConsumerVPC with two public subnets.
const vpc = new ec2.Vpc(this, "ConsumerVPC", {
            natGateways: 0,
            subnetConfiguration: [
                {
                    cidrMask: 24,
                    name: "ingress",
                    subnetType: ec2.SubnetType.PUBLIC,
                },
            ],
});
EC2 instance:
const instance = new ec2.Instance(this, "BastionHost", {
            instanceType: new ec2.InstanceType("t3.nano"),
            machineImage: amz_linux,
            vpc: vpc,
            securityGroup: bastionSecGrp,
            keyName: "ssh-key",
});
HTTP API:
Let’s create an HTTP API based on a default stage.
const api = new apig.HttpApi(this, "http-api", {
            createDefaultStage: true,
});
API integration:
The following construct will integrate the HTTP API with the backend microservices using the Vpclink and the Application Loadbalancer Listener.
const integration = new apig.CfnIntegration(
            this, "HttpApiGatewayIntegration", {
            apiId: api.httpApiId,
            connectionId: httpVpcLink.ref,
            connectionType: "VPC_LINK",
            description: "API Integration",
            integrationMethod: "ANY",
            integrationType: "HTTP_PROXY",
            integrationUri: httpApiListener.listenerArn,
            payloadFormatVersion: "1.0",
});
API route:
Now let’s create the HTTP API proxy routes using the API integration.
new apig.CfnRoute(this, "Route", {
  	apiId: api.httpApiId,
  	routeKey: "ANY /{proxy+}",
  	target: `integrations/${integration.ref}`,
});
Provision AWS resources using the CDK
Install AWS CDK
The AWS Cloud Development Kit (AWS CDK) is an open-source software development framework to model and provision your cloud application resources using familiar programming languages. If you would like to familiarize yourself the CDKWorkshop is a great place to start.
Using Cloud9 terminal use the following commands:
cd ~/environment/http-api-aws-fargate-cdk/cdk
npm install -g aws-cdk@latest
cdk --version
Take a note of the latest version that you install, at the time of writing this post it is 1.79.0. Open the package.json file in ~/environment/http-api-aws-fargate-cdk/cdk/singleaccount and replace the version “1.79.0” of the following modules with the latest version that you have installed above.
    "@aws-cdk/assert": "1.79.0",
    "@aws-cdk/aws-apigatewayv2": "1.79.0",
    "@aws-cdk/core": "1.79.0",
    "@aws-cdk/aws-ec2": "1.79.0",
    "@aws-cdk/aws-ecr": "1.79.0",
    "@aws-cdk/aws-ecs": "1.79.0",
    "@aws-cdk/aws-elasticloadbalancingv2": "1.79.0",
    "@aws-cdk/aws-iam": "1.79.0",
    "@aws-cdk/aws-logs": "1.79.0",
Using Cloud9 terminal use the following commands:
cd ~/environment/http-api-aws-fargate-cdk/cdk/singleaccount
npm install
This will install all the latest CDK modules under the node_modules directory.
Let us now create an ssh key pair using AWS CLI:
cd ~/environment/http-api-aws-fargate-cdk/
aws ec2 create-key-pair --region us-west-2  --key-name "ssh-key"  |  jq -r ".KeyMaterial" > ssh-key.pem
chmod 400 ssh-key.pem
Let us now provision the CDK application. Using Cloud9 terminal use the following commands:
cd ~/environment/http-api-aws-fargate-cdk/cdk/singleAccount
npm run build
cdk bootstrap
cdk synth FargateVpclinkStack
cdk deploy --all

At the prompt, enter y and CDK CLI shall deploy the FargateVpclinkStack and will create 54 resources.

At the second prompt, enter y and CDK CLI shall deploy the HttpApiStack and will create 21 resources.
Test the HTTP API
Take a note of the EC2 IP address along with the HTTP API endpoints of the Book Service and Author Service. Using the Cloud9 terminal run the following commands:
cd ~/environment/http-api-aws-fargate-cdk/
export EC2_IP_ADDRESS=x.x.x.x
ssh -i ssh-key.pem ec2-user@$EC2_IP_ADDRESS
sudo yum install jq -y
export BOOK_API_URL=https://xxxxx.execute-api.us-west-2.amazonaws.com/api/books
export AUTHOR_API_URL=https://xxxxx.execute-api.us-west-2.amazonaws.com/api/authors
curl -s $BOOK_API_URL | jq
curl -s $AUTHOR_API_URL | jq
Here is the integration of the HTTP API with the backend Lambda functions inside the AWS Management Console.

Cleanup
To clean up the resources created by the CDK, run the following commands in a terminal of your Cloud9 instance:
cd ~/environment/http-api-aws-fargate-cdk/cdk/singleAccount/
cdk destroy --all
At the prompt, enter y.
To delete the ssh key pair, run the following command:
aws ec2 delete-key-pair --region us-west-2 --key-name "ssh-key"Log into the AWS Management Console and delete book-service and author-service repositories. Also delete the Cloud9 environment.
Conclusion
This post demonstrated how to architect HTTP API-based services using Amazon API Gateway based on existing microservices running behind a private Application Load Balancer inside private VPCs using AWS PrivateLink. The benefit of this serverless architecture is that it takes away the overhead of having to manage underlying servers and helps reduce costs, as you only pay for the time in which your code executes.

Andy Warzon
Andy has been building on AWS for over a decade and is an AWS Certified Solutions Architect – Professional. As Co-Founder and CTO of Trek10, Andy is responsible for technical leadership and strategy, professional development, and technical innovation. Andy has 20 years of experience in startups and enterprises across software development, IT systems, and data analytics.