Containers
Connecting services across multiple accounts using AWS App Mesh and Amazon ECS
NOTICE: October 04, 2024 – This post no longer reflects the best guidance for configuring a service mesh with Amazon ECS and its examples no longer work as shown. Please refer to newer content on Amazon ECS Service Connect.
——–
Today, many customers are adopting microservices. This approach breaks down software from a a single monolithic component into many independent pieces of software that address a specific business function and communicate over well-defined API’s. This enables independent teams to work on multiple components simultaneously and helps customers shorten the software development lifecycle, enable rapid innovation, and accelerate their time-to-market for new features.
When choosing to adopt microservices, deploying these into multiple AWS accounts to reduce the blast radius of failures and give teams more independence when developing their service are key benefits. To leverage this deployment model, general network connectivity between accounts must be established to allow services to talk to each other. While there are already multiple options available today to our customers to achieve this, going down this route also brings on a new set of challenges like traffic control, tracing and service discovery. This is where AWS App Mesh comes in.
AWS App Mesh is a service mesh that provides application-level networking to make it easy for your services to communicate with each other across multiple types of compute infrastructure, even through cross-account boundaries. It enables seamless application-level networking between services while increasing the resiliency and security of these inter-communicating services by using features like TLS, connection retries, timeout handling and gaining end-to-end visibility through AWS X-Ray. This allows you to standardize how your services communicate, giving you end-to-end visibility over a large set of services without having to add additional complexity to your application code.
In this blog post, you will learn how to utilize AWS App Mesh to connect multiple application components residing in different Amazon ECS clusters across multiple accounts.
Overview
For the purpose of this tutorial, you will deploy the different service components of a sample application called Yelb in two different AWS accounts and connect them using AWS App Mesh. Yelb allows users to vote on a set of alternatives like restaurants and dynamically updates pie charts based on the votes. Additionally, Yelb keeps track of the number of page views and prints the hostname of the yelb-appserver instance serving the API request upon a vote or a page refresh. Yelb components include:
- A frontend called
yelb-uiis responsible for vending the JS code to the browser. - An application server named
yelb-appserver, a Sinatra application that reads and writes to a cache server (redis-server) and a Postgres backend database (yelb-db). - Redis stores the number of page views and Postgres stores the votes.
The target architecture will look like this:
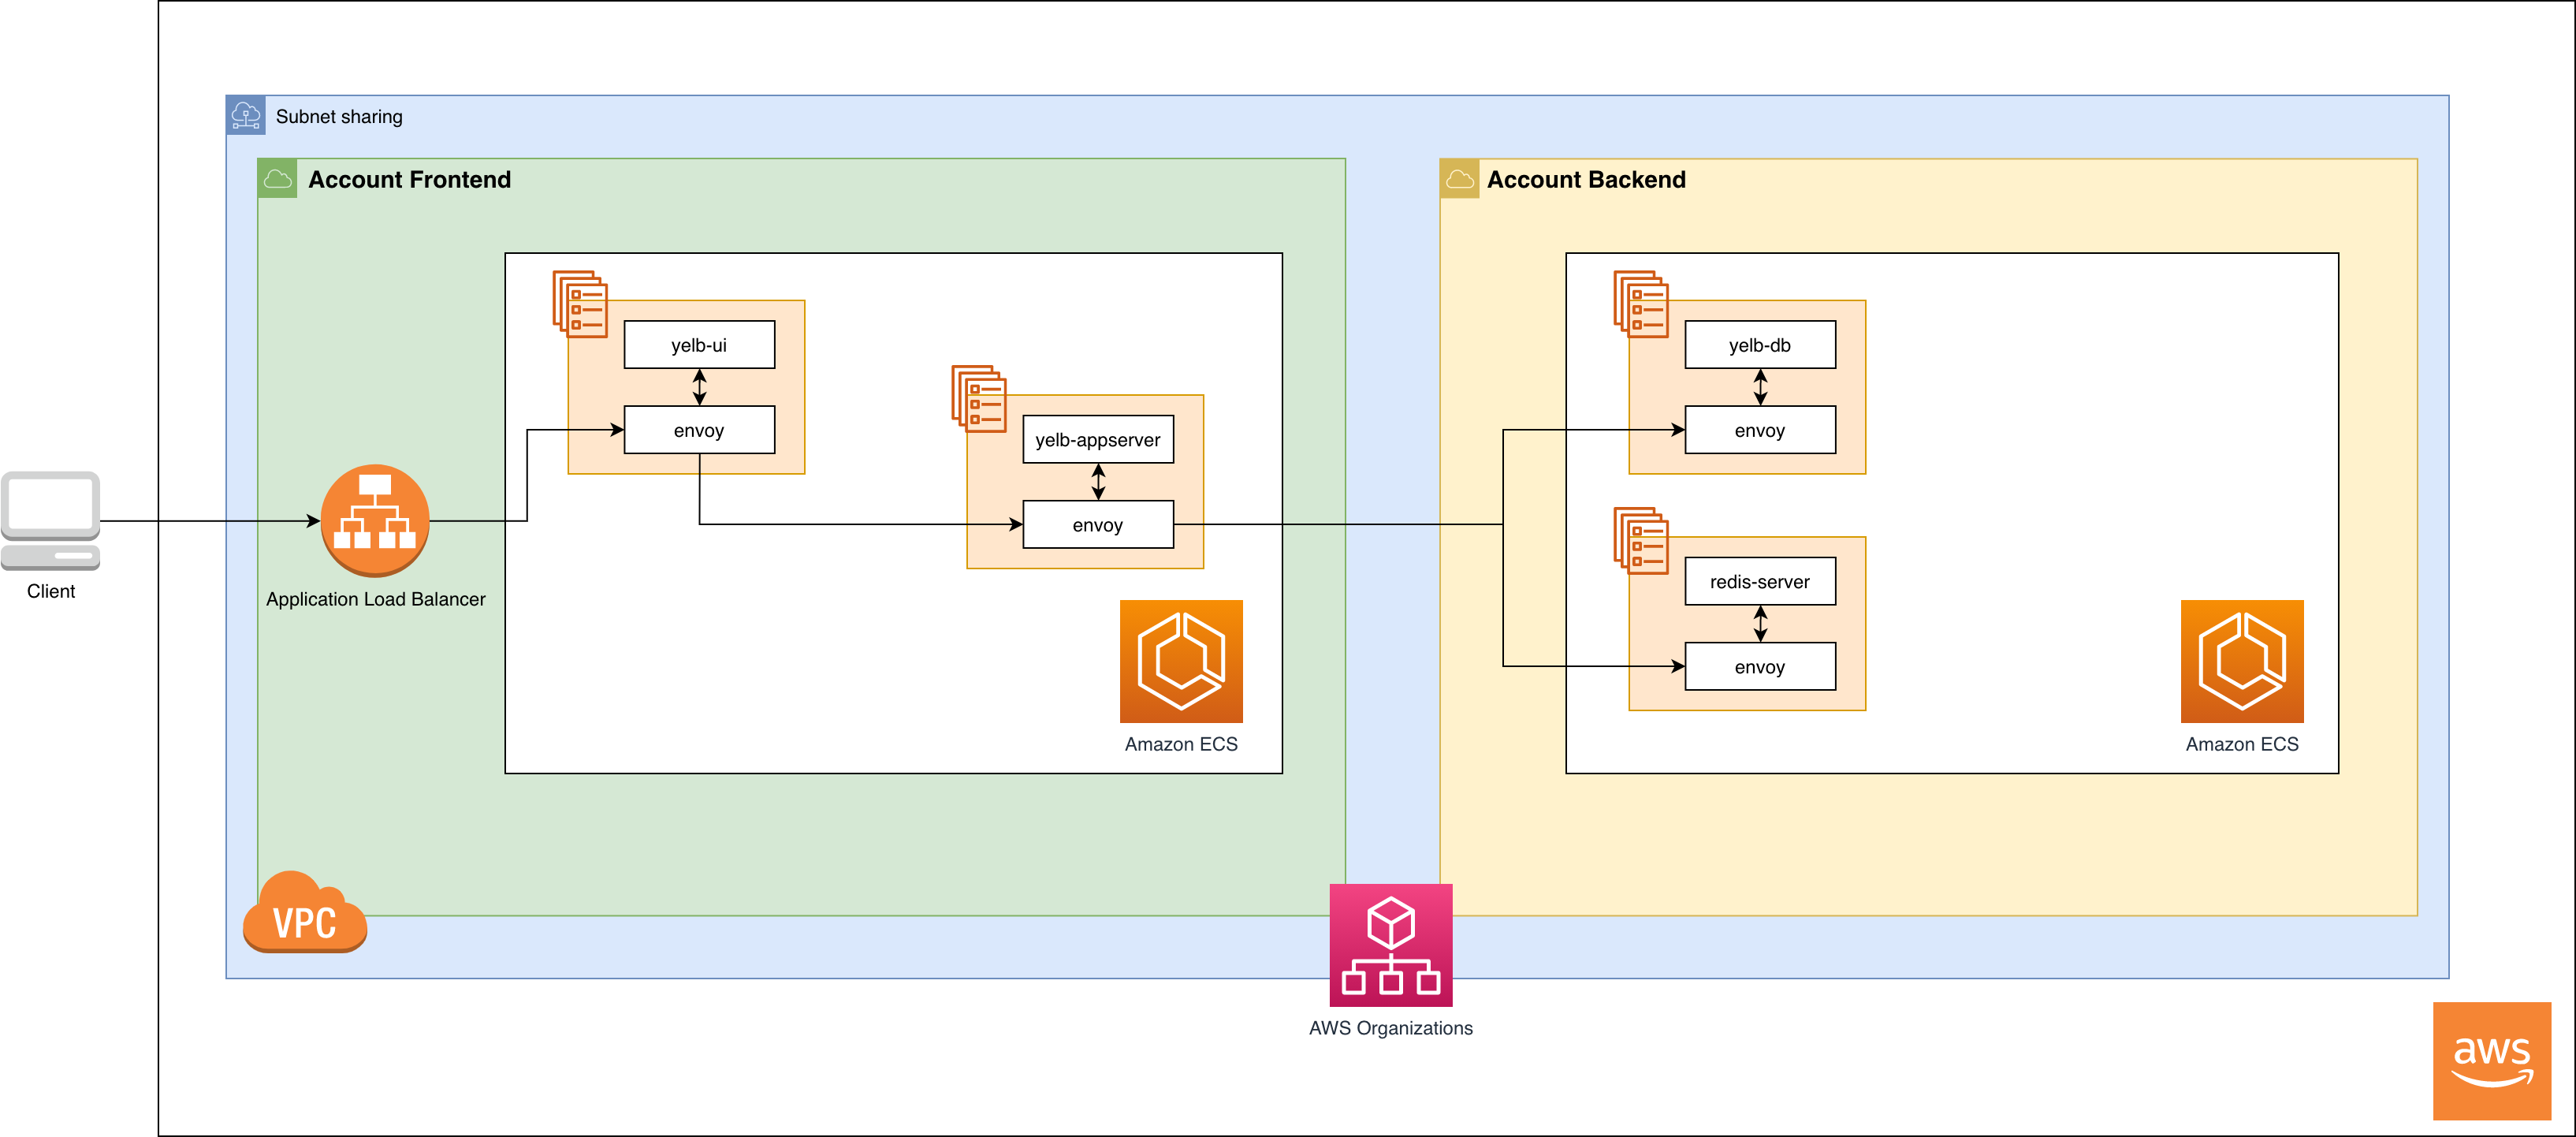
NOTE: Yelb’s configuration uses ephemeral storage for all the containers. Running databases in this way is only done for demonstration purposes.
As you can see in the architecture diagram, there are two separate AWS accounts that are part of the same AWS Organization. Each account has its’ own Amazon ECS cluster and a Mesh is spanned across both accounts.
To provide basic network connectivity between both accounts, we utilize the subnet sharing feature of Amazon Virtual Private Cloud (VPC), which allows multiple accounts to deploy components in the same subnet and VPC without any overhead or additional data transfer charges.
Prerequisites
Set up your environment
To follow along, you will need to have an environment with some tooling. You can use your local environment or use an AWS Cloud9 instance to run this tutorial. If you want to create a Cloud9 instance in your account, first create a workspace by following the steps as described in the chapter Create a Workspace. After the Cloud9 workspace has been created install and configure the necessary tools as outlined in the chapter Install and Configure Tools.
The following tools have to be installed:
As a first step, clone the GitHub repository that contains the CloudFormation templates you will be using along the way to set everything up:
git clone https://github.com/aws/aws-app-mesh-examples.git
cd aws-app-mesh-examples/blogs/ecs-cross-account
Configure credentials for your accounts
As we are utilizing AWS Resource Access Manager to share resources between accounts, you will need a minimum of two separate AWS accounts which are joined in an AWS Organization. For the purpose of this tutorial we will call them Account Backend and Account Frontend.
To access these accounts from our environment, we will create two configuration profiles for Account Backend and Account Frontend. This allows us to easily define the account in which the commands will be executed. To learn more about how to configure multiple profiles, refer to the AWS CLI user guide.
Before proceeding with the tutorial, make sure that you have profiles with credentials for both AWS accounts configured in ~/.aws/credentials and ~/.aws/config files. For example:
cat ~/.aws/credentials

[backend]
aws_access_key_id = ...
aws_secret_access_key = ...
[frontend]
aws_access_key_id = ...
aws_secret_access_key = ...

cat ~/.aws/config

[profile backend]
region = eu-central-1
[profile frontend]
region = eu-central-1
Create a mesh in Account Backend
To start creating the App Mesh resources and add the Yelb app into a mesh, the first thing you need to do is to create a mesh in Account Backend using the following command:
aws --profile backend appmesh create-mesh --mesh-name yelbYou can also use the AWS console to validate that the mesh was created properly:

You will share this mesh with Account Backend using AWS Resource Access Manager at a later stage, so we can access the mesh resources across both accounts.
For the sake of this exercise, we create the mesh in the same account as the backend resources. However, for production environments we recommend using a dedicated account for managing the mesh itself.
Set up the Redis cache and database in Account Backend
As a next step, you will set-up an ECS cluster and deploy the Redis cache and PostgreSQL database in Account Backend.
1. Create the ECS cluster and infrastructure components
To create the ECS cluster run the following command:
aws --profile backend cloudformation deploy \
--no-fail-on-empty-changeset \
--stack-name am-ecs-multi-account-infra \
--template-file "account_backend/infra.yml" \
--capabilities CAPABILITY_IAM
This command will use AWS CloudFormation to create a new VPC and initialize an ECS cluster. It may take a few minutes to complete as your resources are created.
2. Create a virtual node and service
Next, you will create a virtual node and service to make our Redis cache and database server reachable inside the mesh by running the following command:
aws --profile backend cloudformation deploy \
--no-fail-on-empty-changeset \
--stack-name am-ecs-multi-account-appmesh-resources \
--template-file "account_backend/appmesh_resources.yml" \
--capabilities CAPABILITY_IAM
This snippet will create two virtual nodes which act as a logical pointer to our services which will be deployed to ECS in the next step. In this case, we use the DNS service discovery method to lookup the ECS service instances, which have been registered with AWS CloudMap. You may also use CloudMap selectors as a discovery method, which allow to you use metadata selectors to route traffic to a subset of service instances represented by that selector.
Additionally it creates two virtual services that act as abstractions on top of the virtual nodes and is used to address the services inside the mesh. You can also choose to point your virtual service to a virtual router, which may then route to more than one virtual node to provide more control over the network communication and allow A/B configurations.
3. Deploy the Redis cache and database server
In order to deploy the Redis cache and database server from the Yelb sample application, execute the following:
AWS_REGION=$(aws --profile backend configure get region) && \
 ENVOY_IMAGE=840364872350.dkr.ecr.${AWS_REGION}.amazonaws.com/aws-appmesh-envoy:v1.15.1.0-prod && \
aws --profile backend cloudformation deploy \
--no-fail-on-empty-changeset \
--stack-name am-ecs-multi-account-redis-and-database \
--parameter-overrides \
"EnvoyImage=$ENVOY_IMAGE" \
--template-file "account_backend/redis_and_database.yml" \
--capabilities CAPABILITY_IAM
We’re using the environment variable ENVOY_IMAGE to pass the correct image location for the Envoy sidecar to AWS Cloud Formation. Refer to our documentation for the latest image locations.
Share the mesh with Account Frontend
In this step, you will share the AWS App Mesh resources and the subnets of the VPC with the secondary account using AWS Access Resource Manager. This allows you to access these resources in Account Frontend and establish network connectivity between both accounts.
Run the following command to share the AWS App Mesh resources and the VPC subnets you created in the previous steps with Account Frontend:
aws --profile backend cloudformation deploy \
--no-fail-on-empty-changeset \
--stack-name am-ecs-multi-account-resource-share \
--template-file "account_backend/share_resources.yml" \
--parameter-overrides \
"ConsumerAccountId=$(aws --profile frontend sts get-caller-identity | jq -r .Account)" \
--capabilities CAPABILITY_IAM
Set up the frontend and application server in Account Frontend
In this step, you will deploy the frontend and application server in Account Frontend. Additionally, you will add these components to the mesh and create a public facing Application Load Balancer (ALB) for the frontend so it will be reachable from the internet.
1. Create the ECS cluster and infrastructure components
First, you have to create an ECS cluster in the private subnets of the VPC that has been shared by Account Backend. To accomplish this, run the following command:
aws --profile frontend cloudformation deploy \
--no-fail-on-empty-changeset \
--stack-name am-ecs-multi-account-infra \
--template-file "account_frontend/infra.yml" \
--parameter-overrides \
"VPC=$(aws --profile backend cloudformation describe-stacks --stack-name=am-ecs-multi-account-infra --query="Stacks[0].Outputs[?OutputKey=='VPC'].OutputValue" --output=text)" \
--capabilities CAPABILITY_IAM
2. Create a virtual node and service
In the next step, you will create a virtual node and service in the shared mesh for both the application server and frontend by executing the following:
aws --profile frontend cloudformation deploy \
--no-fail-on-empty-changeset \
--stack-name am-ecs-multi-account-appmesh-resources \
--template-file "account_frontend/appmesh_resources.yml" \
--parameter-overrides \
"MeshOwner=$(aws --profile backend sts get-caller-identity | jq -r .Account)" \
--capabilities CAPABILITY_IAM
This snippet again creates two virtual node and virtual service objects, which allows us to address the frontend components through the mesh.
3. Deploy the frontend and application server
The final step will deploy the application server and frontend to the ECS cluster in Account Frontend and add an ALB to serve traffic from the internet:
AWS_REGION=$(aws --profile frontend configure get region) && \
ENVOY_IMAGE=840364872350.dkr.ecr.${AWS_REGION}.amazonaws.com/aws-appmesh-envoy:v1.15.1.0-prod && \
aws --profile frontend cloudformation deploy \
--no-fail-on-empty-changeset \
--stack-name am-ecs-multi-account-frontend-and-appserver \
--template-file "account_frontend/app_and_frontend.yml" \
--parameter-overrides \
"VPC=$(aws --profile backend cloudformation describe-stacks --stack-name=am-ecs-multi-account-infra --query="Stacks[0].Outputs[?OutputKey=='VPC'].OutputValue" --output=text)" \
"PrivateSubnet1=$(aws --profile backend cloudformation describe-stacks --stack-name=am-ecs-multi-account-infra --query="Stacks[0].Outputs[?OutputKey=='PrivateSubnet1'].OutputValue" --output=text)" \
"PrivateSubnet2=$(aws --profile backend cloudformation describe-stacks --stack-name=am-ecs-multi-account-infra --query="Stacks[0].Outputs[?OutputKey=='PrivateSubnet2'].OutputValue" --output=text)" \
"PublicSubnet1=$(aws --profile backend cloudformation describe-stacks --stack-name=am-ecs-multi-account-infra --query="Stacks[0].Outputs[?OutputKey=='PublicSubnet1'].OutputValue" --output=text)" \
"PublicSubnet2=$(aws --profile backend cloudformation describe-stacks --stack-name=am-ecs-multi-account-infra --query="Stacks[0].Outputs[?OutputKey=='PublicSubnet2'].OutputValue" --output=text)" \
"MeshOwner=$(aws --profile backend sts get-caller-identity | jq -r .Account)" \
"EnvoyImage=$ENVOY_IMAGE" \
--capabilities CAPABILITY_IAM
To get the public endpoint for the ALB, run the following:
aws --profile frontend cloudformation describe-stacks \
--stack-name am-ecs-multi-account-frontend-and-appserver \
--query="Stacks[0].Outputs[?OutputKey=='PublicEndpoint'].OutputValue" \
--output=text
You should now be able to see the Yelb application frontend when opening the URL from the previous command in your web browser:
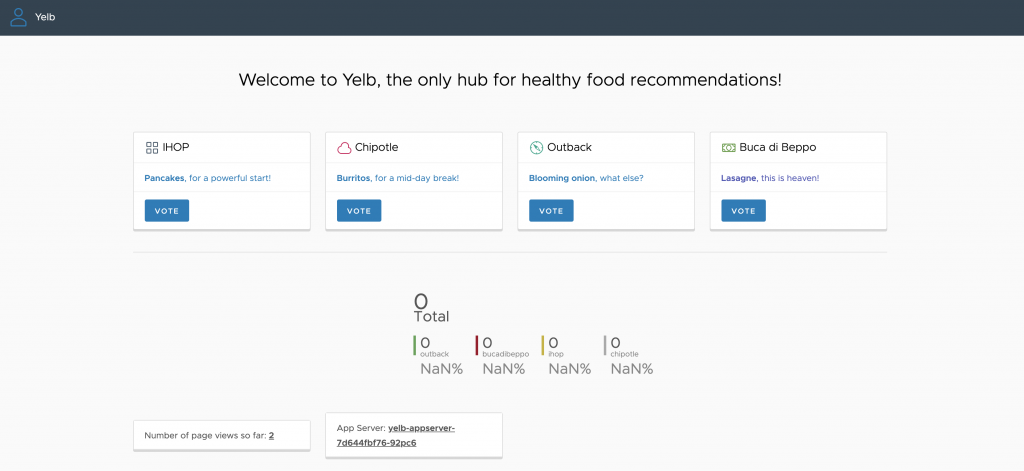
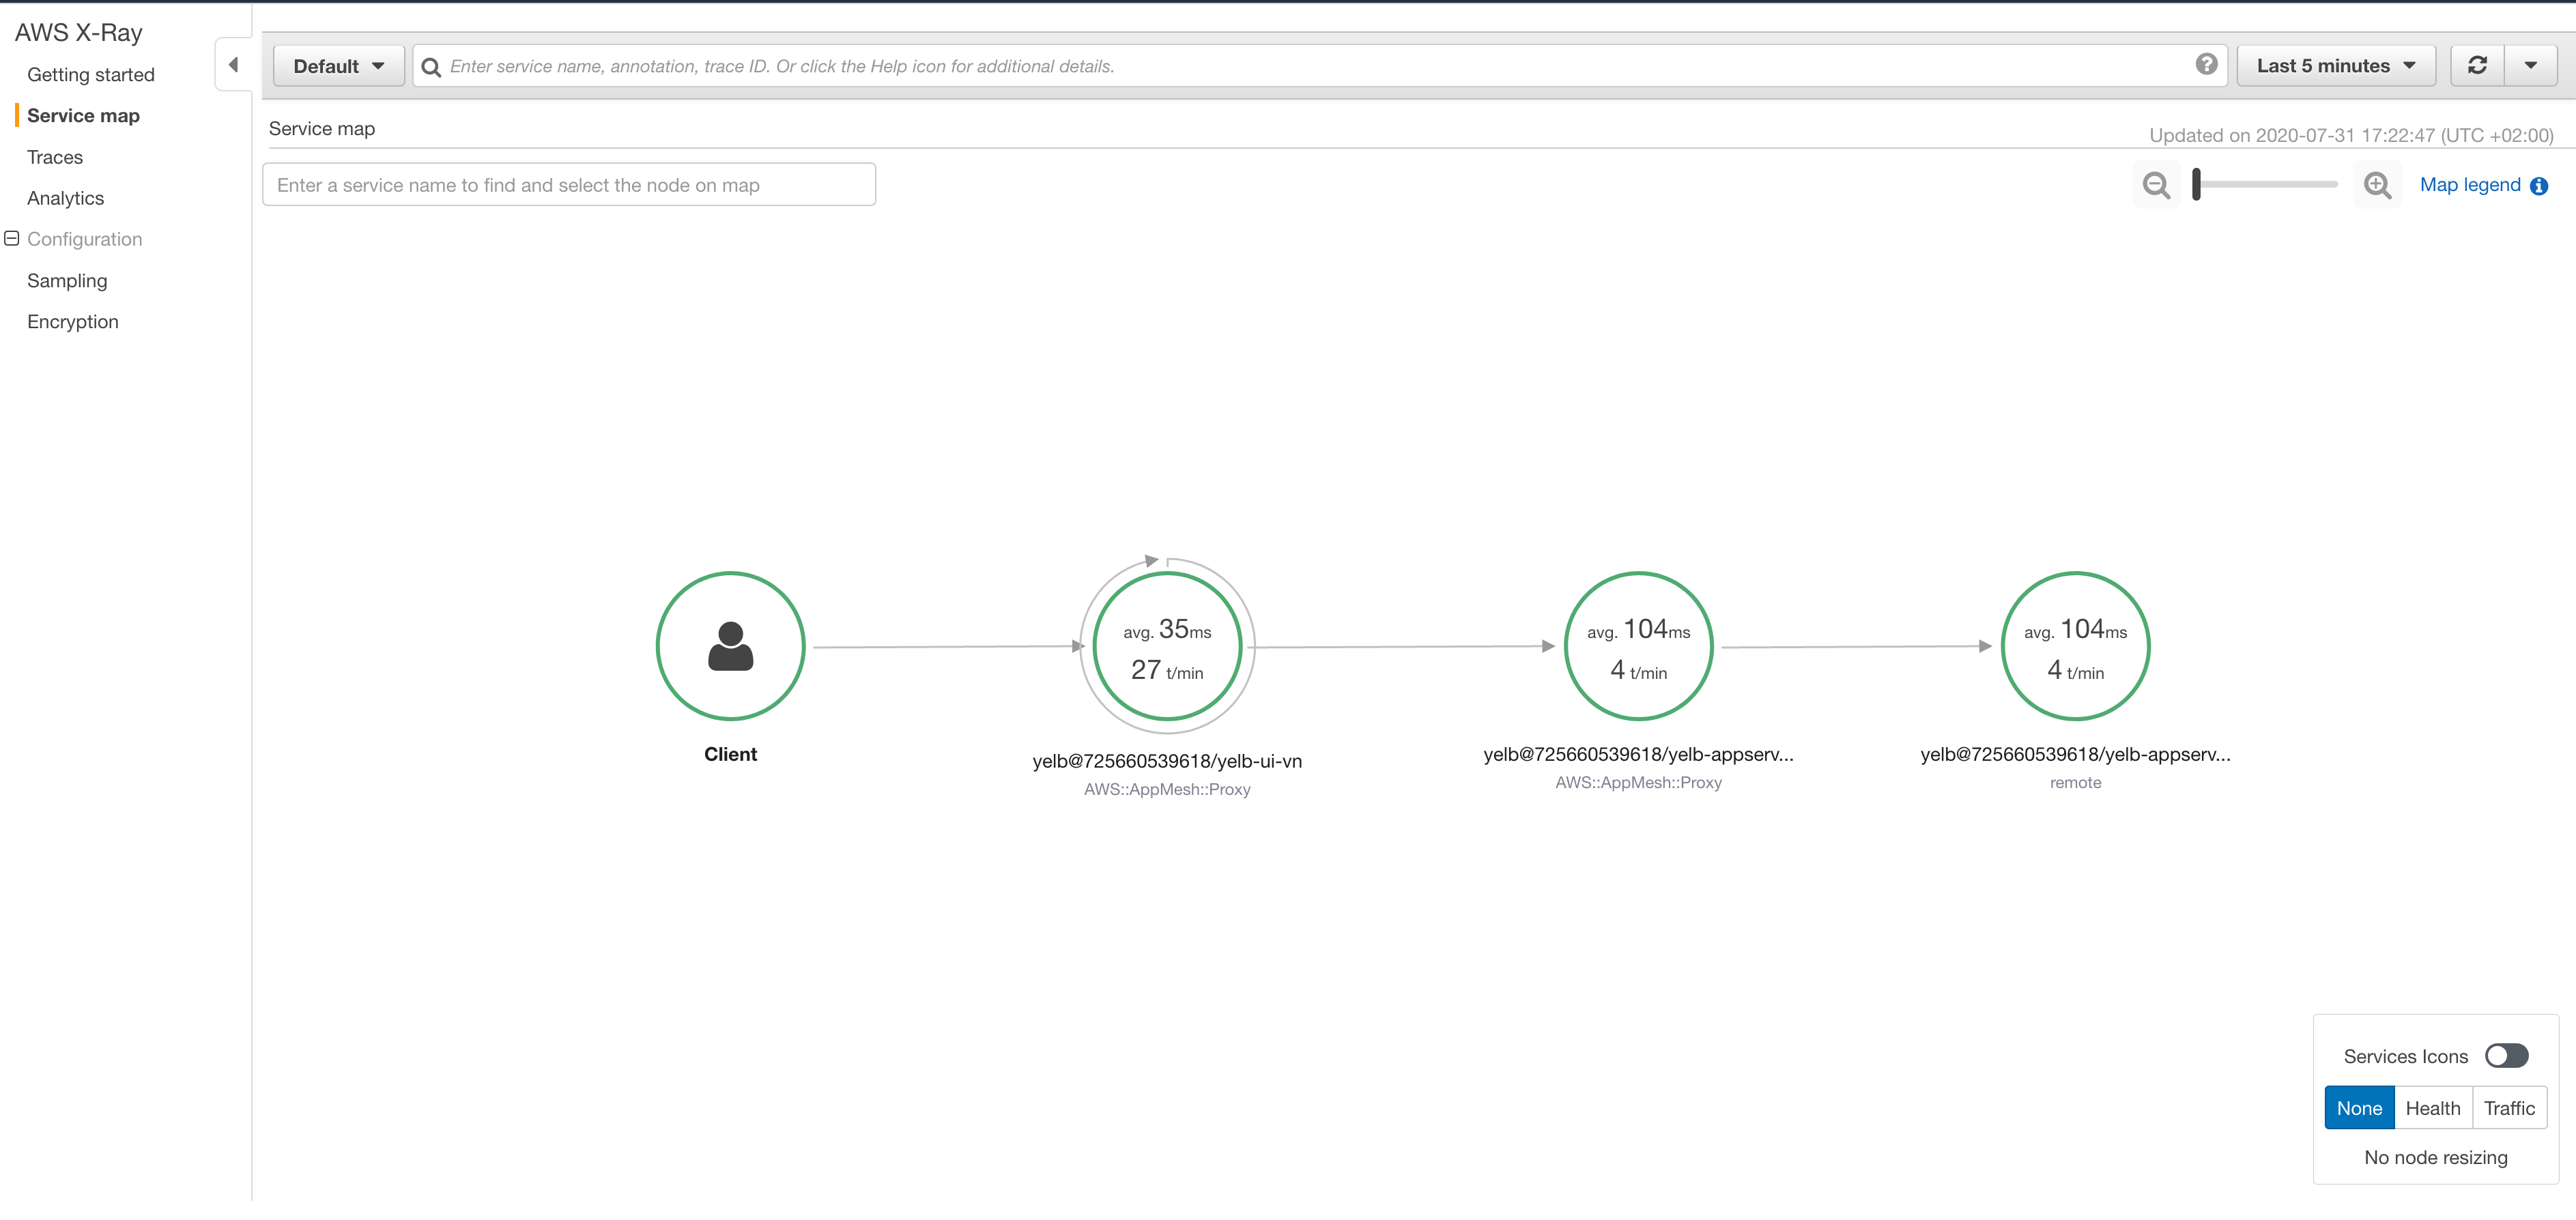
If you play around with the application for a few minutes and vote for your favorite restaurants, you will be able to see a map of the network request flow of the different application components when you open the AWS X-Ray console in Account Frontend:
4. Cleanup
In order to cleanup all the resources created during the execution of this tutorial, run the cleanup script with the following command:
./cleanup.shSummary
In this post, we walked through how to utilize AWS App Mesh and VPC subnet sharing to facilitate a connection between two ECS clusters in different accounts, creating a strong security boundary between application and database components as well as adding the ability to benefit from advanced features like tracing using AWS X-Ray without having to change your application code.
There are a number of ways for establishing network connectivity between multiple AWS accounts such as VPC Peering or AWS Transit Gateway, which weren’t covered here. We encourage you to adjust your networking strategy according to your requirements, as for large organizations with a central networking department other strategies than VPC subnet sharing might be more applicable. You can reference this whitepaper Building a Scalable and Secure Multi-VPC AWS Network Infrastructure for more details.
Regardless of how you establish network connectivity, AWS AppMesh can be used to provide an additional layer that gives you more control over service-to-service communication and provides you with useful insights to manage your services effectively.