Containers
Create a pipeline with canary deployments for Amazon ECS using AWS App Mesh
NOTICE: October 04, 2024 – This post no longer reflects the best guidance for configuring a service mesh with Amazon ECS and its examples no longer work as shown. Please refer to newer content on Amazon ECS Service Connect.
——–
In this post, we demonstrate how customers can implement a canary deployment strategy for applications running on Amazon Elastic Container Service (Amazon ECS) in conjunction with AWS App Mesh. If you are looking to do canary deployments with AWS CodeDeploy using ALB’s weighted target groups, please refer to this post.
By making use of container orchestrators such as Amazon ECS and Amazon EKS, customers across the globe are able to run complex applications at scale. However, when leveraging the power of these tools, customers still need to think about managing the connectivity, operations, and security between microservices in these distributed architectures to run highly decentralized groups of services.
AWS App Mesh is a service mesh that provides application-level networking to make it easy for your services to communicate with each other across multiple types of compute infrastructure. It also provides end-to-end visibility, and helps ensure high availability for your applications. App Mesh gives you consistent visibility and network traffic controls for every service in an application.
1. Canary deployments
With canary deployments/releases, you switch the traffic in user defined percentage increments as per business needs after deploying a new version of a given application. It can also monitor the health of the new version, so if there is an issue, your canary deployment can automatically switch the traffic back to the old version, thereby decreasing the impact of the bug(s) introduced in the new application version on the end customers. This approach not only helps with brand new implementations, but also addresses the need for testing around complex and distributed microservices where you can send a percentage of traffic to newer versions in a controlled manner:
2. Architecture overview
The architecture diagram below represents an overview of the AWS services that will be used to create the pipeline:

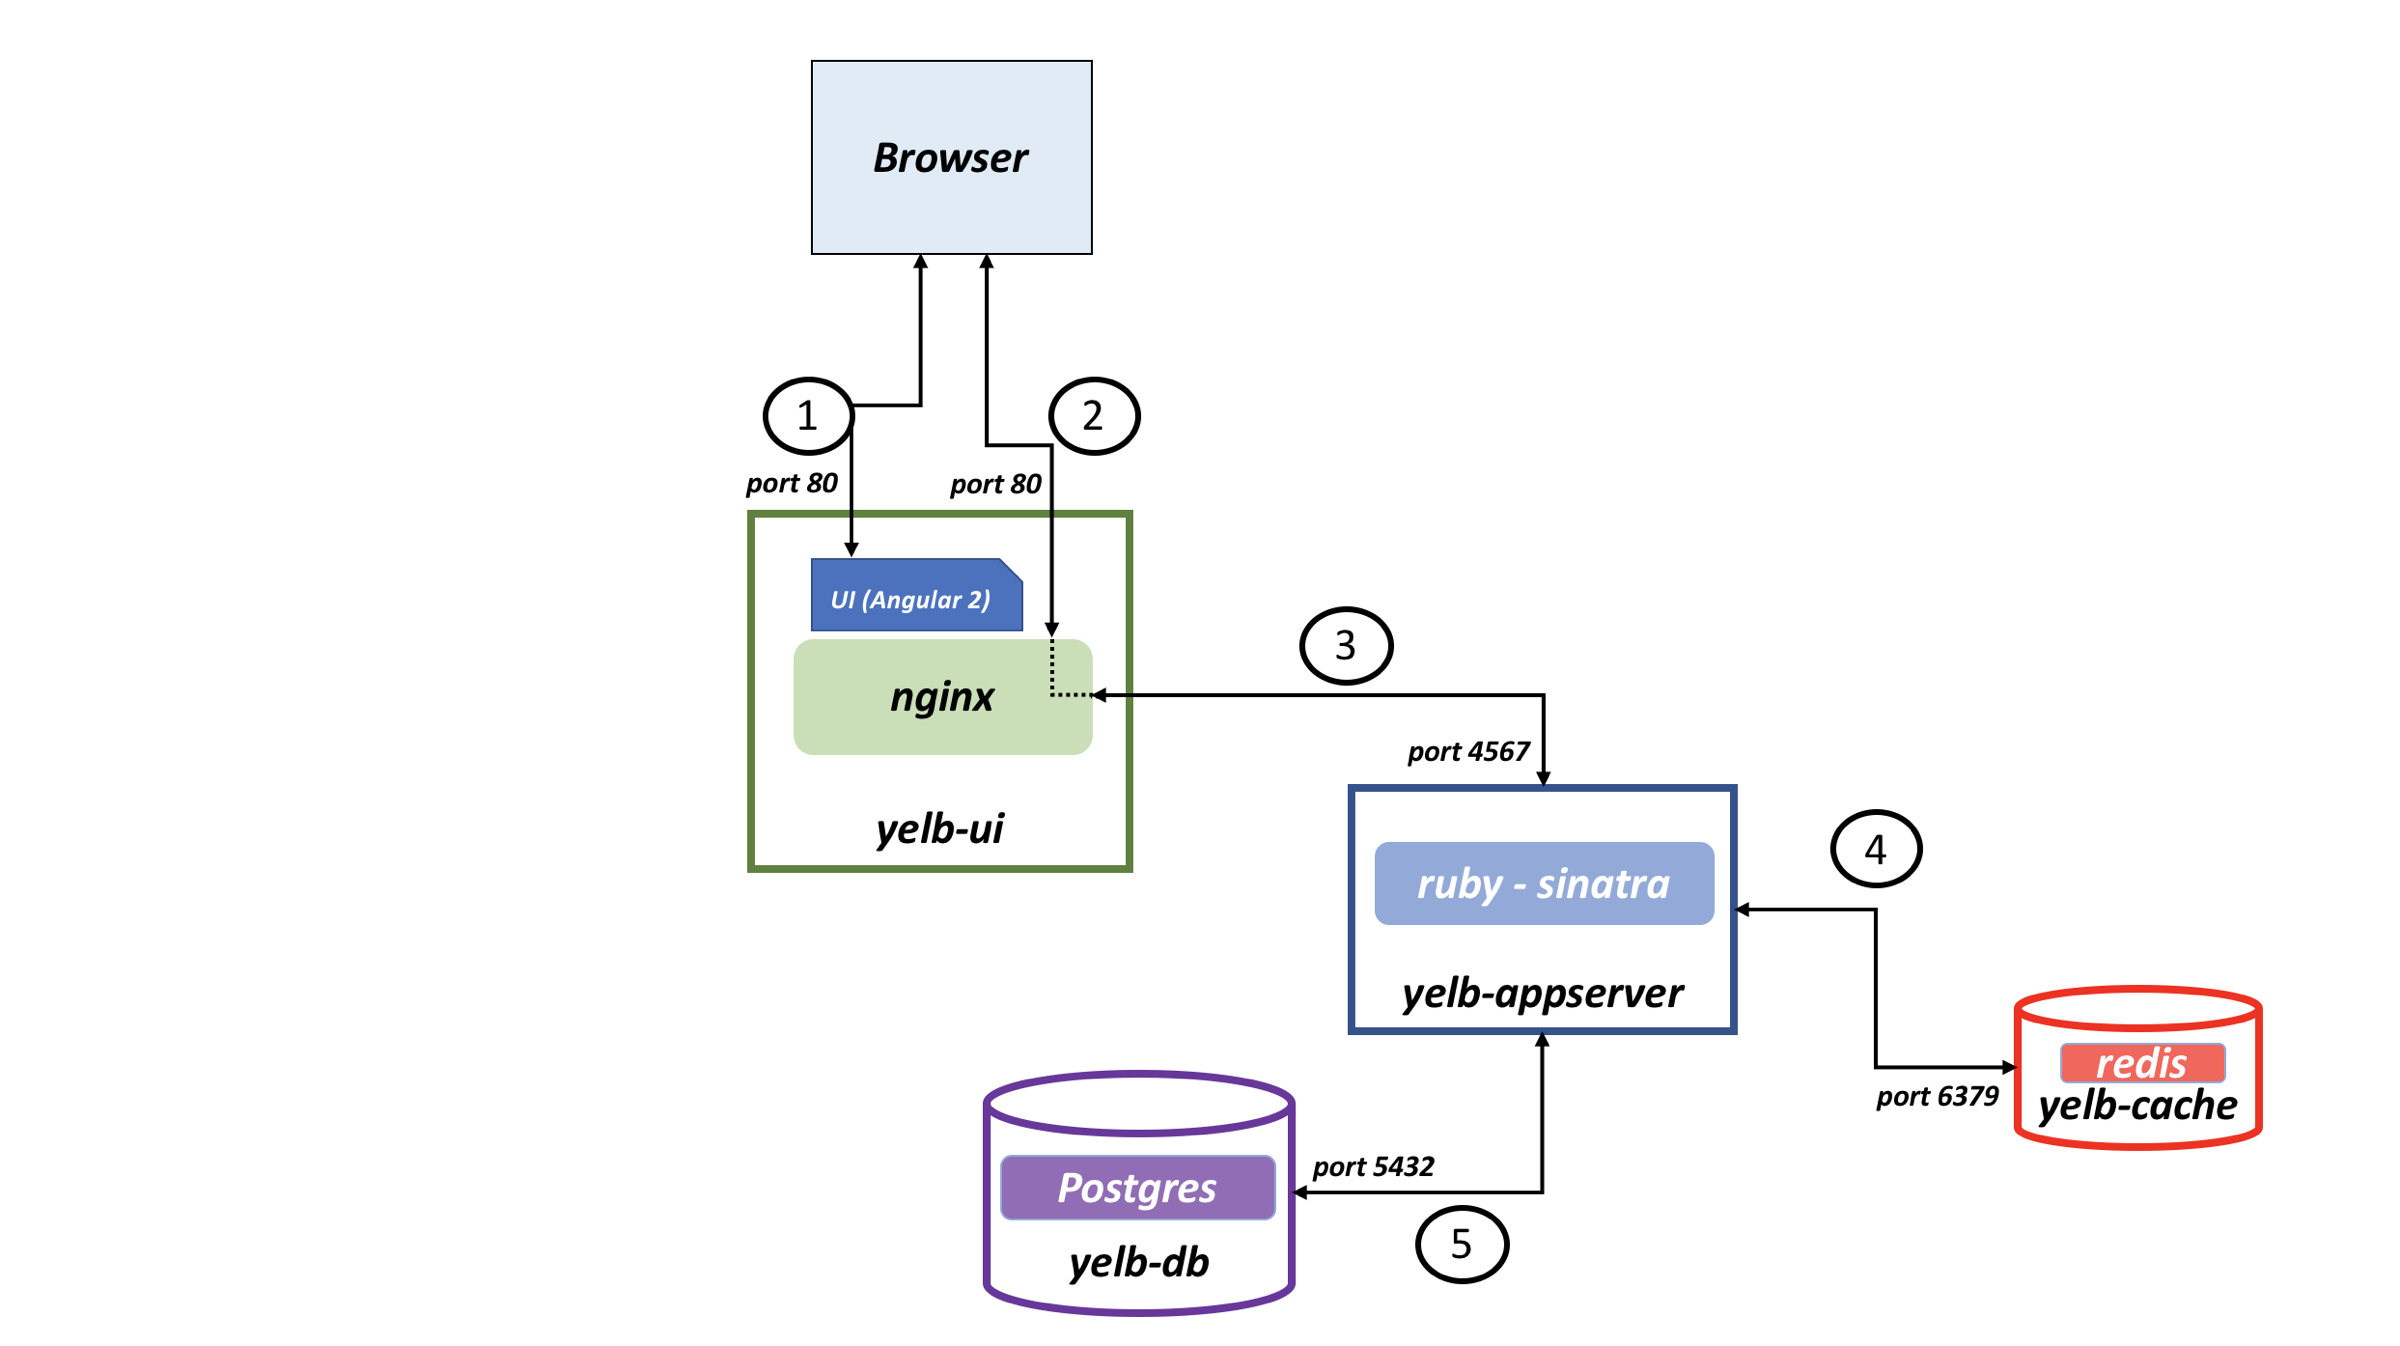
To demonstrate this architecture, we will be using an application called Yelb. Yelb allows users to vote on a set of alternatives like restaurants and dynamically updates pie charts based on the votes. Additionally, Yelb keeps track of the number of page views and prints the hostname of the yelb-appserver instance that is represented (in AWSVPC networking mode on Amazon ECS) by the IP address of the task serving the API request upon a vote or a page refresh. Yelb components include:
- A frontend called
yelb-uithat is responsible for vending the JS code to the browser. - An application server named
yelb-appserver, a Sinatra application that reads and writes to a cache server (yelb-redisserver), and a Postgres backend database (yelb-db). - Redis stores the number of page views and Postgres stores the votes.
Yelb’s architecture looks like this:
Yelb configuration uses ephemeral disks for all the containers. Running databases in this way is only done for demonstration purposes.
3. Set up the infrastructure
During the next steps of the post, we will be using the AWS Oregon (us-west-2) Region.
To follow along, you will need to have an environment with the required tooling. We have used an AWS Cloud9 instance to run this tutorial. If you want to create a Cloud9 instance in your account, follow the steps in the Amazon ECS Workshop chapter “Create a Workspace” from the beginning until the step “Validate the IAM role“.
3.1 Requirements
There are some requirements to be installed and configured before you can create the pipeline. Start by cloning the GitHub repository:
# Helper scripts and blog post resources
git clone https://github.com/aws/aws-app-mesh-examples.git
cd aws-app-mesh-examples/blogs/ecs-canary-deployments-pipeline/

# Sample app
git clone https://github.com/tiagoReichert/yelb.git && mv yelb microservices
For your convenience, we’ve added a Makefile that uses helper scripts placed under the setup folder of the resources you just downloaded. These helper scripts were created and tested on an AWS Cloud9 instance, and will be used during the next steps to facilitate the creation of the resources. Feel free to review the helper scripts to understand their functionality.
Now, let’s start by exporting some environment variables (feel free to customize these variables to your needs):
make set-envNote: The above command will execute the shell script under the location
/setup/scripts/export_environment_variables.sh
You will also need an Amazon Virtual Private Cloud (VPC) to provision a logically isolated section of the AWS Cloud where you can launch AWS resources in a virtual network that you define. You have complete control over your virtual networking environment, including the selection of your own IP address range, creation of subnets, and configuration of route tables and network gateways.
make create-vpcNote: The above command will execute the shell script under the location
/setup/scripts/create_vpc.sh
3.2 Create an Amazon ECS cluster and AWS App Mesh mesh
Amazon Elastic Container Service (Amazon ECS) is a highly scalable, fast container management service that makes it easy to run, stop, and manage containers on a cluster. We will now create an empty Amazon ECS cluster with the prerequisites to standup ECS services and an AWS App Mesh mesh that will be used by the microservices to perform canary deployments.
make create-ecs-meshNote: The above command will execute the shell script under the location
/setup/scripts/create_ecs_mesh.sh
3.3 Prometheus metrics collection on the Amazon ECS cluster
CloudWatch Container Insights monitoring for Prometheus automates the discovery of Prometheus metrics from containerized systems and workloads. Prometheus is an open source systems monitoring and alerting toolkit. For more information, see “What is Prometheus?” in the Prometheus documentation. We leverage the concept of dynamic service discovery mechanisms to discover ECS task definitions based on ECS task definition ARN regular expression-based service discovery.
make create-monitoring-resourcesNote: The above command will execute the shell script under the location
/setup/scripts/create_prometheus_env.sh
4. Creating the pipeline
Now that you have all the requirements installed and configured, you can move forward with the creation of the pipeline per microservice, powered by AWS CodePipeline.
4.1 Shared AWS CloudFormation stack
The shared AWS CloudFormation stack contains multiple AWS Lambda functions and one AWS Step Functions state machine that will be responsible for the deploy stage of the pipeline. As it accepts all configuration parameters as input, you can use the same resources for all deployments.

The AWS Step Functions state machine orchestrates multiple Lambda functions, which perform canary deployments leveraging a helper CloudFormation template available in the microservice specific repository. It happens by switching traffic between versions of applications, respecting the wait time declared by the user.
Overview of state machine workflow:
Step 1: Check Deployment Versionis a Lambda step in the state machine workflow that checks the deployed version from the AWS SSM Parameter Store. During the first deployment, the function returns the version as `1` and during subsequent deployments, it returns the corresponding version deployed.Step 2: Deploy New Version/CFNis a Lambda step that deploys the helper CloudFormation template which further deploys canary resources required for the new version, prefixing the resource names with GitSha obtained from the version control.Step 3: Canary & Switch Trafficis a Lambda step that shifts percentage of traffic between the AWS App Mesh virtual routes in a virtual router, and respects the user definedWaittime. Then,,Gather Health Check Statusis a Lambda step that describes the health of the recent deployment.- What happens during a
SUCCESSFULdeployment?- If the deployment is found to be healthy, Step 3 is repeated until the percentage of traffic shift reaches 100% to the new version. Then, the workflow verifies if it’s a first time deployment or not. In case of a first time deployment, there wouldn’t be any old version (previous canary components) to clean up. In case of subsequent deployments, the
Remove Old VersionLambda step would clean up the old version and update the deployment version in the AWS SSM Parameter Store.
- If the deployment is found to be healthy, Step 3 is repeated until the percentage of traffic shift reaches 100% to the new version. Then, the workflow verifies if it’s a first time deployment or not. In case of a first time deployment, there wouldn’t be any old version (previous canary components) to clean up. In case of subsequent deployments, the
- What happens during a
FAILEDdeployment?- If the deployment is not found to be healthy, the workflow invokes the
RollBackLambda step which would clean up the current deployed version (faulty version) and retain the previously deployed working version.
- If the deployment is not found to be healthy, the workflow invokes the
Now, let’s create the shared CloudFormation stack:
make create-shared-cloudformation-stackNote: The above command will execute the shell script under the location
/setup/scripts/create_shared_cloudformation_stack.sh
Only move to the next step if the last command has returned CREATE_COMPLETE.
4.2 Pipeline AWS CloudFormation stack
The pipeline AWS CloudFormation stack was designed to be deployed for each microservice you have. It will create one AWS CodeCommit repository and the pipeline that will be triggered by new commits into the master branch of that repository.
For demonstration purposes, you will create four stacks with the Yelb microservices. You can change the environment variable called USE_SAMPLE_MICROSERVICES to 'False' and it will create all the needed resources for the pipeline with an empty AWS Code Commit repository to be used with your own source code.
Because the Yelb architecture contains four microservices, we have created a script that will create all the needed AWS CloudFormation stacks:
make create-sample-microservice-pipeline-stackNote: The above command will execute the shell script under the location
/setup/scripts/create_sample_microservice_pipeline_stack.sh
Only move to the next step if the last command has returned All CloudFormation stacks created successfully!.
5. Testing the pipeline
Now that you have completely created the architecture, you can start to see how it works.
5.1 Configuration Files
First, let’s take a look into the AWS CodeCommit repositories where you will find a microservice specific code repository, under which you will find a folder called specfiles with 3 files in it. Let’s dive into those three files:
build.ymlhas the steps to build the Docker image for the respective microservice and save it to an Amazon ECR repository. It also adds two additional parameters to deploy.json:- Sha is added to the deploy.json file with the head of the commit SHA.
- ContainerImage is added to the deploy.json file with the Image URI after the docker image is pushed to Amazon ECR.
- CanaryTemplate is added to the deploy.json file with the content of base64 encoded
canary-helper.yaml.
canary-helper.yamlis an AWS CloudFormation template that will be used to create the Amazon ECS service, AWS CloudMap service discovery record, and AWS App Mesh virtual node during deployment. You will notice that it has some variables that will be substituted during deployment:- MicroserviceName will be substituted by the value of MicroserviceName from the deploy.json file.
- Sha will be substituted by the value of commit Sha from the deploy.json file.
- EnvironmentName will be substituted by the value of EnvironmentName from the deploy.json file.
- MeshName will be substituted by the value of MeshName from the deploy.json file.
deploy.jsonhas the configuration parameters to deploy the microservice.- EnvironmentName is a string that will be used as prefix to the physical names of the AWS resources to make AWS CloudFormation Cross Stack references.
Note: This blog uses EnvironmentName to name the ECS cluster and AppMesh MeshName resources.
-
- Namespace is the name of the service discovery namespace you want to deploy into.
- MicroserviceName is the name of the application microservice.
Note: Sample values could be are
yelb-ui,yelb-appserveretc. This variable will be used for naming application specific canary resources such as AWS App Mesh virtual node, Amazon ECS service, task definition, and service discovery record.
-
- Protocol is the protocol to communicate with your microservice used by the listener of AWS App Mesh virtual node.
Note: Sample values could be are `http`, `tcp`, `grpc` etc.
-
- Port is the port to communicate with your microservice used by the listener of AWS App Mesh virtual node.
- PercentageStep is the amount of traffic percentage switched to the new version in increments.
Note: Sample values could be are 10, 25, 50 etc. For example, if the percentage is set to 25, the state machine workflow will shift 25% of traffic in increments from old version to the new version until the percentage reaches 100%.
-
- WaitTime represents the time in seconds to wait between each traffic switch during a canary deployment from the old to the new version. This parameter would assist a user to complete any tests to be performed during the wait time period.
Note: Sample values could be are 60, 300 etc.
-
- FailureThresholdValue is optional and used to specify the maximum allowed 5xx HTTP response code before triggering an automatic rollback. (
default = 0) - FailureThresholdTime is optional and used to specify the time range in seconds to count the amount of 5xx HTTP response code. The minimum recommended value is 60 because CloudWatch metric filter aggregates and reports every minute. (
default = 600)
- FailureThresholdValue is optional and used to specify the maximum allowed 5xx HTTP response code before triggering an automatic rollback. (
The following is a sample layout of directory structure of a microservice repository. Everything else inside of the AWS CodeCommit repositories is source code from the respective Yelb applications.

5.2 Pipeline resources
The easiest way to look into the resources created is to open AWS CodePipeline. There you will see the four pipelines you created earlier:
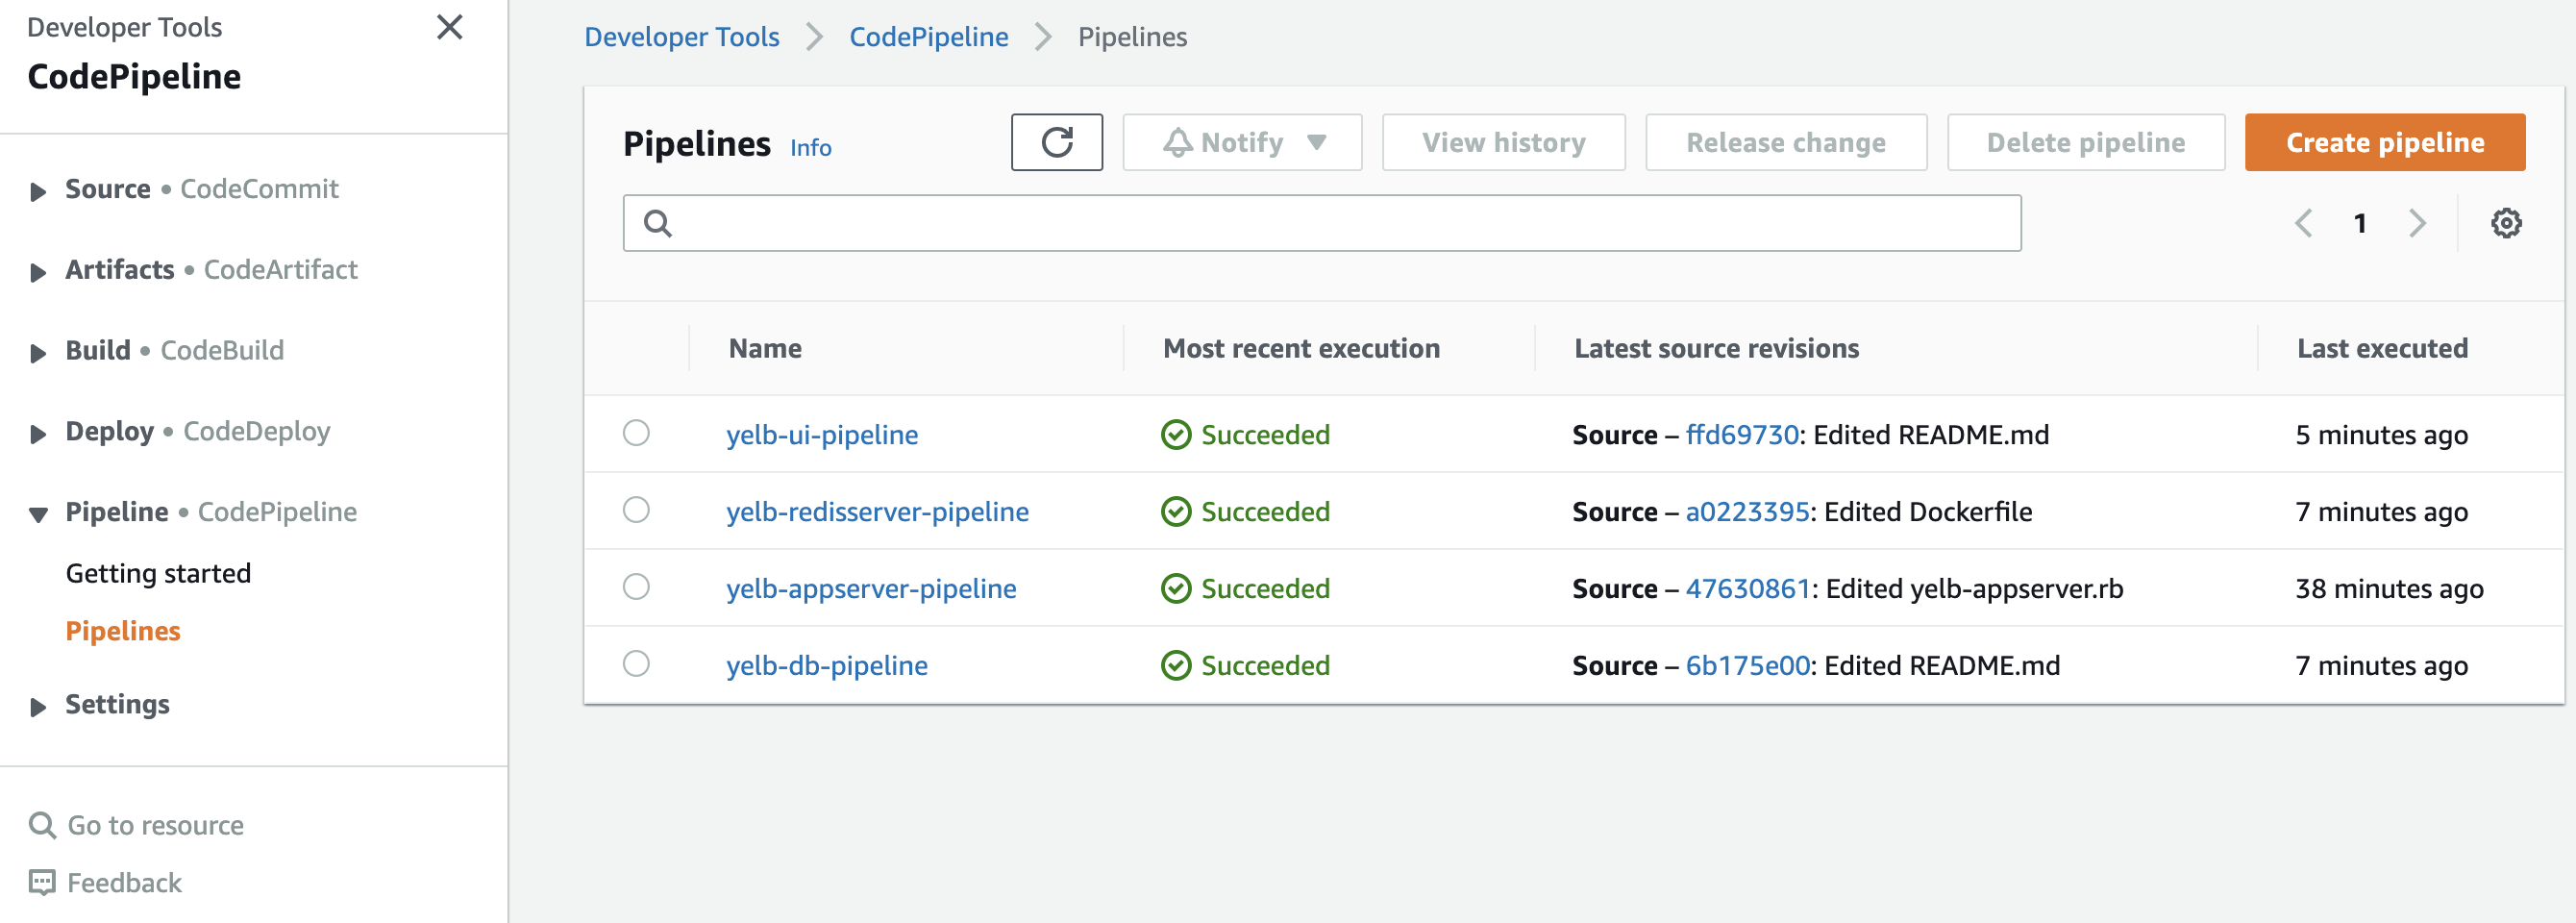
You can open one of them and see the steps Source, Build, and Deploy. These steps are all customizable. You could add before deploying, for example, security checks or manual approvals.
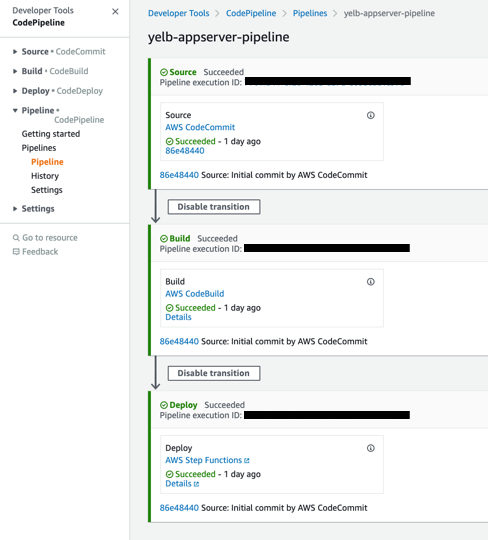
1. The Source step monitors if there are any changes to the master branch of the AWS CodeCommit repository. You can get to the repository by clicking on the AWS CodeCommit link inside of the source step.
2. The Build step builds the Docker image with AWS CodeBuild and stores it in Amazon ECR. You can see the build logs by clicking in the Details link from the build step.
3. The Deploy step triggers the AWS Step Functions state machine created by the shared AWS CloudFormation stack. You see its status by clicking on the Details link.
Click on the Details tab from the Deploy step and you can check the input and output of the execution and for each step as well as the AWS Lambda functions and the execution logs:

A successful deployment that switched 100% of the traffic to the new version and passed all health checks looks similar to following images:

Looking into the ECS/ContainerInsights/Prometheus CloudWatch metrics namespace, you should not see any 5xx response code for the new version (yelb-appserver-<gitsha>):

5.3 Deploy a new version
Now, let’s see the Yelb application working and make some changes to see how the pipeline behaves.
source ~/.bash_profile && echo http://$APP_URI
Open the URL returned by the command above in your preferred browser. You should see a page similar to the following (it might take some minutes for the DNS name to propagate):

Click in some vote buttons and see how the values are updated. Did you notice something wrong while voting?
We intentionally added an issue to the yelb-appserver microservice so that it increments by two each time there is one vote. Now, let’s fix that issue and see how it gets applied.
Open AWS CodeCommit and navigate to the yelb-appserver repository, open the file modules/restaurantsdbupdate.rb and click on the Edit button to fix the issue. Change the line:
con.prepare('statement1', 'UPDATE restaurants SET count = count +2 WHERE name = $1')
to:
con.prepare('statement1', 'UPDATE restaurants SET count = count +1 WHERE name = $1')
and commit the changes.
Go to AWS CodePipeline in the AWS Management Console and after some seconds you will see that yelb-appserver-pipeline is In progress. Open it to see the progress of the deployment. Wait until it gets to the Deploy stage and then refresh the browser tab with the Yelb application a few times. You will see that the App Server hostname (as shown in the image below) will be switching between two names, that is the canary deployment taking place.

Open the AWS App Mesh virtual router for the yelb-appserver microservice and you will be able to see how are the weights at this moment. You can also open the deploy.json file in the yelb-appserver AWS CodeCommit repository to see the percentage_step and wait_time parameters to know how long it will take to switch all the traffic. For this example, the values percentage_step: 10 and wait_time: 60 were used and it will take a total of 10 minutes to switch all the traffic.
After the deployment completes, you can try to vote on the Yelb application again and see that now it increments by one.
5.4 Deploy a version that triggers rollback
Open the yelb-appserver.rb file from the yelb-appserver AWS CodeCommit repository. Change the port for the application under the production configuration (line 33) from 4567 to 4568 (or any port number other than 4567) and commit the changes.
That will trigger yelb-appserver-pipeline and deploy a new version of the yelb-appserver microservice that does not work. Open yelb-appserver-pipeline in AWS CodePipeline and wait until the Deploy stage reaches In Progress. Then click into Details under the Deploy stage. In this page, you will see the visual workflow during the deployment.
Try to refresh the Yelb application a few times. You will see that sometimes when you refresh there is no vote data returned and you are not able to vote. That’s because you are being redirected to the new version that is not working.
Wait a few minutes and you will see in the visual workflow that a rollback was triggered because the new version did not pass the health check. It’s important to note that the health check is a AWS Lambda function that can be customized if needed.

Looking into the ECS/ContainerInsights/Prometheus CloudWatch metrics namespace you should now see that the old version still got 2xx response code while the new version got 5xx response code and after some time there is no metric for the new version anymore because it was deleted (automatic rollback).

You can now refresh the Yelb application a few times again and it will work properly using previous version.
6. Cleanup
You can use the command below to delete the resources created during the previous steps.
make delete-blog-contents
Note: The above command will execute the shell script under the location
/setup/scripts/delete_blog_contents.py
7. Conclusion
In this post, we demonstrated how you can leverage AWS App Mesh and implement a canary deployment strategy in conjunction with other AWS services such as AWS Code Pipeline and AWS Step Functions.
Further, here are some useful links if you want to dive deeper into AWS App Mesh:
- Check out the AWS App Mesh official documentation.
- Learn more about the AWS App mesh capabilities in the AWS App Mesh workshop.
You can track upcoming features via the App Mesh roadmap and experiment with new features using the App Mesh preview channel. You can also join us in the App Mesh Slack community to share experiences and discuss with the team and your peers.