Containers
Persistent Storage using EFS for EKS on Bottlerocket
In this post, we discuss about how to achieve persistent storage with Amazon Elastic Kubernetes Service (Amazon EKS) clusters running on Bottlerocket OS with Amazon Elastic File System (Amazon EFS). Persistent storage is needed for long running stateful applications to persist state for high availability or to scale out around shared datasets. This is true with machine learning customers who use Amazon EFS to store shared data sets and data science home directories, allowing them to train models in parallel across multiple containers and access data from individual data science notebook containers. Examples of open-source platforms for machine learning include MxNet, TensorFlow, Jupyter, Jupyterhub, Kubeflow.
Before we dive into the blog, we’ll cover a high-level overview of each of the components and services.
Bottlerocket is an open-source Linux-based operating system, minified and purpose-built for running container workloads. It is secure by design, following best practices for container security. It only includes tools needed to run containers, significantly reducing the attack surface and impact of vulnerabilities. By virtue of being minimal, nodes running Bottlerocket have a fast boot time thus enabling clusters to scale quickly based on varying traffic patterns or workload changes.
Amazon Elastic File System (Amazon EFS) provides a simple, serverless, elastic file system that allows you to share file data without provisioning or managing storage. It can be used with AWS services and on-premises resources, and is built to scale on demand to petabytes without disrupting applications.
Bottlerocket OS uses a read-only file system to improve overall security posture of the host OS. Taking this into consideration, we need to follow specific steps to implement a shared storage solutions across cluster nodes and the pods running on them. In this post, we will demonstrate how to leverage EFS with Bottlerocket OS to run stateful workloads and enable us to persist data.
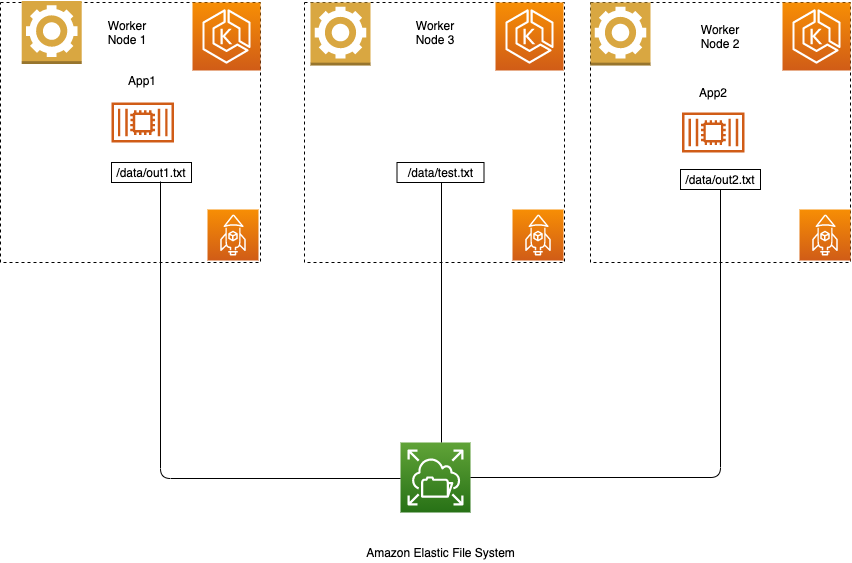
Figure 1: Amazon EKS cluster on Bottlerocket using Amazon EFS
In our example, we have built an EKS cluster with three worker nodes running on Bottlerocket OS sharing an Elastic File System. We deployed two instances of a busy box application, app1 and app2, sharing a common/data mount.
Prerequisites
In order to get started with EKS cluster there are a few mandatory prerequisites. You will need to follow the instructions on getting started with Amazon EKS, as well as install and configure eksctl, kubectl, the AWS Command Line Interface (CLI), and Helm CLI.
It’s important to have the right IAM roles and permissions for creating the cluster
Instructions for setting up Amazon EKS on Bottlerocket can be found here
1. After EKS cluster setup, verify that nodes are running on Bottlerocket OS by running the following command.

Figure 2: List EKS worker nodes
Steps to configure and install the Amazon EFS CSI driver
2. Create an EFS file system.
The following command is used to create an EFS file system.
For our example, we will name our filesystem “eks-efs.”
3. Capture the VPC-ID.
Run the following commands to capture the VPC-ID.
4. Capture the CIDR block, using the VPC-ID from step 3.
5. Create a security group, using the VPC-ID from step 3.
6. Create an inbound rule that allows inbound NFS traffic from the CIDR for your cluster’s VPC, using CIDR block from step 4, and the security group-id from the output of step 5.
7. Create an EFS mount target.
Create the mount target using the below command for each of the subnet IDs.
Run the following command to verify that the aws-efs-csi-driver has started.
Clone the following GitHub Repo
git clone https://github.com/kubernetes-sigs/aws-efs-csi-driver.git
cd aws-efs-csi-driver
Create a PV (persistence volume), PVC (persistence volume claim), storage class, and the pods that consume the PV.
Update the value of the volume handle in pv.yaml to match the new EFS file system
Both the pods, pod1 and pod2, are writing to the same EFS file system at the same time.
Verify that the pods are running using below command.
Verify that data is written onto EFS filesystem from both the pods.
Validate data persistence
To confirm if the mount persists, restart the pods, app1, app2, and validate that the files, out1.txt and out2.txt, still remain in the mount under/data.
Conclusion
Integrating Amazon EFS with EKS worker nodes running on Bottlerocket OS allows you to run stateful workloads while improving overall security posture and underlying performance. Amazon EFS enables thousands of pods or EC2 instances to read and write to a shared volume simultaneously. This blog can help you to deploy workloads that require secured shared storage across EKS worker nodes.