Organizations are aggressively adopting the cloud as a standard and actively evaluating their database needs. Amazon RDS for Oracle is a managed service that makes it easy to quickly create Oracle Database instances, enabling you to migrate existing on-premises workloads to the cloud. Migration from on-premises Oracle Database to Amazon RDS for Oracle is quick because it doesn’t involve code conversion.
Oracle Enterprise Edition (Oracle EE) has become the standard adopted by many organizations. However, if you do a more in-depth database assessment, you may find that not every application needs all the features of Oracle EE, and you may be overpaying.
You can significantly reduce your Oracle commercial license usage by switching to Oracle Database Standard Edition (Oracle SE), which is even easier with the Amazon RDS for Oracle License Included (LI) option. Applications with no or minimum Oracle EE features usage are excellent candidates for migrating to Oracle SE.
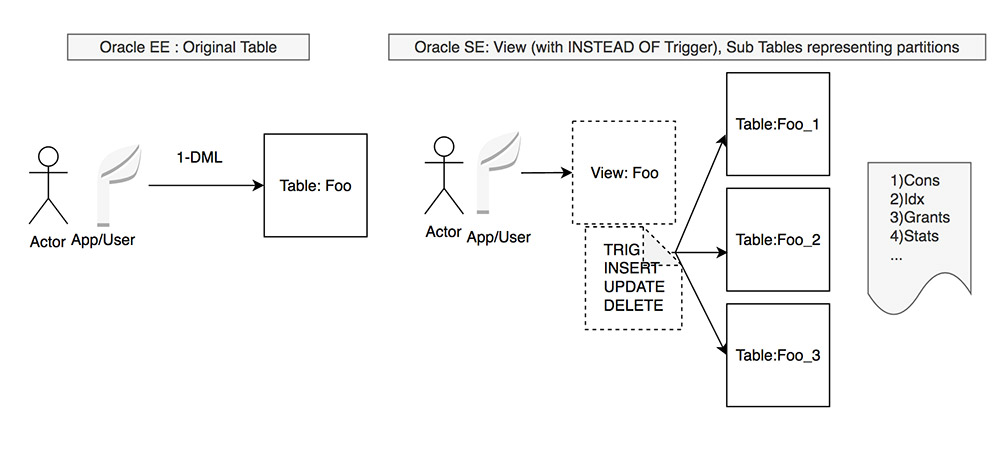
Oracle table partitioning is a commonly used feature to manage large tables and improve SELECT query performance. Oracle partitioning is only available in the Oracle EE Extra cost option.
This post demonstrates how to implement a partitioning feature for tables in Oracle Standard Edition (Oracle SE) using a single view accessing multiple sub-tables and the INSTEAD OF trigger.
The following diagram illustrates the architecture of this solution.
Creating objects
To implement the solution, start by creating your objects.
- To demonstrate the feature, you break the Oracle EE partition tables into individual tables per partition on Oracle SE. Create a sample table using the following code:
CREATE TABLE "TESTPART"."PARTTBL_MAIN"
   (    "ORD_DAY" NUMBER(2,0),
        "ORD_MONTH" NUMBER(2,0),
        "ORD_YEAR" NUMBER(4,0),
        "ORD_ID" NUMBER(10,0)
   )
  PARTITION BY RANGE ("ORD_YEAR","ORD_MONTH","ORD_DAY")
 (PARTITION "P1"  VALUES LESS THAN (2020, 3, 31),
 PARTITION "P2"  VALUES LESS THAN (2020, 6, 30),
 PARTITION "P3"  VALUES LESS THAN (2020, 9, 30),
 PARTITION "P4"  VALUES LESS THAN (2020, 12, 32));
- Collect the privilege details of the source table. For this use case, grant SELECT to oraadmin and use the following script to collect the object-level grant details:
select 'GRANT ' || PRIVILEGE || ' ON ' || OWNER ||'.' || TABLE_NAME || ' to ' || GRANTEE ||';' "USER_PRIVILGES"  from ALL_TAB_PRIVS_MADE WHERE OWNER = 'TESTPART';

Sample output

USER_PRIVILGES
---------------------------------------------------
GRANT SELECT ON TESTPART.PARTTBL_MAIN to ORAADMIN;
- Connect Oracle SE Database and create four individual tables, append the unique number to each to identify it like a table partition:
sqlplus <username>/<password>@<TNSAlias>
-- Partition like table 1
CREATE TABLE PARTTBL_MAIN_1
(
ord_day NUMBER(2),
ord_month NUMBER(2),
ord_year NUMBER(4),
ord_id NUMBER(10)
);

-- Partition like table 2

CREATE TABLE PARTTBL_MAIN_2
(
ord_day NUMBER(2),
ord_month NUMBER(2),
ord_year NUMBER(4),
ord_id NUMBER(10)
);

-- Partition like table 3
CREATE TABLE PARTTBL_MAIN_3
(
ord_day NUMBER(2),
ord_month NUMBER(2),
ord_year NUMBER(4),
ord_id NUMBER(10)
);

-- Partition like table 4
CREATE TABLE PARTTBL_MAIN_4
(
ord_day NUMBER(2),
ord_month NUMBER(2),
ord_year NUMBER(4),
ord_id NUMBER(10)
);
- Enter the following code to create a single view that acts as the main partition table by combining all four tables using the UNION ALL statement:
-- View based on all partition tables
CREATE VIEW PARTTBL_MAIN AS
SELECT * FROM PARTTBL_MAIN_1 UNION ALL
SELECT * FROM PARTTBL_MAIN_2 UNION ALL
SELECT * FROM PARTTBL_MAIN_3 UNION ALL
SELECT * FROM PARTTBL_MAIN_4;
Inserting and distributing data
To insert and distribute your data, complete the following steps:
- Enter the following code to create an INSTEAD OF INSERT trigger for the PARTTBL_MAIN view:
-- Before insert trigger on view
-- This will propagate the data to respective partition table

CREATE OR REPLACE TRIGGER PARTTBL_MAIN_INSERT
INSTEAD OF INSERT
ON PARTTBL_MAIN
FOR EACH ROW

DECLARE
n_part integer;

BEGIN
  n_part := :NEW.ORD_MONTH;
  IF n_part <= 3  THEN
    insert into PARTTBL_MAIN_1 values(:new.ORD_DAY,:new.ORD_MONTH,:new.ORD_YEAR,:new.ORD_ID);
  ELSIF n_part > 3 and n_part <= 6 THEN
    insert into PARTTBL_MAIN_2 values(:new.ORD_DAY,:new.ORD_MONTH,:new.ORD_YEAR,:new.ORD_ID);
  ELSIF n_part > 6 and n_part <= 9 THEN
    insert into PARTTBL_MAIN_3 values(:new.ORD_DAY,:new.ORD_MONTH,:new.ORD_YEAR,:new.ORD_ID);
  ELSIF n_part > 9 and n_part <= 12 THEN
    insert into PARTTBL_MAIN_4 values(:new.ORD_DAY,:new.ORD_MONTH,:new.ORD_YEAR,:new.ORD_ID);
 END IF;
END;
/
- Confirm that tables are empty. See the following code:
select 'PARTTBL_MAIN',count(*) rowcount from PARTTBL_MAIN
union all
select 'PARTTBL_MAIN_1',count(*) rowcount from PARTTBL_MAIN_1
union all
select 'PARTTBL_MAIN_2',count(*) rowcount from PARTTBL_MAIN_2
union all
select 'PARTTBL_MAIN_3',count(*) rowcount from PARTTBL_MAIN_3
union all
select 'PARTTBL_MAIN_4',count(*) rowcount from PARTTBL_MAIN_4;

'PARTTBL_MAIN'   rowcount
-------------- ----------
PARTTBL_MAIN            0
PARTTBL_MAIN_1          0
PARTTBL_MAIN_2          0
PARTTBL_MAIN_3          0
PARTTBL_MAIN_4          0
- Create a sequence to control row creation:
-- Create a large number of rows for the partitioning
-- Worked examples. It is up to the user to ensure there is appropriate
-- Temporary/Rollback space.
-- Sequence used for control
DROP SEQUENCE partition_seq
/
CREATE SEQUENCE partition_seq
/
- Insert the data into the
PARTTBL_MAIN view. Each time you run the following code, it inserts approximately 93 rows because we insert 1 row per day:
BEGIN
FOR j in 1..12 LOOP
FOR i in 1..31 LOOP
INSERT INTO PARTTBL_MAIN VALUES ( i , j, 2020, partition_seq.nextval );
END LOOP;
END LOOP;
END;
/
Commit;
- Confirm that the rows are inserted into each table, and we get a total row count at the
PARTTBL_MAIN view:
select 'PARTTBL_MAIN',count(*) rowcount from PARTTBL_MAIN
union all
select 'PARTTBL_MAIN_1',count(*) rowcount from PARTTBL_MAIN_1
union all
select 'PARTTBL_MAIN_2',count(*) rowcount from PARTTBL_MAIN_2
union all
select 'PARTTBL_MAIN_3',count(*) rowcount from PARTTBL_MAIN_3
union all
select 'PARTTBL_MAIN_4',count(*) rowcount from PARTTBL_MAIN_4;

'PARTTBL_MAIN'   rowcount
-------------- ----------
PARTTBL_MAIN          372
PARTTBL_MAIN_1         93
PARTTBL_MAIN_2         93
PARTTBL_MAIN_3         93
PARTTBL_MAIN_4         93
Updating the data
To update your data, complete the following steps:
- Enter the following code to create an
INSTEAD OF UPDATE trigger to the PARTTBL_MAIN view:
-- Update trigger
CREATE OR REPLACE TRIGGER PARTTBL_MAIN_UPDATE
INSTEAD OF UPDATE
ON PARTTBL_MAIN
FOR EACH ROW

DECLARE
n_part integer;

BEGIN
  n_part := :NEW.ORD_MONTH;
  IF n_part <= 3  THEN
    update PARTTBL_MAIN_1 set ORD_YEAR=:NEW.ORD_YEAR where ORD_MONTH=:NEW.ORD_MONTH;
  ELSIF n_part > 3 and n_part <= 6 THEN
    update PARTTBL_MAIN_2 set ORD_YEAR=:NEW.ORD_YEAR where ORD_MONTH=:NEW.ORD_MONTH;
  ELSIF n_part > 6 and n_part <= 9 THEN
    update PARTTBL_MAIN_3 set ORD_YEAR=:NEW.ORD_YEAR where ORD_MONTH=:NEW.ORD_MONTH;
  ELSIF n_part > 9 and n_part <= 12 THEN
    update PARTTBL_MAIN_4 set ORD_YEAR=:NEW.ORD_YEAR where ORD_MONTH=:NEW.ORD_MONTH;
 END IF;
END;
/
- Review the current data using the following
SELECT statement on the PARTTBL_MAIN view. See the following code:
select ORD_MONTH,ORD_YEAR,count(*) from PARTTBL_MAIN group by ORD_MONTH,ORD_YEAR order by 1;

ORD_MONTH   ORD_YEAR   COUNT (*)
---------- ---------- ----------
         1       2020         31
         2       2020         31
         3       2020         31
         4       2020         31
         5       2020         31
         6       2020         31
         7       2020         31
         8       2020         31
         9       2020         31
        10       2020         31
        11       2020         31
        12       2020         31

12 rows selected.
- Update the
PARTTBL_MAIN view and confirm that the records are updated correctly. See the following code:
-- Case 1: update ORD_MONTH 1 records with ORD_YEAR as 2021. This will only update data into PARTTBL_MAIN_1 table

update PARTTBL_MAIN set ORD_YEAR=2021 where ORD_MONTH=1;

31 rows updated.

select ORD_MONTH,ORD_YEAR,count(*) from PARTTBL_MAIN_1 group by ORD_MONTH,ORD_YEAR order by 1;

 ORD_MONTH   ORD_YEAR   COUNT (*)
---------- ---------- ----------
         1       2021         31
         2       2020         31
         3       2020         31

-- Case 2: update records between ORD_MONTH  2 and 3 records with ORD_YEAR as 2022. This will only update data into PARTTBL_MAIN_1 table

update PARTTBL_MAIN set ORD_YEAR=2022 where ORD_MONTH between 2 and 3;

62 rows updated.

select ORD_MONTH,ORD_YEAR,count(*) from PARTTBL_MAIN_1 group by ORD_MONTH,ORD_YEAR order by 1;

 ORD_MONTH   ORD_YEAR   COUNT (*)
---------- ---------- ----------
         1       2021         31
         2       2022         31
         3       2022         31

commit;

Commit complete.

select ORD_MONTH,ORD_YEAR,count(*) from PARTTBL_MAIN group by ORD_MONTH,ORD_YEAR order by 1;

 ORD_MONTH   ORD_YEAR   COUNT (*)
---------- ---------- ----------
         1       2021         31
         2       2022         31
         3       2022         31
         4       2020         31
         5       2020         31
         6       2020         31
         7       2020         31
         8       2020         31
         9       2020         31
        10       2020         31
        11       2020         31
        12       2020         31

12 rows selected.

-- Case 3: update records between ORD_MONTH 8 and 12 records with ORD_YEAR as 2030. This will update data into PARTTBL_MAIN_3 table and PARTTBL_MAIN_4

update PARTTBL_MAIN set ORD_YEAR=2030 where ORD_MONTH between 8 and 12;

155 rows updated.

select ORD_MONTH,ORD_YEAR,count(*) from PARTTBL_MAIN group by ORD_MONTH,ORD_YEAR order by 1;

 ORD_MONTH   ORD_YEAR   COUNT (*)
---------- ---------- ----------
         1       2021         31
         2       2022         31
         3       2022         31
         4       2020         31
         5       2020         31
         6       2020         31
         7       2020         31
         8       2030         31
         9       2030         31
        10       2030         31
        11       2030         31
        12       2030         31

12 rows selected.
Deleting the data
To delete your data, complete the following steps:
- Enter the following code to create an
INSTEAD OF DELETE trigger on the PARTTBL_MAIN view:
-- delete trigger on view
CREATE OR REPLACE TRIGGER PARTTBL_MAIN_Delete
INSTEAD OF DELETE
ON PARTTBL_MAIN
FOR EACH ROW

DECLARE
n_part integer;

BEGIN
  n_part := :OLD.ORD_MONTH;
  IF n_part <= 3  THEN
    delete from PARTTBL_MAIN_1 where ORD_MONTH=:OLD.ORD_MONTH;
  ELSIF n_part > 3 and n_part <= 6 THEN
    delete from PARTTBL_MAIN_2 where ORD_MONTH=:OLD.ORD_MONTH;
  ELSIF n_part > 6 and n_part <= 9 THEN
    delete from PARTTBL_MAIN_3 where ORD_MONTH=:OLD.ORD_MONTH;
  ELSIF n_part > 9 and n_part <= 12 THEN
    delete from PARTTBL_MAIN_4 where ORD_MONTH=:OLD.ORD_MONTH;
 END IF;
END;
/
- Review the current partition data using the following
SELECT statement on the PARTTBL_MAIN view:
select ORD_MONTH,ORD_YEAR,count(*) from PARTTBL_MAIN group by ORD_MONTH,ORD_YEAR order by 1;

 ORD_MONTH   ORD_YEAR   COUNT(*)
---------- ---------- ----------
         1       2021         31
         2       2022         31
         3       2022         31
         4       2020         31
         5       2020         31
         6       2020         31
         7       2020         31
         8       2030         31
         9       2030         31
        10       2030         31
        11       2030         31
        12       2030         31

12 rows selected.
- Delete the records for
ORD_MONTH 3 and confirm that the records are deleted successfully. See the following code:
SQL> delete from PARTTBL_MAIN where ORD_MONTH=3;

31 rows deleted.

SQL> select ORD_MONTH,ORD_YEAR,count(*) from PARTTBL_MAIN group by ORD_MONTH,ORD_YEAR order by 1;

 ORD_MONTH   ORD_YEAR   COUNT(*)
---------- ---------- ----------
         1       2021         31
         2       2022         31
         4       2020         31
         5       2020         31
         6       2020         31
         7       2020         31
         8       2030         31
         9       2030         31
        10       2030         31
        11       2030         31
        12       2030         31

11 rows selected.
Granting privileges on view and individual tables
To grant privileges on the view and individual tables using the grant information you collected, complete the following steps:
- Connect to the ORACLE SE instance with a database privilege user, create a user called
oraadmin, and grant only connect privileges. See the following code:
sqlplus system/<password>@<TNSAlias>
SQL> create user oraadmin identified by oraadmin;

User created.

SQL> grant connect to oraadmin;

Grant succeeded.
- Test and confirm that
oraadmin doesn’t have access to the PARTTBL_MAIN view. The following query should return an ORA-00942 error:
SQL> conn oraadmin/oraadmin
Connected.
SQL> select 'PARTTBL_MAIN',count(*) rowcount from TESTPART.PARTTBL_MAIN
union all
select 'PARTTBL_MAIN_1',count(*) rowcount from TESTPART.PARTTBL_MAIN_1
union all
select 'PARTTBL_MAIN_2',count(*) rowcount from TESTPART.PARTTBL_MAIN_2
union all
select 'PARTTBL_MAIN_3',count(*) rowcount from TESTPART.PARTTBL_MAIN_3
union all
select 'PARTTBL_MAIN_4',count(*) rowcount from TESTPART.PARTTBL_MAIN_4;

ERROR at line 1:
ORA-00942: table or view does not exist
- Connect as a database privilege user and grant privileges on the
PARTTBL_MAIN view and all underlying tables:
sqlplus system/<password>@<TNSAlias>
GRANT SELECT ON TESTPART.PARTTBL_MAIN to ORAADMIN;
GRANT SELECT ON TESTPART.PARTTBL_MAIN_1 to ORAADMIN;
GRANT SELECT ON TESTPART.PARTTBL_MAIN_2 to ORAADMIN;
GRANT SELECT ON TESTPART.PARTTBL_MAIN_3 to ORAADMIN;
GRANT SELECT ON TESTPART.PARTTBL_MAIN_4 to ORAADMIN;

Grant succeeded.

Grant succeeded.

Grant succeeded.

Grant succeeded.

SQL>
Grant succeeded.
- Confirm that
oraadmin has access to the PARTTBL_MAIN view and underlying tables:
select 'PARTTBL_MAIN',count(*) rowcount from PARTTBL_MAIN
union all
select 'PARTTBL_MAIN_1',count(*) rowcount from PARTTBL_MAIN_1
union all
select 'PARTTBL_MAIN_2',count(*) rowcount from PARTTBL_MAIN_2
union all
select 'PARTTBL_MAIN_3',count(*) rowcount from PARTTBL_MAIN_3
union all
select 'PARTTBL_MAIN_4',count(*) rowcount from PARTTBL_MAIN_4;

'PARTTBL_MAIN'   rowcount
-------------- ----------
PARTTBL_MAIN          372
PARTTBL_MAIN_1         93
PARTTBL_MAIN_2         93
PARTTBL_MAIN_3         93
PARTTBL_MAIN_4         93
Limitations
A global, unique index key at an overall view level is unsupported; however, you can have unique local indexes at a table level.
Conclusion
In this post, we described how we could use a view and tables per partition and an INSTEAD OF trigger on the view as an alternate solution to implementing partitioning in Oracle SE. You can gather the grants and privilege information from the source database and replicate the same on an individual table and views. You can also use a similar technique for range-list partitioning. Additionally, you can migrate Oracle EE partition data to individual tables in Oracle SE with AWS Data Migration Service (AWS DMS).
In the next post in this series, we describe automating partition maintenance in Oracle SE.
About the Authors
 Srinivas Potlachervoois a Lead Database Consultant with the Professional Services team at Amazon Web Services. He works as database migration specialist to help AWS customers to move their on-premises database environment to AWS cloud database solutions.
 Bhavesh Rathod is a Senior Database Consultant with the Professional Services team at Amazon Web Services. He works as database migration specialist to help Amazon customers to move their on-premises database environment to AWS cloud database solutions.
 Samujjwal Roy is a Principal DB Consultant with the Professional Services team at Amazon Web Services. He has been with Amazon for 17+ years and has led migration projects for internal and external Amazon customers to move their on-premises database environment to AWS Cloud database solutions.