AWS Database Blog
Migrate Cloud SQL for MySQL to Amazon Aurora and Amazon RDS for MySQL Using AWS DMS
In this post, we demonstrate how to migrate from Cloud SQL for MySQL 8+ to Amazon Relational Database Service (Amazon RDS) for MySQL 8+ or Amazon Aurora MySQL–Compatible Edition using AWS Database Migration Service (AWS DMS) over an AWS Site-to-Site VPN. We cover preparing the source and target environments, exemplifying cross-cloud connectivity, and setting up DMS tasks. Since MySQL 5.x has now reached retirement, we also highlight considerations around Global Transaction Identifier (GTID) versus binary log replication, which are especially important for MySQL 8 and later.
Solution overview
AWS DMS supports homogeneous data migrations from source database to the equivalent engine on Amazon RDS or Amazon Aurora. AWS DMS homogeneous migration creates a serverless environment that uses native MySQL tools, reducing the complexity of manual migration scripts. It supports three migration approaches:
- Full load using mydumper/myloader
- Change data capture (CDC) using binlog replication
- Full load and CDC using mydumper/myloader combined with binlog replication
Migrating a MySQL database from Google Cloud SQL to Amazon RDS for MySQL or Aurora MySQL-Compatible using AWS DMS homogeneous data migration involves the following high-level steps:
- Prepare the source MySQL database (Google Cloud SQL)
- Prepare the target MySQL database (Amazon RDS or Aurora MySQL-Compatible)
- Create a source data provider
- Create a target data provider
- Create a DMS homogeneous data migration project
- Start the DMS homogeneous data migration
- Validate the migration: Verify data integrity, test application connectivity, and perform cutover
In this walkthrough, we use AWS Site-to-Site VPN for connectivity between GCP and AWS.
Site-to-Site VPN is quick to set up, cost-effective, and can be implemented directly by database administrators without involving network vendors. For database migrations between GCP and AWS using DMS, network bandwidth is a key consideration because the available bandwidth directly impacts migration duration and performance. AWS Site-to-Site VPN offers standard bandwidth tunnels up to 1.25 Gbps per tunnel or large bandwidth tunnels up to 5 Gbps per tunnel (requires Transit Gateway or Cloud WAN), while GCP HA VPN provides 1-3 Gbps per each Cloud VPN tunnel depending on packet size. When connecting the two, throughput is limited to 1.25 Gbps with AWS Standard Bandwidth tunnels or ~3 Gbps with AWS Large Bandwidth tunnels (constrained by GCP HA VPN).
Based on these bandwidth limitations, smaller databases can typically be migrated within reasonable timeframes over VPN—for example, a 500 GiB database would take approximately 1-2 hours over a 1.25 Gbps connection. However, for multi-terabyte databases or workloads requiring higher throughput and lower latency, AWS recommends using AWS Interconnect – multicloud, where AWS and Google Cloud have pre-built large pools of capacity between select Direct Connect and Google Cloud Interconnect PoPs, alleviating the need for maintaining physical connections.

Figure 1: Migration architecture
Prerequisites
Before you begin, make sure you have the following:
- Basic familiarity with AWS and GCP services.
- An AWS account with permissions to access the following services:
- AWS DMS
- Amazon RDS
- AWS Secrets Manager
- AWS VPN
- AWS Identity and Access Management (IAM)
- Source database: Cloud SQL for MySQL version 8+.
- Requested IAM roles: HomogeneousDataMigrationsRole.
- A Google Cloud account with permissions to access the following:
- VPC
- Cloud SQL
- Target database: Amazon RDS for MySQL or Aurora MySQL-Compatible version 8+.
- Established connection between AWS and GCP such as Site-to-Site VPN.
This solution has been specifically tested with MySQL 8.0.40. For other versions, additional testing is recommended.
Set up Site-to-Site VPN
Network configuration, such as setting up a Site-to-Site VPN and establishing a tunnel between AWS and GCP, is outside the scope of this post. For this walkthrough, make sure that the MySQL port is open and accessible between the AWS and GCP instances. To minimize internet latency between the two clouds, we recommend deploying them in the same geographic Region. For example, during the testing for this post, both AWS and GCP were deployed in the US West (Oregon) Region. In this post, we use a MySQL database named sampledb as an example and migrate it from GCP to AWS.
MySQL GTID compared to DMS Binlog Replication
As of this writing, AWS DMS does not use GTIDs for data replication even if the source data contains them. Instead, DMS relies on traditional binary log–based (binlog) replication to capture ongoing changes from the source.
Because GTID is not used, failover scenarios are not automatically tracked by DMS. If the source Cloud SQL instance fails over, the DMS task may need to be restarted with the correct binlog file and position.AWS DMS is optimized for one-time migrations and uses binary log position-based replication for maximum compatibility. For ongoing cross-cloud replication or scenarios requiring automatic failover with GTID tracking, native MySQL replication between Cloud SQL and RDS/Aurora may be more appropriate.
Prepare the Source Database (Google Cloud SQL)
- Verify your source Google Cloud SQL for MySQL instance is configured in a private subnet on GCP.
Note: DMS CDC requires binary logging to be enabled on the source database. In the Google Cloud console, when you create a new instance, both Automated backups and Point-in-time recovery are enabled by default. As a result, binary logging is automatically turned on. - Create a database user named dms_user with the following permissions:
- Store the
dms_usercredentials details in AWS Secrets Manager.
Prepare the Target Database (Amazon RDS for MySQL or Aurora)
To set up the target database on AWS and configure the required user privileges:
- Provision an Amazon RDS for MySQL or Aurora instance in a private subnet.
- Use the same MySQL version as the source database to facilitate compatibility.
- Create a database user named dms_user with the following permissions:
- Store the
dms_usercredentials as a secret in AWS Secrets Manager.
Configure homogeneous data migration in AWS DMS
To configure homogeneous data migration, go to the AWS DMS console, expand Convert and migrate section, and complete the following steps:
- Creating data providers:
Choose Data providers in the navigation pane, then choose Create data provider.
Figure 2: Creating data providersCreate data providers in AWS DMS to connect to your source MySQL instance on GCP and your target MySQL instance on AWS. Use the following settings:
GCP AWS Name <Provide a name to identify your data provider> Purpose Move to managed (homogeneous data migrations) Engine type MySQL Engine configuration Enter manually Choose RDS DB instance from list - Create instance profiles
Choose Instance profiles in the navigation pane, then choose Create instance profile.
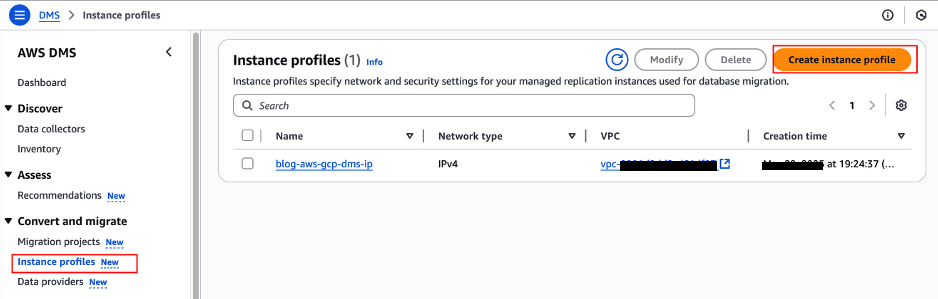
Figure 3: Creating instance profile
Create the instance profile in the same VPC as your RDS for MySQL DB instance to simplify the network configuration.
- Create an IAM role
After creating the data providers, configure an IAM policy and role to for the homogeneous data migration project in AWS DMS. The following IAM role (
DMS-Secret-Role) grants the necessary permissions and trust relationships, enabling DMS to retrieve database credentials from AWS Secrets Manager for both the source and the target databases.- Permission policies
- Trust relationships
- Create Migration Project
Choose Migration projects in the navigation pane, then choose Create migration project.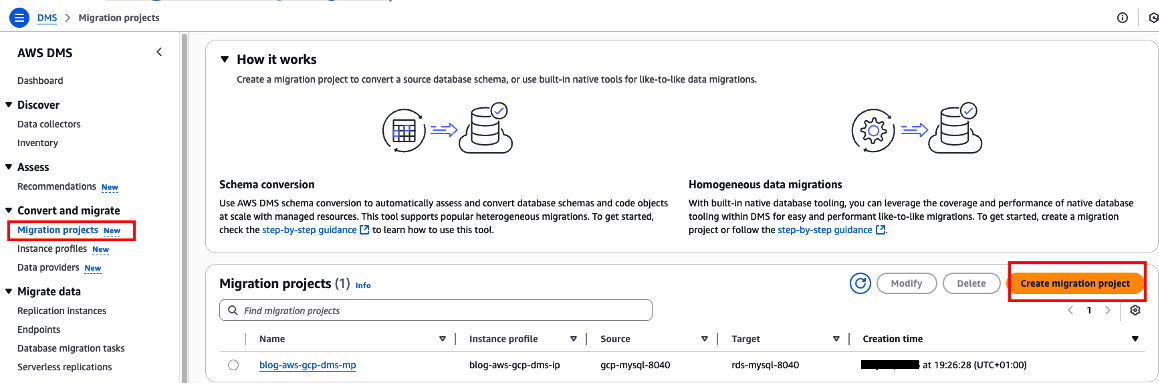
Figure 4: Creating migration project
- Enter a migration project name, then choose the instance profile, source data provider, and target data provider, and select Use the same IAM role for target data provider.
- After creating your migration project, open it, then on the Data migrations tab, choose Create data migration to create a new data migration task.

Figure 5: Creating data migration
- Choose your AWS DMS replication type: Full load, Full load and change data capture (CDC), or Change data capture (CDC). For this post, we use full load and CDC.
- Create the data migration and wait for it to be ready to run your data migration task.
Run data migration in AWS DMS
When the data migration is ready, select the migration task, and on the Actions dropdown menu, choose Start to begin the migration.

Figure 6: Migration task
Validate the migration
After migrating your MySQL database from GCP to AWS, it’s essential to verify that the data transferred correctly and remains consistent between source and target. The validation process involves connecting to both databases, running identical queries, and comparing the results to facilitate data integrity. In this section, we’ll use AWS CloudShell, a browser-based shell environment with pre-installed tools, to perform these validation checks without requiring additional software installation.
The mysql command-line tool is available by default in AWS CloudShell. Follow these steps to validate your migration:
- Open the AWS CloudShell terminal in the AWS console.
- Connect to both the source (GCP) and target (AWS) MySQL database.
- Run the same queries on both connections and compare results:
- Compare the results and make sure the data in the target database matches the source database.
Clean up
To avoid ongoing charges, remember to delete the resources created during this migration:
- Stop and delete DMS migration tasks and data providers
- Delete AWS resources (RDS instance, VPN connections, Secrets Manager entries, IAM roles)
- Delete GCP resources (Cloud SQL instance, VPN tunnels, Cloud Router)
Cost consideration
Migration costs vary based on data size, instance types, and duration. Key cost factors:
- MySQL instance types
- Amount of data transferred between GCP and AWS or DMS charges per migration instance hour
- Duration of the VPN connection
- Storage used during migration
For detailed pricing information, refer to the AWS Pricing Calculator and Google Cloud pricing calculator.
Conclusion
In this post, I explained how you can configure AWS DMS for homogeneous data migration, migrating a MySQL database from Google Cloud to Amazon RDS for MySQL or Aurora MySQL-Compatible. AWS DMS streamlines the migration process and helps reduce operational complexity.