Desktop and Application Streaming
Enabling Identity Federation with Shibboleth and Amazon AppStream 2.0
Shibboleth is an open-source project that provides single sign-on capabilities and identity federation solution used by research and education communities worldwide. If you are already using Shibboleth IdP, this post shows you how to configure it for Security Assertion Markup Language 2.0 (SAML 2.0) identity federation with Amazon AppStream 2.0.
Overview
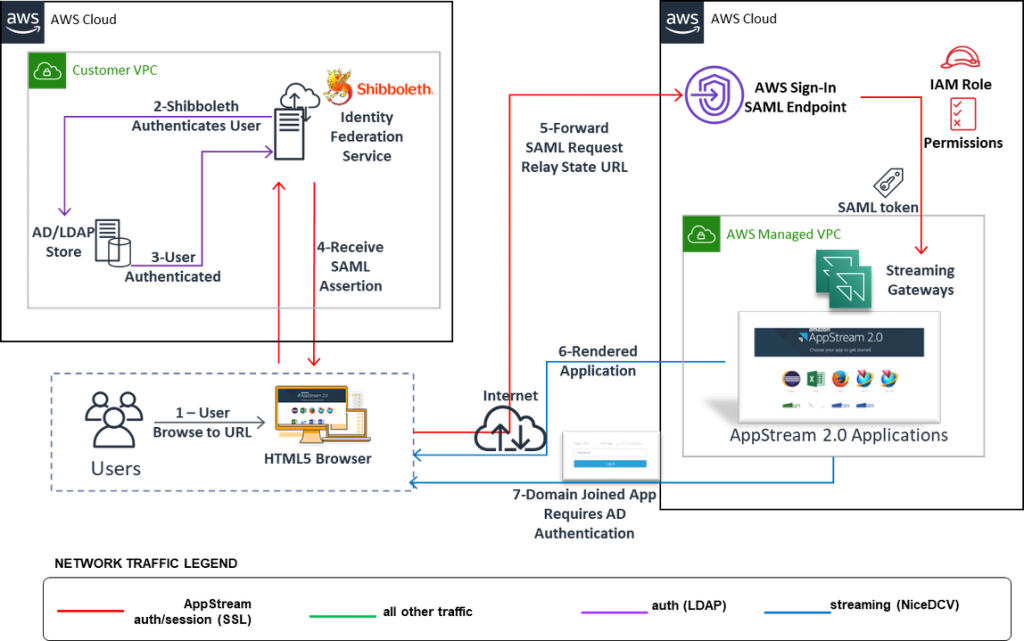
The AppStream 2.0 SAML 2.0 integration is modeled after the SAML 2.0 integration widely used by customers to access the Amazon Web Services (AWS) Management Console. At a high level, a Shibboleth IdP instance attempts to authenticate a user against Active Directory as defined in its ldap.properties file. Upon successful user authentication, the IdP sets up SAML 2.0 assertion attributes based on one or more Active Directory group memberships of the authenticated user. The Active Directory group is associated with an AWS Identity and Access Management (IAM) role. This grants streaming access to the user for an Amazon AppStream 2.0 stack defined in the IAM policy attached to the role.
After setting up SAML 2.0 federation for AppStream 2.0, users can browse to a unique URL and be taken directly to their AppStream 2.0 applications. When users sign in with this URL, they are authenticated against Active Directory. Upon successful authentication, the browser receives a SAML assertion as an authentication response from Shibboleth. That response is then forwarded to AWS, the service provider (SP), SAML endpoint. Temporary security credentials are issued after the assertion and the embedded attributes are validated. The temporary credentials are then used to create the sign-in URL. The user is then redirected to the AppStream 2.0 streaming session. The following diagram shows the process.
For more information, see: Single sign-on access in the AppStream 2.0 documentation.
This post expands on the previously documented Shibboleth IdP SAML integrations to access the AWS Management Console. We have added the additional steps to configure the Shibboleth IdP to perform browser-based identity federation with an existing Amazon AppStream 2.0 stack.
Here are the high-level steps we complete:
- Define a common RoleName for federating identities
- Configure Active Directory
- Provision an Active Directory group
- Populate the group with domain users
- Configure the existing Shibboleth IdP instance
- Configure Shibboleth to use AWS as a relying party
- Configure Shibboleth AWS metadata
- Add an LDAP object value to be retrieved upon authentication
- Define custom attributes to generate
- Authorize the custom attributes to be released in the SAML assertion
- Generate a persistent UserPrincipalName configuration
- Configure AppStream 2.0 identity federation
- Download the Shibboleth IdP metadata file
- Create the SAML identity provider in AWS IAM
- Create a SAML 2.0 federation IAM role
- Embed an inline policy for the IAM role
- Validate the configuration
- Generate the AppStream 2.0 relay state URL
- Generate the Shibboleth IdP federation URL
- Access the AppStream 2.0 stack from your browser
Prerequisites
For this walkthrough, you should have the following prerequisites:
- A working knowledge of Active Directory, Shibboleth, and AppStream 2.0
- An existing Microsoft Active Directory Forest or AWS Managed Microsoft AD
- An existing Linux-based Shibboleth IdP v3.x environment
- An existing Amazon AppStream 2.0 stack
NOTE: If needed a link to an AWS CloudFormation template that provisions a functioning Shibboleth IdP environment is included at the end of the post. See the “AWS CloudFormation Template to provision a Shibboleth IdP EC2 instance” section at the end of this blog post for details and instructions.
For this blog, we use example.com as the name of the Active Directory domain, ExampleStack as the name of our existing domain joined Amazon AppStream 2.0 stack, and shib3idp.example.com as the hostname of the existing Shibboleth IdP instance. Remember to replace them with the appropriate values for your configuration. Shibboleth integration is case sensitive. It is imperative that you are consistent and conscience of this as you work through the configuration.
Step 1: Define a common RoleName for federating identities
When federating identity via SAML 2.0 to AWS accounts, Active Directory groups are mapped to AWS IAM identity providers and roles in an AWS account. The federated sessions assume these IAM roles. We must create an Active Directory group and AWS IAM role with specific patterns that can be matched using regex. In this blog, we use the pattern AS2-<AWSAccountNumber>-<RoleName> for the Active Directory group, and <IAM Identity Provider>-<RoleNameSuffix> for the corresponding AWS IAM role.
We use the prefix AS2 to indicate that the Active Directory group is used for AppStream 2.0 access. This helps to separate domain groups used for AWS Management Console access, which often use the prefix AWS. You can use any prefix you want, however keep it same for all Active Directory groups participating in SAML federation.
The <RoleNameSuffix> value, here we are using AS01, is a common value found in both the Active Directory group and the AWS IAM role name. We use this common value to facilitate the federated association. We chose a four character suffix that we can map to a specific AppStream 2.0 stack. You can use the AppStream 2.0 stack name, but be aware of SAML 2.0 RelayState value string length limitation as noted in section 3.4.3 of the bindings specification.
For this blog, we use the following values:
AppStream 2.0 stack name: ExampleStack
Active Directory group name: AS2-111122223333-AS01
AWS IAM role name: shib3idp-AS01
Step 2: Configure Active Directory
In this step, we create the Active Directory group using the naming convention we defined in the previous step, AS2-<AWSAccountNumber>-<RoleNameSuffix>. Replace <AWSAccountNumber> with the AWS account number in which the AWS IAM role and identity provider for a federated login will be provisioned. Replace <RoleNameSuffix> with the common value, in this example AS01.
Provision an Active Directory group
Using Active Directory Users and Computers, create an Active Directory group named AS2-111122223333-AS01. Replacing 111122223333 with you AWS account number.
Optionally, add a note and description to the Active Directory group such as: “Group members are granted federation access through the AWS IAM ‘shib3idp’ identity provider to the AppStream 2.0 ‘ExampleStack.’”

Populate group with domain users
Using Active Directory Users and Computers, add the users who need access to the AppStream 2.0 stack to the newly created group.
Step 3: Configure existing Shibboleth IdP instance
The AppStream 2.0 SAML 2.0 configuration requires the Shibboleth IdP to pass two attributes. A RoleSessionName that is a username and a Role that is a list of the IAM roles mapped to the user’s Active Directory groups. There are three key things to know:
- For stacks with domain-joined fleets, the RoleSessionName value must be provided in the format “domain\username” using the sAMAccountName or “username@domain.com” using userPrincipalName. For this blog, we are going to configure Shibboleth to return the userPrincipalName value from Active Directory upon successful authentication.
NOTE: Be careful to not assume the value of a userPrincipalName equates to an email address of a given user as they may not match. A userPrincipalName is not the same as an email address although it can match the user’s email address in some case.
- This RoleSessionName attribute must be configured as a persistent type. Setting the value to persistent ensures that your IdP sends the same unique value for the attribute in all SAML requests from a particular user.
- The Role attribute contains one or more AttributeValue elements that list the IAM role and SAML identity provider mapped by your IdP for the user. The role and identity provider are specified as a comma-delimited pair of ARNs. We configure the Shibboleth IdP instance to map the Active Directory groups of the user to AWS IAM roles.
For more information, see step 5 of the Setting Up SAML guide.
Configure Shibboleth to use AWS as a relying party
Shibboleth uses the relying-party.xml file to specific AWS as a service provider. To do so, we edit the /opt/shibboleth-idp/conf/relying-party.xml file and add this entry for AWS at the end of the file:
<!—Amazon AppStream 2.0 Setup -->
<bean parent="RelyingPartyByName" c:relyingPartyIds="urn:amazon:webservices">
<property name="profileConfigurations">
<list>
<bean parent="SAML2.SSO"
p:postAuthenticationFlows="attribute-release"
p:encryptAssertions="false"
p:assertionLifetime="PT5M"
p:signResponses="false"
p:signAssertions="true"
p:includeConditionsNotBefore="true"
p:includeAttributeStatement="true"
p:nameIDFormatPrecedence="urn:oasis:names:tc:SAML:2.0:nameid-format:persistent" />
<ref bean="SAML2.ECP" />
<ref bean="SAML2.Logout" />
<ref bean="SAML2.AttributeQuery" />
<ref bean="SAML2.ArtifactResolution" />
</list>
</property>
</bean>
</util:list>
</beans>
The line p:nameIDFormatPrecedence=”urn:oasis:names:tc:SAML:2.0:nameid-format:persistent” /> is added specifically for AppStream 2.0. This is to make the UserPrincipalName identifier precedence a persistent format.
Configure AWS metadata URL details
Shibboleth IdP requires SAML metadata to establish connected with relying parties and understand its related configuration options. Here we edit the /opt/shibboleth-idp/conf/metadata-provider.xml file and add this entry for AWS at the end of the file:
<!-- AWS as Service Provider (SP) metadata -->
<MetadataProvider id="AWS"
xsi:type="FileBackedHTTPMetadataProvider"
metadataURL="https://signin.aws.amazon.com/static/saml-metadata.xml"
backingFile="/opt/shibboleth-idp/metadata/aws.xml"/>
</MetadataProvider>
This entry instructs our Shibboleth IdP instance where to pull the AWS metadata file from and where to save a copy.
Add an LDAP object attribute to be retrieved upon authentication
We must update the list of attributes that are returned from Active Directory to include the userPrincipalName value. To do this, we modify the LDAP.returnAttributes line, of the /opt/shibboleth-idp/conf/ldap.properties file to include the userPrincipalName like:
idp.attribute.resolver.LDAP.returnAttributes = cn,displayName,mail,memberOf,userPrincipalName
Define custom attributes to generate
As discussed, the key component of the AppStream 2.0 SAML 2.0 configuration is the mapping of an Active Directory group to an AWS IAM role. This mapping is defined in our Shibboleth IdP through the configuration of the /opt/shibboleth-idp/conf/attribute-resolver.xml file. We define three attributes to pass as the assertions for our authenticated user. These are three different types of attributes, a mapped one, a pass-through one, and a static one. We are inserting these entries into the existing Building SAML Attributes section of the attribute-resolver.xml file.
First, the Role attribute is where we map Active Directory groups to IAM roles for a given user. This is where the naming convention for both the Active Directory group and IAM role is crucial.
The entry to insert is:
<AttributeDefinition id="awsRoles" xsi:type="Mapped">
<InputDataConnector ref="myLDAP" attributeNames="memberOf"/>
<AttributeEncoder xsi:type="SAML2String" name="https://aws.amazon.com/SAML/Attributes/Role" friendlyName="Role"/>
<ValueMap>
<!-- In this case Active Directory group AS2-AWSAccountId-Role is mapped to IAM
roles arn:aws:iam::$1:role/shib3idp-$2-Role with SAML federation.
$1 : Regex. pattern matches the AccountId (for example: from AS2-11112222333-Role, $1 matches as 111122223333
$2 : Regex. pattern matches the remaining part (for example: from AS2-11112222333-Role, $2 matches as Role -->
<ReturnValue>arn:aws:iam::$1:saml-provider/shib3idp, arn:aws:iam::$1:role/shib3idp-$2</ReturnValue>
<SourceValue>CN=AS2-(\d{12})-(\w*),.*</SourceValue>
</ValueMap>
</AttributeDefinition>
This mapping parses any Active Directory group names returned in memberOf that match the pattern AS2-<AWSAccountNumber>-<RoleNameSuffix>. The IAM role name suffix, $2, and AWS account number, $1, are used to return the ARNs of the IAM identity provider and role mapped to the Active Directory group.
Second, the RoleSessionName attribute is configured to pass through the userPrincipalName value that is returned from Active Directory for the authenticated user.
The second entry to insert is:
<AttributeDefinition id="awsRoleSessionName" xsi:type="Simple">
<InputDataConnector ref="myLDAP" attributeNames="userPrincipalName"/>
<AttributeEncoder
xsi:type="SAML2String"
name="https://aws.amazon.com/SAML/Attributes/RoleSessionName"
friendlyName="RoleSessionName" />
</AttributeDefinition>
Here we are using the data connector “myLDAP”. Replace this with the data connector name defined for your existing Active Directory/Shibboleth IdP configuration. If you are using the AWS CloudFormation template provided at the end of this blog post, keep “myLDAP”.
Third, the final attribute to add is an optional, but recommended, static attribute for the session duration. In this example, we set it to 3600 seconds/1 hour.
<!-- (Optional) Session duration attribute -->
<AttributeDefinition id="awsSessionDuration" xsi:type="Simple">
<InputDataConnector ref="staticAttributes" attributeNames="awsSessionDuration" />
<AttributeEncoder
xsi:type="SAML2String"
name="https://aws.amazon.com/SAML/Attributes/SessionDuration"
friendlyName="awsSessionDuration" />
</AttributeDefinition>
This configuration references a “staticAttributes” data connector definition. We must append this data connector configuration to the end of the attribute-resolver.xml file immediately after the data connector defined for your existing Active Directory/Shibboleth IdP configuration. In this blog post, this is “myLDAP”.
<!-- (Optional Connector) Implementing longer Session duration -->
<DataConnector id="staticAttributes" xsi:type="Static">
<Attribute id="awsSessionDuration">
<Value>3600</Value>
</Attribute>
</DataConnector>
Authorize the custom attributes to be released in the SAML assertion
The attributes that Shibboleth IdP sends are now defined. The next step is to configure the Shibboleth IdP instance to send them. To do this, we edit the /opt/shibboleth-idp/conf/attribute-filter.xml file. We populate the Release policy section of the XML file as follows:
<!-- Release/Send attributes awsRoles and awsRoleSessionsName attributes to AWS SP -->
<AttributeFilterPolicy id="releaseAWSToAWS">
<PolicyRequirementRule xsi:type="Requester" value="urn:amazon:webservices"/>
<AttributeRule attributeID="awsRoles">
<PermitValueRule xsi:type="ANY"/>
</AttributeRule>
<AttributeRule attributeID="awsRoleSessionName">
<PermitValueRule xsi:type="ANY"/>
</AttributeRule>
<!-- Optional -->
<AttributeRule attributeID="awsSessionDuration">
<PermitValueRule xsi:type="ANY"/>
</AttributeRule>
<AttributeRule attributeID="transientID">
<DenyValueRule xsi:type="ANY"/>
</AttributeRule>
</AttributeFilterPolicy>
By defining these entries in this file, we specify the IdP server should send the Roles, RoleSessionName, and SessionDuration attributes to AWS. Additionally, to force the persistent requirement for userPrincipalName we deny send any transient data types.
Generate a persistent UserPrincipalName configuration: saml-nameid.xml
Finally, we must update the /opt/shibboleth-idp/conf/saml-nameid.xml file to add an entry that is used to generate name identifiers. In our case, the userPrincipalName value that populates the RoleSessionName attribute.
Within the SAML 2 NameID generation section of this file, insert this code:
<bean parent="shibboleth.SAML2AttributeSourcedGenerator"
p:format="urn:oasis:names:tc:SAML:2.0:nameid-format:persistent"
p:attributeSourceIds="#{ {'awsRoleSessionName'} }" />
Step 4: Configure AppStream 2.0 identity federation
Now that your Shibboleth IdP server has been configured, we can begin the AppStream 2.0 federation configurations.
Download the Shibboleth IdP metadata file
The metadata file must be downloaded from your Shibboleth IdP server. The metadata file is a signed document that is used to establish the relying party trust. Do not edit or reformat this file. Save the file to a local location that you can access from the AWS Management Console later.
Open a browser and navigate to https://hostname:8443/idp/shibboleth, replacing hostname with the IP address or the fully qualified domain name (FQDN) of your Shibboleth IdP instance. To download our metadata file, we browse to this address: https://shib3idp.example.com:8443/idp/shibboleth.
NOTE: If you are using a self-signed security certificate, you will see a message about a problem with the website’s security certificate. This is because you are not using a public key certificate from a CA when you access the Shibboleth IdP instance. Click Continue to this website. This experience is slightly different based on the browser used.
The browser displays the metadata document from the Shibboleth IdP server.

Save the document on your computer as shib3idp-metadata.xml. Remember the path used to save the file.
Create the SAML identity provider in AWS IAM
Next we create the SAML provider in IAM using the console, or alternatively using the AWS CLI.
- From the IAM console, in the navigation pane, click Identity providers and then click Create Provider.
- For Provider Type, choose SAML.
- For Provider Name, enter shib3idp. NOTE: Be sure you use the name ‘shib3idp’. This walkthrough uses that name, all in lower case, in the configurations.
- For the Metadata Document, choose the previously downloaded the IdP server’s metadata document.
- Click Next Step.
- Verify the provider information and choose Create.
Create a SAML 2.0 federation IAM role
In Step 2, we provisioned the Active Directory group. Now we are going to provision the associated AWS IAM role.
- In the IAM console, choose Roles, Create new role.
- For the type of trusted entity, choose SAML 2.0 federation.
- For SAML provider, choose the Shibboleth IAM identity provider from the dropdown that you created earlier, shib3idp.
- Do not select either Allow programmatic access only or Allow programmatic and AWS Management Console access.
- For Attribute, choose SAML:aud from the dropdown.
- For Value, enter https://signin.aws.amazon.com/saml. Then click Next: Permissions.
- We add permissions for this role later, but for now click Next: Tags.
- Optionally, add any tags you need, then choose Next: Review.
- Enter the Role name we defined in step one, shib3idp-AS01. Make sure to enter the name exactly as it is case sensitive.
- Optionally, for Role description, enter a description for the new role. For example, “Grants federated access through the shib3idp IAM identity provider to the AppStream 2.0 ExampleStack via Shibboleth IdP v3x SAML integration. Members of the associated Active Directory group AS2-111122223333-AS01 are granted access.”
- Click Create role.
Embed an inline policy for the IAM role
Next we create an inline policy in order to grant permission to connect to our AppStream 2.0 stack. For more information, see step 3 of the guide Setting Up SAML.
- In the navigation pane, choose Roles.
From the list of roles, click on the role name of the IAM role previously created.
On the Permissions tab, choose Add inline policy
On the Create policy screen, choose the JSON tab.
Copy and paste the following policy, replacing the existing placeholder policy.
{
"Version": "2012-10-17",
"Statement": [
{
"Effect": "Allow",
"Action": "appstream:Stream",
"Resource": "arn:aws:appstream:<REGION-CODE>:<ACCOUNT-ID >:stack/<STACK-NAME>",
"Condition": {
"StringEquals": {
"appstream:userId": "${saml:sub}"
}
}
}
]
}
6. Replace the following values:
- Replace <REGION-CODE> with the Region code you are using AppStream 2.0. For example, us-east-1 for N. Virginia.
- Replace <ACCOUNT-ID > with your AWS account ID. For example, 111122223333.
- Replace <STACK-NAME> with the case-sensitive name of your AppStream 2.0 stack. For example, ExampleStack.
7. Choose Review policy.
8. Enter a descriptive name for Name.
9. Click on Create policy.
Step 5: Validate the configuration
To federate the user to an AppStream 2.0 session, you must add the stack relay state URL as a query string to your Shibboleth IdP login URL.
Generate the AppStream 2.0 relay state URL
Now that all of the components have been configured, we must generate the relay state URL portion of our Shibboleth IdP federation.
To construct the relay state URL, we need the following information:
- Your AWS account ID
- Your AppStream 2.0 stack name
- The relay state endpoint associated with the Region in which your stack is located.
Refer to the AppStream 2.0 documentation to find the proper relay state endpoint for the Region of your AppStream 2.0 stack. Since we are adding the relay state URL as a query string, we must replace ‘?’ and ‘&’ with their HTML encoded characters, ‘%3f’ and ‘%26’ respectively. The generic relay state format to populate with the collected data points is:
https://relay-state-region-endpoint%3fstack=stackname%26accountId=aws-account-id-without-hyphens
For our example, the final relay state URL would look like this:
https://appstream2.us-east-1.aws.amazon.com/saml%3fstack=ExampleStack%26accountId=111122223333
Generate the Shibboleth federation IdP login URL
Our Shibboleth IdP configuration is almost complete. In order for users to access the AppStream 2.0 ExampleStack, we must send them the Shibboleth IdP federation URL they will use for SSO access to their AppStream 2.0 stack. We construct this URL by adding the stack relay state URL as a query string parameter to your Shibboleth IdP FQDN. The base URL format for this is:
https://shibbolethIdPFQDN:8443/idp/profile/SAML2/Unsolicited/SSO?providerId=urn:amazon:webservices&target=AppStream2RelayStateURL
In our case, our end users would access the URL:
https://shib3idp.example.com:8443/idp/profile/SAML2/Unsolicited/SSO?providerId=urn:amazon:webservices&target=https://appstream2.us-east-1.aws.amazon.com/saml%3fstack=ExampleStack%26accountId=111122223333
Access the AppStream 2.0 stack from your browser
We are now ready to try out our solution to validate user authentication against Active Directory, generate SAML assertion string, and start an AppStream 2.0 session. Open a browser of your choice and navigate to the Shibboleth IdP federation URL. You should be prompted with the authentication window of the Shibboleth IdP instance.

Login using an account you added to the Active Directory group created in step two. Upon successful login, you are prompted with an intermediate screen that displays the SAML attributes to be posted to AWS as the service provider.

Keep the “Ask me again…” option selected and click Accept.
If the account belongs to multiple groups matching the AS2-<AWSAccountNumber>-<RoleNameSuffix> pattern, you will be prompted to select a role:

You will must select the role associated with the AppStream 2.0 stack. In this blog post, shib3idp-AS01. Select the appropriate role, and choose Sign in.
You are then directed to the Application Catalog of the ExampleStack stack.

Since this is a domain joined fleet, you are prompted for the account’s domain password once the specific AppStream 2.0 fleet instance has been allocated:

Finally, the streamed application starts within the browser:

AWS CloudFormation template to provision a Shibboleth IdP EC2 instance
In case you do not have a functional Shibboleth IdP environment or want to build a new environment quickly, we have provided a AWS CloudFormation template that deploys a single Shibboleth IdP v3.4.7 running on an Amazon Linux EC2 instance. The steps to configure and provision the instance follow.
AWS CloudFormation template specific requirements
Prerequisites:
- An AWS account
- An existing VPC
- An existing domain joined Amazon AppStream 2.0 stack
- A public subnet within the VPC for the Shibboleth IdP EC2 instance
- Access to an existing Active Directory environment from the VPC.
- Ability to create a publicly facing DNS A-record, using Amazon Route 53 or your existing DNS solution, for your Shibboleth IdP instance.
- An Active Directory service account for LDAP bind queries and searches on behalf of the Shibboleth IdP server. Standard user permissions to read Active Directory resources are all that is required.
Download the AWS CloudFormation template
In this section, you download the AWS CloudFormation template that deploys the Shibboleth IdP v3.4.7 EC2 instance on your behalf. You can find detailed information related to the installation and configuration for Shibboleth IdP here: Shibboleth IDP3 documentation home page.
- The sample template provided for this tutorial is available here: ShibIDPV347-AS2Blog.yaml.
- Save the file on your computer as ShibIDPV347-AS2Blog.yaml and note the location where you are saving it.
Use the AWS CloudFormation stack to provision your Shibboleth IdP EC2 instance
- Open the AWS CloudFormation console, and select Create stack.
- Select Template is ready, then Upload a template file.
- Select Choose file to navigate to the path you downloaded the ShibIDPV347-AS2Blog.yaml file to select it, then choose Next.
- Enter a value for Stack name. Then provide the following configuration parameters:
| Parameter | Value |
| Stack Name | Stack name can include letters (A-Z and a-z), numbers (0-9), and dashes (-). |
| Select VPC to use | Existing VPC hosting your AppStream 2.0 stack |
| SubnetId | A public subnet within the VPC selected |
| Network to allow incoming SSH and HTTPS access from | CIDR block to allow access to Shibboleth EC2 instance. |
| Shib3ServerKeyName | AWS account key pair to use for EC2 access |
| IdpName | Name to use for AWS identity provider |
| AWSRolePrefix | Value to use for the prefix of AWS IAM roles. (Should match your IDPName above) |
| SessionDuration | Time duration for federation session to stay alive |
| LDAPServer | IP address of a domain controller or LDAP server |
| LDAPUser | LDAP service account name created earlier |
| LDAPPassword | Domain password of the LDAPuser |
| LDAPBasedDN | Distinguished Name of the base OU the IdP server uses when searching for user objects for authentication |
| LDAPuserFilter | Keep default entry of “sAMAccountName” |
| LDAPGroupPrefix | Keep default entry of “AS2” |
| Shib3ServerFQDN | Fully qualified domain name (FQDN) to use for your IdP server |
| Shib3InstallPassword | Arbitrary 8-character password to use when generating the IdP server PKCS 12 certificates |
This Shibboleth EC2 instance must be able to access the Active Directory servers for LDAP queries. It must also have access to the Internet to download the Shibboleth v3.4.7 source and related components.
Conclusion
In this post, we walked through configuring a Shibboleth identity provider to enable SAML 2.0 federation to an AppStream 2.0 stack. As you go forward, keep in mind that for every AppStream 2.0 stack, you must create a separate SAML application and IAM identity provider. To learn more, see Single Sign-on Access to AppStream 2.0 Using SAML 2.0.
To learn more about Amazon AppStream 2.0, see:
About the Authors
 Greg LaVigne, is a Sr. End User Computing Specialist Solution Architect for AWS, based in Chicago, IL. Greg provides technical and architectural guidance to Enterprise customers building secure end user computing based solutions. His customers are looking to provide their users anytime access to data and applications on their favorite device, while helping IT maintain data security, reduce complexity, and improve user productivity. In his free time, he enjoys spending time with his family and spending time in his native Colorado.
 Dzung Nguyen is a Senior Consultant at AWS Professional Services, focusing on End User Computing solutions on AWS. He engages with customers to help design and implement complex solutions to meet business requirements.