Desktop and Application Streaming
Hardening DNS Resolution for Amazon WorkSpaces Personal
Amazon WorkSpaces Personal is a managed, secure Desktop-as-a-Service (DaaS) solution. You can use WorkSpaces to provision Windows and Linux desktops in just a few minutes and quickly scale across the globe. With WorkSpaces your users get a fast, responsive desktop they can access anywhere, anytime, from any supported device.
Customers using WorkSpaces want to maximize the security of their organizations in the cloud. An item often coming into consideration is security, integrity, and confidentiality of DNS traffic on their network. When customers examine the network traffic from their WorkSpaces, they can see DNS queries to resolvers that are not their directory’s IP addresses. This can raise concern as it resembles an occurrence of DNS exfiltration in appearance when, in fact, this behavior is normal and expected.
To understand this behavior, you need to dive into the architecture. WorkSpaces are created inside service-owned infrastructure; this is called the Management Network. The WorkSpace and its first network interface are launched in an Amazon Virtual Private Cloud (VPC), managed by the service.
A second network interface is created in the customer-owned VPC, the Customer Network. This makes the WorkSpace a multi-homed instance, having two network interfaces located in two different networks (figure 1).

Figure 1: a basic representation of the WorkSpaces network interfaces.
By default, Windows uses Smart Multi-Homed Name Resolution (SMHNR), an enhancement to the DNS client that attempts resolution over all DNS resolvers configured in all active network interfaces from lowest to highest metric. Whether SMHNR is enabled or disabled, Windows will try the resolution over all available interfaces. When SMHNR is enabled, the client starts involving other network interfaces sooner and simultaneously.
This explains why WorkSpaces customers see DNS queries to DNS resolvers not configured in the network interface they know from their VPC. This traffic is flowing between the WorkSpace and the DNS resolvers configured in the network interface in the Management Network because of Windows SMHNR. Customers who operate under strict regulatory frameworks may want to prevent any DNS queries to DNS resolvers that are not under their exclusive control.
Solution Overview
There are two available options to work around this situation:
- Use Windows Defender Firewall to block DNS traffic to the DNS resolvers in the Management Network.
- Deploy a Name Resolution Policy rule to route all DNS queries to the DNS resolvers in the Customer’s Network.
Both methods will deliver similar results: no DNS queries will reach the Management Network. The second method has the added value that it specifies DNS resolvers that are mandatory for all DNS queries. Even other resolvers in the customer’s Network won’t be considered. You can apply either or both simultaneously. Both options can be configured locally or using Group Policy. Alternatively, using local policy settings, you can build these configurations into your custom WorkSpaces images.
Prerequisites
- An AWS Account.
- A WorkSpaces environment with at least one available WorkSpace.
- A self-managed Active Directory or AWS Directory Service for Microsoft Active Directory domain.
- A Windows computer or EC2 instance that is joined to your domain and has Active Directory Administration Tools installed.
- An Active Directory domain user with privilege to create, edit and, link Group Policy Objects.
Configure a group policy object
To create a group policy object
- On a Windows computer that has the Group Policy Management feature installed, go to the Start Menu, type msc to open the Group Policy Management Console (GPMC).
- In the GPMC console tree, select Group Policy Objects in the forest and domain in which you want to create a GPO.
- Select New.
- In the New GPO dialog box, specify a name for the new GPO, and then select OK.
To edit a group policy object
- On a Windows computer that has the Group Policy Management feature installed, go to the Start Menu, and type msc to open the GPMC.
- In the GPMC console tree, select Group Policy Objects and find the GPO that you created in the previous section.
- Select the GPO, and then choose Edit.
Use Windows Defender Firewall to block DNS traffic to the DNS resolvers in the management network
Configure Windows Defender Firewall to block outbound DNS traffic to the DNS resolvers in the Management Network. The DNS resolver in the Management Network can be one of a few different IP address based on some architectural variables. You can proactively block all these IP addresses but make sure none of them matches your own VPC’s IP address block. Review Management interface IP Ranges in the WorkSpaces Administration Guide for a complete list of possible IP address ranges for the WorkSpaces Management Network.
To create the Windows Defender Firewall rule in the GPO
- On a Windows computer that has the Group Policy Management feature installed, select to the Start Menu, type msc to open the GPMC.
- Select the group policy object and choose Edit.
- Navigate to Computer Configuration > Policies > Windows Settings > Security Settings > Windows Defender Firewall with Advanced Security.
- Expand Windows Defender Firewall with Advanced Security console.
- In the navigation pane, choose Outbound Rules.
- Select New rule.
- On the Rule Type page of the New Outbound Rule wizard, select Custom, and then select Next.
- On the Program page, select All programs, and then select Next.
- On the Protocol and Ports page, select the protocol type that you want to block. Select the following options:
– Protocol type: UDP.
– Local port: All Ports.
– Remote port: Specific Ports and enter the number 53 in the textbox below this option.
When you’ve configured the protocols and ports, select Next. - On the Scope page, Select the following options:
– Which local IP address does this rule apply to: Any IP address.
– Which remote IP address does this rule apply to: These IP addresses.
Enter the following IP addresses in the textbox:
169.254.169.253
172.31.0.2
192.168.0.2
198.19.0.2
fd00:ec2::25
Select Next.
- On the Action page, select Block the connection, and then select Next.
- On the Profile page, select all three network location types, and then select Next.
- On the Name page, type a name and description for your rule, and then select Finish.
Repeat steps 1 to 13 to create a second Firewall Rule. This time select TCP protocol on Step 9 under Protocol Type.
Deploy a Name Resolution Policy rule to route all DNS queries to the DNS resolvers in the customer’s network
Configure Name Resolution Policies that enforce how the operating system handles DNS queries according to your preference. Using NRPT rules organizations can enforce what DNS resolver is queried to resolve part or all the DNS namespace.
To create a Name Resolution Policy rule
- On a Windows computer that has the Group Policy Management feature installed, select to the Start Menu, and type msc to open the GPMC.
- Select the group policy object and choose Edit.
- Navigate to: Computer Configuration > Policies > Windows Settings > Name Resolution Policy.
- The Create Rules dialog box will populate on the center panel.
- Expand the combo box under To which part of the namespace does this rule apply? and select Any.
- (Optional) In the DNSSEC tab, check the box Enable DNSSEC in this rule (figure 2).
- In the Generic DNS Server tab, check the box Enable DNS settings. The Generic DNS Server settings will now be available.
- Select Add and enter the IP address of the DNS resolver of your choice. Usually this will be the IP addresses of your WorkSpaces directory. Repeat this step to add additional IP addresses (figure 3).
- Select Create to create this rule.
- Select Apply and see that the rule has been added under Name Resolution Policy Table (figure 4).
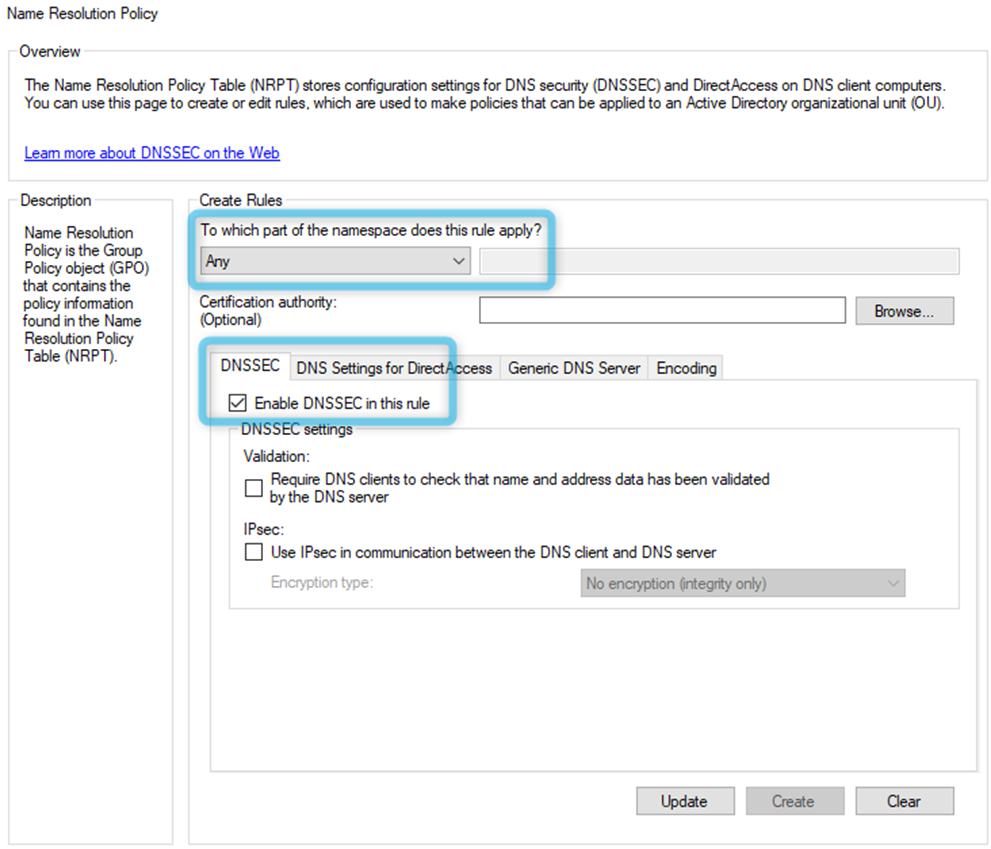
Figure 2: an image of the step 5 in the NRPT rule creation process.

Figure 3: an image of step 7 in the NRPT rule creation process.
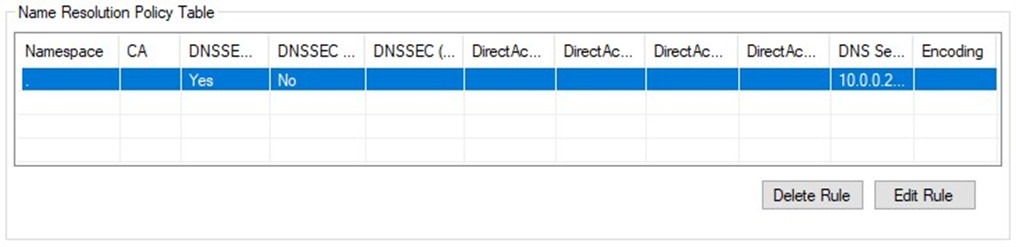
Figure 4: an image highlighting the newly created NRPT rule inside the GPO.
Cleanup
Group Policy Objects can be used to deploy changes that are persistent. In this post, you created a GPO that deploys custom Windows Defender Firewall rules or Name Resolution Policy rules. Follow these steps in order to revert these changes:
- Modify the same GPO to remove the custom firewall rules or name resolution rules.
- Allow enough time to let the policy be applied again to all target systems with the new settings.
- Validate that the custom firewall rules or name resolution rules have been removed from the target systems.
- Last, use GPMC to delete the GPO.
To remove a Windows Defender Firewall rule from the GPO
- Open the GPMC, select the group policy object and choose Edit.
- Navigate to Computer Configuration > Policies > Windows Settings > Security Settings > Windows Defender Firewall with Advanced Security.
- Expand Windows Defender Firewall with Advanced Security console.
- In the navigation pane, choose Outbound Rules.
- Select the rules that you created previously and choose Delete.
To remove a Name Resolution Policy rule from the GPO
- Open the GPMC, select the group policy object and choose Edit.
- Navigate to: Computer Configuration > Policies > Windows Settings > Name Resolution Policy.
- The Name Resolution Policy overview will populate on the center panel.
- Select the rules that you created previously and choose Delete Rule.
To delete a Group Policy Object
- Open the GPMC.
- In the GPMC console tree, select Group Policy Objects in the forest and domain in which you want to create a GPO.
- Select the GPO that you created previously and chose Delete.
Conclusion
DNS resolution plays a key role in cloud computing. A reliable, high-performing, and secure DNS infrastructure is a must-have component to pursue success in every type of business and organization. With the sustained growth of WorkSpaces as DaaS solution for customers, a strong security posture is crucial. In this post, I presented two simple and effective solutions to further enhance security of your DNS queries from your WorkSpaces. Setting an NRPT rule for the whole namespace you direct the operating system to route DNS queries only to DNS resolvers under your organization’s control. By implementing these rules, you can optimize observability and audit of all DNS traffic originating from your WorkSpaces.
For more information, see Network interfaces and Management interface IP ranges in the Amazon WorkSpaces Administration Guide.
 About the Autor
Nahuel is a Sr. CSE in AWS Support Engineering who specializes in Directory Services, Microsoft Technologies and MS SQL Server. He enjoys teaming-up with customers to discover new and exciting ways to make use of AWS services. Personally, Nahuel loves to spoil his niece and goddaughters above all else. Also, anything Dungeons and Dragons related (before it was popular), CrossFit, hiking & trekking and, sharing a pint with friends but “just one”.