Desktop and Application Streaming
Using multi-Region AWS Managed Active Directory with Amazon WorkSpaces
AWS Directory Service for Microsoft Active Directory is a fully managed Microsoft Active Directory that is often paired with Amazon WorkSpaces. Customers choose AWS Managed Microsoft AD because of its built-in high availability, monitoring, and backups. AWS Managed Microsoft AD Enterprise edition adds the ability to configure multi-Region Replication. This feature automatically configures inter-Region networking connectivity, deploys domain controllers, and replicates all the Active Directory data across multiple Regions, ensuring that Windows and Linux workloads residing in those Regions can connect to and use AWS Managed Microsoft AD with low latency and high performance. Unfortunately, the use of a managed directory that has been replicated to additional Regions cannot be natively registered with Amazon WorkSpaces.
Overview
In this blog, we will go through how you can use your multi-Region AWS Managed Microsoft AD with WorkSpaces. When using replicated Regions, it is not possible to register the replicated directory with WorkSpaces. We will need to use another mechanism to present the directory as a registrable entity. This will be accomplished by using an Active Directory Connector (AD Connector) that is pointed at the replicated Domain Controllers.
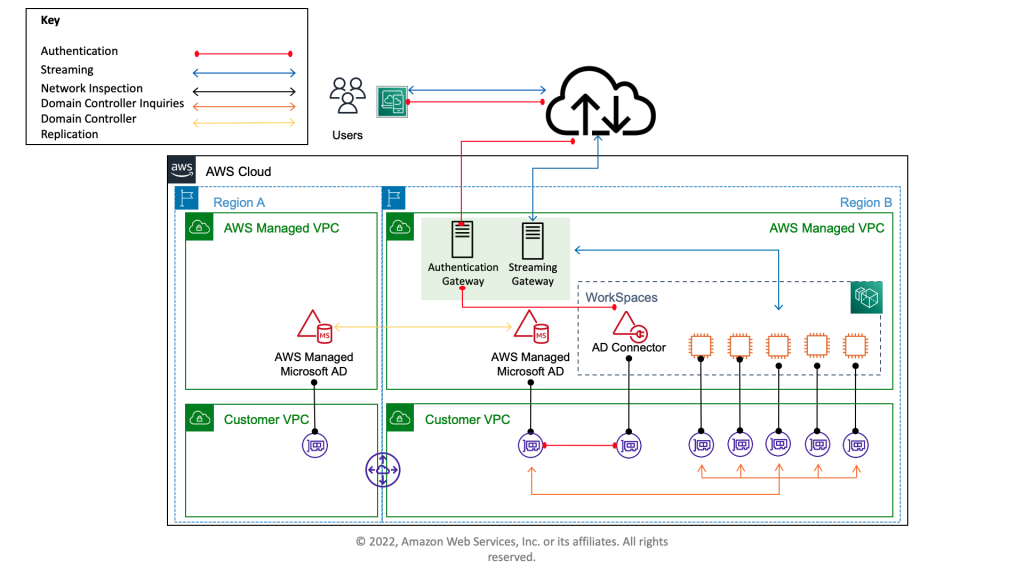
Solution Architecture
Walkthrough
In this walkthrough, you complete the following tasks:
- Retrieving your replicated Domain Controller’s information
- Create a DHCP Option Set for the Amazon VPC
- Create an AD Connector for WorkSpaces
Prerequisites
To follow the steps in the post, you need the following:
- Amazon Virtual Private Cloud (Amazon VPC) environments that can support WorkSpaces Availability Zones.
- Enterprise AWS Managed Microsoft AD with multi-Region Replication configured.
- The proper permissions to create an AD Connector, add DHCP options set, and Register WorkSpaces Directories.
- A service account for an AD Connector.
Step 1. Retrieving your replicated Domain Controller’s information
In this step, you will be gathering information about your current multi-Region AWS Managed Microsoft AD configuration. This information will be used within subsequent sections to configure the AD Connector.
- Open the Directory Services console.
- Choose the replicated Region of your directory from the Region menu.
- Click the Directory ID for the existing directory.
- In the directory details page, locate the IP addresses for your replicated Domain Controllers.
- Record the DNS IP addresses for use in later steps.
Step 2. Create a DHCP Option Set for the Amazon VPC
In this step, we will be configuring a DHCP options set for your VPC so that the configuration parameters relating to your replicated directory will be applied to all machines within that VPC. The Dynamic Host Configuration Protocol (DHCP) provides a standard for passing configuration information to hosts on a TCP/IP network. The options field of a DHCP message contains configuration parameters, including the domain name, domain name server, and the netbios-node-type.
- Open the VPC console.
- In the navigation pane, choose DHCP Options Sets.
- In the dialog box, enter values for the options using the IP addresses from the previous step for the Domain name servers.
- Choose Create DHCP options set.
- Make a note of the ID of the new set of DHCP options.
- In the navigation pane, choose Your VPCs.
- Select your existing VPC, and select Actions, Edit DHCP options set.
- In the DHCP options set list, select the set of options previously created.
- Choose Save.
Step 3. Create an AD Connector for WorkSpaces
In this step, you will be creating an AD Connector to present your replicated region to the WorkSpaces service.
- Open the Amazon WorkSpaces console.
- In the navigation pane, choose Directories.
- Click the Set up Directory button.
- Click the AD Connector radio button and select Next.
- Under Directory size, choose the size that meets your environments requirements.
- Click Next.
- Under VPC, select the VPC that you configured the DHCP options set for.
- Under Subnets, select your preferred subnets.
- Click Next.
- Enter the fully qualified name of your existing directory for Directory DNS name.
- Enter the DNS IP addresses from step 1 for DNS IP addresses.
- Enter the existing service account username for Service account username.
- Enter the service account password for Service account password, and Confirm password.
- Click Next.
- Create Directory.
- Wait for the new directory to become Active.
- Select the new directory in the WorkSpaces Directories console.
- Choose Actions, Register.
- Choose your preferred WorkSpaces subnets.
- Click Register.
If you would need to specify an OU for your WorkSpaces to be placed in, you can set this in the directory level settings.
Clean up
The resources created in this blog are free to you as a WorkSpaces customer assuming you have at least one running WorkSpace under your AD Connector. If you do not have a WorkSpace associated to your replicated Region’s AD Connector, there is a fee for the AD Connector. To ensure you don’t incur costs for unused resources, the following steps will show you how to terminate your AD Connector.
- Open the Amazon WorkSpaces console.
- In the navigation pane, choose Directories.
- Select the Directory associated with your replicated Region’s AD Connector. Click Actions, Deregister, Deregister confirmation.
- Once the Directory’s Registered status is No, you can proceed with deleting the AD Connector by selecting Actions, Delete, Delete confirmation.
Conclusion
After completing these steps, you can now use your multi-Region AWS Managed Microsoft AD with Amazon WorkSpaces. For next steps on how to deploy WorkSpaces in your new directory, see this guide.