AWS for Games Blog
Enabling Quest 2 AR/VR on EC2 with NICE DCV
As AR/VR becomes more prevalent, companies are starting to work within the cloud to develop, test, and deliver real-time AR/VR environments for their customers. To meet this demand, AR/VR companies must ensure that they have a performant solution for headset users.
AWS provides multiple avenues to achieve this kind of solution by utilizing HPC infrastructure and services. These include (but are not limited to) G4dn EC2 instances, the Nice DCV protocol, and high throughput network connections between the customer and the solution.
This post will teach you how to build out one of these solutions in order to enable the use of the Oculus Quest 2 VR headset on an AWS graphics intensive EC2 instance. Once it is setup, end-users can connect wirelessly to a highly performant cloud instance in order to run, test, and further develop AR/VR applications.
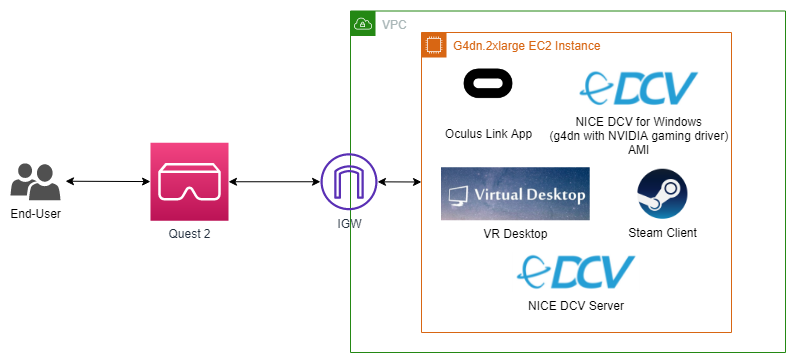
Overview of solution
For this instructional blog, you will create a basic infrastructure in order to test the solution. We will follow best practices to secure the connection to the remote instance, while providing a simple setup that should be up and running within an hour or two. Note: this post will not cover scaling the solution out in order to meet a large demand, but may be part of an updated version of this document.
Walkthrough
The following walkthrough provides information on the prerequisites, as well as steps needed to create the AWS resources required for this solution. Helpful links are also included for any third-party items necessary to stand up your AR/VR environment in AWS.
Prerequisites
For this walkthrough, you will need the following prerequisites:
- An AWS account
- Access/permission to create EC2 instances (Specifically G4)
- Access/permissions to AWS Marketplace
- Facebook account for Oculus and VR Desktop software
- An Oculus Quest 2 headset
- Oculus Link cable
- Steam Account for any Steam VR games to be tested
Create basic VPC
Based on the diagram presented above, you must create a basic VPC with a public subnet and internet gateway. You EC2 instance will be supplied a public IP for access, and later we will demonstrate how to lockdown access to said instance. For information on creating a VPC, and if you are still new to creating this environment type, see the following documentation: https://docs.aws.amazon.com/vpc/latest/userguide/vpc-getting-started.html
Spin up Graphics intensive EC2 instance
- Log into your Amazon console and access the EC2 service
- Click Launch instance
- “Step 1: Choose an Amazon Machine Image (AMI)”
- Search for string “nice dcv”
- Select AWS Marketplace
- Click Select next to “NICE DCV for Windows (g4dn with NVIDIA gaming driver)”
- Information on the image will be presented including pricing. Select Continue
- “Step 2: Choose an Instance Type”
- We suggest a minimum of g4dn.2xlarge
- “Step 3: Configure Instance Details”
- Network: Select the VPC in which you’d like to have the instance spun up. Otherwise add to default
- Subnet: Select the subnet you created in which you want your EC2 instance to reside
- Auto assign Public IP: set to Enable
- “Step 4: Add Storage”
- From the drop-down list, select General Purpose SSD (gp2)
- Set the size to an amount you believe you will need as based on games or applications to be installed
- Minimum for this use-case: 1TB
- “Step 5: Add Tags”
- Best practices: add tags if you believe you will need to charge back to another cost center, or if you need an easy way to find this instance for any reason
- “Step 6: Configure Security Groups”
 If you used the NICE DCV for Windows AMI from Step 1
- You should see two rules for SSH by using TCP on Port 22 and RDP over TCP by using port 3389 already added. These will be alternate ways to connect to the instance when needed
- We’ll be using Virtual Desktop VR, so add the following rules:
- Custom TCP & Custom UDP over ports 38810 – 38840. Add a description of “Virtual Desktop VR”
- We also want to be able to utilize QUIC UDP with Nice DCV
- Add two rules as Custom TCP and Custom UDP over port 8443. Add a description of “NiceDCV QUIC”
- For security purposes, we suggest the Source should be your own public IP address
- whatsmyip.com
- or select My IP from the drop down
- “Step 7: Review and Launch Instance”
- Review setup and select “Launch”
- Create a security key
- Download .pem to a location that you’ll remember
- Instance should be up and running in about 10 minutes
- “Step 1: Choose an Amazon Machine Image (AMI)”
Set up the NICE DCV Client on your local machine
- Download and install the NICE DCV client on your local machine based on your OS
- Open the NICE DCV client
- Click Connection Settings
- Select the Protocol tab
- Click the drop-down menu that currently has Automatic selected, and switch it to QUIC (with Datagram Extension)
- Ensure that the ports are set to 8443

- Click Ok
- Ensure that the ports are set to 8443
Connect to your EC2 instance by using NICE DCV
- Go back to the EC2 dashboard in the AWS console
- Select the instance you spun up earlier
- In the details section below, copy the Public IPv4 DNS
- Open NICE DCV client on local machine
- Paste the copied address into Hostname/IP Address
- Click Connect
- You may be prompted with a “Security Issue” prompt. Click Trust
- For Username, input “Administrator”
- For Password:
- Go back to EC2 instance page
- Select instance
- Click Connect
- Select RDP Client (even though we will not be using RDP)
- Click Get password
- Browse for the .pem you downloaded earlier
- Click Decrypt Password
- Copy password, and paste it into NICE DCV client
Enable USB Remotization
The following sets up a USB passthrough from your local machine to the remote instance. This lets the remote instance recognize your Quest 2 when connected with the Oculus link cable.
- From your local client machine
- Connect your Quest 2 VR headset to your local machine
- Follow instructions to pull the USB filter string for your headset: Using USB Remotization – NICE DCV
- Copy the filter string
- On the remote EC2 instance
- Follow instructions to add the filter string to the config file: Enabling USB Remotization – NICE DCV
- This will let you pass through your Quest 2 by selecting the settings button in the top left
- Select “Removable Devices”

- Toggle Quest 2 to on when required

- Select “Removable Devices”
Install third party items on remote EC2 instance
There is a known issue when installing the Oculus software. You must add the “Wireless LAN Service” feature in server manager in order to ensure that the Oculus software installs correctly. From there you can install all of the other items required:
- Add “Wireless LAN Service” feature
- Server Manager → Add roles and features
- Click through until you get to Features, and select the Wireless LAN Service feature
- Click Next to move to the end to install the feature
- Reboot the EC2 instance in order to complete the installation of the new feature
- Install Oculus Link Software: Setup Your Oculus: Quest, Quest 2, Link, Rift S & Rift | Oculus
- Install Virtual Desktop VR Software: Home | Virtual Desktop
- Add you Oculus/Facebook username in settings
- Install Steam Client: Steam, The Ultimate Online Game Platform
- Install SteamVR from client
Connect to Instance with the Quest 2 Headset
Now that everything is setup on both ends, you will connect to your EC2 instance through the VR Desktop application from your Quest 2 headset.
- Connect to your instance through the NICE DCV application that you installed on your local machine
- Ensure that the VR Desktop Streaming application is running
- Put on the Quest 2 VR headset and open the VR Desktop
- You should see your EC2 instance in the list of computers to connect to
- If not, then ensure that you’ve added your Oculus account to the desktop streamer on the EC2 instance
- Virtual Desktop should automatically connect. If not, then click the EC2 instance, and click Connect
- You should see your EC2 instance in the list of computers to connect to
- Once connected, you should be able to open Steam/Steam VR and play through the headset
Cleaning up
As this was most likely your first test in the VR/AR world on AWS, we suggest conducting the following cleanup in order to avoid incurring future charges:
- Stop or terminate your EC2 instance
- Delete basic VPC
- Delete Account if required
Conclusion
In this post, we’ve provided information on how to setup an EC2 instance in an AWS environment in order to enable AR/VR testing and development on the Quest 2 in a cost effective and performant manner.
Author bio
 |
Sam is a Sr. Solutions Architect focused on games customers. He helps large-scale developers and publishers innovate next-gen features on top of AWS. He is particularly passionate about helping developers build with AR & VR to driving deeper levels of engagement with players. |
 |
Andy is an End-User Compute (EUC) Solutions Architect with around 20 years of experience in IT infrastructure and management. He specializes in services such as AppStream 2.0 and WorkSpaces. He has worked with enterprise customers and their High-Performance Computing requirements through AppStream and the protocol it was built on, NICE DCV. |