AWS for Games Blog
Redesigning Amazon Lumberyard’s Viewport Interaction Model

Amazon Lumberyard recently introduced a new Viewport Interaction Model to make editing entities simpler and more intuitive in the Lumberyard editor.
The new Viewport Interaction Model enables you to manage entities in 3D spaces faster and more effectively, and is a complete reworking of one of our editor’s most essential production tools, the viewport manipulator. A tool that enables you to select, move, rotate and scale any entity within the Lumberyard editor.
This new feature also includes component mode editing, enabling you to lock a single entity component for editing. This will prevent you from accidentally editing other components that are attached to the entity.
As with any key feature updates, we like to put them in the hands of our customers as soon as possible. Often that means tools aren’t feature complete, but are in a functional position and with your feedback, are continually updated through future releases.
The new Viewport Interaction Model is ready for this first phase of release and is available in preview mode today.
So how did the new Viewport Interaction Model come about?
Redesigning the Lumberyard Viewport Interaction Model
When we started to develop and release new Entity and Slice workflows in Lumberyard, we realized that they weren’t highly compatible with the existing Viewport tools. Rather than attempting to retrofit that, we decided it would be a good time to address the surrounding methods with manipulators and how perspective viewport interactions function, by making a clean break.
When approaching the challenge of rebuilding the Viewport Interaction Model, we wanted to shed all of the legacy dependencies we were previously tied to and provide a better experience, no matter what our customers are editing. We also wanted that experience to be consistent across entities and components, while providing further control and flexibility.
For component mode, we didn’t want to build a specialized ‘X’ editor for a particular component (e.g. a Vehicle editor). Instead we wanted to provide a technology pattern for building any type of editor, so you can edit any type of component like shapes, lights, and cameras. This helps keep the editing experience consistent across all components, and prevents fragmented editors that could behave differently.
So what has changed?
Previously, the manipulator gizmo tool provided the essential requirements needed to, move, rotate, and scale objects. Movement in world or local spaces was switched with a dropdown setting. Selection of multiple objects resulted in multiple gizmos selected, which quickly resulted in visual clutter and selection errors.
None of these issue are terrible, but they can certainly slow you down. The team knew we could improve workflow efficiency for developers by providing a more robust and reliable method of object selection and manipulation.
In the new system, selection is locked to each selected entity without the risk of accidentally selecting something else. We use a single manipulator with multiple selections. And we center that manipulator between objects selected, but with a simple ctrl+lmb you can reposition that manipulator anywhere you want.
That’s just one of many changes we’ve implemented to the Viewport Manipulator. The best way to explain all the changes is to jump into the Lumberyard editor and see these changes for yourself. You can also see an overview of the changes made below.
The Viewport Interaction Model is currently available in preview mode. To try the feature for yourself, you need to turn it on:
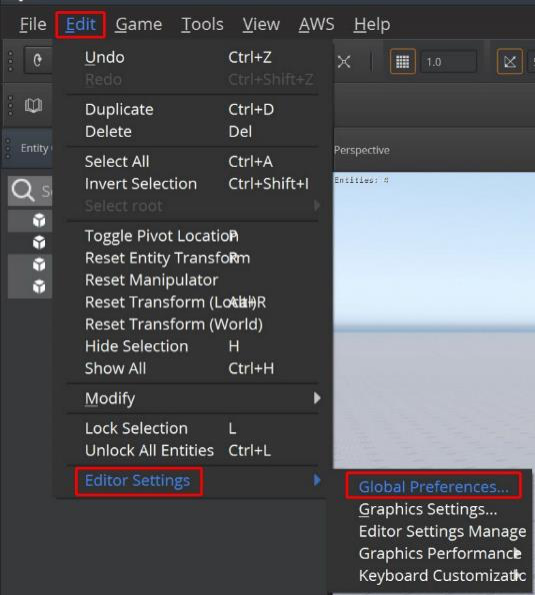
First in the Lumberyard Editor, choose Edit, Editor Settings, Global Preferences
In Global Preferences, check the button: Enable New Viewport Interaction Model (EXPERIMENTAL)

Restart your editor to activate this new mode.
So what’s new?
Selecting and deselecting entities
Once you select an entity, you have to intentionally deselect from your selection by pressing the spacebar or esc key. Alternatively, you can double click in the scene.
Selecting multiple entities
The manipulator now centers itself between the selected entities. In the examples below you’ll see how you can also position the manipulator to any location you want.
Switching between move, rotate, and scale
We maintain the same selection switch method from our old tool, as this is still an excellent hotkey method to change manipulation modes.
Quick toggling between move and rotate
The majority of your manipulator actions center around translation and rotation. This added feature gives you a fast and easy way to swap states while still keeping your fingers close to your mouse and the ctrl/alt keys. This action takes a little practice to remember, but really pays off in time.
Moving pivot to any location in scene

Moving the manipulator positions with a simple ctrl and move action opens up a completely new level of speed and efficiency when working with one or more entities.
Aligning pivot to a selected entity
Every entity in your scene now becomes a potential reference point for a quick movement or rotation action, giving you much faster methods to position any entity how you need it.
Moving selection to any position in scene

If you need to reposition an entity nearby, or even far away, this keystroke combination reduces that motion to just one click instead of multiple drags of the manipulator.
Matching rotation of another entity with the selected entity
Being aware of your mode state between rotate and translate quickly changes the function possible with the same keystroke inputs.
Rotating entities as a group or rotate on each entities pivots
You don’t always want the same rotate function when multiple objects are selected. With this keystroke change you can now simply rotate the entire group or rotate all selected objects based on their own pivot point.
Aligning an entity to another entity
Just like example 8, being aware of your mode state between rotate and translate quickly changes the function possible with the same keystroke inputs.
We hope that by combining these actions, your day-to-day editor workflow becomes a much faster and more effective experience. These ten examples are just cover the basics, visit the documentation pages to see more advanced selection and manipulation features to work with the Viewport Interaction Model.
And as usual, we want to hear from you! Let us know what you think of the new Viewport Interaction Model on our forums.