AWS HPC Blog
High performance actuarial reserve modeling using AWS Batch
Actuarial modeling is a key component in the insurance industry, used for analyzing and predicting various risks and potential losses. Due to the complexity of calculations involved, actuarial modeling requires significant computing power and resources. This is where AWS Batch, a high performance computing (HPC) service comes in.
In this blog post, we’ll discuss how to use AWS Batch to improve actuarial modeling workloads. We’ll provide an overview of Batch and its features, and we will show you how to use it to run actuarial modeling jobs. We’ll also discuss some of the benefits of using Batch for this, like scalability, cost-effectiveness, and integration with other AWS services.
Our reference architecture
Figure 1 describes the architecture we’ll create to show how you can achieve this.
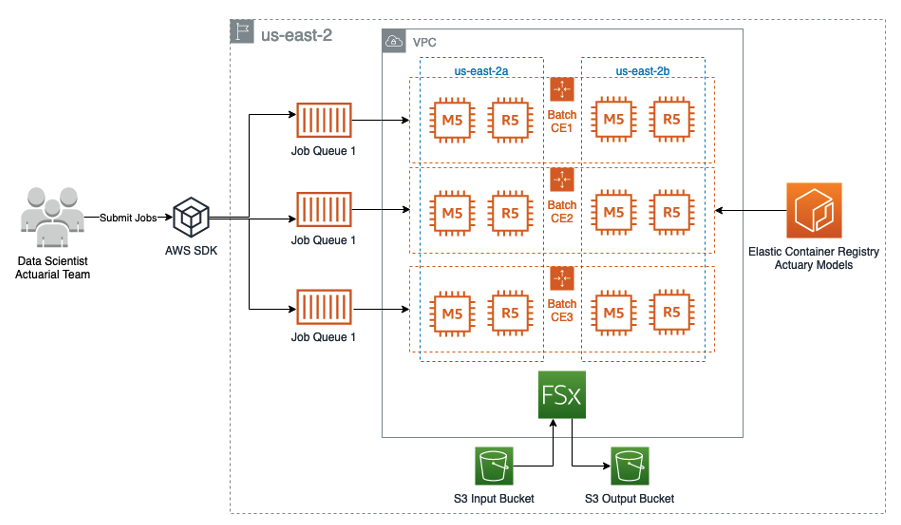
Figure 1. Our architecture showing AWS Batch managing EC2 Instances that mount an Amazon FSx for Lustre shared filesystem. Data are synced with Amazon S3 and containers images with actuarial models are pulled from Amazon ECR registries.
To manage data for our batch jobs, we’ll use Amazon Simple Storage Service (Amazon S3) for storing both input and final output data sets. Amazon S3 offers a range of benefits, including scalability, security, lifecycle management – and integration with other AWS services.
We’ll also use Amazon FSx for Lustre to access the input dataset on Amazon S3 through regular POSIX file operations. By configuring FSx for Lustre to import object metadata into the filesystem, all S3 bucket additions will be synchronized with the filesystem. When file data is accessed, FSx for Lustre will retrieve the S3 object data and store it in the filesystem. you can find out more about FSx for Lustre in our service documentation.
With the FSx for Lustre filesystem in place, multiple compute instances can access the data concurrently. To make this happen, we’ll use AWS Batch to manage those compute instances and the overall batch processing job. AWS Batch dynamically provisions the optimal quantity and type of compute resources (like CPU or memory-optimized instances) based on the specific requirements of each job submitted.
Key services and elements
There are several factors that are important for making actuarial modeling workloads run well in any environment. Let’s consider the most important ones that informed the choices we made when developing this architecture.
High performance compute: AWS provides access to compute instances with high performance CPUs, GPUs, and dedicated high-speed network connectivity for compute clusters. This means that your actuarial calculations can be performed faster, resulting in quicker model iteration and more accurate predictions.
Scalability: Actuarial modeling is a resource-intensive process, requiring a significant scale of resources. AWS Batch provides elastic scalability, meaning that resources can be scaled up or down depending on demand. This allows you to efficiently allocate resources based on your needs – and scale down to save costs during periods of low use.
Cost-effectiveness: There’s no additional charge for using AWS Batch. You only pay for the resources you use. Additionally, you can optimize your consumption further by using Amazon EC2 Spot Instances, which provide access to spare EC2 capacity at a reduced cost.
Data storage: AWS provides a variety of data storage options, including Amazon S3, which is highly scalable and durable, and stores large volumes of data reliably. This is important in actuarial modeling where massive amounts of data is necessary to get accurate predictions.
Collaboration: Actuarial modeling often involves collaboration between different teams and individuals. The cloud is an effective medium for collaboration, allowing teams to work together in a single environment, share data, and use the same computing resources.
Security: AWS has robust security protocols in place to protect data and computing resources. Actuarial modeling requires sensitive data, so the security measures provided by AWS will allow you to ensure you protect data from unauthorized access.
Walkthrough
To create this architecture in your own AWS account, follow these steps.
The steps we will perform are as follows:
- Run CDK deployment process to provision infrastructure in your account
- Submit sample AWS Batch jobs
- Modify Amazon EventBridge rule
- Look for the reserves results in AWS CloudWatch logs
Prerequisites
For smooth running, we advise spinning up an AWS Cloud9 instance.
However, if you elect to follow the deployment process using your local desktop, just make sure you have the following installed:
- AWS CDK version 2
- Docker
- AWS CLI installed and configured
Clone GitHub Repository and install dependencies
We’ll clone the GitHub repository with the source-code and install-dependencies for the AWS CDK stack.
In a terminal, run the following command to clone the repository:
git clone https://github.com/aws-samples/actuarial-reserve-modelling.gitAfter you cloned the repository, navigate to the infrastructure subfolder located in the cloned repository’s root directory, and run the following command:
python -m pip install -r requirements.txtDeploy AWS CDK stack
This will build a docker image locally and push it to Amazon Elastic Container Registry (Amazon ECR), deploy the infrastructure and copy policy_[*].csv files to the Amazon S3 bucket. The process can take anywhere between 15 to 30 minutes depending on the machine you’re running deployment from.
Continuing in the infrastructure directory, deploy the CDK stack with the following command:
cdk bootstrap --require-approval never && cdk deploy --require-approval neverAfter the cdk command successfully executes, you’ll see output results in the console. It should look something like this:
Outputs:
ActuaryCalculationStack.EventBridgeRuleName = ActuaryCalculationStack-BatchJobCompletedEventBrid-1CH4ZMV0LYL71
ActuaryCalculationStack.FsxFileSystemId = fs-09ae7e84627d424bf
ActuaryCalculationStack.LambdaFunctionName = ActuaryCalculationStack-sumReservesFunctionA86431B-FaA5vkjhj7vR
ActuaryCalculationStack.VPCId = vpc-037c8f46fb1927d8b
Stack ARN:
arn:aws:cloudformation:us-west-2:111122223333:stack/ActuaryCalculationStack/5144a3f0-d4b7-11ed-a662-02cf31d82b91
Next, copy the ActuaryCalculationStack.EventBridgeRuleName and ActuaryCalculationStack.LambdaFunctionName values and save them somewhere where you can access later (we’ll be asking you for these values soon).
Submit sample AWS Batch jobs using AWS CLI
In our example, each Batch array job worker selects its own discrete list of input files to process. The worker determines the files based on all the file names available on the FSx for Lustre filesystem, using the AWS Batch-provided AWS_BATCH_JOB_ARRAY_INDEX environment variable.
If you want to learn more about the structure of the entrypoint.sh file that our docker image uses, see this blog post for an example.
Before we begin, let’s take a quick look at a code snippet from a simulation we perform for actuarial modeling calculations:
    // Run the simulation
    let mut total_reserves = 0.0;
    for _ in 0..NUM_SIMULATIONS {
        let mut reserves = 0.0;
        for policy in &policies {
            // Calculate the number of claims for this policy
            let num_claims = thread_rng().sample(Exp::new(1.0 / (policy.term / CLAIM_INTERVAL)).unwrap());

            // Calculate the reserves for this policy
            for _ in 0..num_claims as usize {
                let claim_amount = thread_rng().sample(Normal::new(100.0, 10.0).unwrap());
                reserves += claim_amount;
            }
        }
        total_reserves += reserves;
    }
This code snippet, written in the Rust programming language, simulates insurance claim payouts for a set of policies over multiple iterations. The purpose of the simulation is to estimate the expected size of reserves that an insurance company will need to hold to cover claims for the given set of policies.
In our example, we’ll perform simulations using an exponential distribution and calculate the amount of each claim using a normal distribution. We calculate the reserves for each simulation by adding up the total number of claims for all policies. Finally, the total reserves across all simulations are added up to get an estimate of the expected volume of reserves needed to cover the given set of policies.
Now, we’ll submit Array job with ten workers using AWS CLI.
Navigate to the root directory of the cloned repository and run the following to submit a job with ten workers and to store the output for jobId in a local variable:
jobId=$(aws batch submit-job --cli-input-json file://test-10-workers.json 2>&1 | awk -F'"jobId": "' '/"jobId": "/{print $2}' | cut -d '"' -f1)You can run the same command with 2 or 5 workers using json files in the root directory (test-2-workers.json or test-5-workers.json).
Next, substitute ActuaryCalculationStack.EventBridgeRuleName with the value we asked to record during the Deploy AWS CDK stack section.
After that, run the command:
aws events put-rule --name "ActuaryCalculationStack.EventBridgeRuleName" --event-pattern "{\"source\":[\"aws.batch\"],\"detail-type\":[\"Batch Job State Change\"],\"detail\":{\"jobId\":[\"$jobId\"],\"status\":[\"SUCCEEDED\"]}}"This will modify our AWS EventBridge Rule to only be triggered on the SUCCEEDED status after all our jobs complete their execution.
Finally:
- Open the AWS Batch dashboard to view job status.
- In the left navigation pane, choose Jobs
- For Job queue, select
actuary-computing-job-queue - Wait until status of
test-10-workersjobchanges fromPENDINGtoSUCCEEDEDand navigate to your AWS Lambda console. - Use
LambdaFunctionNamevaluein the search box to find the Lambda function you deployed with CDK. - Open the Lambda function and navigate to Monitor→ View CloudWatch logs
- Look for
The total reserves value isline where you can see the aggregated value for the reserves across your workers. Here’s an example of what you can expect:
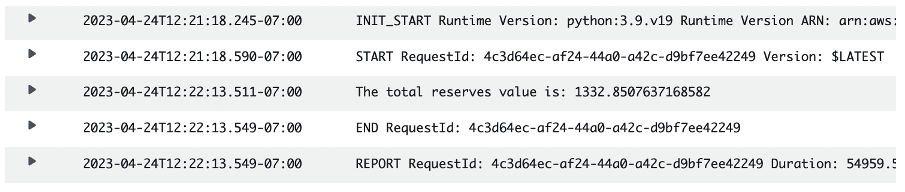
Figure 1 – an example of the output from the workload, recorded in CloudWatch logs
In our test, this job completed in 11 minutes and 40 seconds. Since we used an input dataset of 10 files, each worker processed just one file. We used 10,000 as the number of simulations per claim as a benchmark for actuarial computing in our Rust code.
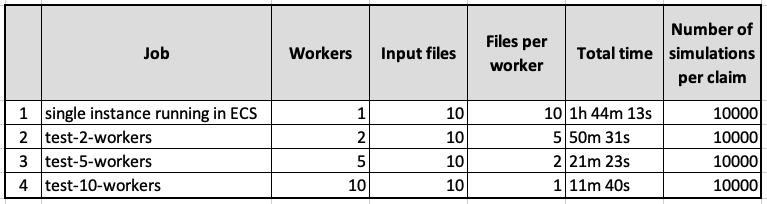
Table 1 – Summary of jobs and runtimes.
Pricing
There’s no additional charge for using AWS Batch, and you only pay for resources you use to store or run your workloads. For actuarial modeling with Batch, you can save on your costs by using Reserved Instances or leveraging Savings Plans. You can also use EC2 Spot Instances to realize significant cost reduction by specifying this in your compute-types when setting up your Batch compute environments.
To understand the cost efficiency of this solution, you can just calculate a normalized cost per simulation.
Pricing is per instance-hour consumed for each instance (from the time you launch an instance until you terminate it, or stop it). Billing is per-second. Let’s consider the following cost using an Amazon EC2 C4.2xLarge instance type, with a cost of $0.40 per hour.
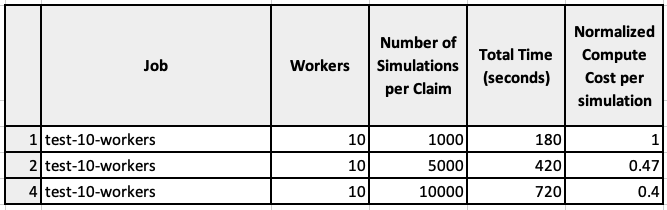
Table 2 – Test results: Number of simulations-per-claim and Normalized compute cost per simulation.

Figure 2 – Computing Cost efficiency improves as the number of simulations-per-claim increases.
Figure 2 shows that as we increase the number of simulations-per-claim, the normalized compute cost decreases. By increasing the number of simulation-per-claim, the actuarial models can significantly improve performance and accuracy while improving the cost efficiency.
Cleaning up:
To clean up, navigate to the infrastructure directory, and run the following command:
cdk destroy --forceThis process will take somewhere between 10 to 20 minutes and will completely remove all the infrastructure that you provisioned following the steps in this blog post.
If you followed this blog using AWS Cloud9, delete the environment to stop incurring any charges from that service.
Conclusion
In this post, you learned about how you can use AWS Batch and Amazon FSx for Lustre to speed up actuarial reserves computing for insurance claims using cost-effective batch processing.
You evaluated a design that enables simple scaling of the number of concurrent jobs deployed to process a set of input files. Based on the tests results, we determined that running with 10 jobs speeds up the process of actuarial reserves computing by almost 10 times compared to a traditional single batch test. And this resulted in saving both cost and time for insurance companies. Even better, you saw evidence that using more workers in the actuarial process can speed up processing even more.
If you’re interested in learning more about using these tools together, this post just serves as a starting point. We’d love to hear your suggestions or proposed feature improvements, so please create a pull request on our GitHub repo or reach out to us at ask-hpc@amazon.com.