The Internet of Things on AWS – Official Blog
Connecting Disparate Industrial Devices and Applications from the Plant Floor to AWS Using KEPServerEX
Update: The content in this blog references AWS IoT Greengrass v1, which has been replaced AWS IoT Greengrass v2. AWS IoT Greengrass v2 builds on the powerful architectural pillars of Greengrass v1 with a robust, extensible gateway core that is supported on a wide set of devices. Also, KEPServerEX is now PTC KepWare+. For further information, please see this blog.
When managing Industrial Internet of Things (IIoT) data, it can be challenging to collect and send this data to the cloud for processing and advanced analytics (for example, to predict quality or equipment failure). There might be many different devices on a manufacturing floor, each with its own protocol.
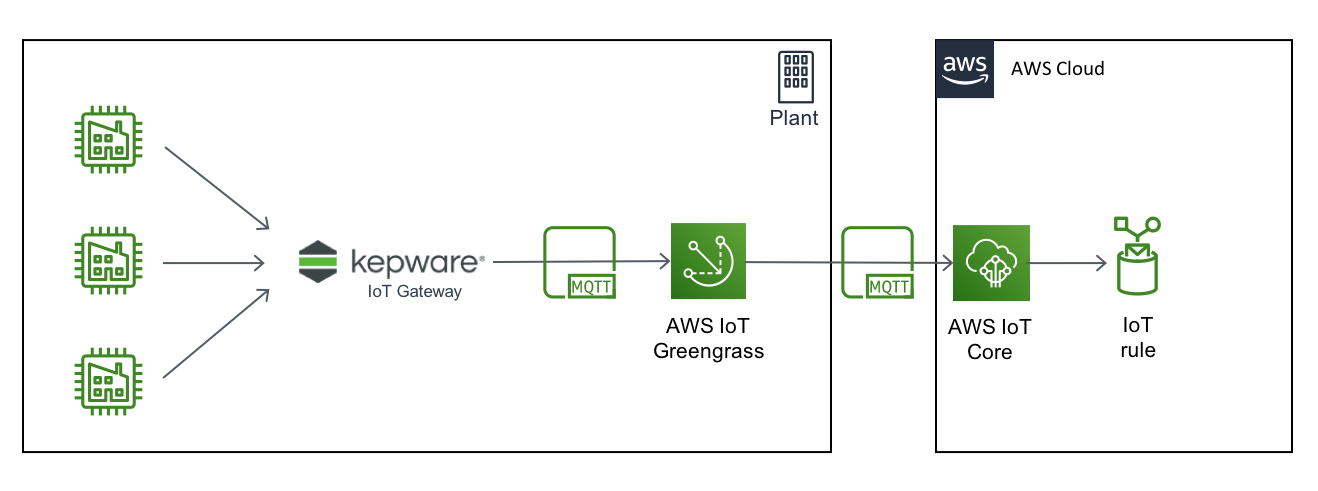
In this blog post, we discuss how customers can address the industrial protocol challenges by using KepServerEX at the edge for industrial protocol conversion, AWS IoT Greengrass for edge processing, and AWS IoT for data ingestion into AWS. By the end of the post, you should have enough information to create a secure and reliable process for real-time industrial data so everyone from the shop floor to the top floor can make smarter decisions.
First, we show you how to connect and configure KEPServerEX with AWS IoT Greengrass Core. This information is helpful if your application needs to connect to AWS IoT Greengrass Core by using the AWS IoT Core certificate chain. Most applications don’t need the root CA to verify the server (AWS IoT Greengrass) certificate, but KEPServerEX requires it to verify the certificate chain.
The AWS IoT Greengrass Core software provides the following functionality:
- Allows deployment and execution of local applications that are created by using AWS Lambda functions and managed through the deployment API.
- Enables local messaging between devices over a secure network by using a managed subscription scheme through the MQTT protocol.
- Ensures secure connections between devices and the cloud using device authentication and authorization.
- Provides secure, over-the-air software updates of user-defined AWS Lambda functions.
- Deploys machine learning models optimized to run on AWS IoT Greengrass using Greengrass ML inference.
Prerequisites
In this post, we recommend that you install the following software on EC2 instances in the same VPC.
- Install KEPServerEX from the Kepware website on a Windows Amazon EC2 instance. For the Kepware IoT gateway to run, the server requires a working 32-bit JRE. You can download and install the current JRE from here.
- Follow the instructions in the AWS IoT Greengrass Developer Guide to install AWS IoT Greengrass Core software on Linux or Rasberry Pi:
- KEPServerEX supports OPC UA and MQTT (stock implementation). We use MQTT messages to communicate with AWS IoT Greengrass.
- Make sure that KEPServerEX and the AWS IoT Greengrass Core software are running on the same network.
- Follow the instructions in the AWS CLI documentation to install the AWS CLI on your personal computer, and then configure it with your AWS access key and secret key.
Architecture diagram
Getting started
You should now have the AWS IoT Greengrass Core software running on a gateway. If you followed the steps in the Getting Started modules, you should also have a Greengrass group (for example, MyFirstGroup) with one core device (for example, MyFirstGroup_Core) configured. The core device should be able to communicate with AWS IoT Core.
The resources you create in these procedures should be created in the same AWS Region.
- Open the AWS IoT console and choose Greengrass, Groups, MyFirstGroup, and then Cores, you should see your core device:

- Choose your core device, and in the left pane, choose Connectivity. Make a note of the endpoint address and port.

Create AWS IoT Devices in an AWS IoT Greengrass Group
Now we add the KEPServerEx device to the AWS IoT Greengrass group.
- In the AWS IoT console, choose Greengrass, choose Groups, and then choose your group to open its configuration page. Next, choose Devices, and then choose Add your first Device (or Add Device).

- Choose Create New Device.

- To create a registry entry for this device, in Name, enter
KepServer, and then choose Next.

- On the Set up security page, choose Use Defaults to use the 1-Click option. This option generates the required keys and certificates using the AWS IoT root CA and creates a default policy and IAM role with default permissions.

- On the Download security credentials page, download the certificates for your device into a kepserver_certificates folder, and then extract them. Be aware that this is the only step in the process when you can download keys (so make sure you download them here or you will have to create a new AWS IoT device). Choose Finish.

KepServer should now appear in the Devices list of your Greengrass group.
Configure subscription
Now we enable the KEPServerEx device to send messages to the AWS IoT cloud.
- On the group configuration page, choose Subscriptions, and then choose Add Subscription.
- For Select a source, choose Select, Devices, and KepServer.
- For Select Target, choose Select, Services, and IoT Cloud. Then choose Next.
- For Optional topic filter, enter
iotgateway, choose Next, and then choose Finish.

- On the group configuration page, from the Actions menu, choose Deploy to deploy the updated group configuration to your Greengrass core device:

- To confirm a successful deployment, choose Deployments. You should see Successfully completed in the Status column close to the time you initiated the deployment.

Configure KEPServer IoT gateway
Copy the device certificates that you downloaded and extracted earlier. You can use the local file sharing feature of the Microsoft Remote Desktop Connection software.
Now we configure the MQTT Agent and the IoT gateway to connect Kepware to the Greengrass core device.
Configure the IoT Gateway
- To access the IoT gateway system settings, right-click the Administration icon in the system tray, and then choose Settings. Choose the IoT Gateway tab.
- To configure the MQTT Agent, choose Manage Certificate.

- On MQTT Agent Certificate, choose Import New Certificate.
- Browse to your kepserver_certificates folder, choose the kepserverID.cert.pem file and the kepserverID.private.key.
- If you are prompted for a password, leave it blank, and then choose OK.
- Verify that the common name is
AWS IoT Certificate, and then choose Close.

Retrieve AWS IoT Greengrass Core Certificate Authority (CA)
To retrieve the CA for your Greengrass group, type the following command in your terminal:
Look for MyFirstGroup, and copy the ID (referred to here as group-id).
Here is the output :
Copy the PemEncodedCertificate value and paste it in a text editor. Edit the content, replacing any newline character (\n) with a carriage return (Enter).
Your file should have the following template:
Save the file as greengrassgroupCA.pem.
Add AWS IoT Greengrass Core Certificate Authority (CA) to Windows
- From the Windows Start menu, open Run.
- Type mmc, and choose OK.
- In the console window, from the File menu, choose Add/Remove Snap-in.
- Choose Certificates, and then choose Add. Choose Computer account, and then choose Next.
- Choose Finish, and then choose OK.
- Expand Certificates, Trusted Root Certification Authorities, and then choose Certificates.
- On the right menu, choose Certificates, choose More Actions, All Tasks, and then Import.
- On the Import Wizard page, choose Next. Browse your local folder, or the shared folder where you saved the greengrassgroupCA.pem file, and choose Open.

Note : If you can’t see the file, in File name, enter the wildcard * and choose Open to see all of the files with the extension of *.pem. - Choose Next, and then choose Finish. You should see a message that confirms the certificate was imported successfully. Close the console window and choose No if you are prompted to save the template.
Configure an agent
At least one agent must be configured with one active tag for the gateway service to start. Configure the agents and tags in the IoT Gateway section.
- Under IoT Gateway, choose Add Agent.

- Configure the agent with the following parameters:
- Name:
Kepserver - Type:
MQTT ClientChoose Next.
- Name:
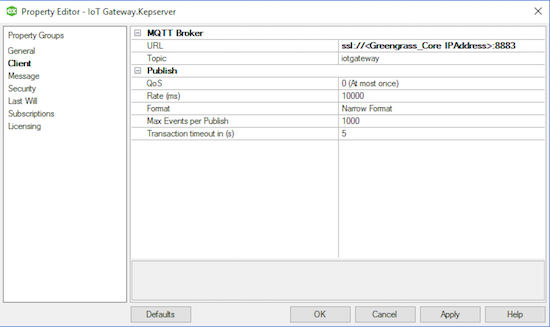
- Using the connectivity parameters you saved earlier, configure the MQTT Client Broker with the following parameters:
- URL:
ssl://Greengrass_Core IPAddress:8883 - Topic:
iotgateway - QOS:
0 (At most once)Keep the other parameters at their defaults, and then choose Next.
- URL:
- Configure the MQTT Client Security as follows:
- Client ID:
KepServer - Username:
< Leave empty > - Password:
< Leave empty >The client ID must match the device name in the AWS IoT console. Choose Finish.
- Client ID:
- Right-click the KEPServer Agent you just created, and then choose Properties.
- Go to Security, and modify the TLS configuration so the KEPServer client sends its certificate:
- Client Certificate: Enable
- Go to Message, and then customize the default template as follows:
- Message Format: Advanced Template
- Template:
Choose OK.
- Go to Security, and modify the TLS configuration so the KEPServer client sends its certificate:
- Configure the agent with the following parameters:
Your MQTT Agent configuration should look like this:

- Select the KEPServer Agent, and choose Add IoT items:
- Choose IoT_Gateway_ / Kepserver branch, and then choose the _PublishesSent tag. Choose Apply.
- Under Publish, choose Every scan.

Connect KEPServer to Greengrass core
Both the KEPServerEX and Greengrass group are now configured. In this step, we verify that the connection from KEPServer is successful, and then subscribe to the topic in AWS IoT Core.
Verify the connection is successful
In KEPServer:
- From the Runtime menu, choose Reinitialize.

- In the event log window, you should see a message that confirms the MQTT Agent KEPServer is connected to the Greengrass core device:

If you get one of the following errors in the event log window:
'Software caused connection abort: recv failed'.
Check that you have enabled the client certificate option in the security options, and review AWS IoT Greengrass logs to resolve connectivity issues.
You can also enable Amazon CloudWatch logs and look there.
Test topic subscription
To test the topic subscription, in the left pane of the AWS IoT console, choose Test.
- Choose Subscribe to a topic, and in Subscription topic, enter
iotgateway, and then choose Subscribe to topic.

- You should see the messages published by KEPServer:

Wrapping up
In this blog, we looked at how to connect and configure KEPServerEX with AWS IoT Greengrass Core. We installed the AWS IoT Core certificate chain to allow these services to communicate with each other.
We are now able to process the IoT messages from disparate industrial devices in the AWS environment.
Summary and additional resources
By following the steps in this post, you can collect industrial data from programmable logic controllers (PLCs), SCADA systems, plant historians, and other manufacturing systems and in a few hours get data flowing into AWS securely, efficiently, and cost-effectively. After the industrial data is ingested in AWS, it can be used for a variety of smart manufacturing use cases, including building ML models for predictive maintenance. See for yourself. Get started today with connecting industrial assets and applications from the plant floor to AWS.
Learn More:
- Industrial Internet of Things: https://aws.amazon.com/iot/solutions/industrial-iot/
- AWS IoT: https://aws.amazon.com/iot/?nc2=h_iot_
- AWS IoT Analytics User Guide: https://docs.aws.amazon.com/iotanalytics/latest/userguide/welcome.html
- Amazon SageMaker Getting Started Developer Guide: https://docs.aws.amazon.com/sagemaker/latest/dg/gs.html
- ML model building: https://aws.amazon.com/blogs/machine-learning/predict-march-madness-using-amazon-sagemaker/
- Using AWS IoT for Predictive Maintenance: https://aws.amazon.com/fr/blogs/iot/using-aws-iot-for-predictive-maintenance/