The Internet of Things on AWS – Official Blog
Orchestrate NVIDIA Isaac Sim and ROS 2 Navigation on AWS RoboMaker with a public container image
Introduction
High-fidelity simulation is increasingly important during the development of robots and robotic applications. Virtual environments with photo-realistic objects, and robot models with accurate physics are essential for developing and testing robots that perform reliably on sophisticated tasks in the physical world. Setting up a high-fidelity simulation, training, and testing environment, however, poses challenges. Installing and configuring simulation tools takes time and expertise, and accurate realistic simulations demand significant computing, network, and storage resources. Precisely repeating and scaling simulations and tests across distributed teams is also challenging.
This blog provides a tutorial to address these challenges, showing how to orchestrate NVIDIA Isaac Sim and ROS 2 Navigation on AWS RoboMaker, a cloud-based simulation service that enables robotics developers to run, scale, and automate simulation, using a container image from the Amazon Elastic Container Registry (ECR) Public Gallery. The NVIDIA Isaac Robotics Platform provides industry leading simulation photo-realism, with a high performance open source physics engine (NVIDIA PhysX), which makes it ideal for robot simulation.
Solution overview
AWS RoboMaker is a fully managed service for running simulations at scale in the cloud without needing to provision servers or networks. AWS RoboMaker also supports running containers based on images from public container registries, including the Amazon ECR Public Gallery. NVIDIA has published an Isaac Sim image to the Amazon ECR Public Gallery, for use with AWS RoboMaker.
NVIDIA Isaac Sim is a scalable robotics simulation application and synthetic data-generation tool that powers photorealistic, physically accurate virtual environments, and ROS 2 Navigation is a stack that enables a mobile robot to move and complete complex tasks in many types of environments. Running the NVIDIA public container images on AWS RoboMaker in the cloud offers many advantages. Robot developers can launch powerful simulation and training environments in a matter of minutes rather than days and tap nearly unlimited resources, paying only for what’s needed. Teams can also achieve consistency and standardization by using a common set of containers.
The tutorial below explains how to run a high-fidelity robotic simulation using NVIDIA Isaac Sim and ROS 2 Navigation as containerized simulation and robot applications on AWS RoboMaker. The tutorial steps include launching an AWS RoboMaker Simulation from the Amazon ECR Public Gallery containing the NVIDIA tools and interacting with the tools via AWS RoboMaker. The example in the tutorial drives a Carter robot through a simulated warehouse environment using the ROS package RViz. An architecture diagram depicting how the simulation is set up is shown below. The AWS RoboMaker simulation job uses a simulation application to orchestrate the simulation environment (Isaac Sim), and a robot application to orchestrate the robot navigation software (ROS 2 Navigation), each based on a separate container, enabling modularity, repeatability, and flexibility. Logs from both applications are aggregated by AWS RoboMaker in Amazon CloudWatch.
Tutorial

AWS Architecture to orchestrate NVIDIA Isaac Sim and ROS 2 Navigation containers on AWS RoboMaker
Prerequisites
- An AWS Account
- A user or role with permissions to create and run AWS RoboMaker simulation jobs and to create and store Amazon Elastic Container Registry (ECR) images
- A development environment with the AWS CLI installed, or an AWS Cloud9 environment
Tutorial overview
The tutorial consists of the following steps:
- Step 1: Build the Docker image for the AWS RoboMaker robot application
- Step 2: Create and launch the AWS RoboMaker simulation job
- Step 2a (Optional): Export a simulation JSON file to launch simulations via the AWS CLI
- Step 3: Load a simulation environment in the simulation application
- Step 4: Load and run navigation with RViz in the robot application
Step 1: Build the Docker image for the AWS RoboMaker robot application
This step provides specific instructions on how to build the Docker image for the AWS RoboMaker robot application in a Linux environment, but you can build the image in other environments with the files provided below. The image contains ROS2 Foxy and the NVIDIA carter_navigation package, along with NICE DCV, OpenGL, and the vim and nano editors.
In the development environment with the AWS CLI installed, from the Linux command line prompt, create a new working directory in the location of your choice by entering the following:
mkdir docker && cd dockerCreate a file named Dockerfile in the docker directory with the following contents:
FROM osrf/ros:foxy-desktop

ENV DEBIAN_FRONTEND=noninteractive

RUN apt-get update && apt-get install -y xterm python3-rosdep python3-rosinstall python3-rosinstall-generator python3-wstool build-essential python3-colcon-common-extensions ros-foxy-navigation2 ros-foxy-nav2-bringup ros-foxy-turtlebot3*

# install NICE DCV (for RoboMaker)
RUN apt-get update -y && apt-get upgrade -y && apt-get install -y wget pgp v4l2loopback-dkms
RUN wget https://d1uj6qtbmh3dt5.cloudfront.net/NICE-GPG-KEY
RUN gpg --import NICE-GPG-KEY
RUN wget https://d1uj6qtbmh3dt5.cloudfront.net/nice-dcv-ubuntu2004-x86_64.tgz
RUN tar -xvzf nice-dcv-ubuntu2004-x86_64.tgz
RUN apt-get update && apt-get install -y ./nice-dcv-*/nice-dcv*.deb

# install opengl
RUN apt-get update && apt-get install -y libglfw3 libglfw3-dev libnss3

# install vim and nano
RUN apt-get update && apt-get install -y vim nano

#Build ROS2 Project for Carter navigation
RUN git clone https://github.com/NVIDIA-Omniverse/IsaacSim-ros_workspaces/
RUN mkdir -p /isaac-sim/ros2_workspace/
RUN cp -r IsaacSim-ros_workspaces/foxy_ws/* /isaac-sim/ros2_workspace/
RUN rm -rf IsaacSim-ros_workspaces/
WORKDIR /isaac-sim/ros2_workspace
SHELL ["/bin/bash", "-c"]
RUN apt-get update -y && apt-get upgrade -y
RUN source /opt/ros/foxy/setup.bash && rosdep install -i --from-path src --rosdistro foxy -y && colcon build

# Add the application source file to the entrypoint.
WORKDIR /
COPY entrypoint.sh /entrypoint.sh
RUN sudo chmod +x /entrypoint.sh
ENTRYPOINT ["/entrypoint.sh"]
Create a file named “entrypoint.sh” in the “docker” directory with the following contents:
#!/bin/bash
set -e
source "/opt/ros/foxy/setup.bash"
source "/isaac-sim/ros2_workspace/install/local_setup.bash"
printenv
exec "${@:1}"
From the command prompt in the “docker” directory build the robot application image by entering the following:
sudo docker build -t isaac-ros:latest .Create a new Amazon ECR repository by entering the following:
aws ecr create-repository --repository-name isaac-rosSave the repositoryUri output from the previous command in an environment variable for future use by entering the following:
REPOSITORY_URI=<repositoryUri>Authenticate to the newly created Amazon ECR by entering the following:
aws ecr get-login-password | sudo docker login -u AWS --password-stdin $REPOSITORY_URITag the Docker image by entering the following:
sudo docker tag isaac-ros:latest $REPOSITORY_URI:latestPush the Docker image to the Amazon ECR by entering the following:
sudo docker push $REPOSITORY_URI:latestStep 2: Create and launch the simulation job
AWS RoboMaker simulation jobs are based on running a simulation application and an optional robot application, which are based on container images stored in Amazon ECR.
From the AWS RoboMaker menu, choose Simulation jobs under Simulation run in the left-hand navigation pane and then choose Create simulation job:

Configure the following for Step 1, Configure simulation, leaving the remaining inputs set to the defaults:
- Choose Create new role from the IAM role drop-down and enter a Name for the role, such as
isaac - Choose CPU and GPU from the Compute type drop-down
- From the VPC drop-down in the Networking section, choose a VPC containing two or more public subnets, for example your default VPC. The NVIDIA containers need internet access for loading example assets.
- From the Security groups drop-down in the Networking section, choose a security group that allows outbound TCP traffic on ports 80 and 443 to allow the container to load NVIDIA example assets.
- From the Subnets drop-down in the Networking section, choose at least two subnets.

- Choose Next at the bottom of the page.
For documentation on creating and editing VPCs, public subnets, and security groups, please refer to the Amazon VPC User Guide.
Configure the following for Step 2, Specify robot application, leaving the remaining inputs set to the defaults:
- From the Choose method section choose Create new application
- In the Robot application section,
- Provide a name such as
ros-2-navigation - In the Container image sub-section, make sure the Private radio button is chosen and enter the following URI for the ROS 2 Navigation image you created, substituting the repository URI from the above Step 1: Build the Docker image for the AWS RoboMaker robot application:
<repositoryUri>:latest
- Provide a name such as
- In the Robot application configuration section,
- Enter the following into the Launch command field
ros2, launch, carter_navigation, carter_navigation.launch.py - Make sure the Run with streaming session checkbox is chosen

- Enter the following into the Launch command field
- Expand the Robot application tools section and choose Customize tools.
- Choose Add tool and input the information indicated below:
- Enter
robot-app-terminalfor Tool Name - Enter
/usr/bin/xterm -geometry 120x40for Command - Choose Restart from the Exit behavior drop-down
- Choose Enable UI Streaming for Output settings
- Make sure the Send output to Amazon CloudWatch checkbox is chosen

- Choose Add tool
- Enter
- Choose Next at the bottom of the page.
Configure the following for Step 3, Specify simulation application, leaving the remaining inputs set to the defaults:
- From the Choose method section choose Create new application
- In the Simulation application section,
- Provide a Name as
isaac-sim - In the Container image sub-section, choose the Public radio button and enter the following URI for the NVIDIA Isaac Sim public image:
public.ecr.aws/nvidia/isaac-sim-robomaker:latest
- Provide a Name as
- In the Simulation application configuration section,
- Input the following into the Launch command field
/isaac-sim/isaac-sim.sh --allow-root - Make sure the Run with streaming session checkbox is chosen
- Input the following into the Launch command field
- In the Environment variables section, choose Add item
- Enter
ACCEPT_EULAfor Name - Enter
Yfor Value
- Enter
- Expand the Simulation application tools section and choose Customize tools.
- Choose Add tool and input the indicated information for the following fields:
- Enter
simulation-app-terminalfor Tool name - Enter
/usr/bin/xterm -geometry 120x40for Command - Choose Restart from the Exit behavior drop-down
- Choose Enable UI Streaming for Output settings
- Make sure the Send output to Amazon CloudWatch checkbox is chosen

- Choose Add tool
- Enter
- Choose Next at the bottom of the page.
On the Review and create simulation job page, scroll down to the bottom and choose Create. It may take 5-10 minutes for the status of the job to transition to Running. Proceed to Step 3 once the simulation job is in the Running state.
For more details on other options when creating AWS RoboMaker simulation jobs, please refer to the AWS RoboMaker Developer Guide.
Step 2a (Optional): Export a simulation JSON file to launch simulations via the AWS CLI
While the job is launching, you can export a JSON file that can be used with the AWS CLI aws robomaker create-simulation-job command to launch simulations from the command line.
First, copy the job ARN by choosing the copy icon to the left of the ARN in the Details section of the simulation job:

From a terminal enter the following command, replacing <JOB ARN> with the ARN copied above:
aws robomaker describe-simulation-job --job <JOB ARN> >> launch-simulation.json
You can now edit this JSON file as desired and launch similar simulations from the command line with a command like:
aws robomaker create-simulation-job --cli-input-json file://<path to the JSON file>For more details on launching AWS RoboMaker simulations from the command line, please refer to the AWS RoboMaker Developer Guide.
Step 3: Load a simulation environment in the simulation application
In this step, you will run NVIDIA Isaac Sim in the simulation application on AWS RoboMaker. You can proceed with the following steps once the simulation job launched in Step 2 is in the Running state.
- If you’re not already on the simulation details page, choose the ID link for the running simulation job.

- Choose Connect on the Simulation application tool – this will launch the Isaac Sim UI.

- Resize the pop-up browser window to fill your entire screen. If you see the message “RTX Loading”, please wait until it disappears, which could take several seconds.
- From the Isaac Sim UI top menu, choose Isaac Examples > ROS > Navigation. The example may take a few minutes to load.

- When the high-resolution navigation example is loaded choose the Play button on the left of the Isaac Sim UI.
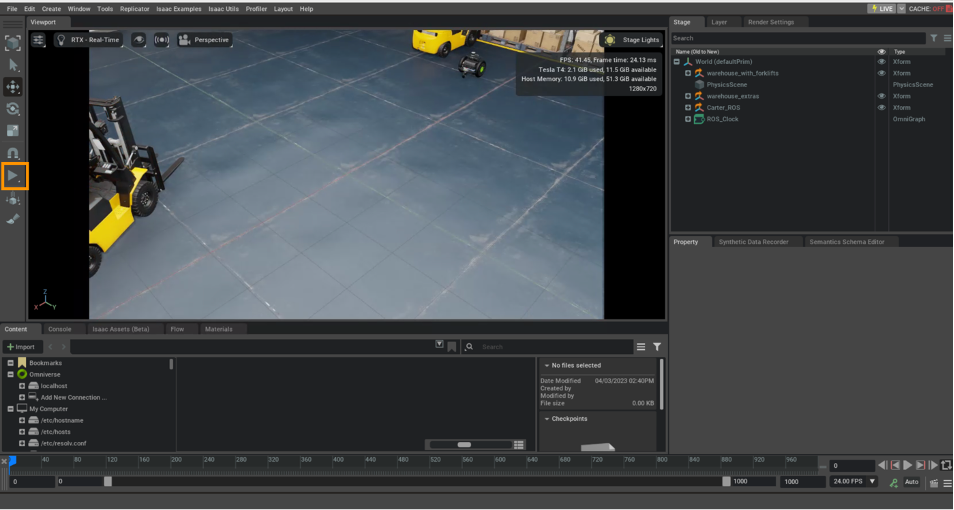
- You should see the perspective change to a first-person view from the robot, facing a shelf with boxes.

Step 4: Load and run navigation with RViz in the robot app
In this step, you will navigate the NVIDIA Carter robot using RViz.
- From the AWS RoboMaker simulation detail page, choose Connect on the Robot application tool.

- Resize the pop-up browser window showing RViz to fill your screen again:

- Choose the Navigation2 Goal button at the top and then click and drag the mouse at the desired location in the map to set the target position and pose for the robot to navigate to. ROS 2 Navigation (Nav2) will now generate a trajectory, and the robot will start moving towards its destination. You can observe the Isaac Sim UI to see the robot moving from the first-person perspective in NVIDIA Isaac Sim in the AWS RoboMaker simulation app.
To learn more about how to use NVIDIA Isaac Sim, please refer to the tutorials in the NVIDIA Isaac Sim overview. You can use the xterm tool in the AWS RoboMaker robot app to perform command line tasks described in the tutorials. (Since Isaac Sim is already running on AWS RoboMaker with ROS 2 Foxy, you don’t need to perform the installation steps in the tutorials.)
Cleaning up
When you’ve completed the tutorial, remove any resources you created to avoid incurring additional charges:
- From the simulation job detail page, choose Cancel from Actions drop down, and then choose Continue.
- Delete the robot and simulation applications
- Delete the AWS IAM role created in step 1 of this tutorial
- Delete the Amazon ECR repository
Conclusion
In this blog you have learned how to run high-fidelity simulations using NVIDIA Isaac Sim and ROS 2 Navigation on AWS RoboMaker, leveraging the new capability to load container images, including one from a public repository, into AWS RoboMaker. Running simulations in the cloud using pre-packaged container images saves time setting up the sophisticated tools for high-fidelity simulation. In addition, it provides a very cost-effective way to tap the considerable compute, storage, and networking resources required to run realistic simulations, paying for only what you use. Finally, containers can promote standardization across teams, increasing efficiency and repeatability in the design and testing phases. If you would like to learn more about how you can use NVIDIA tools on AWS RoboMaker to advance your robotics development or simulation efforts, please reach out to the authors or contact your account team.

Shaun Kirby
Shaun Kirby is a Principal Customer Delivery Architect at AWS, specializing in the Internet of Things (IoT). He helps customers excel with cloud technologies, diving deep into their challenges and opportunities to pioneer game changing solutions across industries. Prior to AWS he led rapid prototyping and an IoT showcase at Cisco. He is a trusted advisor to technology executives, with roots in large scale systems architecture and integration. Shaun is passionate about how robotics can bring breakthrough improvements in the quality of life.

Abhishek Srivastav
Abhishek Srivastav is a Senior Solutions Architect at AWS. He is passionate about enabling customers to accelerate their cloud adoption. He is an IoT enthusiast and holds deep expertise in NoSQL databases, analytics, and AI/ML technologies. He is passionate about finding answers to complex problems by drawing on his in-depth understanding of these technologies. He has held lead positions for NoSQL Center of Excellence roles at various enterprise customers prior to joining AWS.

Matt Hansen
Matt Hansen is a Principal Solutions Architect at AWS Robotics. Matt has many years of experience with robotics, especially with ROS, ROS 2 and cloud robotics solutions. Since 2020 Matt has been with AWS Robotics, primarily focused on cloud-based robot simulation using AWS RoboMaker. Prior to joining AWS, Matt led the development of the ROS 2 Navigation stack – Nav2, and was an original member of the ROS 2 Technical Steering Committee. Matt is passionate about robotics, navigation, and simulation in the cloud.