AWS for M&E Blog
Unlocking creator expressions to enhance live streaming experiences with Amazon IVS and Snap’s Camera Kit AR SDK
This blog post was co-authored by Ankit Baphna (Partner Engineer), Arash Pessian (Partner Engineer), Brooke DeWitt (Senior Product Strategy & Product Marketing Manager), and Michael Mase (Partner Engineer) at Snap.
Introduction
Live streaming has revolutionized the way we connect, share, and consume content. From gaming to shopping, fitness to education, live stream creators have become the modern-day storytellers, captivating audiences worldwide in real time. But what if there was a way to elevate immersive experiences even further? Enter augmented reality (AR), a transformative technology that not only enhances our reality but also unlocks boundless possibilities for creative expression.
In a previous blog post, we discussed how Snap’s Camera Kit AR SDK opens the door for new engagement opportunities with Amazon Interactive Video Service (Amazon IVS). In this blog post, we discuss how customers can integrate Snap AR Lenses using Snap’s Camera Kit SDK with Amazon IVS from Amazon Web Services (AWS).
Prerequisites
To get started with Amazon IVS, you will need to set up a channel and integrate the Amazon IVS Broadcast SDK. Refer to the Getting Started with Amazon IVS Guide for more details on how to do that. Once you go through the guide to setup an AWS account and create a channel, make note of the ingest server endpoint and the stream key. You will need both of these later on in the article to start streaming. If you will be live streaming with multiple hosts, refer to the Enabling Multiple Hosts on an Amazon IVS Stream Guide for more details as you will also need to create a stage.
For this article, we focus on how to integrate Camera Kit on Android after integrating with the Amazon IVS Broadcast SDK. A sample code repository demonstrating this integration can also be found on GitHub. Guides for integrating Camera Kit are also available for iOS and Web. You can also find sample code projects that integrate Snap Camera Kit and Amazon IVS available for Web.
Integration steps
- Set up the Amazon IVS Broadcast SDK
- Install the Camera Kit SDK
- Create a Camera Kit session
- Fetch and Apply Lenses
- Set up a custom input source using the Custom Image Source API
- Connect Camera Kit Session to a broadcast session

Diagram showing how the device camera image works with Snap’s Camera Kit AR SDK and the Amazon IVS Broadcast SDK
Set up the Amazon IVS Broadcast SDK
Let’s get started with using the Amazon IVS Broadcast SDK to set up a broadcast session to enable live streaming from an Android app.
The first step is to install the Broadcast SDK for Android by adding it to your build.gradle file.
You will then need to create an event listener to monitor for state updates, errors, and other notifications and create a broadcast session. Detailed instructions for doing all of this can be found in the Android getting started guide. If you also need to support multiple hosts where video is combined from multiple participants into one live stream, refer to the guide to adding multiple hosts with the Broadcast SDK for Android.
Set up Camera Kit
Now that you have done the basic steps of setting up a broadcast session using the Amazon IVS Broadcast SDK, you can integrate an Android app with the Camera Kit SDK using the following steps.
Install the Camera Kit SDK
First, to install the SDK, add the desired Camera Kit dependency in your module’s build.gradle file, e.g., add implementation “com.snap.camerakit:camerakit:$cameraKitVersion”. Next, add your Snap API Token, either Staging or Production Token based on what stage of app development you are on. You can pass the Token to Camera Kit either programmatically to the Session object using the apiToken() function or hardcode that into AndroidManifest.xml as “com.snap.camerakit.api.token”. Lastly, set the compile options for the Java version. Within Snap’s Camera Kit Docs, these steps, together with code-snippets, are detailed here.
camerakit-api and the base camerakit modules are designed to be fully Java compatible and therefore do not require Kotlin standard library nor its toolchain to be available in pure Java projects. On the other hand, Kotlin projects are advised to use the camerakit-kotlin for official extensions.
Launch Camera Kit
To launch a Camera Kit AR experience, you will first need to initialize and obtain a Camera Kit Session. Session is the point of entry for all Camera Kit SDK features. To obtain a new Session, use one of the provided static or extension builder methods (in Kotlin here):
A Session instance is typically shared within a single Android application, service, or activity lifecycle scope. A Session is costly in terms of the memory and CPU resources it requires to operate. Once done with a Session, it is essential to dispose of it using Session#close method, which releases all the acquired resources in Camera Kit safe manner.
AR Content/Lenses
When it comes to getting AR content for your Camera Kit application, you can either build Lenses using Lens Studio – Snap’s free software development tool, or tap into Snap’s robust network of proven Lens Creators via the Creator Marketplace. We cover both options next.
Creating Lenses
To get started building AR content for your Camera Kit powered application, you will need to download Lens Studio. Lens Studio is Snap’s AR development software used to develop a wide range of AR Lens experiences. It’s free to download and includes a broad set of templates and tutorials to help you get started. Before downloading Lens Studio, ensure that the version you are downloading is compatible with the version of Camera Kit you are trying to enable this for. Lenses built in an unsupported version of Lens Studio will not be shown in your Camera Kit application. Refer to this table to find out the version compatible with your app’s Camera Kit SDK version.
(https://docs.snap.com/camera-kit/guides/quick-start/build-manage-ar-content/lens-studio-compatibility) . Previous versions of Lens Studio can be found at ar.snap.com/older-versions.
Once you have created Lens(es) in Lens Studio, you can follow this guide (https://docs.snap.com/camera-kit/quick-start/build-manage-ar-content/getting-lenses-into-camera-kit) to upload them to the Camera Kit portal.
Buying Lenses
Go to https://ar.snap.com/creatormarketplace and select Discover Creators. Here you can find creator information, Lens production costs, technology specializations, as well as Lens examples, and contact information to begin connecting with the creators that can deliver on your vision. Some of the creators also offer Lens Packs that contain several pre-built Lens projects ready for use in your application.
Fetching and applying Lenses
You are now ready to augment your reality by fetching and applying Snap Lenses. Here is a code snippet for initiating a Camera Kit Session, fetching, and applying Lenses. All the Lenses that are present in the Lens Group will be downloaded and made available in your app. You can configure Lenses and their ordering in the carousel on the Camera Kit Developer Portal (https://camera-kit.snapchat.com/). In your layout file, you also need to add a ViewStub and attach it to the Camera Kit Session using the attachTo() function, as mentioned in the following code snippet. Camera Kit also provides a convenient wrapper for Android’s CameraX APIs so that you don’t have to write complicated logic to use CameraX with Camera Kit. You can use the CameraXImageProcessorSource object as a Source for ImageProcessor which allows you to start camera preview streaming frames. It also provides helper methods to take a snapshot image (photo) as well as video recording APIs.
public final class BasicActivity extends AppCompatActivity implements LifecycleOwner {
private Session cameraKitSession;
@Override
protected void onCreate(@Nullable Bundle savedInstanceState) {
super.onCreate(savedInstanceState);
setContentView(R.layout.activity_main);
// Camera Kit support implementation of ImageProcessor that is backed by CameraX library:
// https://developer.android.com/training/camerax
CameraXImageProcessorSource imageProcessorSource = new CameraXImageProcessorSource(
this /*context*/, this /*lifecycleOwner*/
);
imageProcessorSource.startPreview(true /*cameraFacingFront*/);
cameraKitSession = Sessions.newBuilder(this)
.imageProcessorSource(imageProcessorSource)
.attachTo(findViewById(R.id.camerakit_stub))
.build();
}
@Override
protected void onResume() {
super.onResume();
// Fetch lenses from repository and apply them
// Replace LENS_GROUP_ID with Lens Group ID from https://camera-kit.snapchat.com
cameraKitSession.getLenses().getRepository().get(new Available(LENS_GROUP_ID), available -> {
Log.d(TAG, "Available lenses: " + available);
Lenses.whenHasFirst(available, lens -> cameraKitSession.getLenses().getProcessor().apply(lens, result -> {
Log.d(TAG, "Apply lens [" + lens + "] success: " + result);
}));
});
}
@Override
protected void onPause() {
cameraKitSession.getLenses().getProcessor().clear(result -> {
Log.d(TAG, "Clear lenses success: " + result);
});
super.onPause();
}
@Override
protected void onDestroy() {
  cameraKitSession.close();
  super.onDestroy();
}
}
Sending augmented frames from a Camera Kit session for video ingestion
Once you have set up a Camera Kit session, you can now send processed frames for the broadcast session to stream by using the Custom Image Source feature of the Broadcast SDK. This API enables you to specify a custom image input source as input to the Broadcast SDK.
To get started, the first step is to create an image input source using the broadcast session. In the following code snippet, the call to createImageInputSource returns a SurfaceSource, which is an image source backed by a standard Android Surface.
The next step is to bind the SurfaceSlot to a mixer slot. In this example, we simply name the slot “custom” since we’re providing a custom input source, but you can use any name you like.
Finally, you then render the output from a Camera Kit session to the underlying Surface provided by the SurfaceSource.
There is a great deal going on in that line of code, so let’s dissect it piece by piece. The Camera Kit Session exposes a processor that acts as a pipeline for inputs and outputs. To begin, image input frames are connected to the Camera Kit pipeline using the connectInput method. These frames serve as the input for visual tracking algorithms, which analyze the frames to determine key elements of the environment to apply the Lens (AR effect). It’s important to note that this input is not used for rendering.
Once the input frames are processed by the visual tracking algorithms, an applied Lens is rendered. This rendered Lens is then connected to one or more outputs using the connectOutput method. These outputs can be utilized to display the augmented reality effect to the user or further process the . The connectOutput method accepts as a parameter an ImageProcessor.output. To pass it the parameter type it expects, we then pass in the Surface from the SurfaceSource that was created earlier using the createImageInputSource method of the Broadcast SDK. Frames that are rendered to this surface are then sent to the ingest server endpoint.
If you will be using the multiple hosts feature, you can also similarly use the Custom Image Source feature to apply a Snap Lens. To do that, you would use a DeviceDiscovery object and create a CustomImageSource to return a SurfaceSource. As before, you would then render the output from a Camera Kit session to the underlying Surface provided by the SurfaceSource.
After rendering the output from a CameraKit session to the Surface, you can then return it as a LocalStageStream to be published by the Broadcast SDK.
At this point, you’re now ready to start broadcasting with the following code. Simply insert your ingest server endpoint and stream key from your channel configuration page in the AWS console.
Demo
Once you start broadcasting from your app, here is how it will look. The left hand image shows the preview from the Android app when broadcasted. The right hand image shows a playback of the live stream.

Snap Lens applied using the Amazon IVS Broadcast SDK for Android
You can also try Snap Lenses yourself and start streaming to your audiences with the live hosted demo that integrates the Amazon IVS Broadcast SDK for Web with the Camera Kit Web SDK. Following is an example of how that looks with a Lens applied.
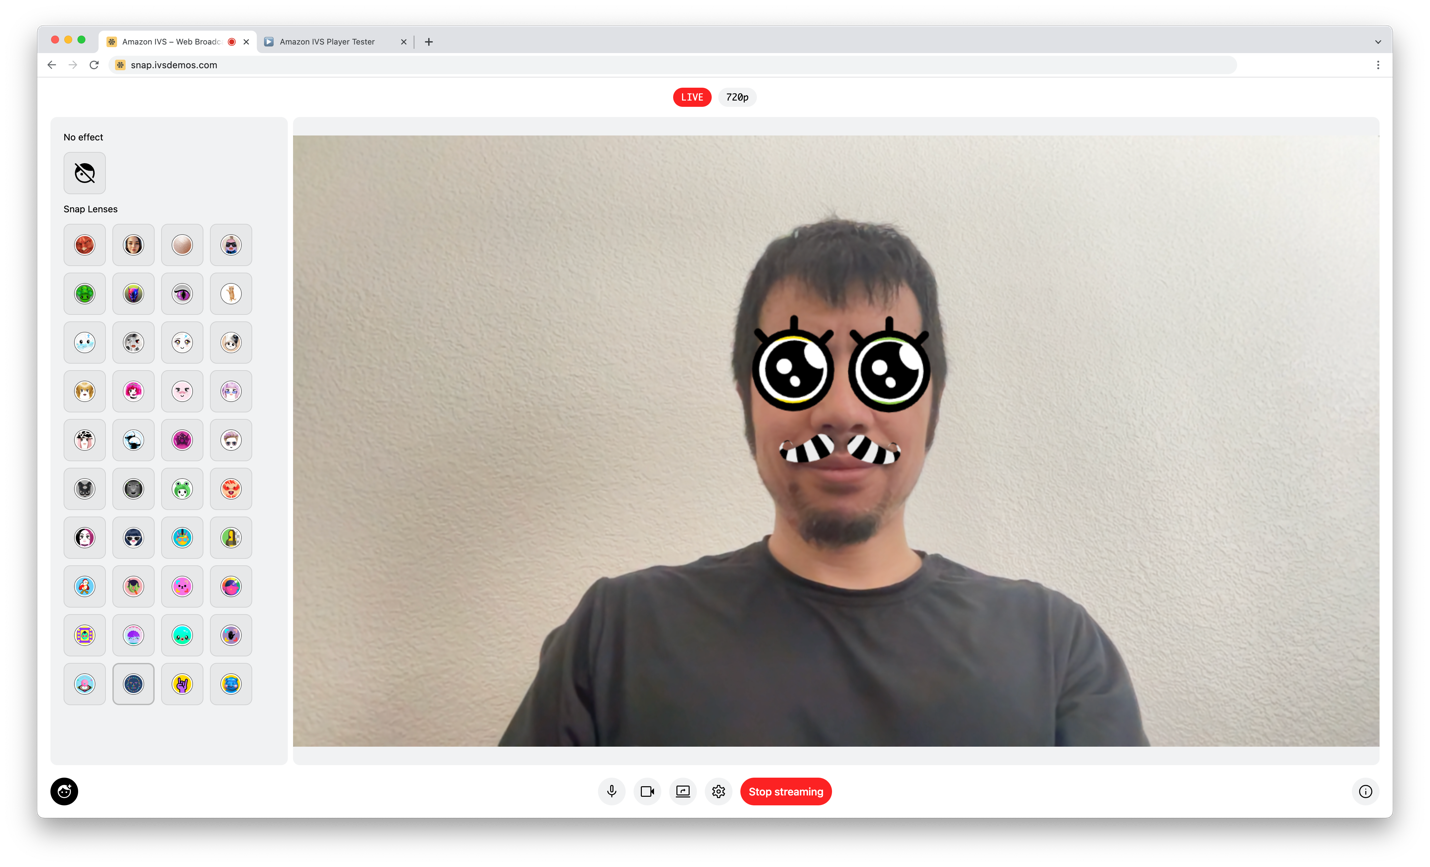
Snap Lens applied using the Amazon IVS Broadcast SDK for Web
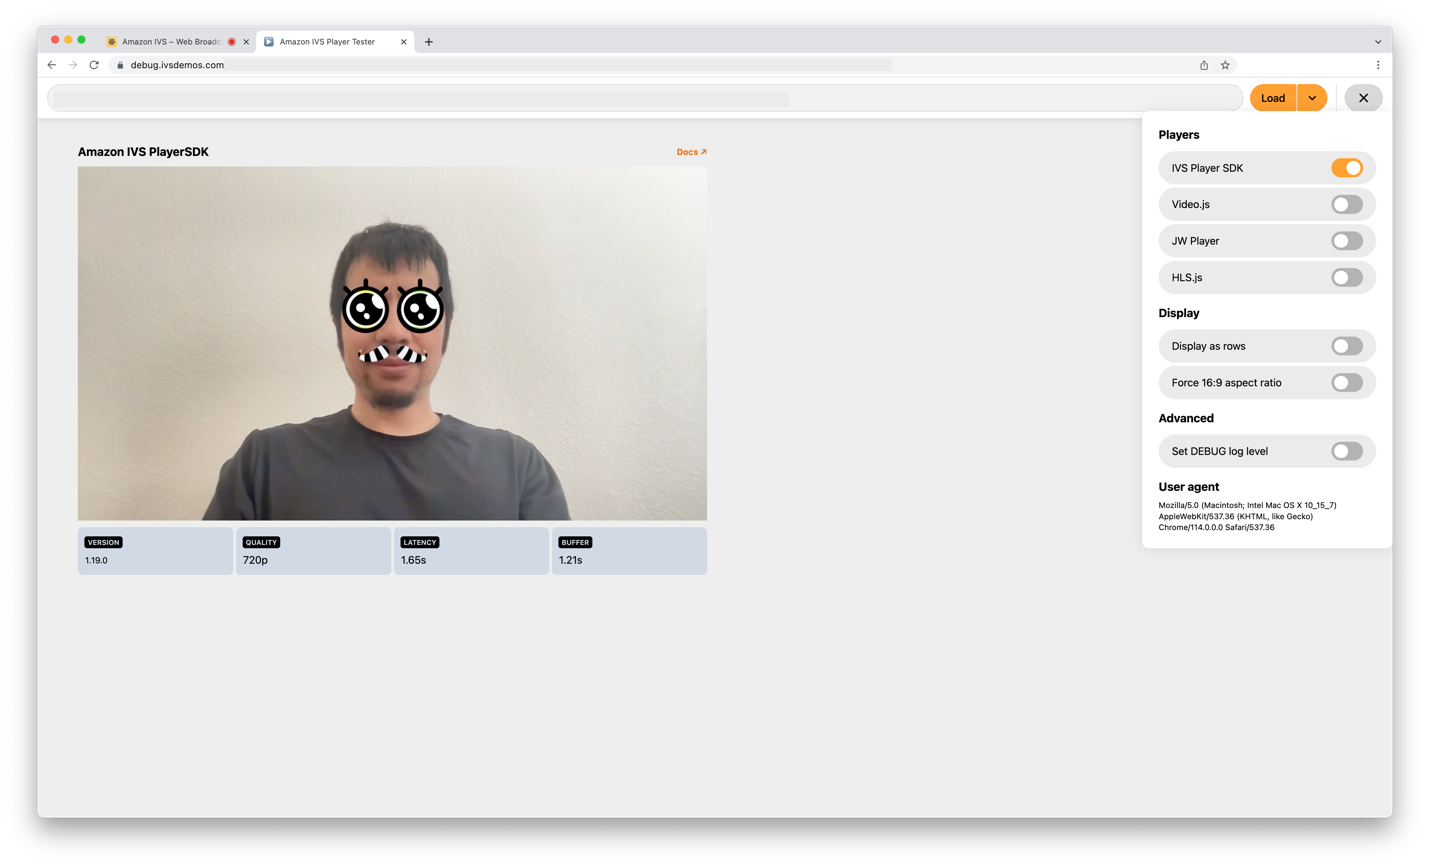
Playback of a live stream with a Snap Lens applied using the Amazon IVS Player SDK for Web
About Snap Camera Kit
Camera Kit is Snap AR’s SDK that allows partners to leverage Snap AR technology in their applications and websites. Using Camera Kit, businesses can bring a new dimension to their customer experience and unleash new applications for Snap’s underlying AR technology. If you would like to learn more about Snap, read about the company here: https://snap.com/en-US