Today, Amazon Location Service introduces the new Suggestions API which adds autocomplete functionality when searching for places on a map or inserting addresses in a web form. The benefits of this new addition are twofold: it guides users to selecting their intended search string more rapidly and improves the relevance of results by increasing the likelihood of direct matches, leading to an overall better user experience.
Amazon Location Service provides affordable data tracking and geofencing capabilities, and native integrations with AWS services, so you can create sophisticated location-enabled applications quickly, without the high cost of custom development.
Introducing the new Suggestions API
Until today, users could leverage the SearchPlaceIndexForText API and search for free-form text with no autocomplete capabilities included in it. Hence, a user would need to type the precise address in order to get the expected result. Also, this API is built for returning common landmarks, buildings and businesses that contain the search term that was submitted as input, say “fish”.
With the newly launched SearchPlaceIndexForSuggestions API, you start getting suggestions as soon as the first letters are inserted in your search bar (or web form), decreasing the time it takes to identify the intended address, in order of relevance. Continuing the example above, when inserting “fish” to the new API, the first result might be (based on other factors that are explained in the API call syntax below): “Fish Aquarium”, or “Fish Market” as a suggested completion to the word/phrase based on the most popular search criteria. This way, the higher a result is returned from the API, the more likely it will be aligned to what the user was expecting when they started typing.
Using another example, searching for “statue” when using the SearchPlaceIndexForSuggestions API will return the following results:
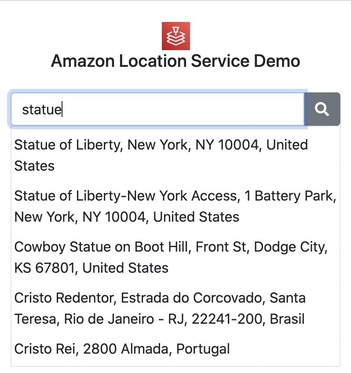
In order to use the Suggestions API the parameters needed are listed as follows:
- IndexName is the name of the place index resource that has been created in your AWS account and you want to use for the search.
- Text is the address, name, city, or Region to be used in the search.
- BiasPosition searches for results closest to the given position.
More information about these parameters can be found on the API’s documentation page.
Let us show you how get started with a simple demo.
Demo
Let us walk you through how to build a very simple web application featuring a map with a search box available to look for places using the newly launched API.
Firstly, let’s get set up by using the AWS Management Console and in particular, Amazon Location Service to create our map.
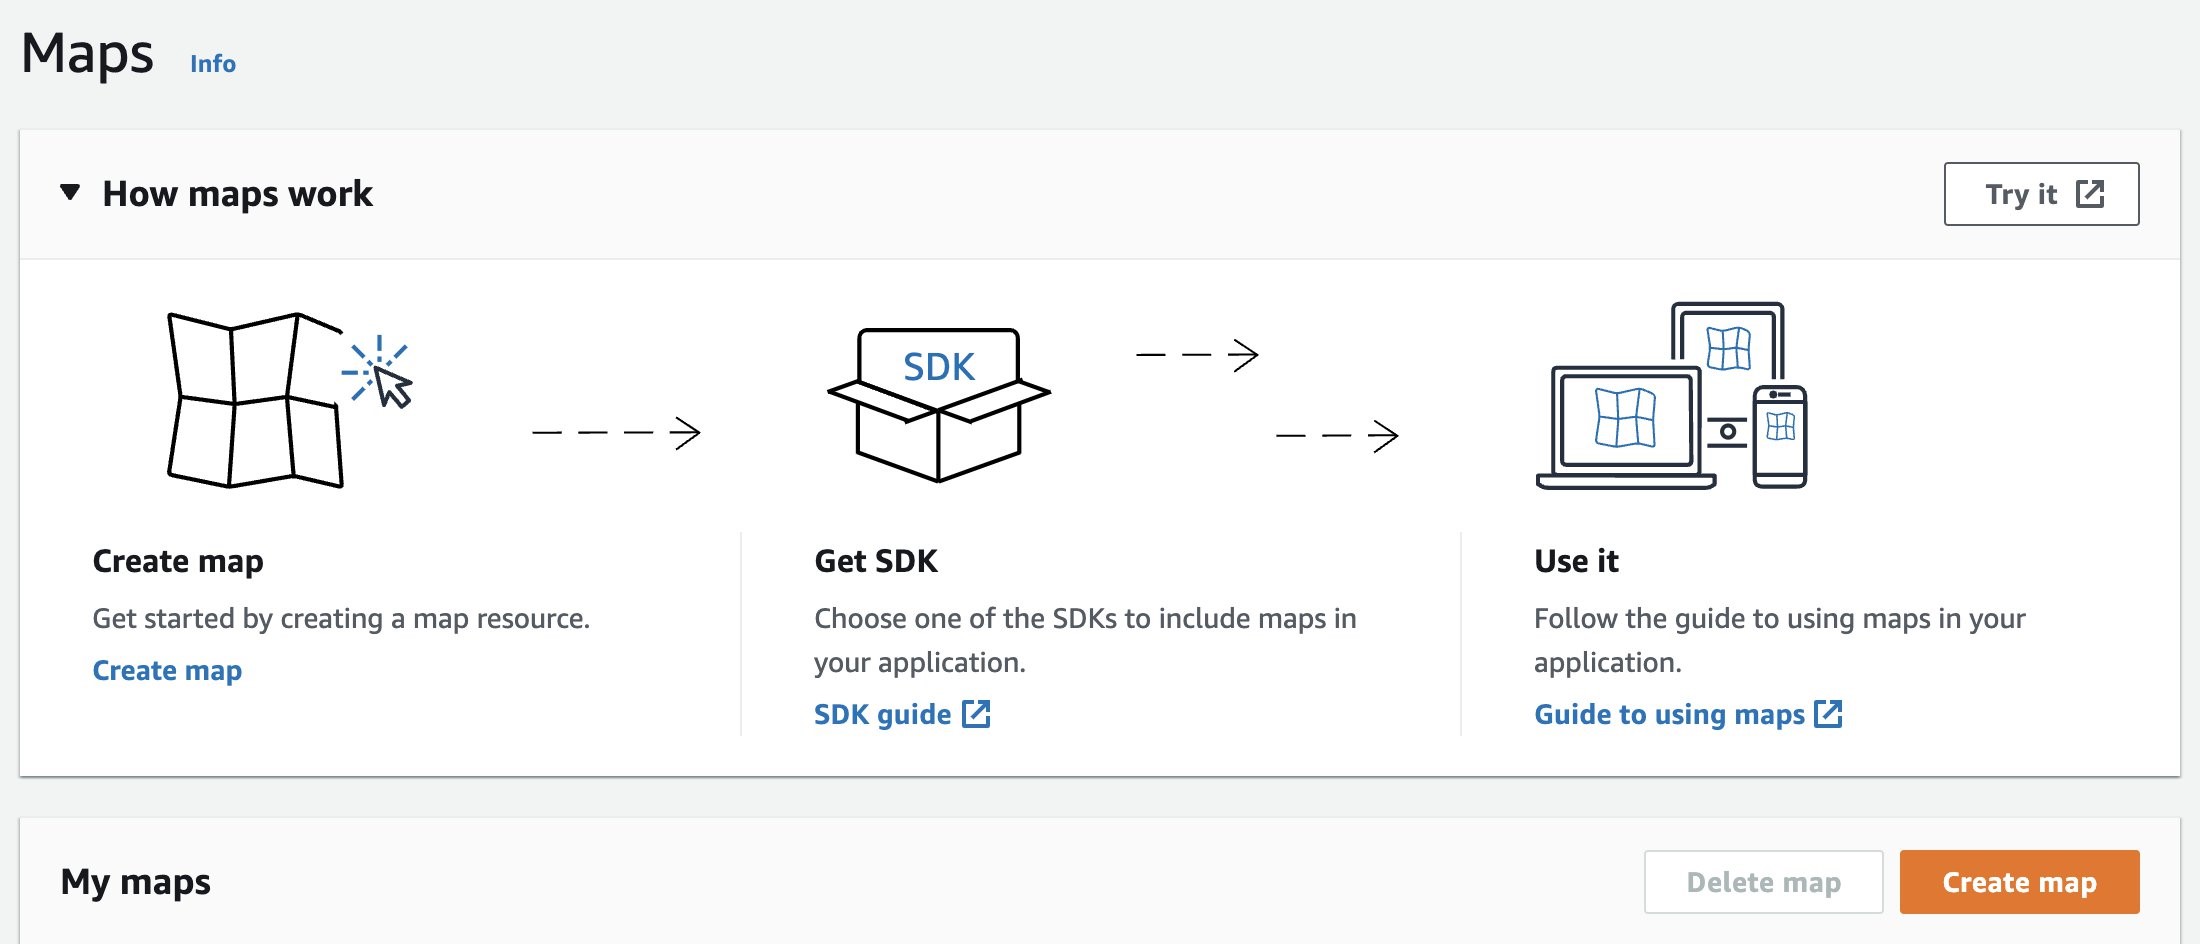
- You can open the Amazon Location Service Console, and then can either click Try it! to create a set of starter resources, or you can open up the navigation on the left and create them one-by-one. Let’s go for one-by-one, and click Maps:
- Click Create map
- Add a Name and Description to help you differentiate this map from other ones that are already existing or might exist in the future.
- Choose Esri Light from the map selection as this is a good fit for our application.

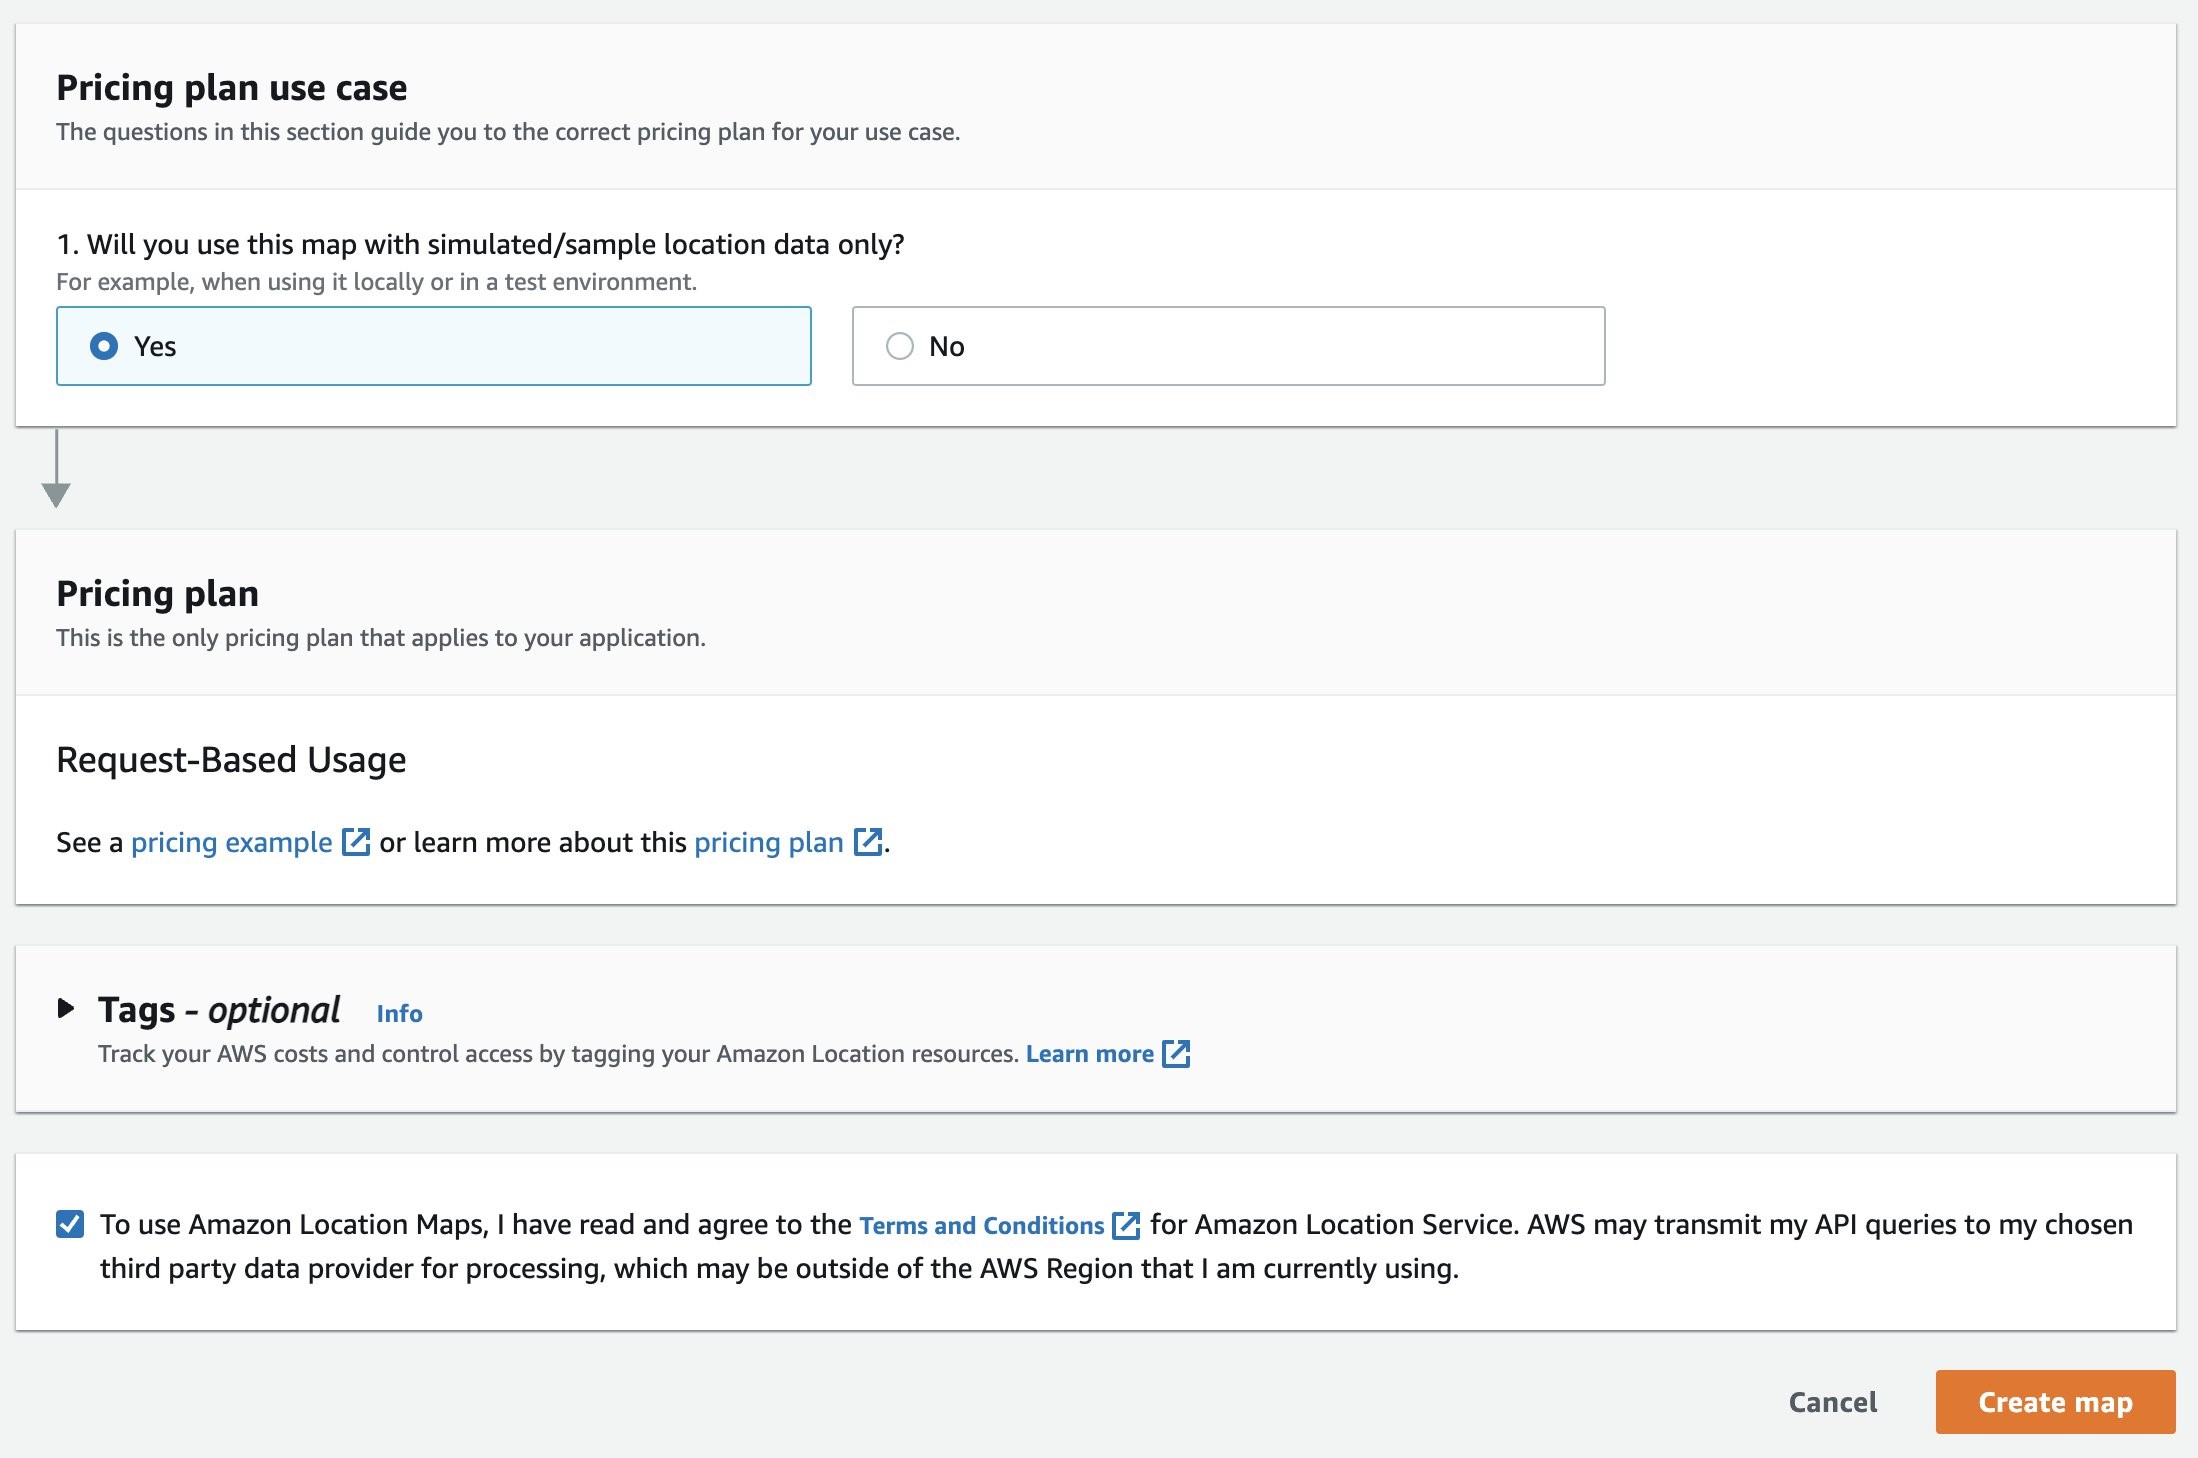
- You can choose Yes on the Pricing plan use case since this is only going to be using sample location data.
- Finally, tick the very last box before clicking Create map. If you want to know more about the available Pricing plans available on Amazon Location Service, you can have a look at its pricing page.
Almost instantly after that, you can see the newly created map!

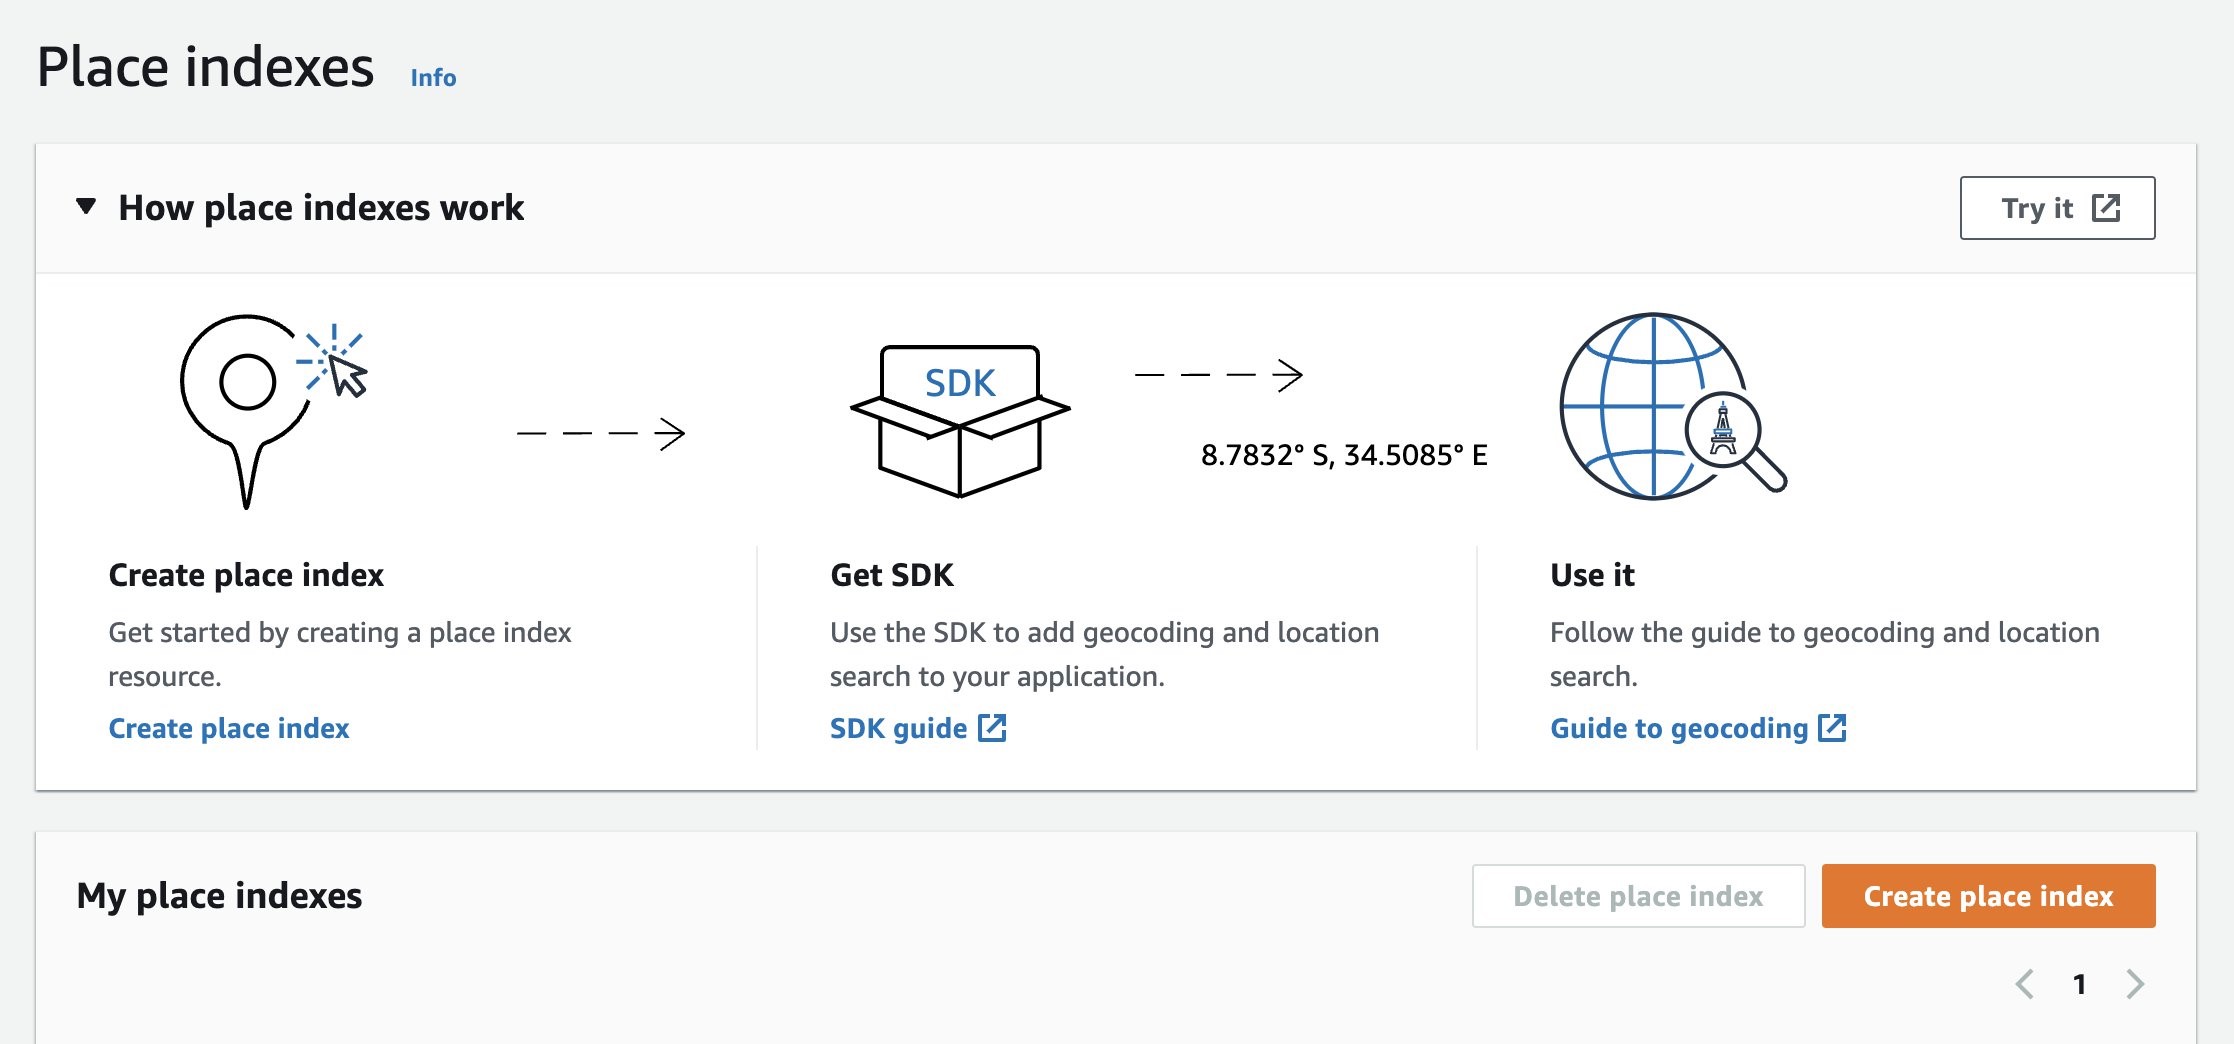
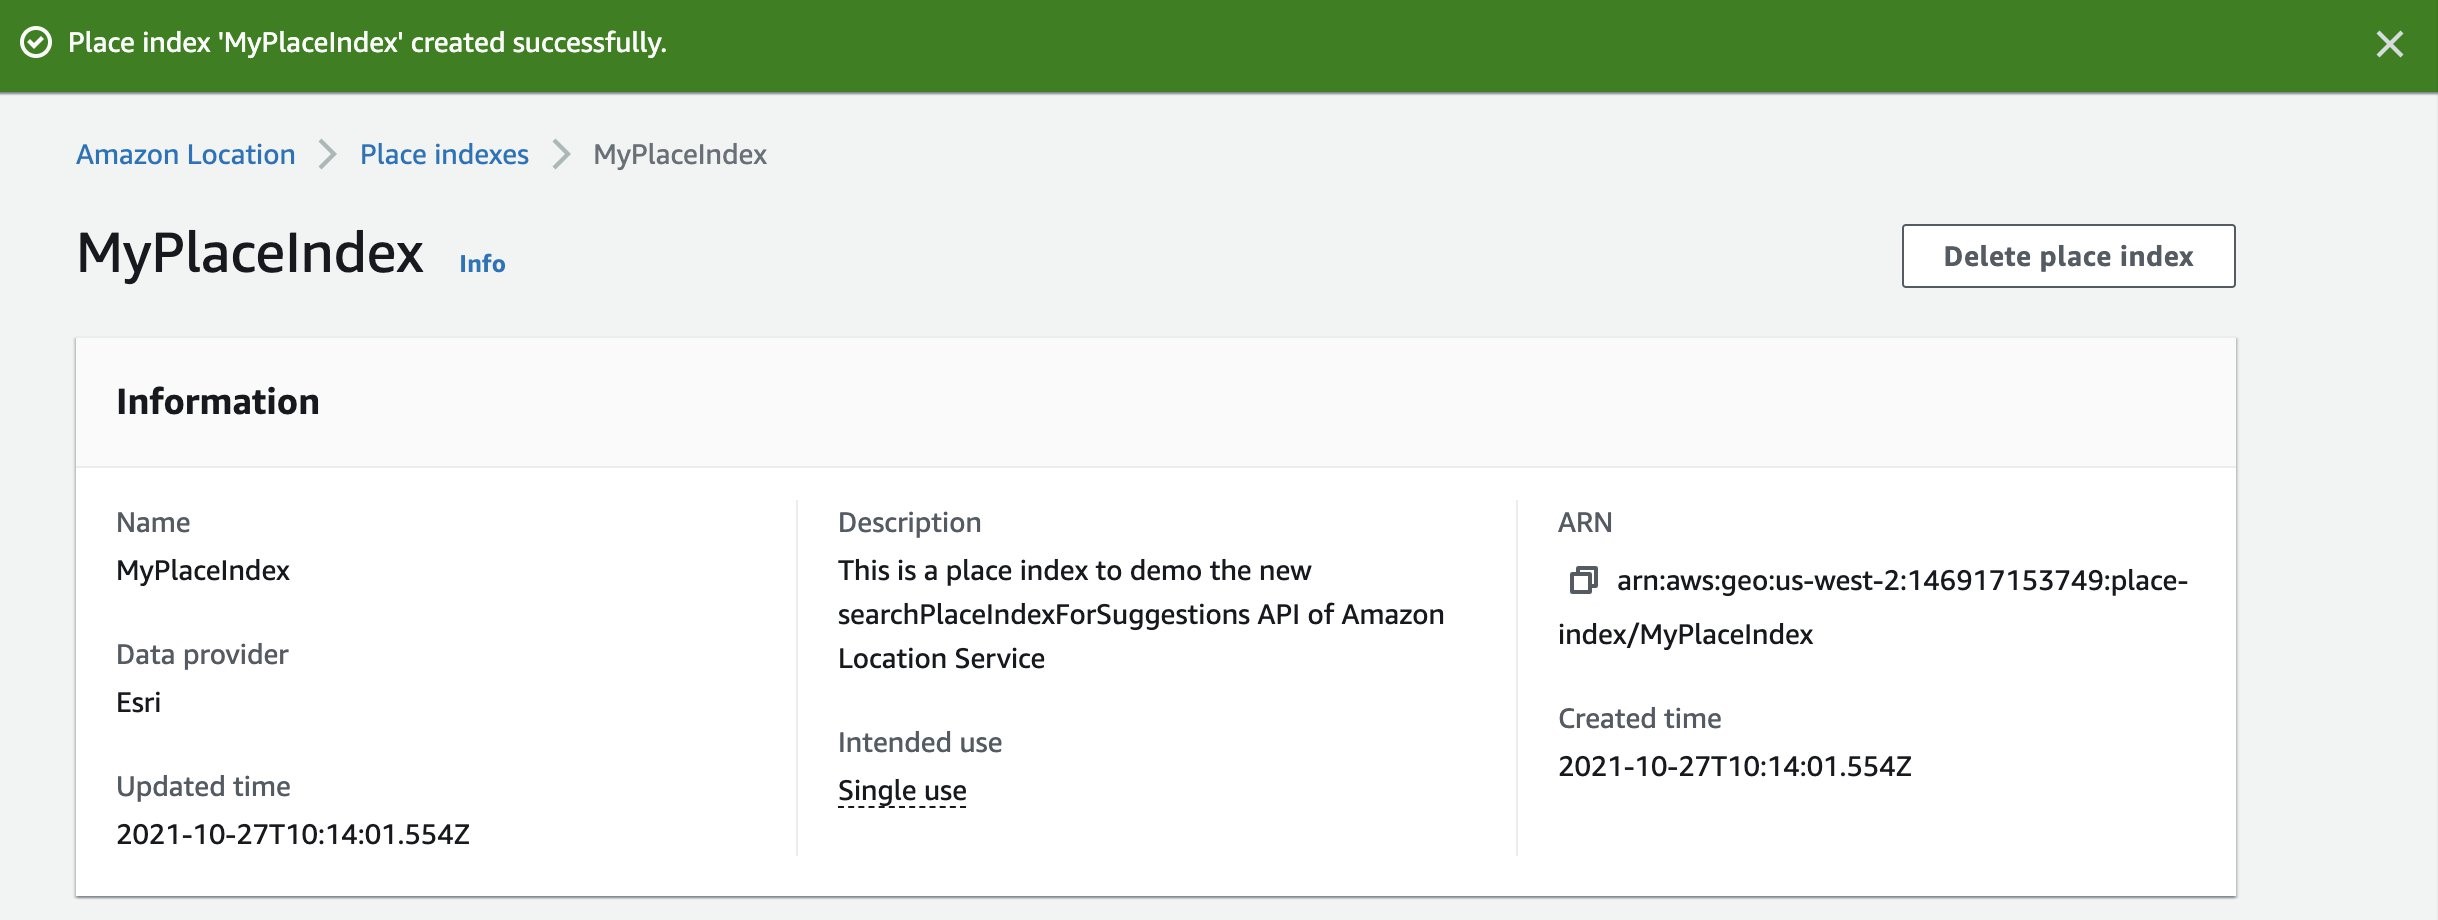
Now, let’s create a Place index which supports both “SearchPlaceindexForSuggestions” and “SearchPlaceindexForText” API operations. In the Amazon Location Service menu, choose “Place indexes”.

You can move ahead with creating one by clicking the respective button.
The overall process is very simple; after adding a Name and a Description, you have to choose one of the two supported Data providers (Esri or HERE, we go for Esri similarly to how we chose the Map above):
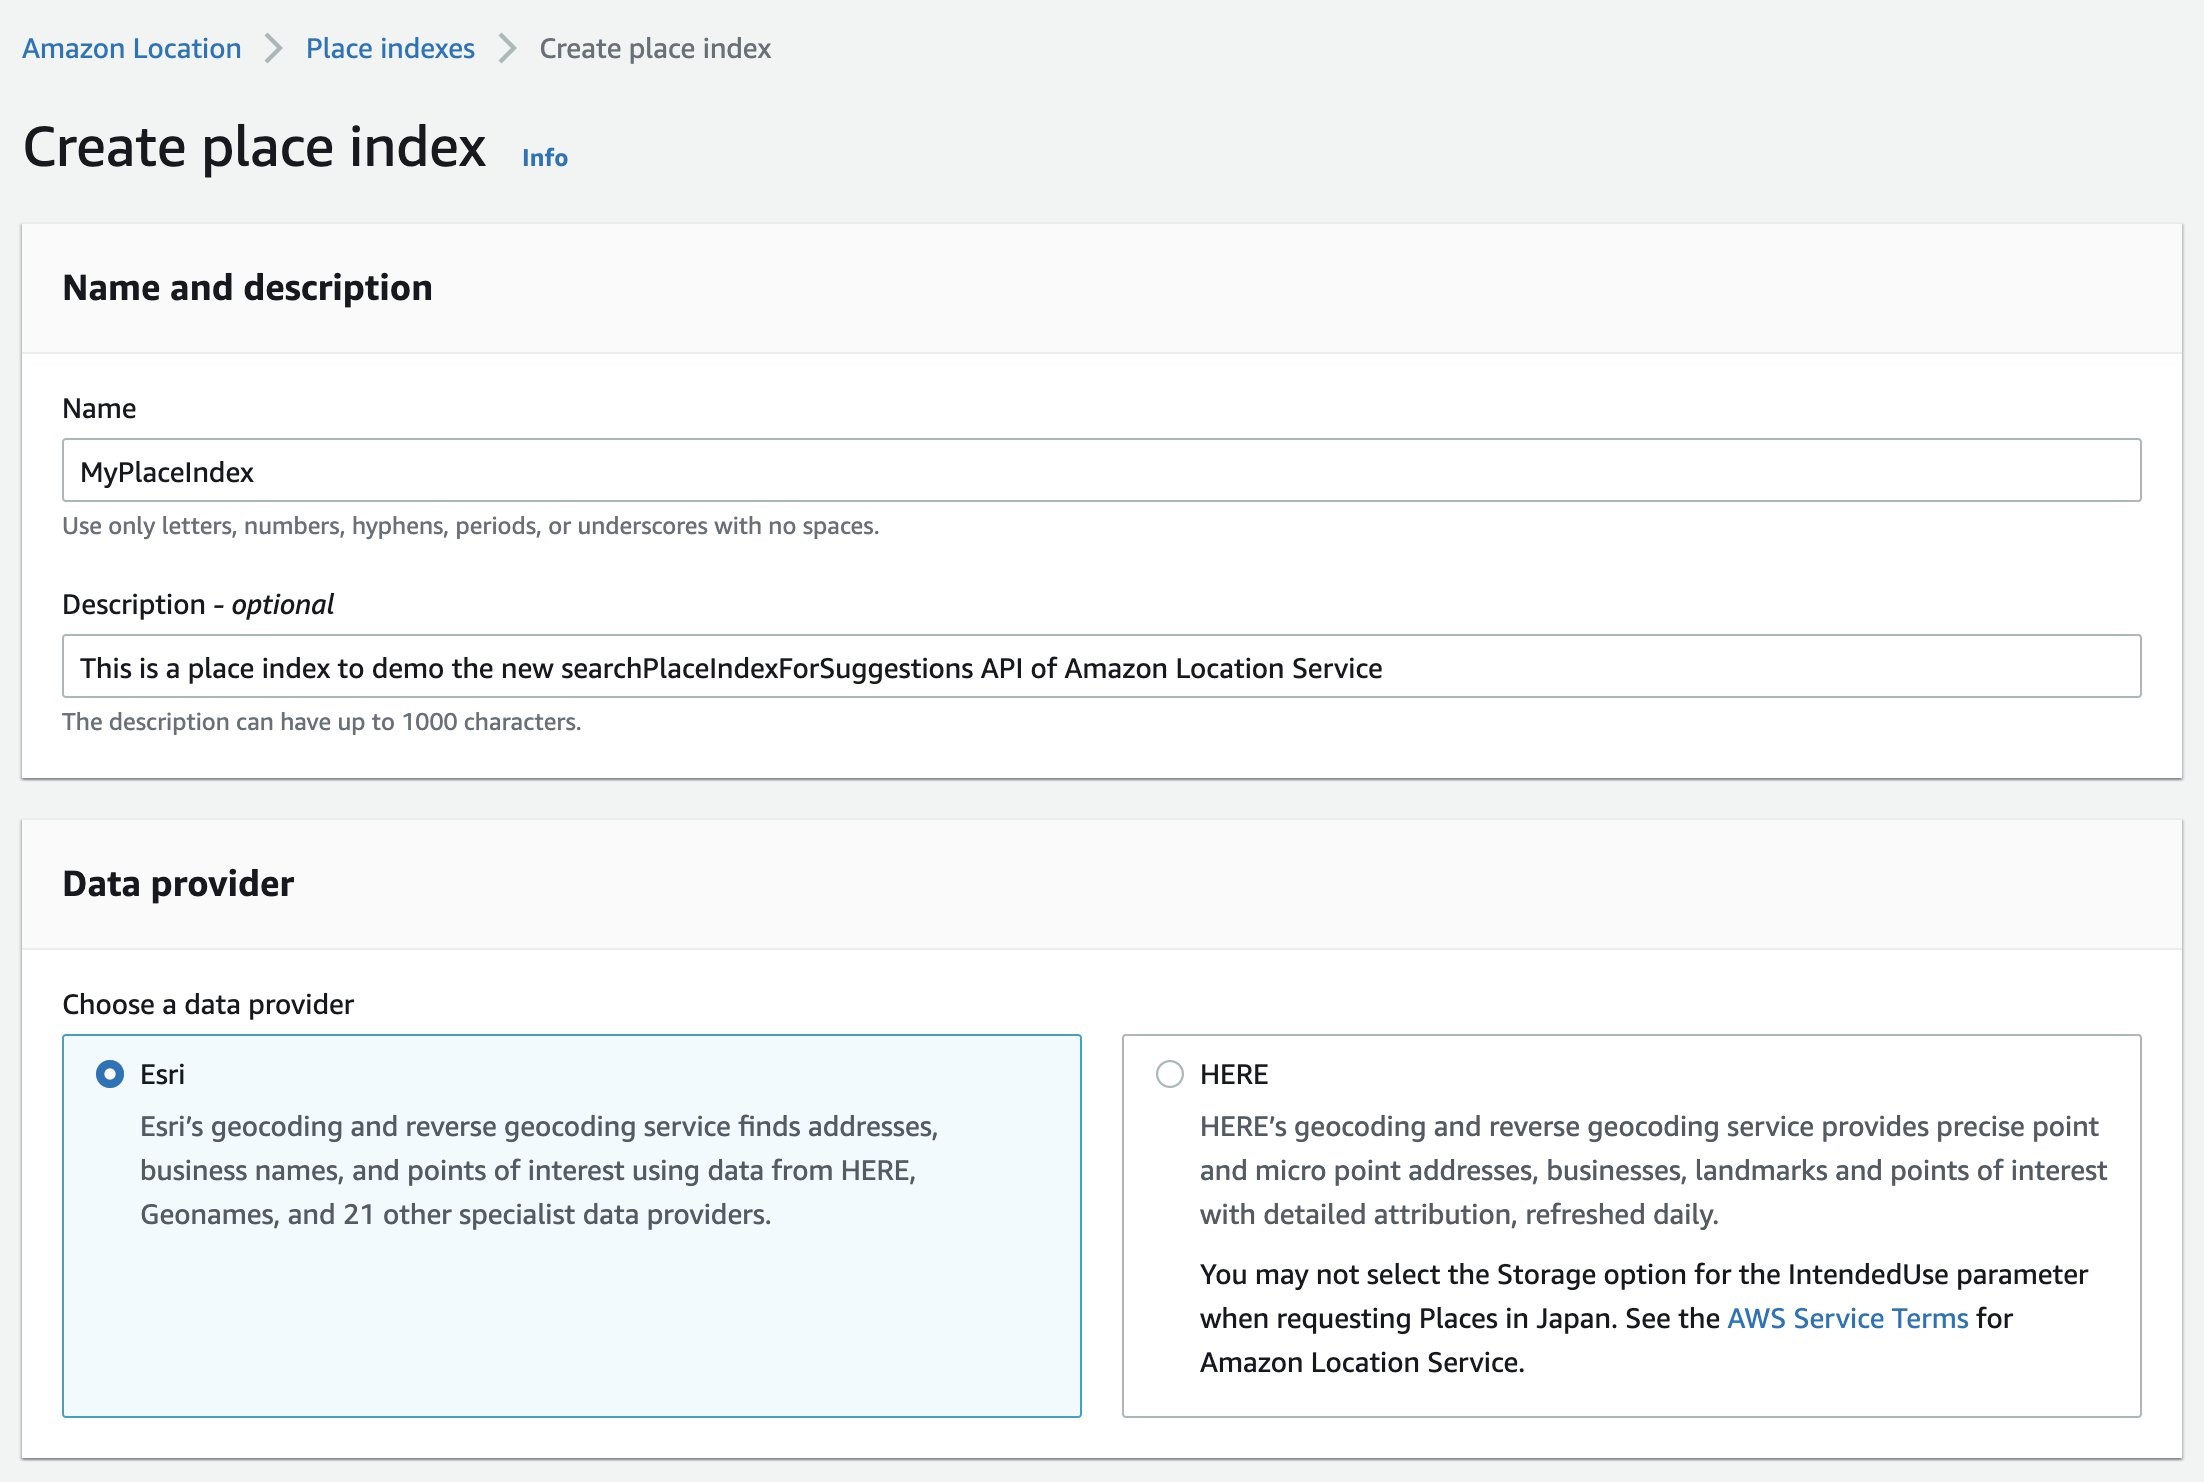
and then Data storage options and Pricing plans, in the exact same fashion as with the previous map creation form before agreeing with the Terms and Conditions and clicking the button to create the place index.

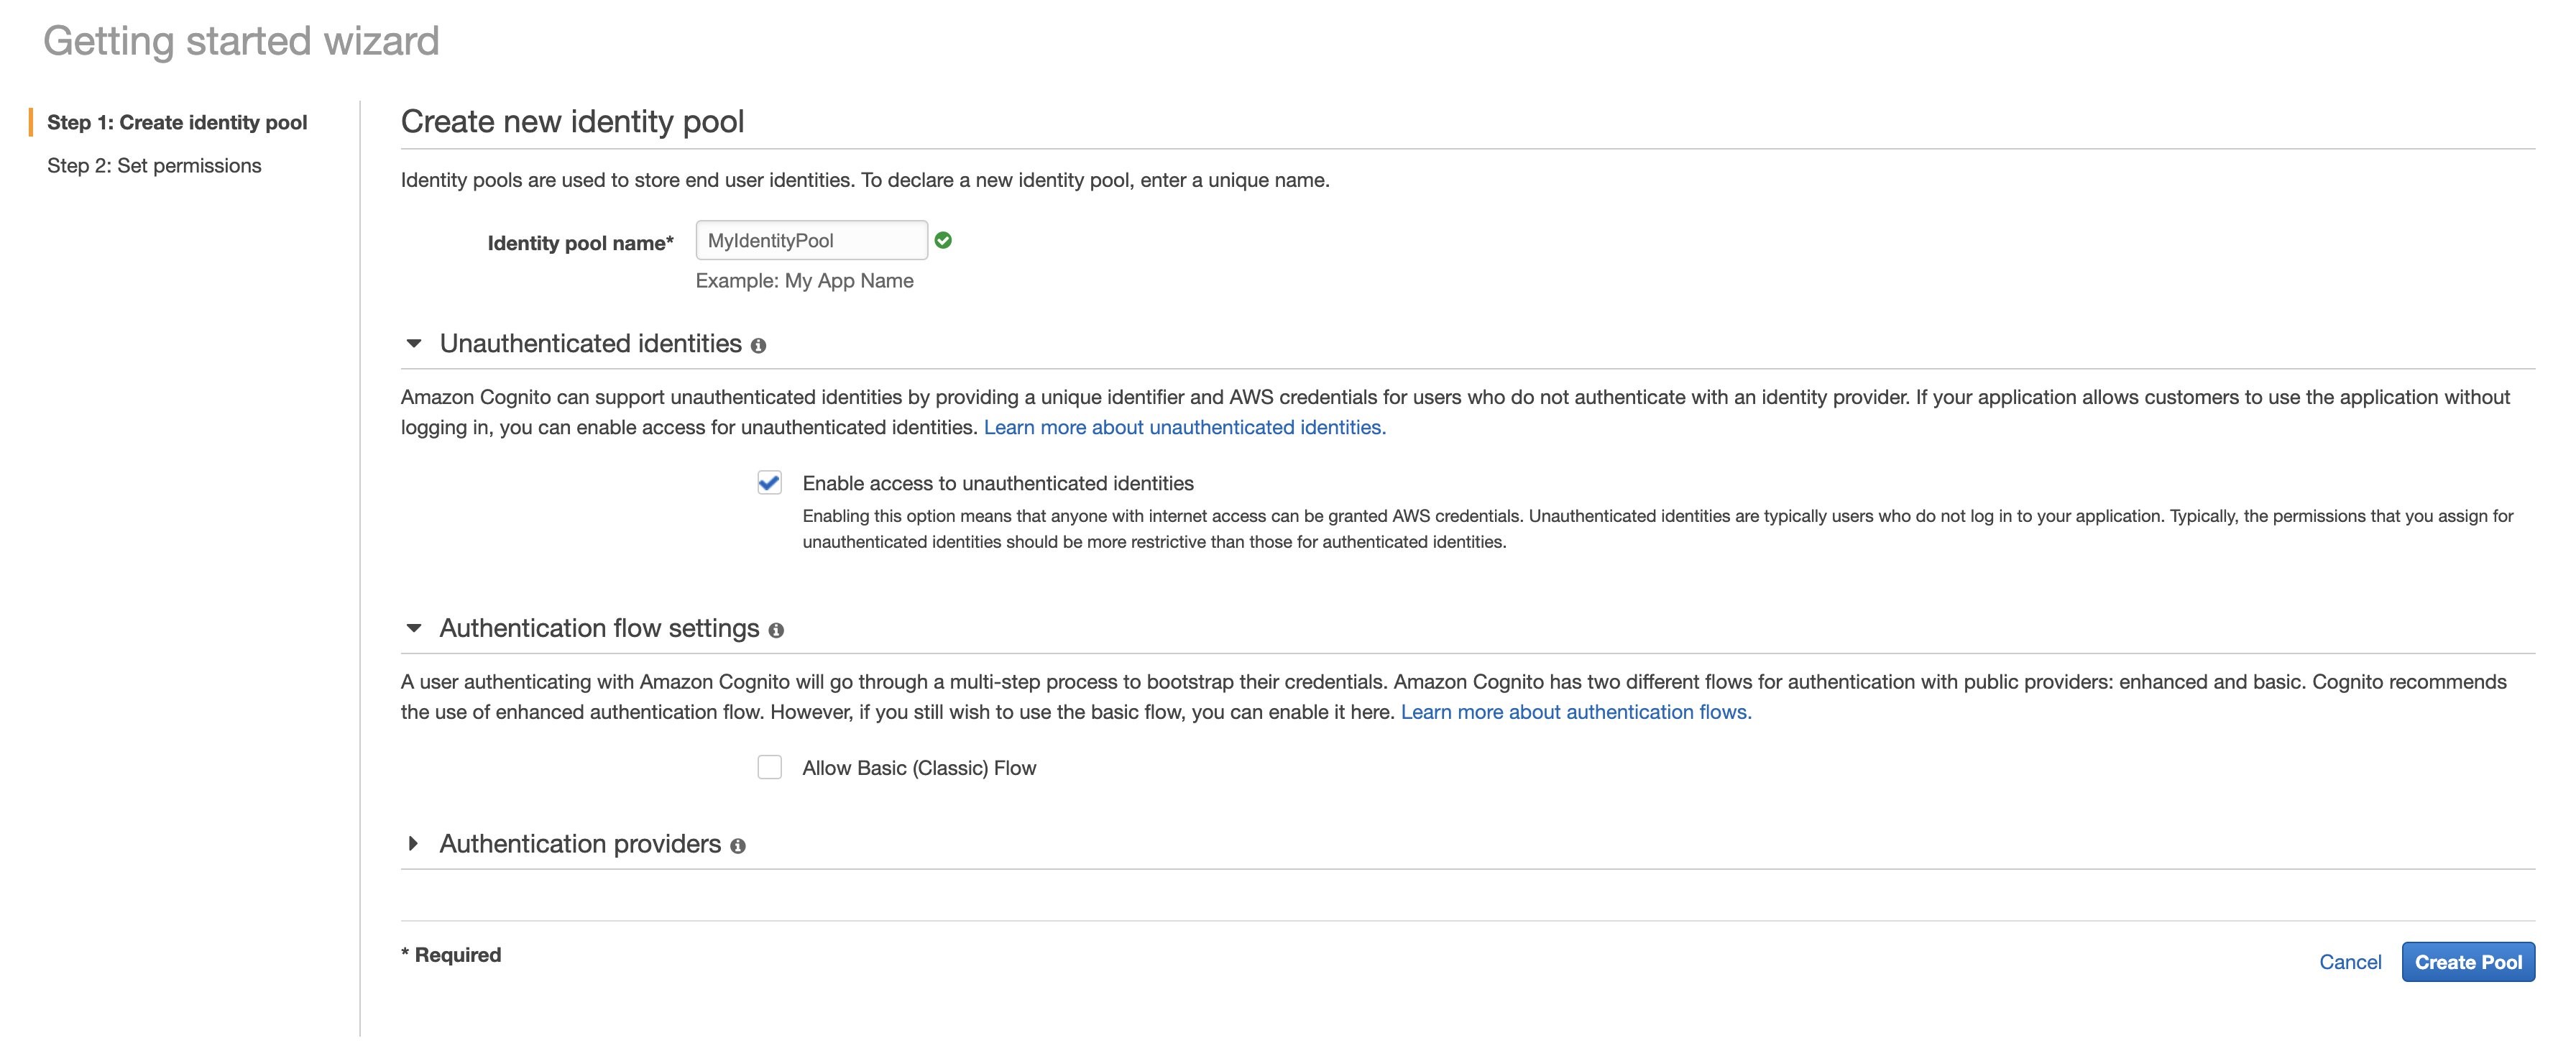
Now that we have created our Map and Place index, we’re ready to move to our next step which involves Amazon Cognito, the service that will help authenticate users as a secure alternative to directly embedding credentials associated with an AWS Identity and Access Management (IAM) user. In particular, we will see how to configure Amazon Cognito for a website with anonymous users, like the demo application we are about to deploy. More information about using Amazon Cognito to allow access to Amazon Location Service can be found here.
- To get started, open Amazon Cognito from the AWS Console and choose Manage Identity Pools and then Create new identity pool so that you reach the page below:
- In the “Role Summary” section, there is an inline policy that looks like the one below:
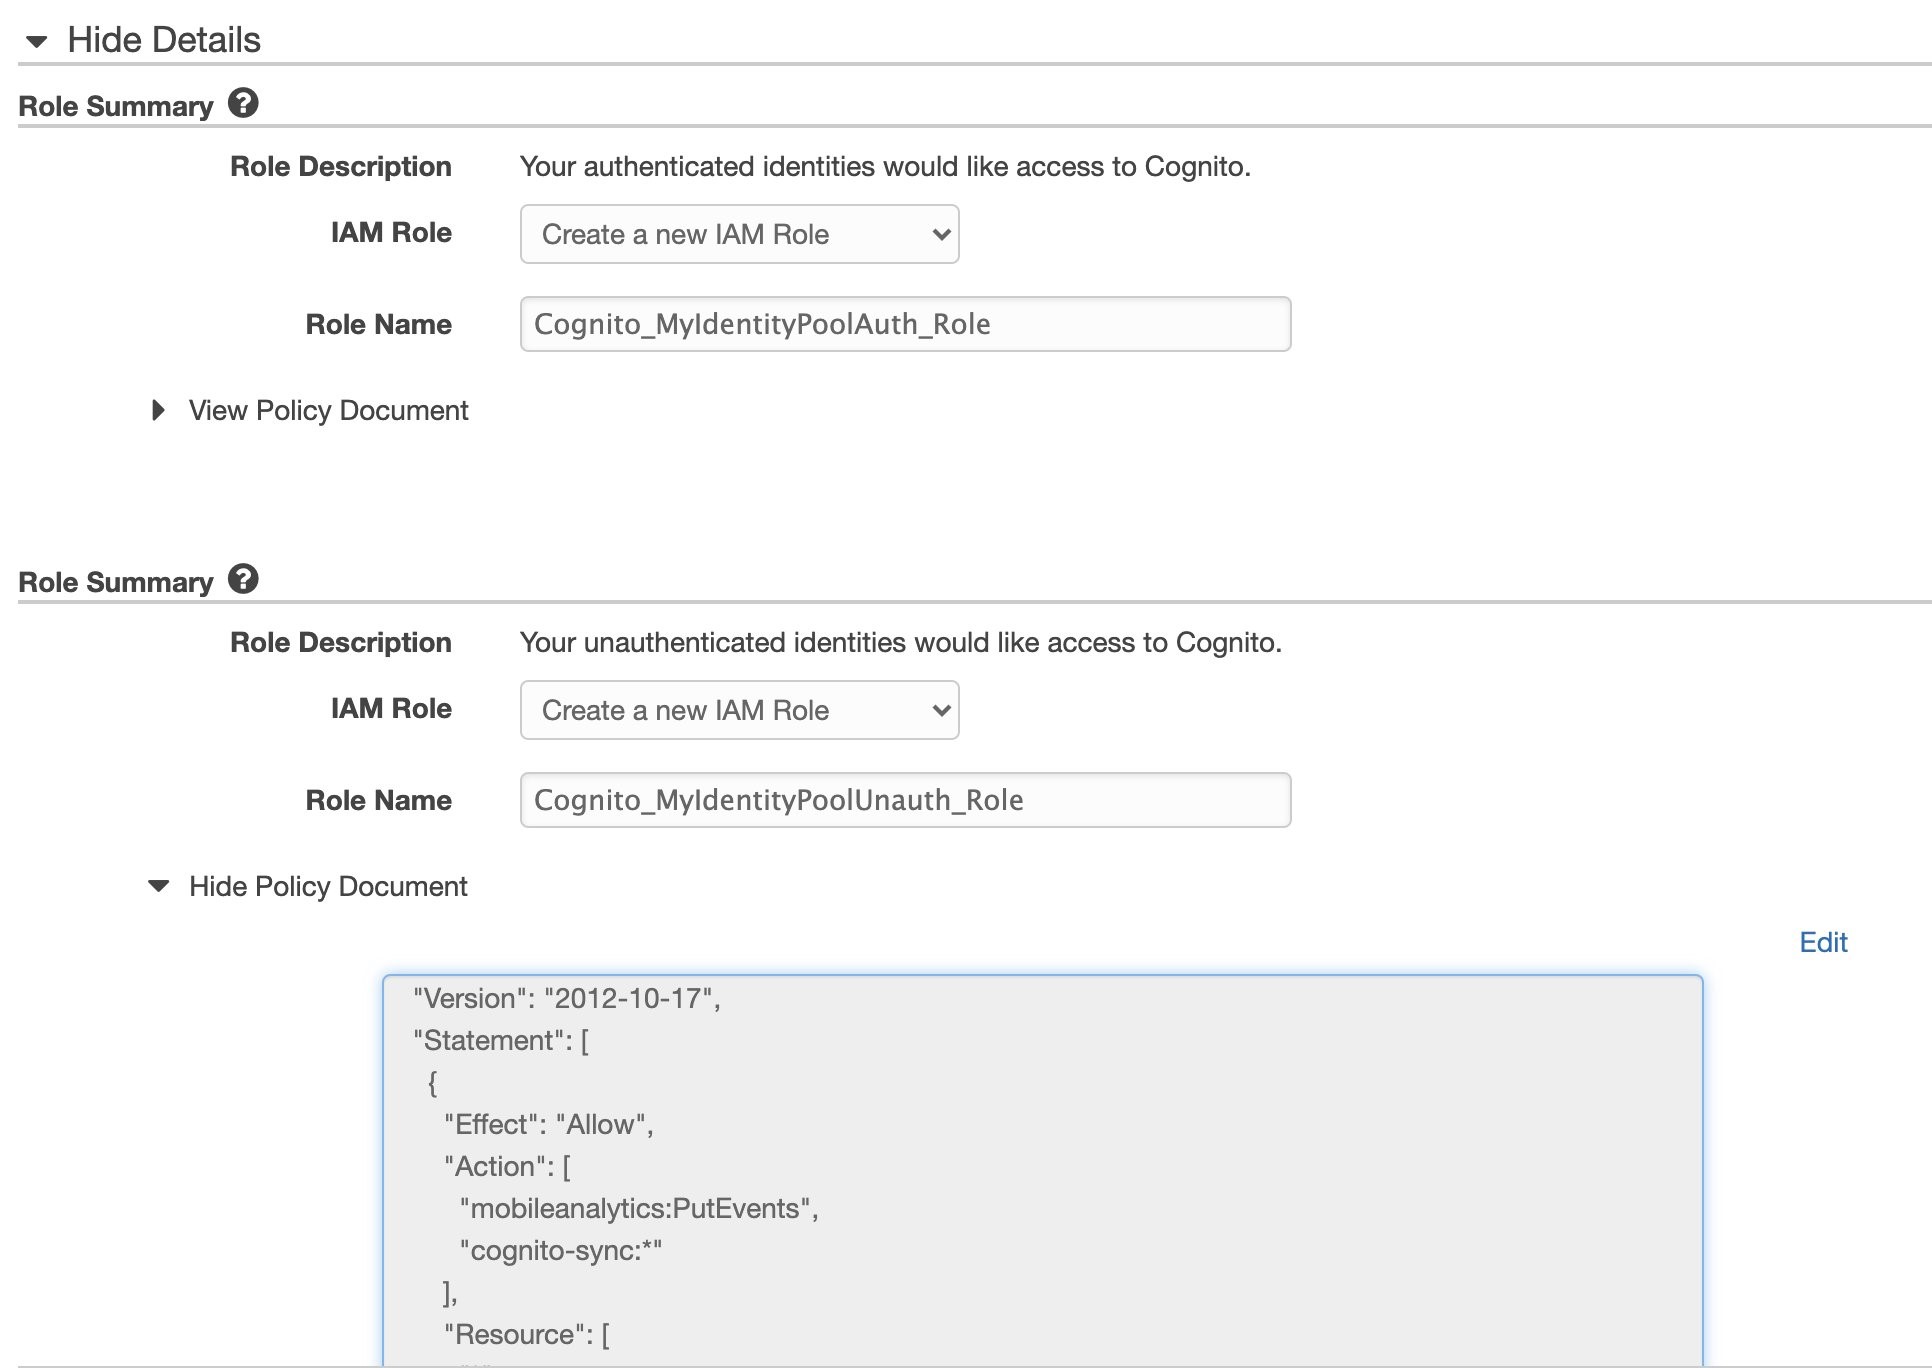
This needs to be replaced by a custom one, so that users are able to interact with the applications but also ensure the principle of least privilege is followed:
{
  "Version": "2012-10-17",
  "Statement": [
    {
      "Condition": {
        "StringLike": {
          "aws:Referer": [
            "http://localhost:[port number]/*"
          ]
        }
      },
      "Action": "geo:GetMap*",
      "Resource": "arn:aws:geo:[region]:[account number]:map/[map name]",
      "Effect": "Allow"
    },
    {
      "Condition": {
        "StringLike": {
          "aws:Referer": [
            "http://localhost:[port number]/*"
          ]
        }
      },
      "Action": "geo:SearchPlaceIndex*",
      "Resource": "arn:aws:geo:[region]:[account number]:place-index/[place index] ",
      "Effect": "Allow"
    }
  ]
}
Note: make sure you replace
- [region] with the region code (e.g. us-east-1 for US East (N. Virginia)),
- [account number] with the unique number of your AWS account, in both occurrences of these above,
- [map name] with the name of the map you created in the first step of the process (this will be “MyMap” if you followed the suggestion of this post)
- [place index] with the name of the place index you crated in the second step of the process (this will be “MyPlaceIndex” if you followed the suggestion of this post).
Note: make sure the “aws:Referer” field matches the domain name of the application (e.g. http://localhost:5000/*), in both occurrences of this above.

- Click next and then you are introduced to a screen that involves a section named “Get AWS credentials”, which you need to expand and copy the text in red (Identity Pool ID) for future usage.
Having set up all 3 items that are needed in order to successfully run our application, namely a Map and a Place index on Amazon Location Service, and an Identity Pool on Amazon Cognito, we are ready to configure the application code which uses MapLibre GL JS with Amazon Location Service and AWS Amplify.
<!doctype html>
<html>
  <head>
    <script>
      const COGNITO_IDENTITY_POOL_ID = '<YOUR_COGNITO_IDENTITY_POOL_ID>';
      const MAP_NAME = '<YOUR_MAP_NAME>';
      const PLACE_INDEX_NAME = "<YOUR_PLACE_INDEX_NAME>";
    </script>
    <meta charset="utf-8">
    <meta name="viewport" content="width=device-width, initial-scale=1">
    <link href="https://cdn.jsdelivr.net/npm/bootstrap@5.0.0-beta1/dist/css/bootstrap.min.css"
      rel="stylesheet"
      integrity="sha384-giJF6kkoqNQ00vy+HMDP7azOuL0xtbfIcaT9wjKHr8RbDVddVHyTfAAsrekwKmP1"
      crossorigin="anonymous"/>
    <link href="https://cdn.amplify.aws/packages/maplibre-gl/1.15.2/maplibre-gl.css" rel="stylesheet" integrity="sha384-DrPVD9GufrxGb7kWwRv0CywpXTmfvbKOZ5i5pN7urmIThew0zXKTME+gutUgtpeD" crossorigin="anonymous" referrerpolicy="no-referrer"></link>
    <script src="https://cdn.amplify.aws/packages/maplibre-gl/1.15.2/maplibre-gl.js" integrity="
    sha384-rwYfkmAOpciZS2bDuwZ/Xa/Gog6jXem8D/whm3wnsZSVFemDDlprcUXHnDDUcrNU" crossorigin="anonymous" referrerpolicy="no-referrer">
    </script>
    <script src="https://cdn.amplify.aws/packages/core/4.3.0/aws-amplify-core.min.js" integrity="sha384-7Oh+5w0l7XGyYvSqbKi2Q7SA5K640V5nyW2/LEbevDQEV1HMJqJLA1A00z2hu8fJ" crossorigin="anonymous" referrerpolicy="no-referrer"></script>
    <script src="https://cdn.amplify.aws/packages/auth/4.3.8/aws-amplify-auth.min.js" integrity="sha384-jfkXCEfYyVmDXYKlgWNwv54xRaZgk14m7sjeb2jLVBtUXCD2p+WU8YZ2mPZ9Xbdw" crossorigin="anonymous" referrerpolicy="no-referrer"></script>
    <script src="https://cdn.amplify.aws/packages/geo/1.1.0/aws-amplify-geo.min.js" integrity="sha384-TFMTyWuCbiptXTzvOgzJbV8TPUupG1rA1AVrznAhCSpXTIdGw82bGd8RTk5rr3nP" crossorigin="anonymous" referrerpolicy="no-referrer"></script>
    <script src="https://cdn.amplify.aws/packages/maplibre-gl-js-amplify/1.1.0/maplibre-gl-js-amplify.umd.min.js" integrity="sha384-7/RxWonKW1nM9zCKiwU9x6bkQTjldosg0D1vZYm0Zj+K/vUSnA3sOMhlRRWAtHPi" crossorigin="anonymous" referrerpolicy="no-referrer"></script>
    <script src="https://kit.fontawesome.com/d010f6acd2.js" crossorigin="anonymous"></script>
    <style>
      body {
        margin: 0;
      }
      #app {
        height: 100vh;
        display: flex;
        flex-direction: row;
        justify-content: center;
        align-content: center;
        align-items: flex-start;
      }
      #sidebar {
        width: 400px;
        height: 100vh;
        border-right: 1px solid #ccc;
      }
      #map {
        flex: 1;
        height: 100vh;
      }
      #loading-overlay {
        position: absolute;
        top: 0;
        bottom: 0;
        left: 0;
        right: 0;
        background-color: rgba(255, 255, 255, 0.75);
        z-index: 2;
        display: none;
        flex-direction: row;
        justify-content: center;
        align-content: center;
        align-items: center;
      }
      #loading-overlay p {
        flex: 1;
        text-align: center;
      }
      img#logo {
        width: 32px;
        height: 32px;
      }
      #result {
        border: 1px dotted #ccc;
        padding: 3px;
      }
      #result ul {
        list-style-type: none;
        padding: 0;
        margin: 0;
      }
      #result ul li {
        padding: 5px 0;
      }
      #result ul li:hover {
        background: #eee;
      }
    </style>
    <title>Amazon Location Service Demo App</title>
  </head>
  <body>
    <!-- main app container -->
    <div id="app">
      <!-- sidebar -->
      <div id="sidebar">
        <div class="container">
          <h5 class="text-center mt-4 mb-4">
            <img id="logo" src="https://d2q66yyjeovezo.cloudfront.net/icon/waypoint-6c1d2320a20dd76867d0420ce2708023.svg"/>
            <br/>
            <span>Amazon Location Service Demo</span>
          </h5>
          <form action="#" class="mb-4" id="search-pois-form">
            <div class="input-group">
              <input autocomplete="off" type="text" class="form-control" id="pois-search-term" placeholder="POI search">
              <button type="submit" class="btn btn-secondary"><i class="fas fa-search"></i></button>
            </div>
            <div id="result"></div>
          </form>
        </div>
      </div>
      <!-- map container -->
      <div id="map" />
    </div>
    <!-- loading overlay -->
    <div id="loading-overlay">
      <p><i class="fas fa-circle-notch fa-spin"></i> <span id="loading-text">Loading...</span></p>
    </div>
    <!-- JavaScript dependencies -->
    <script src="./aws-sdk-location.js"></script>
    <script src="./app.js"></script>
  </body>
</html>
Within index.html, replace <YOUR_COGNITO_IDENTITY_POOL_ID> with the Amazon Cognito Identity Pool ID that you copied earlier. Finally, replace <YOUR_MAP_NAME> with the name of a Map resource that you previously created as well as the <YOUR_PLACE_INDEX_NAME> with the Index name you created, respectively.
const { Amplify } = aws_amplify_core;
const { createMap } = AmplifyMapLibre;
const identityPoolId = COGNITO_IDENTITY_POOL_ID;
const region = COGNITO_IDENTITY_POOL_ID.split(":")[0];
const mapName = MAP_NAME;
const placeIndexName = PLACE_INDEX_NAME;
class ApiService {
async searchPois(term) {
const location = new AWS.Location();
const results = await location.searchPlaceIndexForText({
IndexName: placeIndexName, // required
Text: term // required
}).promise();
return results.Results;
}
async suggestPois(term) {
const location = new AWS.Location();
const results = await location.searchPlaceIndexForSuggestions({
IndexName: placeIndexName, // required
Text: term // required
}).promise();
return results.Results;
}
}
class App {
constructor(apiService) {
this.map = null;
this.mode = 'default';
this.apiService = apiService;
this.poiMarker = null;
this.searchPoisForm = document.getElementById('search-pois-form');
this.searchPoisTermTextBox = document.getElementById('pois-search-term');
this.loadingOverlay = document.getElementById('loading-overlay');
this.loadingText = document.getElementById('loading-text');
// Instantiate a Cognito-backed credential provider
this.awsCredentials = new AWS.CognitoIdentityCredentials({
IdentityPoolId: COGNITO_IDENTITY_POOL_ID,
});
}
async _suggestPois() {
const term = this.searchPoisTermTextBox.value.trim();
if (term.length) {
this.showLoadingOverlay('Searching POIs...');
try {
const results = await this.apiService.suggestPois(term);
if (results.length) {
const res = document.getElementById("result");
res.innerHTML = '';
let list = '';
for (let i = 0; i < results.length; i++) {
list += `<li data-value="${results[i].Text}">${results[i].Text}</li>`;
}
res.innerHTML = `<ul id="autocompletedlist">${list}</ul>`;
document.getElementById("autocompletedlist").addEventListener('click', function(e) {
// e.target is our targetted element.
if(e.target && e.target.nodeName == 'LI') {
document.getElementById('pois-search-term').value = e.target.getAttribute('data-value');
document.getElementById('result').innerHTML = '';
}
});
} else {
console.info('POI suggest yielded no results.');
}
} finally {
this.hideLoadingOverlay();
}
}
}
async _searchPois() {
const term = this.searchPoisTermTextBox.value.trim();
if (!term.length) {
throw new Error('Search term has not been provided');
}
this.showLoadingOverlay('Searching POIs...');
try {
const results = await this.apiService.searchPois(term);
// Remove the previous marker
if (this.poiMarker != null) {
this.poiMarker.remove();
this.poiMarker = null;
}
// Add new marker if there's at least one result
if (results.length) {
const marker = new maplibregl.Marker().setLngLat(results[0].Place.Geometry.Point).addTo(this.map);
this.poiMarker = marker;
this.map.flyTo({
center: results[0].Place.Geometry.Point
});
} else {
console.info('POI search yielded no results.');
}
} finally {
this.hideLoadingOverlay();
}
}
async _initializeMap() {
// extract the region from the Identity Pool ID
AWS.config.region = COGNITO_IDENTITY_POOL_ID.split(":")[0];
// configure the SDK to make use of the Cognito-provided credentials
AWS.config.credentials = this.awsCredentials;
// load credentials and set them up to refresh
await this.awsCredentials.getPromise();
Amplify.configure({
Auth: {
identityPoolId,
region, // may differ from the region containing your Map resource
},
geo: {
amazon_location_service: {
maps: {
items: {
[mapName]: {
style: "Default style"
},
},
default: mapName,
},
region,
},
}
});
// actually initialize the map
this.map = await createMap(
{
container: "map",
center: [55.14892, 25.08515], // initial map center point
zoom: 10, // initial map zoom
hash: true,
}
);
this.map.addControl(new maplibregl.NavigationControl(), "top-left");
}
showLoadingOverlay(msg) {
this.loadingText.innerHTML = msg;
this.loadingOverlay.style.display = 'flex';
}
hideLoadingOverlay() {
this.loadingOverlay.style.display = 'none';
this.loadingText.innerHTML = '';
}
init() {
this.showLoadingOverlay('Initializing...');
// Register UI handlers
this.searchPoisForm.onsubmit = (e) => {
e.preventDefault();
this._searchPois();
};
this.searchPoisTermTextBox.onkeyup = (e) => {
e.preventDefault();
this._suggestPois();
};
// Initialize the map and fetch resources
this._initializeMap()
.then(d => {
this.hideLoadingOverlay();
});
}
}
window.onload = () => {
let apiService = new ApiService();
let app = new App(apiService);
app.init();
};
Copy and paste the code above in a .html and .js file, respectively and place them under the same directory.
You are now ready to test the application on a web server of your choice, such as by running npx run serve or python3 -m http.server on your terminal.
The expected outcome should be an interface like the one below, in which you can type on the textbox placed on the left hand-side and see suggestions popping up in real time via leveraging the newly introduced “SearchPlaceindexForSuggestions” API which powers this feature.
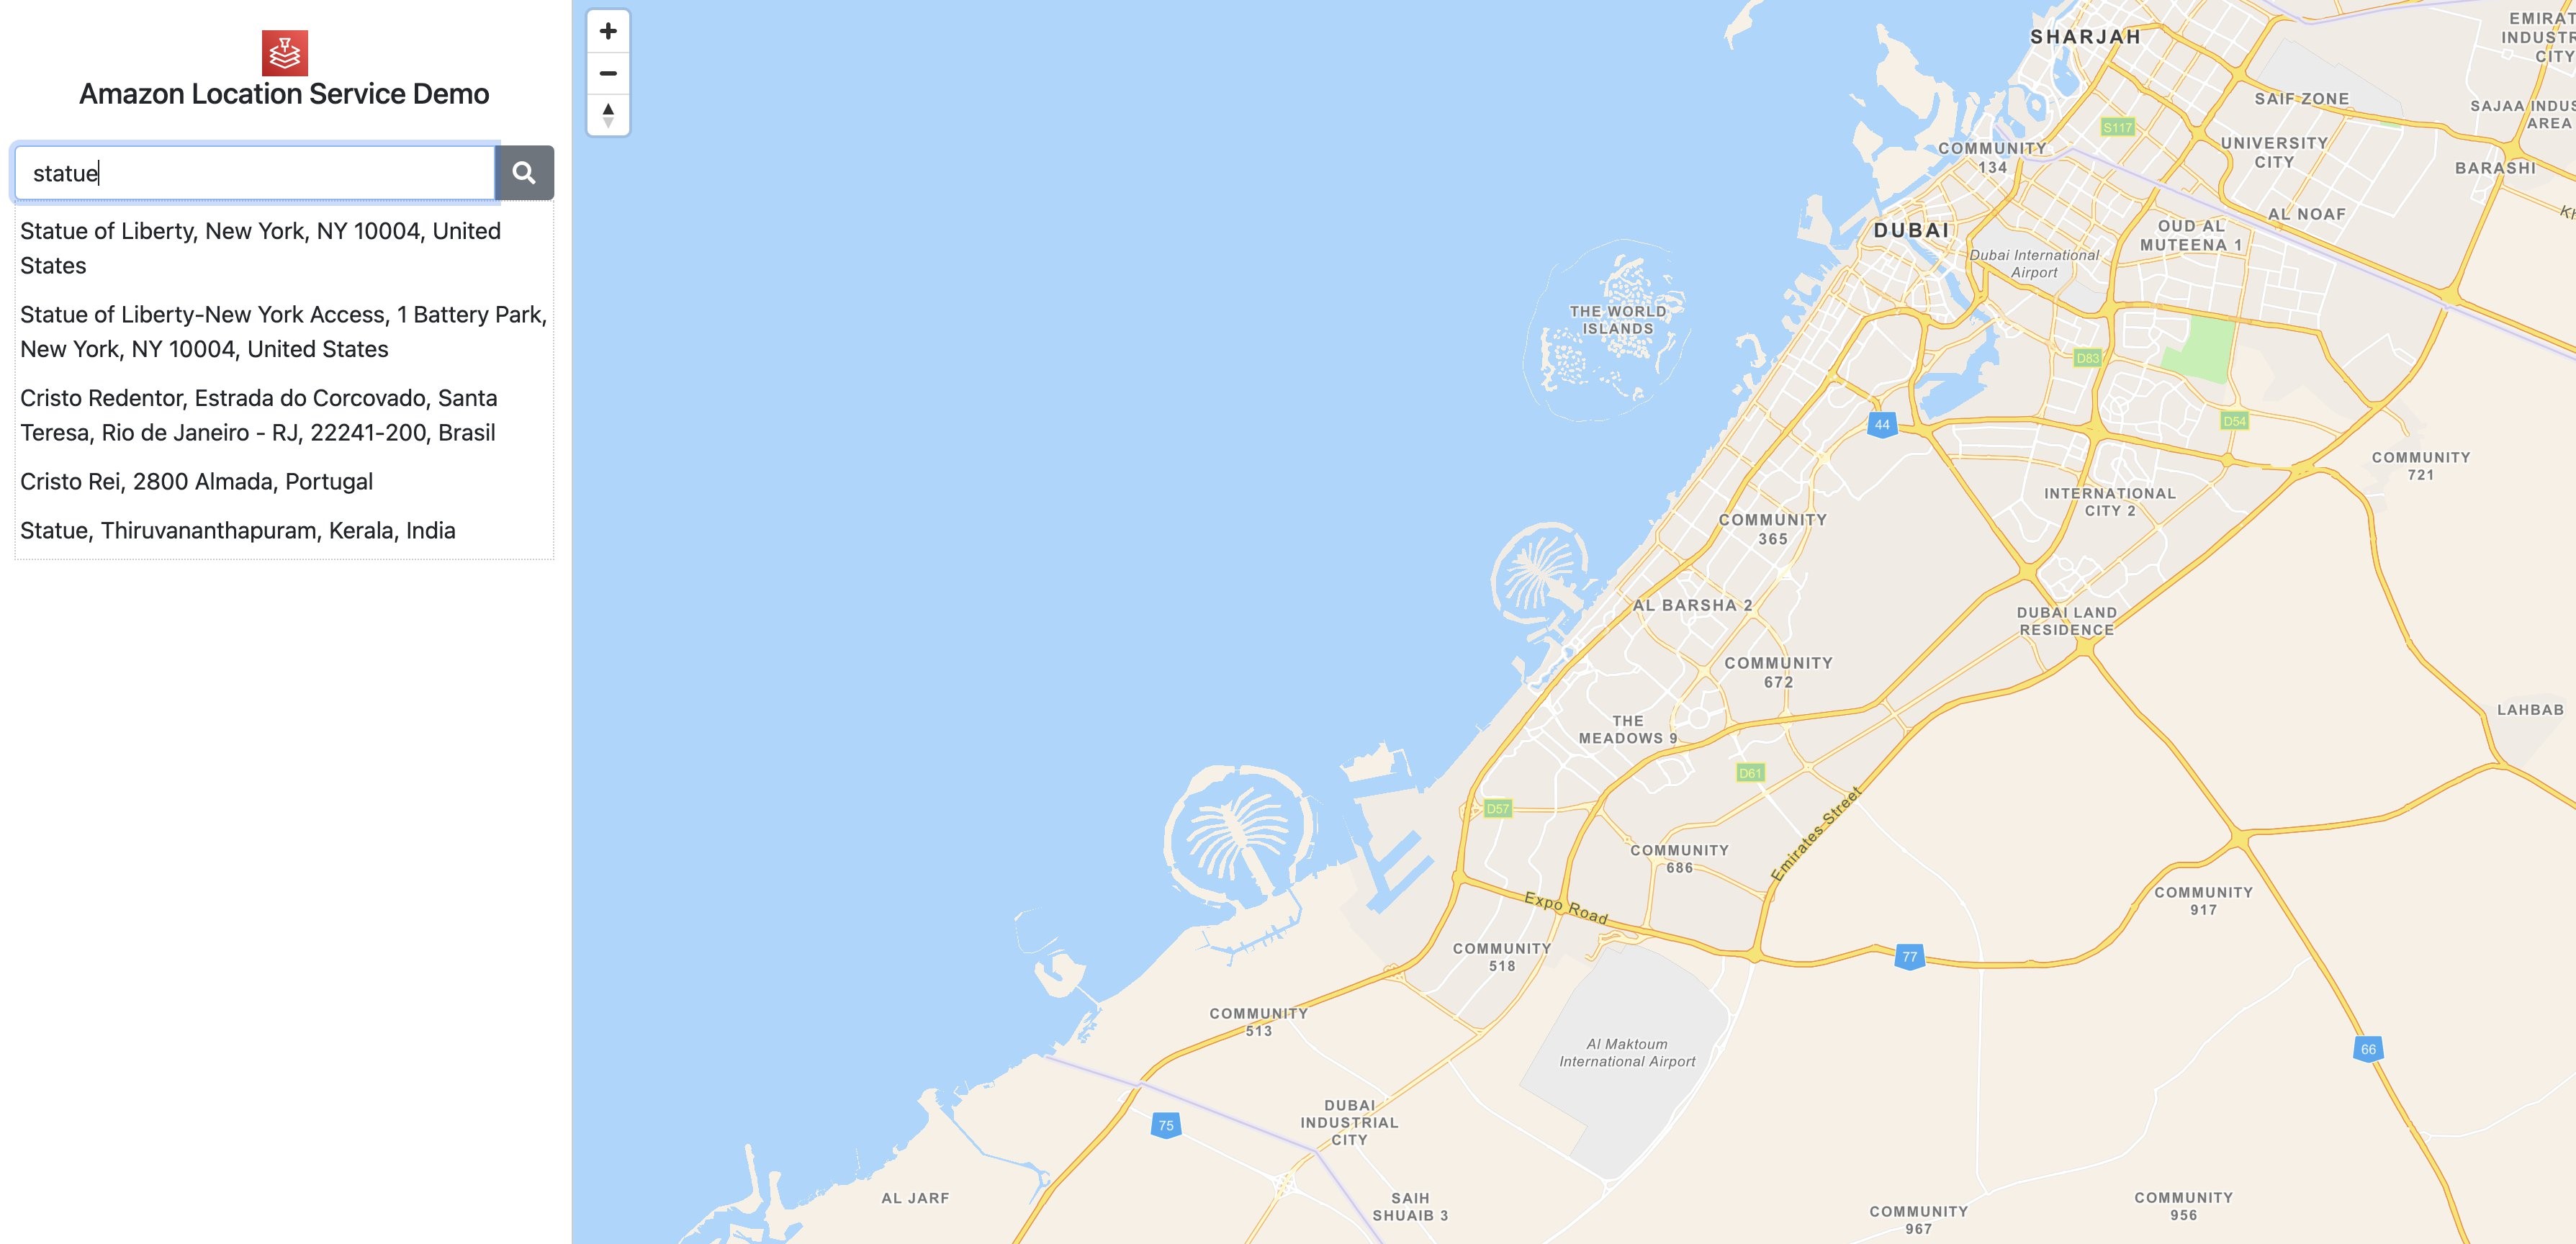
If you do click on the Search button, then the “SearchPlaceIndexForText” API is called, and places a pointer in the map, showcasing how both API operations can work hand-in-hand on real-life use cases.

That’s it! We have now managed to create a simple web application in which we can get suggestions for places in real time as we type, and see where exactly they are located in the map using Amazon Location Service and its new API.
Conclusion
The new SearchPlaceindexForSuggestions API is available today in all Regions where Amazon Location Service is available today. Find more about it by reading its documentation page.
You can evaluate Amazon Location Service using the free tier during your first three months of request-based usage.
About the authors