Front-End Web & Mobile
Authenticating AWS Amplify in an Expo React Native App using Okta OIDC
Managing user identities across multiple applications within an organization can be problematic. If your organization already has a solution for managing user access it is preferable that new applications integrate with currently exiting solutions rather than leveraging a novel mechanism. Okta is one such widely adopted identity management solution that may already be in play at your organization. This blog will teach you how to integrate this OIDC Identity Provider (IdP) with AWS Amplify, specifically for React Native applications.
This example was developed using Expo which is a popular framework for developing React Native applications. Expo provides a number of vital benefits that allow developers to accelerate building their mobile apps, streamlining deployments and start iterating on physical device more quickly.
Overview of solution
This solution gives customers the power to do the following:
- Authenticate users through an external OIDC IdP – in this case Okta
- Empower the mobile application to make calls through Amplify to an API or the AWS SDK
- Allow fine grained access to individual resources
To demonstrate the desired functionality, we will modify a blank React Native project to login to your Okta application and make an AWS SDK call from the app to list the items inside an Amazon Simple Storage Service (Amazon S3) bucket.
Here is the end result as displayed on an iOS emulator:
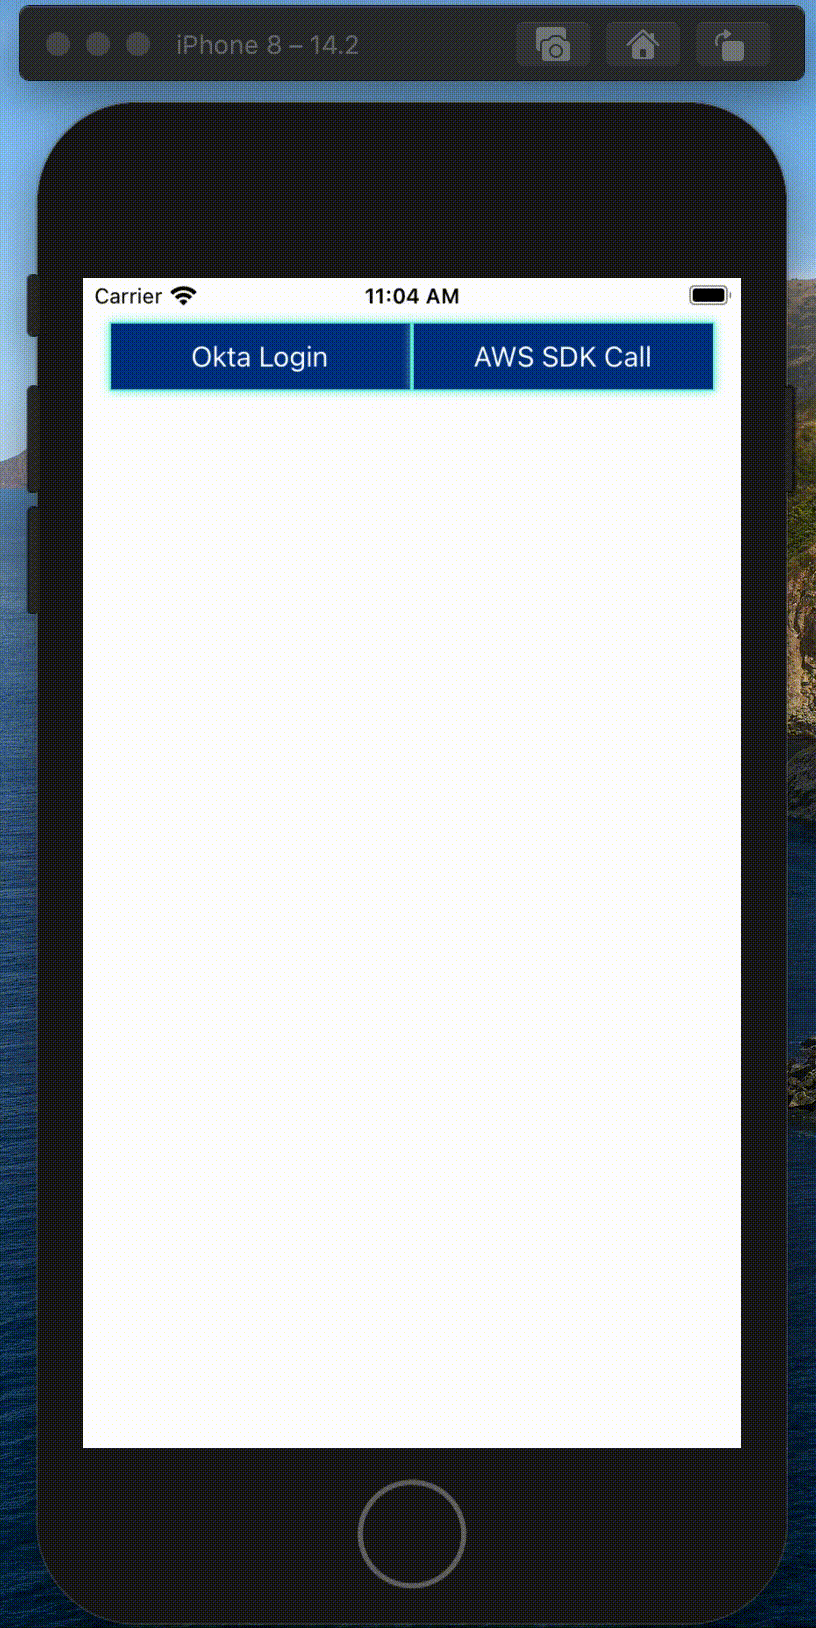
Figure 1. An animated demonstration of the App you will create
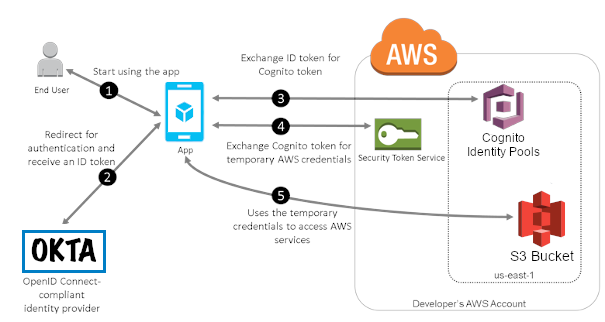
Figure 2. An architecture diagram showing communication between the App, Okta and AWS.
Here is an overview of how the authentication process flows:
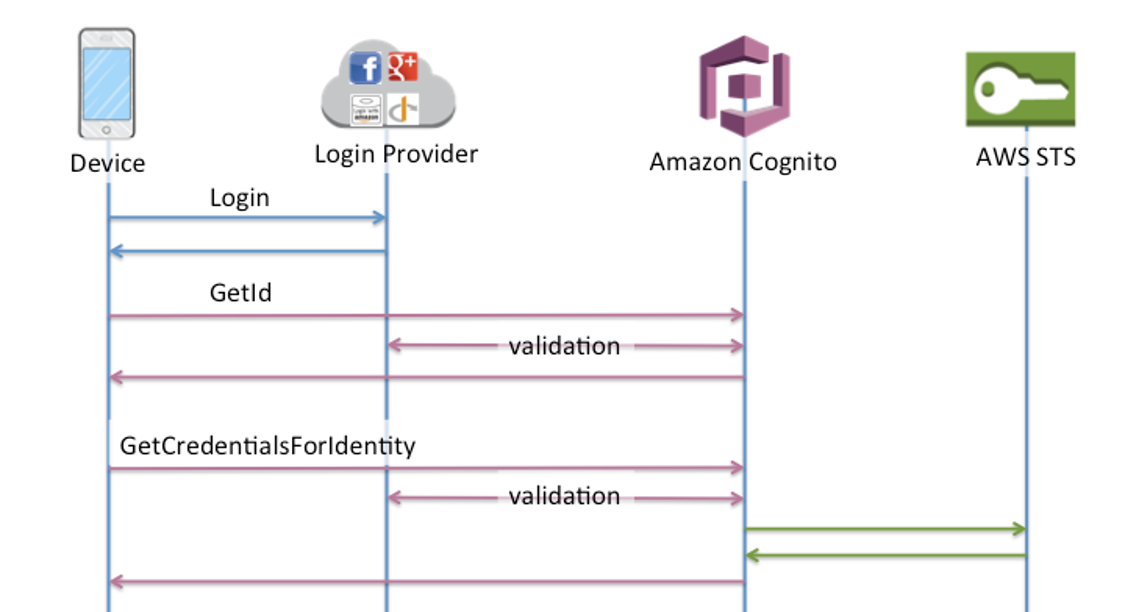
Figure 3. A swim lane diagram showing the communication between the App, the Federated IdPs and AWS services.
Pre-Requisites
- An Expo developer account
- An Okta developer account
- [Optional] Familiarity with CDK for automatically deploying infrastructure
Walkthrough
First, we will setup the Okta App where our user identities will reside.
Creating our Okta IdP App:
- You will need to create a new Okta application in your developer account
- Select “Create an App Integration”
- Select OIDC for sign-in method and Native Application for application type
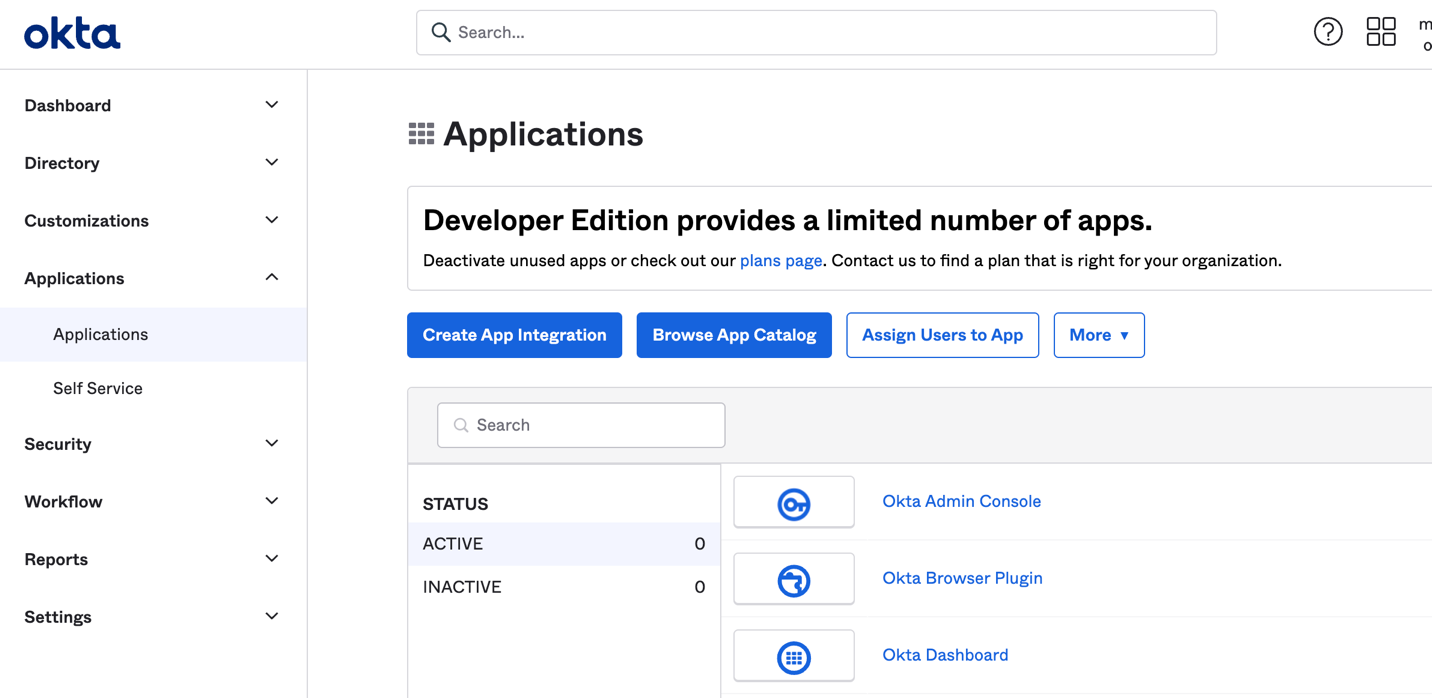
Figure 4. The page you will need to access to create an Okta application
- In the next step you can customize your apps name
- Next to the heading “Sign-in redirect URI” copy the value of the callback URI (Note: you will need it later when you configure the app)
- Select “Skip group assignment for now” in the Assignments section
- Make note of the client Id and the okta domain, it will be needed in the configuration
- Next you will need to add yourself as an authorized user of the Okta application:
- Go to the Assignments tab in the new application
- Select the Assign action
- Assign the application to the people who will use it
- Add your user or a user or group of your choice
- Leave the user profile as is and click the Save and Go Back button
Going back to the general tab, here is what the end result will look like.
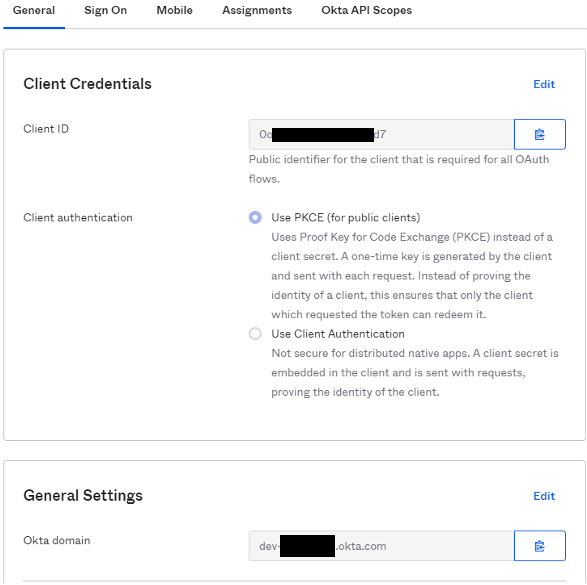
Figure 5. Okta apps dashboard showing configuration relevant information
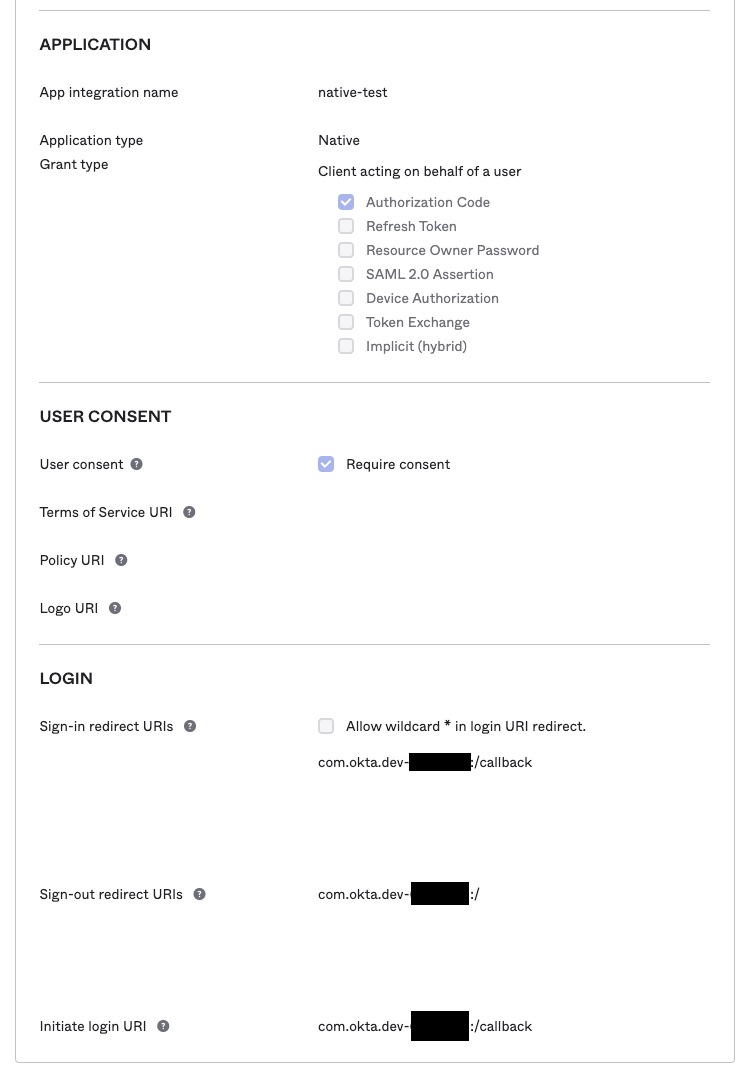
Figure 6. Okta App interface containing more configuration relevant information
IMPORTANT: We aren’t done setting up Okta. You will need to come back here after configuring the code. You will need to add the Expo redirect URL to the Sign-In and Sign-out portion of the Okta app.
Creating the AWS Infrastructure
This blog details two methods of deploying the infrastructure to your AWS account. You can choose to either set up your AWS resources manually or use the CDK snippet provided. CDK is a tool that allows users to manage their infrastructure using code, making changes be more visible and easier to diagnose. If you have never used CDK before, read Getting started with the AWS CDK.
Using CDK
Running these commands will create two S3 buckets, one for placing items that our app will use API calls to list and the other for logging access to the first. The template will create an Identity pool and an OIDC provider in IAM for providing access. It will also provide the necessary IAM roles/policies.
You will still need to add some items to the S3 bucket and perform the remaining Okta configuration steps manually.
Pre-Requisites:
To get started, clone the code from from the AWS samples GitHub repository.
We must configure the values of our Okta App to be able to successfully create the IAM OIDC provider. To do this use the file okta-config-example.ts to create a new file called okta-config.ts the file will look like this:
Replace the values with your Okta domain name and the Client ID of your Okta App. Afterwards, if this is your first time running CDK, you must run the following command:
Deployment Commands:
Running Unit Test for the CDK Template
The code includes Jest unit tests to ensure that the CDK template contains the expected number of resources and that they are configured correctly. To run them all you need to do is run the following commands:
Manual Set-Up
We’ll be setting up an IAM OIDC provider, Cognito Identity Pool, IAM Roles, and an S3 bucket. Here is a step-by-step breakdown of how to do that from the AWS console
First, we will create the IAM OIDC Provider so that it can be used for the Cognito Identity Pool
- Go to IAM in the AWS console
- In the sidebar go to Identity providers, and click Add provider
- Configure the identity provider to use OpenID Connect. For the provider URL enter the following: https://<your-okta-domain>/oauth2/default
for example: https://dev-xxxxxxxx.okta.com/oauth2/default- Click get thumbprint to ensure that the OIDC provider is able to connect to AWS
- For the audience you will add the clientId you copied from your Okta Application
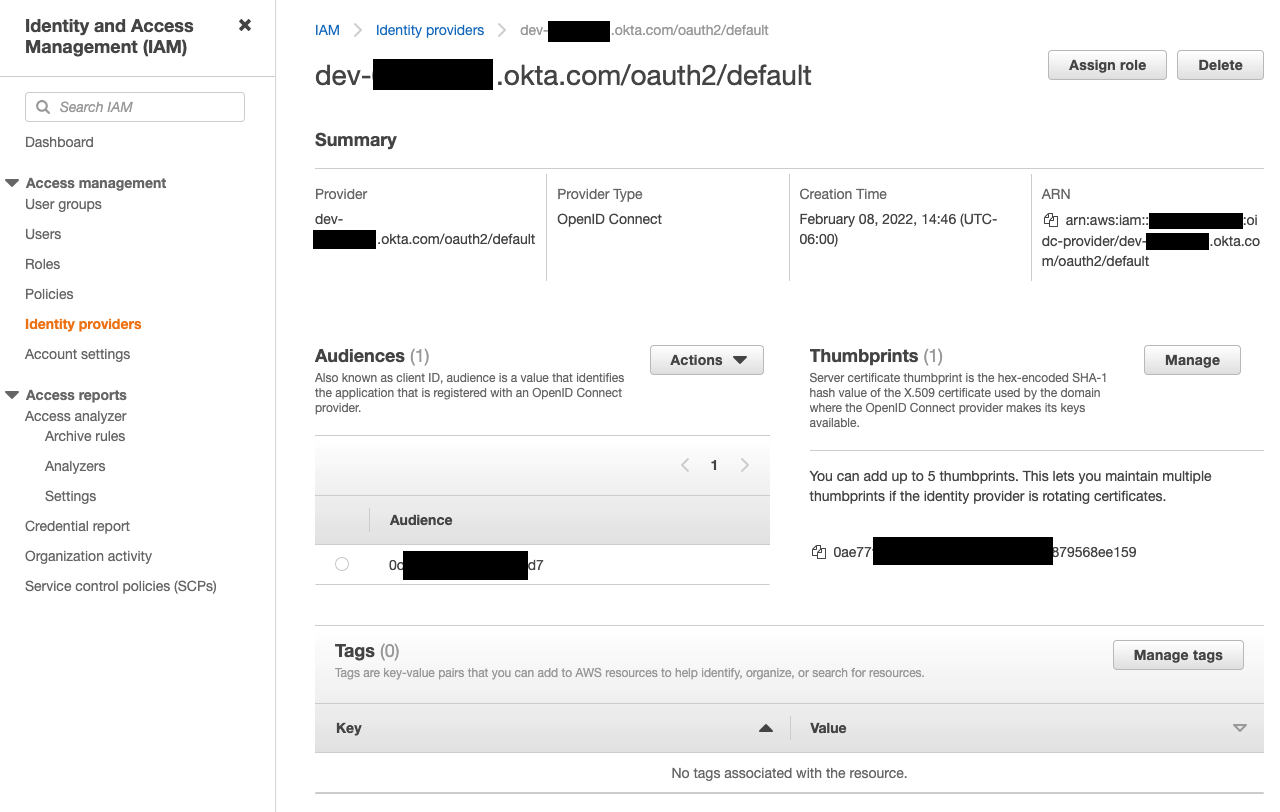
Figure 7. AWS IAM Identity providers console after we have created our third-party IdP.
Next, we are going to create a Cognito Identity Pool and add the provider we just created to it
- In the AWS console, navigate to Cognito, select Manage Identity Pools, click the button to create new Identity Pool.
- Name your Identity Pool
- Expand the dropdown labeled “Authentication providers” and go to the OpenID tab. You should see the IAM provider you just created listed there. Select it and create your pool
- Now you will be asked to create IAM roles to be used with your pool, you can keep the default created roles or you can rename then as you wish.
- After you are done creating the Identity Pool, make note of its ID because you will need to enter it in the configuration file later on.
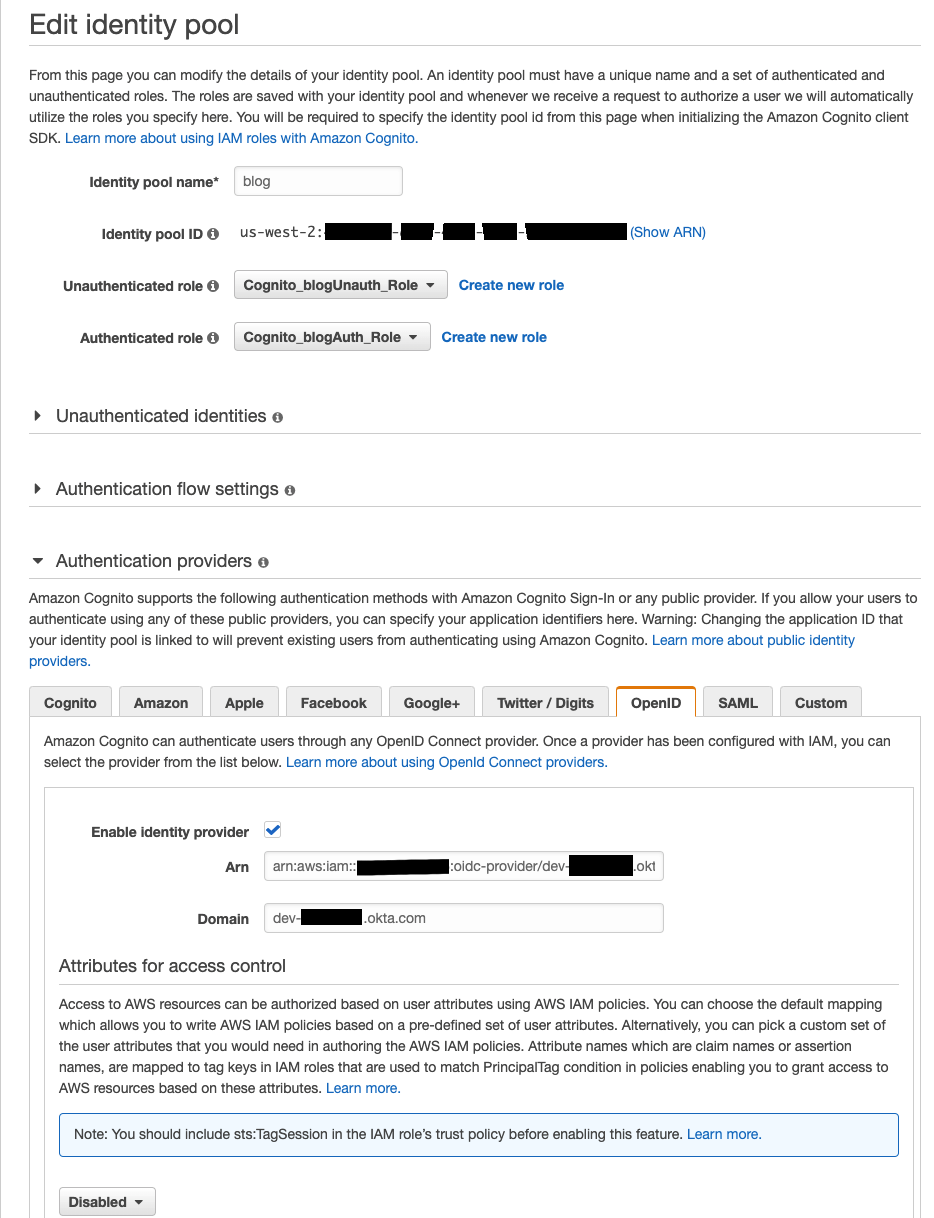
Figure 8: What you should see after editing your Amazon Cognito Identity Pool after it has been configured
We now have all we need for Amplify to be able to authenticate us using Okta. For more information on the steps we just performed you can check the documentation.
We have one last finishing touch before our demo is ready to fire. We’re going to need objects for our Demo S3 bucket that our Expo app can list so go ahead and upload a couple arbitrary non-sensitive files (preferably of small size so you don’t have to wait on them too long)
Now before we can be done with the console, we need to add a couple of items into the S3 bucket so that we have some items to be returned by our SDK call. You may add any objects you so desire.
Wrapping Up Configuration of Okta
Before we can fully wrap up the configuration portion you will need some background information of some of what’s going on in the code.
The authentication process on mobile is more complex than authenticating an application that resides on a web page. Authentication is achieved by redirecting from your app to the Okta provided domain. The Okta domain then needs to send the user back to the application (another redirection) with the appropriate information to prove to your React app that the user has been authenticated.
For this solution, we are implementing the Expo AuthSession library. This library is important because AuthSession cuts down on the number of URLs that need to be configured in the Okta app. Expo apps can exist at multiple URLs depending on the environment after an app has been published to Expo. Additionally, during development apps can exist at localhost URL, LAN or a Tunnel URL. If the URL that’s used for the React app isn’t added to the Okta app then the authentication attempt will fail. Having all of the URLs unified under one will significantly improve the developer experience.
The unified AuthSession redirect URL will look like: https://auth.expo.io/@your-username/your-app-slug
In order to redirect users back to your Expo app Okta will need to be configured through the web interface. However, you will not need to configure this link in the code itself because it is autogenerated when you run this bit of code.
AuthExpo.js
Your username corresponds to your Expo account username and can be found in the Expo app. The app slug can be found in the app.json file of your application. Expo uses the word “slug” to refer to the name your app uses when the project files are being hosted on Expo’s servers.
For more detailed information on the AuthSession library you can read up here.
Detour Back to Okta
Now that you understand the importance and how the link is created, as was foretold you will need to return to the Okta App to add the AuthSession redirect link in the sections reading Sign-In Redirect URI and Sign-out Redirect URI
Notice in the following section how under “Sign-in redirect URI” and “Sign-out redirect URI” we have added the Expo AuthSession redirect URI that should be generated based off of your app slug and your Expo account username.
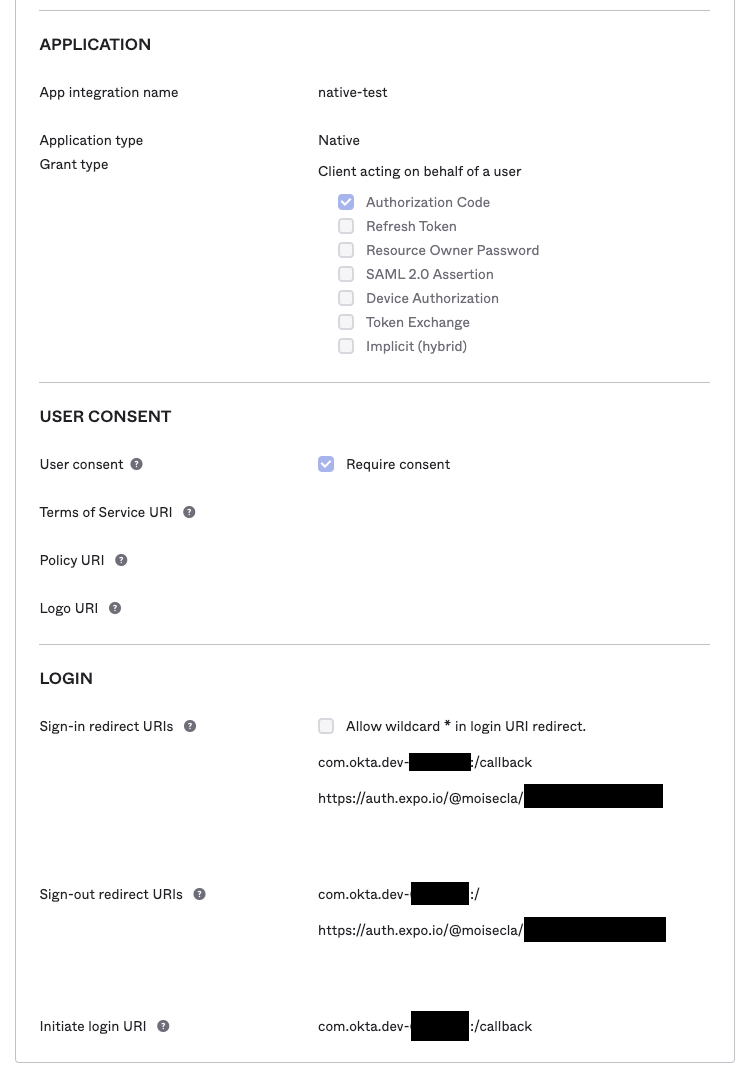
Figure 8. This place should seem familiar to you
As a final sidebar it is worth pointing out that redirection in Expo apps works differently than in plain React Native apps. In case your app does not use Expo you will need to follow the Okta documentation got how to create your integration.
Configuring the Code
Now that all of the infrastructure is configured you can use the values you’ve been making note of to configure the React Application code.
All you need to do to get the application running is to modify the configuration files okta-config.json and aws-exports.json with your own values. An extra step you can take to customize your application is modify the URL scheme of your Expo app in the app.json file. We’ve already created it in the code for you. Having a scheme is necessary for published apps to be able to redirect from Okta to the app. You can learn more about schemes here.
Okta Config example
Amplify Config example
A Tour of the Codebase
AuthExpo.js
After acquiring the authorization code, it can then be exchanged for an Access/ID token through the exchangeCodeAsync function provided by AuthSession.
AuthSession doesn’t provide a built-in method to get the user info from the Authorization provider. In order to retrieve the user’s information, we make an HTTP REST call to an API endpoint Okta provides from our domain. The details of this can be found here.
Finally, we have all of the information needed to be able to federate to AWS Amplify using Okta.
Cleanup
Depending on which method you used to set up your infrastructure for this project your clean-up process will differ.
Automated Teardown
- In the AWS Console go to the CloudFormation section. Find the currently deployed template, it should be named “InfraStack”, open it and click “Delete”. Double check in S3 if any buckets were retained, they should be automatically deleted.
- For the free tier of Okta you are only allowed five applications. For further development you may want to delete or deactivate the Okta App from your Okta developer account. Do this by logging in to your Okta Developer account and going to Applications > Applications, finding the app and clicking the cog or options menu. First deactivate it, then if you wish to delete it go to Inactive and repeat the process to delete it.
Manual Teardown
- Go to the IAM console, in the side bar find the “Identity Provider” section and delete the IAM Identity Provider configured earlier.
- Go to the Cognito console, in the sidebar select “Federated Identities” look for the Cognito Identity Pool you set up earlier. Click the hyperlink and then “edit identity pool”. Expand the section that says “Delete identity Pool” and delete it.
- Go to the S3 console, find the bucket you created and empty it. Then delete the S3 bucket used as the target of this blog exercise
- Delete the Okta Application from your Okta Dev account, follow step 2 in the “Automated Teardown Section”
Conclusion
Congratulations! After following this guide your Expo React Native application is integrated with your Okta IdP, allowing you to use identities contained therein to authenticate to AWS Amplify. In turn this allows your application to make authenticated API and AWS SDK calls.
Let us know if this solution helped delight you or your customers! If you have a suggestion or improvement join the discussion on GitHub!
About the authors: