Front-End Web & Mobile
Build a Mobile App with Passwordless Login on top of AWS Amplify
June 27, 2024: This blog post covers Amplify Gen 1. For new Amplify apps, we recommend using Amplify Gen 2. You can learn more about Gen 2 in our launch blog post.
Note: The Amazon Cognito hosted UI (Web) does not support the custom authentication flow.
According to the Gartner Group , 20% to 50% of all IT help desk tickets each year are password resets, meaning the average managed service provider (MSP) with 1,300 users wastes around $7.19 per user, adding up to an annual cost of $9,350. In a 2021 whitepaper, Auth0, an identity management platform for application builders and developers, stated that each password reset costs a company ~$70.
There is more to the story: Verizon’s 2022 Data Breach Investigations Report (DBIR) cites that over 80% of breaches are attributed to stolen credentials. And since 2017, there has been a steady increase in stolen credentials by roughly 30%. The Fast Identity Online (FIDO) Alliance, an open industry association with a stated mission to reduce an over-reliance on passwords, reports that users have over 90 online accounts of which up to 51% of user’s passwords are reused. What’s more, passwords alone don’t prove the user’s identity when they log in to a system or service. They act as a proxy for the user’s identity. That means that a compromised password is a compromised identity. With this information in mind, one begins to wonder if there is a better way to securely log in to systems and services.
Passwordless is a secure authentication method that allows users to log into a service or system without having to remember a password. To log in to a system or service using this method, a user needs to provide a form of authentication such as an email address, phone number or a biometric element (e.g. finger print or facial recognition). The authentication process completes when the user provides a registered device or token. Passwordless logins provide users with a frictionless login experience, while reducing administrative burden and overall security risks for the user and the website administrators. But implementing passwordless login flows can be tedious, especially when scaling to large user groups.
There are three primary types of passwordless authentication:
- Email – user receives a unique code or a unique URL via email, as part of the log-in process
- SMS – user receives a unique code to their cell phone to get a unique onetime code to log-in
- Biometric – where fingerprint scanning, iris scanning, or face-scanning used to authenticate a user
Overview of Solution
In this blog post, we will work through a solution that demonstrates how to create a passwordless login. You will be using SwiftUI in this project. The diagram, below, illustrates the steps that will use to build out our passwordless log-in project.
Figure 1 – The steps described below inform us on each step that is taken to authenticate the user into our project:
- Amplify– Our Authentication Challenge is built and resides here. After a user enters their email address to sign-in, AWS Amplify triggers the AWS Lambda function
a. The user enters an email address in the custom sign-in page; this creates an identity that gets sent to AWS Amplify.
b. Amazon Cognito invokes the Verify Auth Challenge trigger to verify a valid response from the Auth challenge.
- AWS Lambda – Once the AWS Lambda function is triggered, an Authentication Challenge is presented to the user
- Ability for AWS Amplify application/ iOS can now call other AWS Services
Custom Authentication Challenge with Lambda
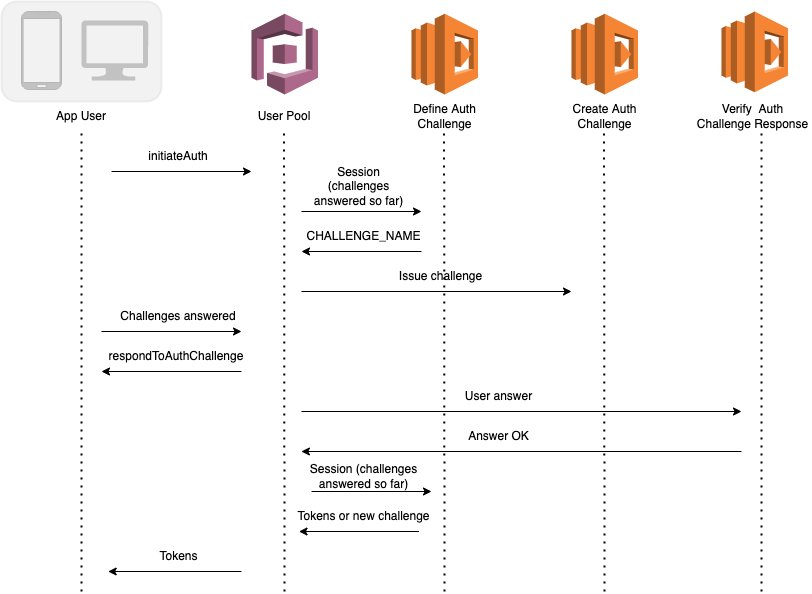
Figure 1. overview of solution diagram
Figure 2 – To Create a Custom Authentication Flow: This Lambda triggers, issues, and verifies their own challenges as part of a user pool custom authentication flow. The three stages are:
- Define Auth challenge Lambda trigger – Cognito invokes this trigger to start the custom authentication flow.
- Create Auth challenge Lambda trigger – Cognito invokes this trigger after Define Auth Challenge to create a custom challenge.
- Verify Auth challenge response Lambda trigger – Cognito invokes this trigger to verify, if the response from the end user for a custom challenge is valid or not.
*Note that the Amazon Cognito hosted UI (Web) does not support the custom authentication flow.
AWS Amplify
The Amplify Framework provides CLI, Libraries and UI Components to build full stack iOS, Android, Flutter, and React Native applications. AWS Amplify UI announced a new version of the Authenticator component for mobile apps, giving developers the easiest way to add login experiences to their app with a single line of code.
The newest version of the Amplify UI library ships with connected components such as the Authentication to quickly set up secure authentication flows with a fully managed user directory. Amplify Auth allows control over what users have access to in your mobile. This gives you a single library to build your entire app user interface, leveraging our connected and primitive components.
The Auth category can be configured to perform a custom authentication flow defined by you. The following guide shows how to setup a simple passwordless authentication flow.
Add authentication
- Define the authentication challenge
- Register a user
- Sign in a user
- Confirm sign in with custom challenge
- Lambda Trigger Setup.
The CLI creates a custom authentication flow skeleton you can manually edit.
Implement the Solution
Prerequisites
Before you begin, make sure you have the following components installed:
- Node.js v14.x or later
- npm v6.14.4 or later
- git v2.14.1 or later
- Install Xcode version 11.4 or later.
- A working Amazon Simple Email Service (Amazon SES) resource
- A skeleton project* , using the steps referenced here: https://docs.amplify.aws/lib/project-setup/create-application/q/platform/ios/
* Amplify can be installed through the Swift Package Manager, which is integrated into Xcode.
Steps
Amazon SES Setup
Amazon Simple Email Service (SES) is an email platform that lets you send and receive emails using your email addresses and domains. We’ll use it in this project to send a challenge code to the user. Follow these steps to set up Amazon SES to use in our project:
- Log in to your Amazon account. In the console search for Amazon SES and select it. I then brought you to the Amazon SES Homepage (shown below). Click the orange button, “Create identity”.
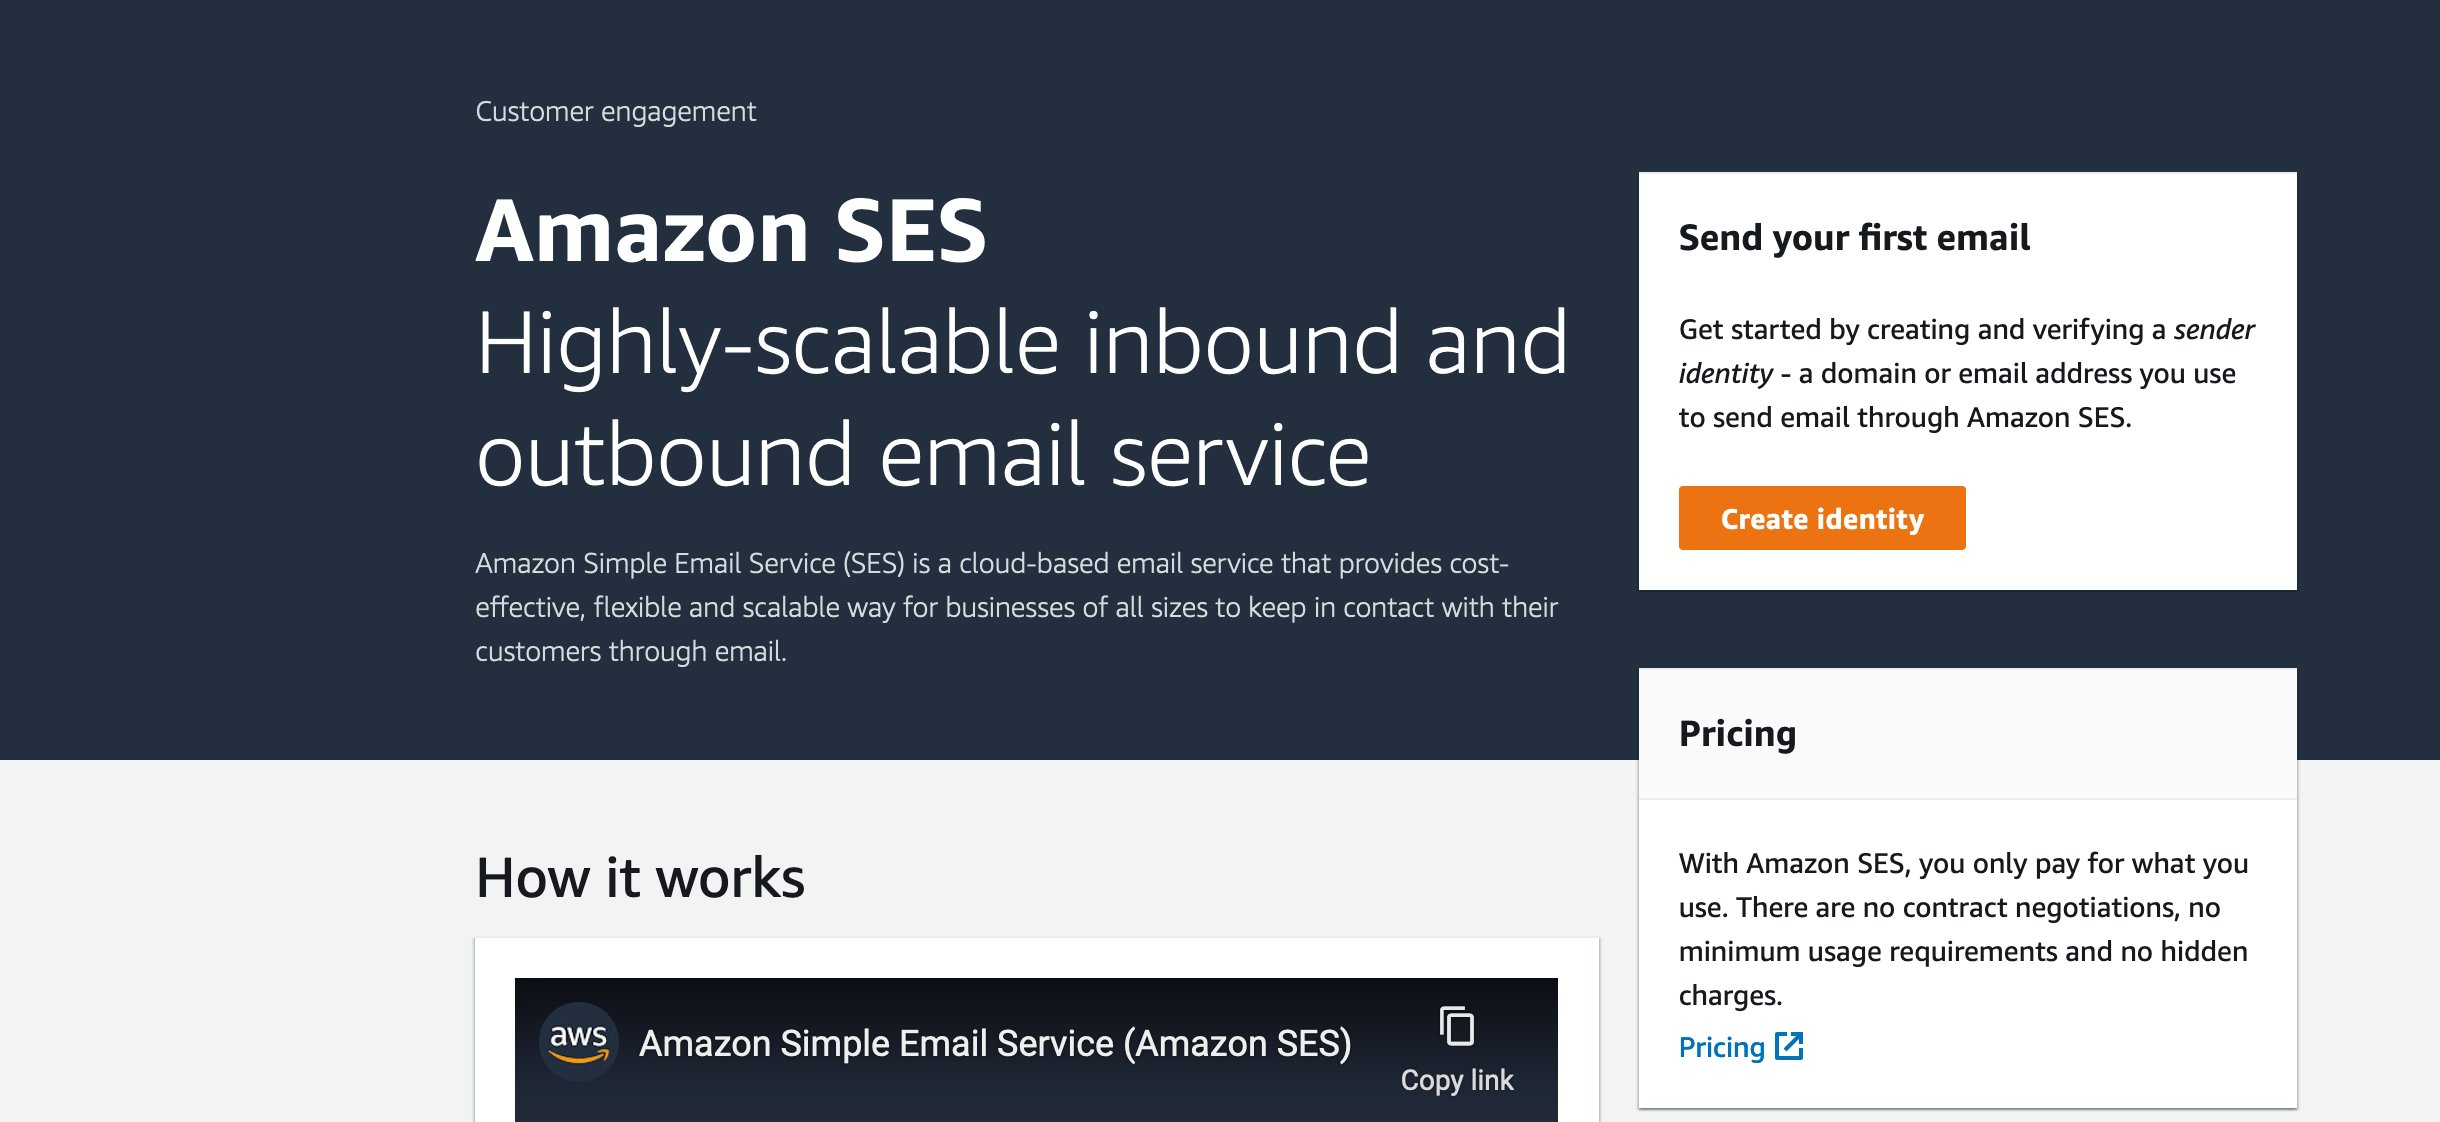
Figure 2. Amazon SES Console home page
- Next, click the radio button, ‘“Email address” and enter the email address you want to use to set up and verify sender identity. Once you do this, click the orange button, “Create identity” which is found at the bottom of the screen.
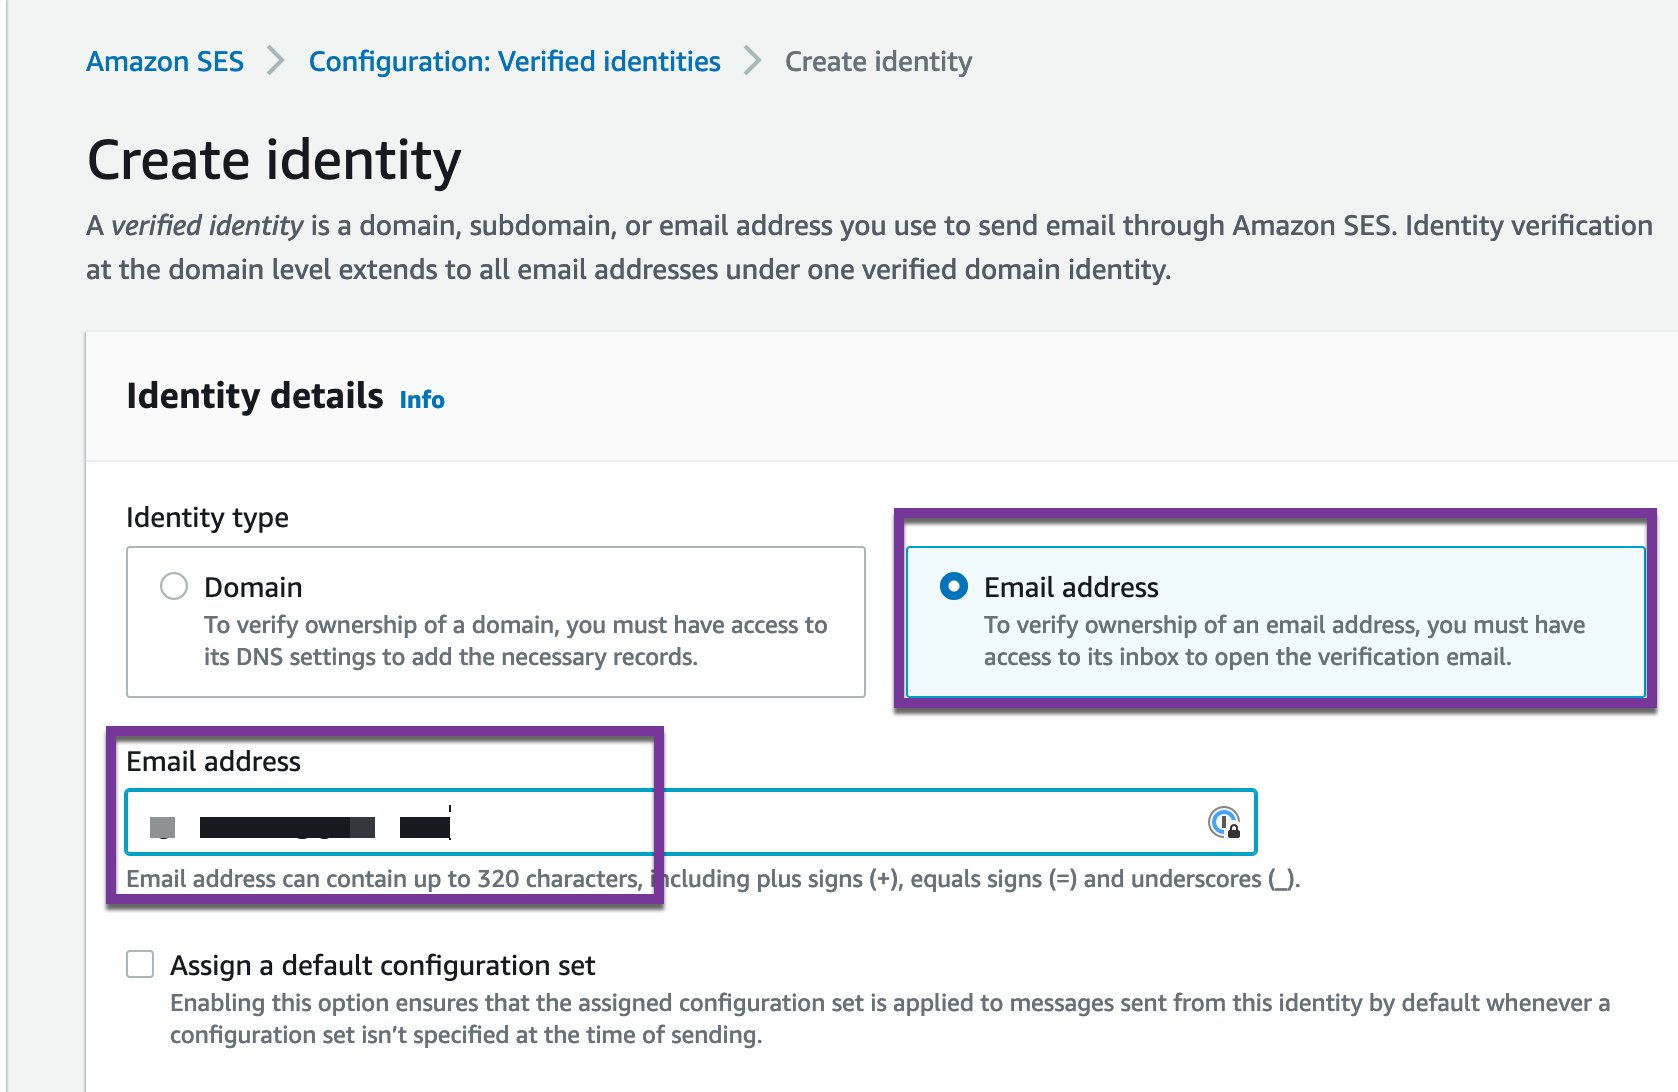
Figure 3. Create identity screen shot
- On the next screen, you see that Amazon SES created the identity but the verification status will be pending. Go to your selected email to find the email from Amazon Web Services. Click on the URL provided in the email body to verify identity.
- After you verify your identity, you will see a congratulations message, as shown below. Now you are ready to continue with configuring our Auth category.
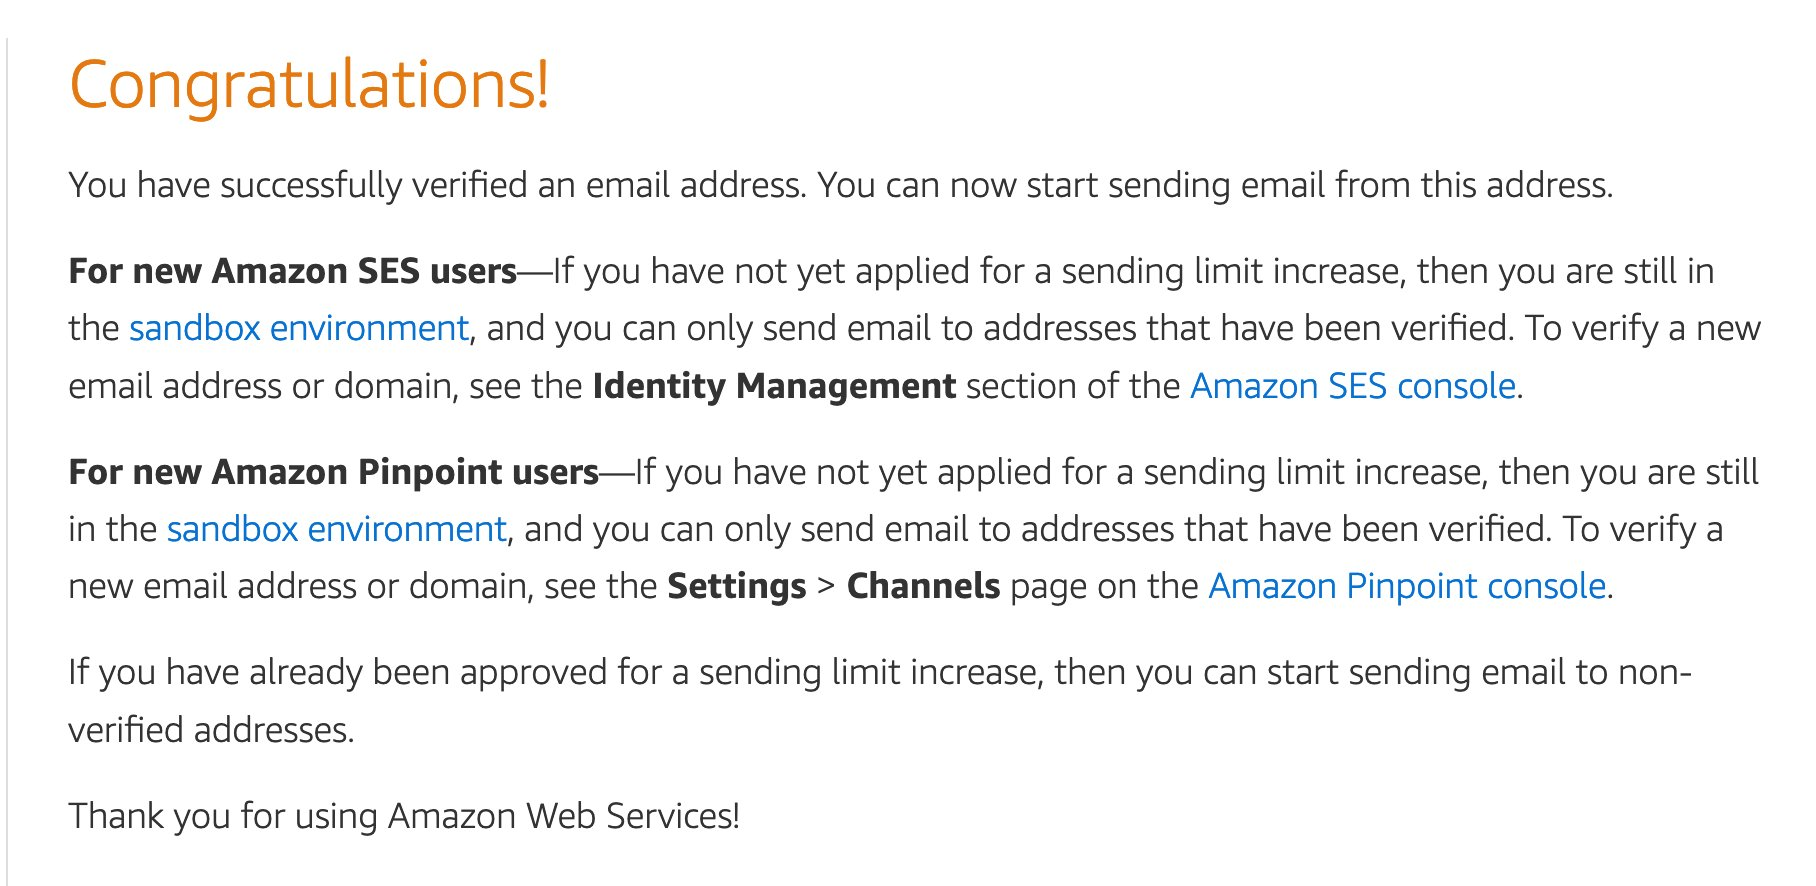
Figure 4: Congratulations page.
Configure Auth Category
In terminal, navigate to your project, run amplify add auth, and choose the following options:
Amazon Cognito invokes the Create Auth Challenge trigger after Define Auth Challenge to create a custom challenge. In this Lambda trigger, you define the challenge to present to the user. privateChallengeParameters contains all the information to validate the response from the user. Save and close the file.
Save and close the file, then switch back to the terminal and follow the instructions:
The boilerplate for Define Auth Challenge opens in your favorite code editor. Enter the following code to this file:
Amazon Cognito invokes the Define Auth Challenge trigger to initiate the custom authentication flow.
The Amplify Auth library always starts with an SRP_A flow, so in the code above, you bypass SRP_A and return CUSTOM_CHALLENGE in the first step.
In the second step, if CUSTOM_CHALLENGE returns with challengeResult == true you recognize the custom auth challenge is successful, and tell Cognito to issue tokens.
In the last else block, you tell Cognito to fail the authentication flow.
Save and close the file, then switch back to the terminal and follow the instructions:
The boilerplate for Verify Auth Challenge opens in your favorite code editor. Enter the following code to this file:
Amazon Cognito invokes the Verify Auth Challenge trigger to verify if the response from the end user for a custom challenge is valid or not. The response from the user will be available in event.request.challengeAnswer. The code above compares that with privateChallengeParameters value set in the Create Auth Challenge trigger. Save and close the file, then switch back to the terminal and follow the instructions:
Once finished, run amplify push to publish your changes.
3) Register a user (iOS 13+)
The CLI flow, as mentioned above, requires a username and a valid email id as parameters to register a user. Invoke the following API to initiate a sign up flow.
The next step in the sign up flow is to confirm the user. A confirmation code will be sent to the email ID provided during the sign-up process. Enter the confirmation code received via email in the confirmSignUp call.
You will know the sign up flow is complete if you see the following in your console window:
4) Confirm sign in with custom challenge (Combine iOS 13+)
Get the custom challenge (1234 in this case) from the user and pass it to the confirmSignin() API.
5) Lambda Trigger Setup
The Amplify CLI can be used to generate triggers required by a custom authentication flow. See the CLI Documentation for details. The CLI will create a custom auth flow skeleton that you can manually edit.
More information on available triggers can be found in the Cognito documentation.
AWSCognitoAuthPlugin assumes the custom auth flow starts with username and password (SRP_A). If you want a passwordless authentication flow, change your Define Auth Challenge Lambda trigger to bypass the initial username/password verification and proceed to the custom challenge:
You also need to pass a dummy password during the signup process as shown above.
You will know the sign in flow is complete if you see the following in your console window:
Cleanup
To avoid incurring future charges to your AWS accounts, delete the resources created using your AWS account for this project. To do this, you will want to navigate to:
Deleting Amplify resources
- Open AWS Amplify console
- Select the associated Passwordless App
- Click
Actions->Delete App

Figure 5. Clean up screen
Deleting Lambdas
- Open AWS Lambda console
- Select the
Functionsin the left-hand menu, search for “passwordless” and check the boxes next to each of those Lambdas - Click the
Actions>Delete functionin the top menu - Click
Deleteon the confirmation screen
Deleting an Amazon S3 Bucket
- Open Amazon S3 console
- Select
Bucketsfrom the left menu and click on the bucket that starts withamplify-passwordless- - Select all the files and click on the menu item
Actions>Delete - Click Delete on the confirmation screen
Deleting an IAM Role/Policy
- Open IAM Roles Console
- Select
Rolesfrom the menu on the left and search for “passwordless” and check the checkboxes next to each of them - Click on the
Delete roleat the top of the screen - Click
Yes,deleteon the confirmation screen
Deleting a CloudWatch log
- Open CloudWatch Console
- Select
Logs>Log groupson the left - Search for
passwordlessin the log group and click all the log groups starting with/aws/lambda/amplify-passwordless - Click the
Actions>Delete log groupbutton at the top of the screen - Click
Deleteon the confirmation screen
Conclusion
In this blog, you leveraged both open source and third-party tools in combination with AWS Amplify Authenticator to build a passwordless login. You extended on top of your skeleton iOS app an AWS Amplify custom authorization extension. Together, you went through the steps to create a custom challenge to send an email message and configured Lambda to verify the custom challenge. Finally, you then registered and signed in a new user.
For more information about the proof of concept code base for this use case check out our Github (https://github.com/aws-samples/amazon-amplify-passwordless-login-authenticator).
About the authors: