Front-End Web & Mobile
Detect real users with AWS Amplify and Face Liveness
In the world of spoofing and bad actors, AWS Amplify and the Amplify UI FaceLivenessDetector component can help you verify if your app is being used by real users. This connected component library is powered by Amazon Rekognition Face Liveness feature. No machine learning or artificial intelligence (AI) experience is needed.
This fully managed feature uses your front facing camera to capture a selfie video to help you detect spoofs. With a few straightforward steps you can add this feature to any React, Android or Swift application.
This tutorial will show you how to verify users that sign up for your application. To do this, we’ll create a new Next.js app, set up Amplify, add authentication, and add the FaceLivenessDetector component. We’ll use a AWS Lambda REST API to create end points that will communicate to the Amazon Rekognition Liveness feature. These end points will return a score that we can use to help determine if users are real or not.
Prerequisites
In this tutorial you’ll need the following:
- an active AWS Account
- Node installed with NPM
Setup App and Permissions
Let’s begin by creating a new Next.js application! We’ll be using npm for this tutorial, but feel free to use your favorite package manager.
$ npx create-next-app@latest --no-appFor this application we will not be using the App Router, which you can use with Amplify as well if needed. If you’d like more information on using the App Router with Amplify please check out the the Amplify UI Docs.
Change directories into your new Next app and install the Amplify Libraries.
$ npm i @aws-amplify/ui-react-liveness @aws-amplify/ui-react aws-amplifyIf you haven’t already, please install the Amplify CLI.
$ npm i @aws-amplify/cli -gYou’ll need an AWS account to proceed. You can sign up for one here. Also, if this is the first time using the Amplify CLI make sure to run amplify configure .
Let’s setup our Next app so it recognizes Amplify. We’ll be using the CLI, however if you’d like you can also use Amplify Studio.
Run the init command.
amplify init
? Enter a name for the project livenessnextexampleg
The following configuration will be applied:

Project information
| Name: livenessnextexampleg
| Environment: dev
| Default editor: Visual Studio Code
| App type: javascript
| Javascript framework: react
| Source Directory Path: src
| Distribution Directory Path: build
| Build Command: npm run-script build
| Start Command: npm run-script start

? Initialize the project with the above configuration? Yes
Using default provider awscloudformation
? Select the authentication method you want to use: AWS profile
You can select the defaults and press enter all the way through. This will create an amplify folder in your app as well as an aws-exports file in the src folder.
Add Authentication For Liveness
Let’s add the Auth category so only authorized users can use the FaceLivenessDetector component. This will create an Amazon Cognito user and identity pool under your account.
Run the following command:
$ amplify add authChoose the default configuration with email and defaults for all remaining questions.
Make sure to push your changes up!
$ amplify pushIf you decide to allow un-authenticated users to use Liveness, I’d suggest choosing Manual Configuration instead. The most important prompt you’ll need to be aware of is the Allow unauthenticated logins. Make sure to choose Yes here. This will allow you to use Liveness service without being logged in. You will also need to setup the correct permissions for the unauthenticated role. In the IAM permission setup update the amplify-<project_name>-<env_name>-<id>-unauthRole instead of the authRole. More information on how to setup IAM permissions is in the next section.
IAM Permission Setup
After adding authentication, you’ll need to make a few changes to your IAM roles. We need to give the authRole access to the Amazon Rekognition Face Liveness services. This role is used for frontend permissions.
Open up the AWS console by running the console command:
$ amplify consoleAfter the console opens, search for and open the IAM console.
Click Roles and then search and click on the Amplify role that was created for you. This will be in the format of amplify-<project_name>-<env_name>-<id>-authRole , make sure to replace the <project_name> , <env_name> and <id> with your information.
Choose Add Permissions, then select Create Inline Policy, then choose the JSON tab and paste the following:
{
    "Version": "2012-10-17",
    "Statement": [
        {
            "Effect": "Allow",
            "Action": [
                "rekognition:StartFaceLivenessSession"
            ],
            "Resource": "*"
        }
    ]
}
This only gives you permissions to start, create and get results from the Rekognition service. You can then choose Review Policy. Name the policy whatever you like, than choose Create Policy.
AWS Lambda Back End
Now that we have our permissions and authentication setup, let’s create our backend application. We’ll be adding a REST API using a Node.js AWS Lambda Function running Express. We’ll use the Express client to setup a couple of end points to create and get our liveness results.
Open up the terminal and run the add api command.
$ amplify add apiChoose the following options. Make sure to add a /session end point, and choose Serverless ExpressJS function as the template. Note down the label for the category you choose. You’ll need that later when connecting in your frontend code.
? Select from one of the below mentioned services: REST
✔ Provide a friendly name for your resource to be used as a label for this category in the project: ·liveness
✔ Provide a path (e.g., /book/{isbn}): · /session
Only one option for [Choose a Lambda source]. Selecting [Create a new Lambda function].
? Provide an AWS Lambda function name: liveness
? Choose the runtime that you want to use: NodeJS
? Choose the function template that you want to use: Serverless ExpressJS function (Integration with API Gateway)

Available advanced settings:
- Resource access permissions
- Scheduled recurring invocation
- Lambda layers configuration
- Environment variables configuration
- Secret values configuration

? Do you want to configure advanced settings? No
? Do you want to edit the local lambda function now? Yes
This will generate a few new folders for our API Gateway and our Lambda function.
Let’s begin by adding a new library. Go to the amplify/backend/function/liveness/src folder and run the following command to install the correct dependency for the Rekognition client.
$ npm i @aws-sdk/client-rekognitionWe’ll need to update the function we just created. Go to the amplify/backend/function/liveness/src folder. Add a utils folder and create a new file called getRekognitionClient.js.
Add the following code. This code will configure the Amplify application and create a new Rekognition client.
const { Rekognition } = require("@aws-sdk/client-rekognition");

const getRekognitionClient = () => {
  const rekognitionClient = new Rekognition({
    region: 'us-east-1'
  });

  return rekognitionClient;
};

module.exports = getRekognitionClient;
Please update the region in the code snippet above to match your region. The region must match between the backend and frontend code and liveness must be available in that region as shown in our FAQ.
In the amplify/backend/function/liveness/src folder open the app.js file. You’ll see some sample GET, POST, PUT and DELETE functions. You can remove the sample ones. We’ll be adding our own.
Add an import at the top of the file. This will grab the utility function we just created.
const getRekognitionClient = require("./utils/getRekognitionClient");Let’s add in the create and get end points. The create end point will create a new Liveness session and return it to the frontend. The get end point will calculate the confidence value and return it.
app.get("/session/create", async function (req, res) {
  const rekognition = getRekognitionClient();
  const response = await rekognition.createFaceLivenessSession({});

  return res.status(200).json({
    sessionId: response.SessionId,
  });
});

app.get("/session/get", async function (req, res) {
  const rekognition = getRekognitionClient();
  const response = await rekognition.getFaceLivenessSessionResults({
    SessionId: req.query.sessionId,
  });

  const isLive = response.Confidence > 90;

  res.status(200).json({ isLive });
});
We only care about the Confidence score but if needed you can retrieve other values from the API, including the bounding box for the audit and reference images.
In our example if the confidence score is above 90 we’ll assume that the image is from a real user. This is not a hard rule and you may need to adjust the confidence level higher or lower based on your application and its needs. You may also want to use the Confidence score as a way to authorize future requests to other parts of your backend.
Lastly, we’ll need to setup the correct Policy. Open the amplify/backend/function/liveness/custom-policies.json file.
Enter this policy in. This will allow the Lambda to only be able to use the Create and Get Liveness session and results.
[
  {
    "Action": [
      "rekognition:CreateFaceLivenessSession",
      "rekognition:GetFaceLivenessSessionResults"
    ],
    "Resource": ["*"]
  }
]
Save that file, and push up the changes!
$ amplify pushLet’s move onto the frontend code!
Next.js Frontend
Now that the backend is completed, we’ll be creating a frontend sign up page, that will redirect users to verify themselves.
We’ll be using the Amplify Authenticator component as well as the FaceLivenessDetector to make this process more straight forward.
Setting Up Amplify With Next.js
Open your _app.tsx file and add the following code.
import type { AppProps } from "next/app";
import { Amplify } from "aws-amplify";
import { withAuthenticator } from "@aws-amplify/ui-react";
import "@aws-amplify/ui-react/styles.css";
import awsExports from "../aws-exports";
Amplify.configure(awsExports);

function App({ Component, pageProps }: AppProps) {
  return <Component {...pageProps} />;
}

export default withAuthenticator(App);
The withAuthenticator high order component will wrap the entire application and allow only signed in users to proceed. We’ll also run Amplify.configure(awsExports) to configure the frontend so it can talk to the AWS authentication service we added in earlier. Lastly, we’ll import the styles from @aws-amplify/ui-react/styles.css.
If you start up your Next application you should see this login page.
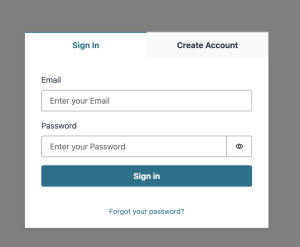
Authenticator
Continue on and create a new folder in src called components Inside that folder add a new file called Liveness.tsx.
Add the following code.
import { useEffect, useState } from "react";
import { Loader, Heading } from "@aws-amplify/ui-react";
import { FaceLivenessDetector } from "@aws-amplify/ui-react-liveness";
import { API } from "aws-amplify";

export function LivenessQuickStart() {
  const [loading, setLoading] = useState<boolean>(true);
  const [sessionId, setSessionId] = useState<{
    sessionId: string;
  } | null>(null);
  const [success, setSuccess] = useState('');

  useEffect(() => {
    const fetchCreateLiveness = async () => {
      const response = await API.get("liveness", "/session/create", {});
      setSessionId(response);
      setLoading(false);
    };

    fetchCreateLiveness();
  }, []);

  const handleAnalysisComplete = async () => {

    const data = await API.get("liveness", "/session/get", {
      queryStringParameters: {
        sessionId: sessionId?.sessionId,
      },
    });

    if (data.isLive) {
      setSuccess("User is live");
      console.log("live");
    } else {
      setSuccess("User is not live");
      console.log("not live");
    }
  };

  const handleError = (error: Error) => {
    console.log("got error", error);
  };
  return (
    <>
      {loading ? (
        <Loader />
      ) : (
        <>
          <FaceLivenessDetector
            sessionId={sessionId?.sessionId ?? "1"}
            region="us-east-1"
            onAnalysisComplete={handleAnalysisComplete}
            onError={handleError}
          />
          <Heading level={2}>{success}</Heading>
        </>
      )}
    </>
  );
}
Make sure to change the region above to match your region. It should match the same region you are using in the backend as well.
What this code does is as soon as the page loads, it will make a call to /session/create where it will retrieve the session information and save it into the createLivenessApiData useState. It will also remove the loading spinner.
The liveness is the name of the API Gateway you setup when you added the REST api. Feel free to change this string to match the API gateway you choose. You can also find this value in the aws-exports file under aws_cloud_logic_custom.
The handleAnalysisComplete function will call the /session/get end point with the sessionId where it will return a confidence score. This can help determine what to do next.
For this tutorial, we’ll console log User is live or User is not live depending on the score that is returned. In a real world situation you may want to handle this differently, or have the user try again if the score is too low.
Lastly, let’s add this new Liveness component to our application. Open the index.tsx file and add the following code.
import { LivenessQuickStart } from "@/components/Liveness";
import { Button, useAuthenticator, View } from "@aws-amplify/ui-react";

export default function Home() {
  const { signOut } = useAuthenticator((context) => [context.signOut]);
  return (
      <View width="600px" margin="0 auto">
        <LivenessQuickStart />
        <Button onClick={signOut} variation="warning">
          Sign Out
        </Button>
      </View>
  );
}
Let’s try it all out!
Testing It Out
After updating all the code, start the Next app, open up localhost:3000 click the Create Account tab and create a new user.
After sign up you should see this page.
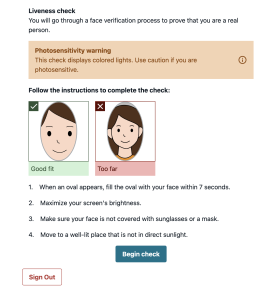
Face Check Instructions
If this is not what you see, you may need to clear out any global styles that may affect this page.
Click the Begin check button. It will then ask you to move closer. Get as close as you can so your face completely fills in the oval.
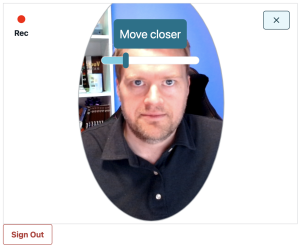
Face Oval Check
If all goes well, you’ll see some flashes and a score will be returned in the console! You can also refresh the page to try again.
Cleanup
Once you’re done with your application you can delete all your resources by running amplify delete.
Conclusion
In this tutorial we looked at how to setup the Amplify Face Liveness component using Next.js and a REST API. If you’d like to continue learning about Liveness please check out our official documentation. From there you can learn about how to fully customize the FaceLivenessDetector component, including internationalization and theming.
To learn more about Amplify please check out the documentation. You can also try Amplify on the AWS Free Tier.
You can find more information about me on Twitter at ErikCH!