Microsoft Workloads on AWS
Integrate multiple Microsoft Entra ID tenants with AWS IAM Identity Center
In this blog post, we will guide you through configuring cross-tenant synchronization with multiple Microsoft Entra ID tenants using AWS IAM Identity Center. By following the steps outlined in this post, you can simplify access to your Amazon Web Services (AWS) resources while enabling collaboration efforts between Entra ID tenants within your organization.
Background
Organizations with multiple Entra ID (formerly Azure AD) tenants have traditionally faced the challenge of integrating external identity providers with their Amazon Web Services (AWS) accounts. To overcome this challenge, customers had several options:
- Integrate each of the Entra ID tenants individually with AWS Identity and Access Management (IAM) for all your AWS accounts.
- Implement a 3rd-party vendor solution to present a single identity provider to AWS IAM Identity Center.
- Selectively invite users into a single Entra ID tenant using Microsoft’s B2B model.
These options, however, may require additional administrative overhead, 3rd-party product fees, or scaling difficulties with the Microsoft B2B model. With the recent release of cross-tenant synchronization, customers with multiple Entra ID tenants now have a scalable solution to present a single external identity provider to AWS IAM Identity Center (successor to AWS Single Sign-On).
Solution overview
In this post, we will use three Entra ID tenants: two of them as source tenants and the third as the Entra ID shared identity target tenant. This solution, as shown in Figure 1, allows you to manage access to your resources across multiple AWS accounts and services using a single set of credentials, regardless of which Entra ID tenant the user originates from.
By following this guide, multi-tenant organizations can take full advantage of the benefits of cross-tenant synchronization and leverage AWS IAM Identity Center without requiring users to take part in invitation and consent processes.
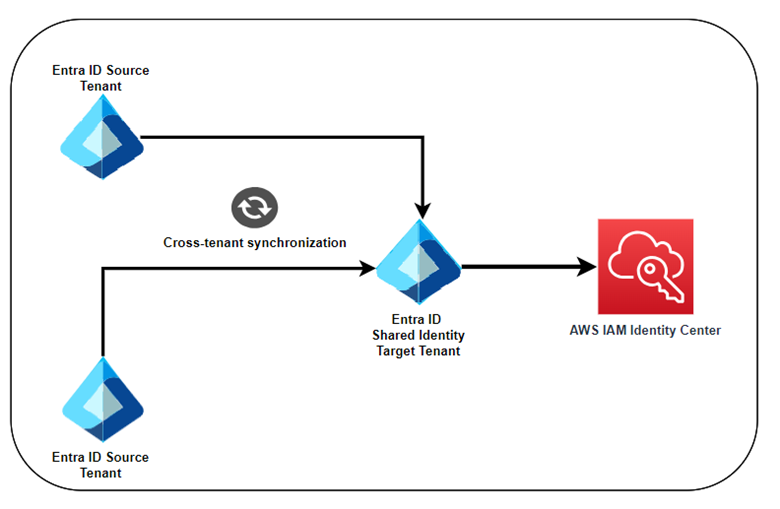
Figure 1 – Cross-tenant synchronization to a single target tenant integrated with AWS IAM Identity Center
Prerequisites
You need the following before you begin:
- AWS account
- Azure account subscription
- An AWS IAM Identity Center enabled organization
Create the target tenant
There are several cross-tenant synchronization topologies available, including many-to-one, one-to-many, and mesh synchronization. In our example, we will be using multiple source tenants with a single target tenant. This topology allows you to present and manage a single external identity provider for federation with AWS IAM Identity Center, allowing users to access AWS resources with credentials from the source Entra ID tenant.
To enable cross-tenant synchronization with multiple Entra ID tenants using AWS IAM Identity Center, you will first need to set up the target Entra ID tenant. For our purposes, we will set up a new Entra ID shared identity target tenant to synchronize from our two source Entra ID tenants.
To add a new Entra ID tenant to your existing setup, follow these steps:
- Sign in to the Microsoft Entra admin center with your credentials.
- Select Microsoft Entra ID from the admin center dashboard.
- Select the Manage tenants option from the top of the page.
- On the Manage tenants page (Figure 2), select the Create button.
- Fill out the required information – including the Organization name, Initial domain name, and Geographic location – then select Review + Create.
For our purposes, we assigned the following values to the new tenant:- Organization name: CorporateAzureADtoAWS
- Initial domain name: SharedAADIdentitytoAWS.onmicrosoft.com
- Geographic location: United States
- This process takes a few minutes. Once the new tenant is successfully created, you will receive a message: “Tenant creation was successful. Click here to navigate to your new tenant.”
- Ensure that you are connected to the CorporateAzureADtoAWS tenant. If not, select the CorporateAzureADtoAWS tenant and click the Switch option from the menu at the top of the page.
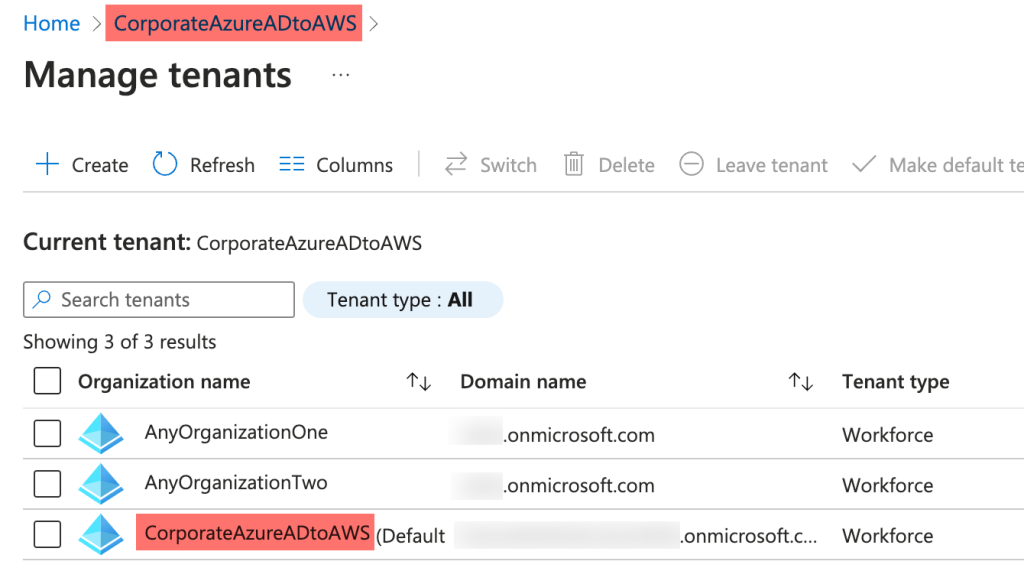
Figure 2 – New CorporateAzureADtoAWS Tenant Created
Configure the target tenant
We will now begin the configuration by starting with the target tenant, where we will synchronize both source tenants’ users.
1. Select the Identity menu option and then select External Identities (Figure 3).
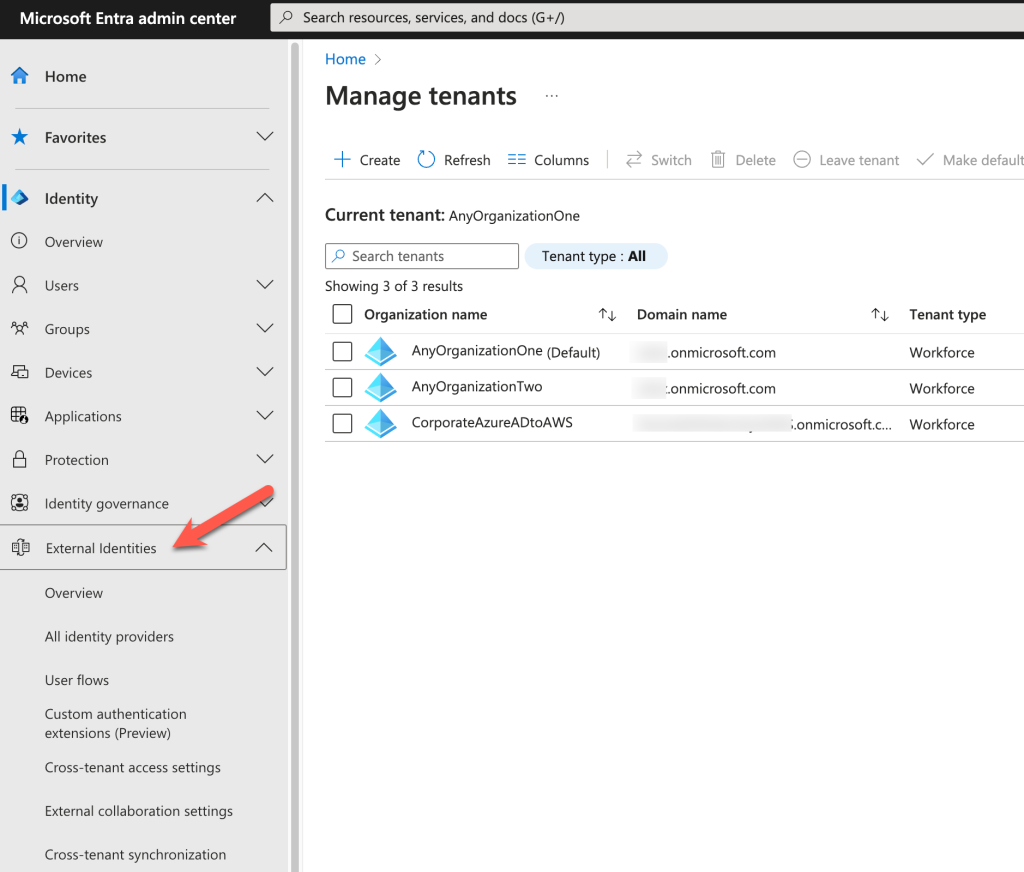
Figure 3 – Select External Identities
2. Select Cross-tenant access settings (Figure 4). Select the Add Organization option from the Organization Settings tab (Figure 5).

Figure 4 – Select Organizational Settings, Add organization
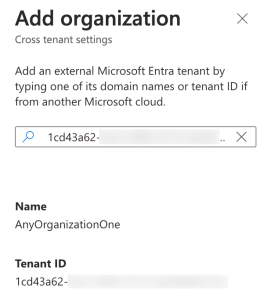
Figure 5 – Add organization
3. Once we have added the tenant, select the Inherited from default option (Figure 6).

Figure 6 – Add organization
4. Choose the Trust settings (Figure 7) tab from the Inbound access settings page. The Entra ID External Identities tab is where you configure how conditional access in your tenant works with claims from another tenant. While here, you can configure additional settings, such as enabling trust multifactor to align with your organization’s security practices. Our focus is on the Consent Prompt options located within the Trust settings tab. Enabling this feature will suppress consent prompts from apps in your tenant for synchronized user accounts, improving user experience across tenants. We recommend you update the following options and choose Save.
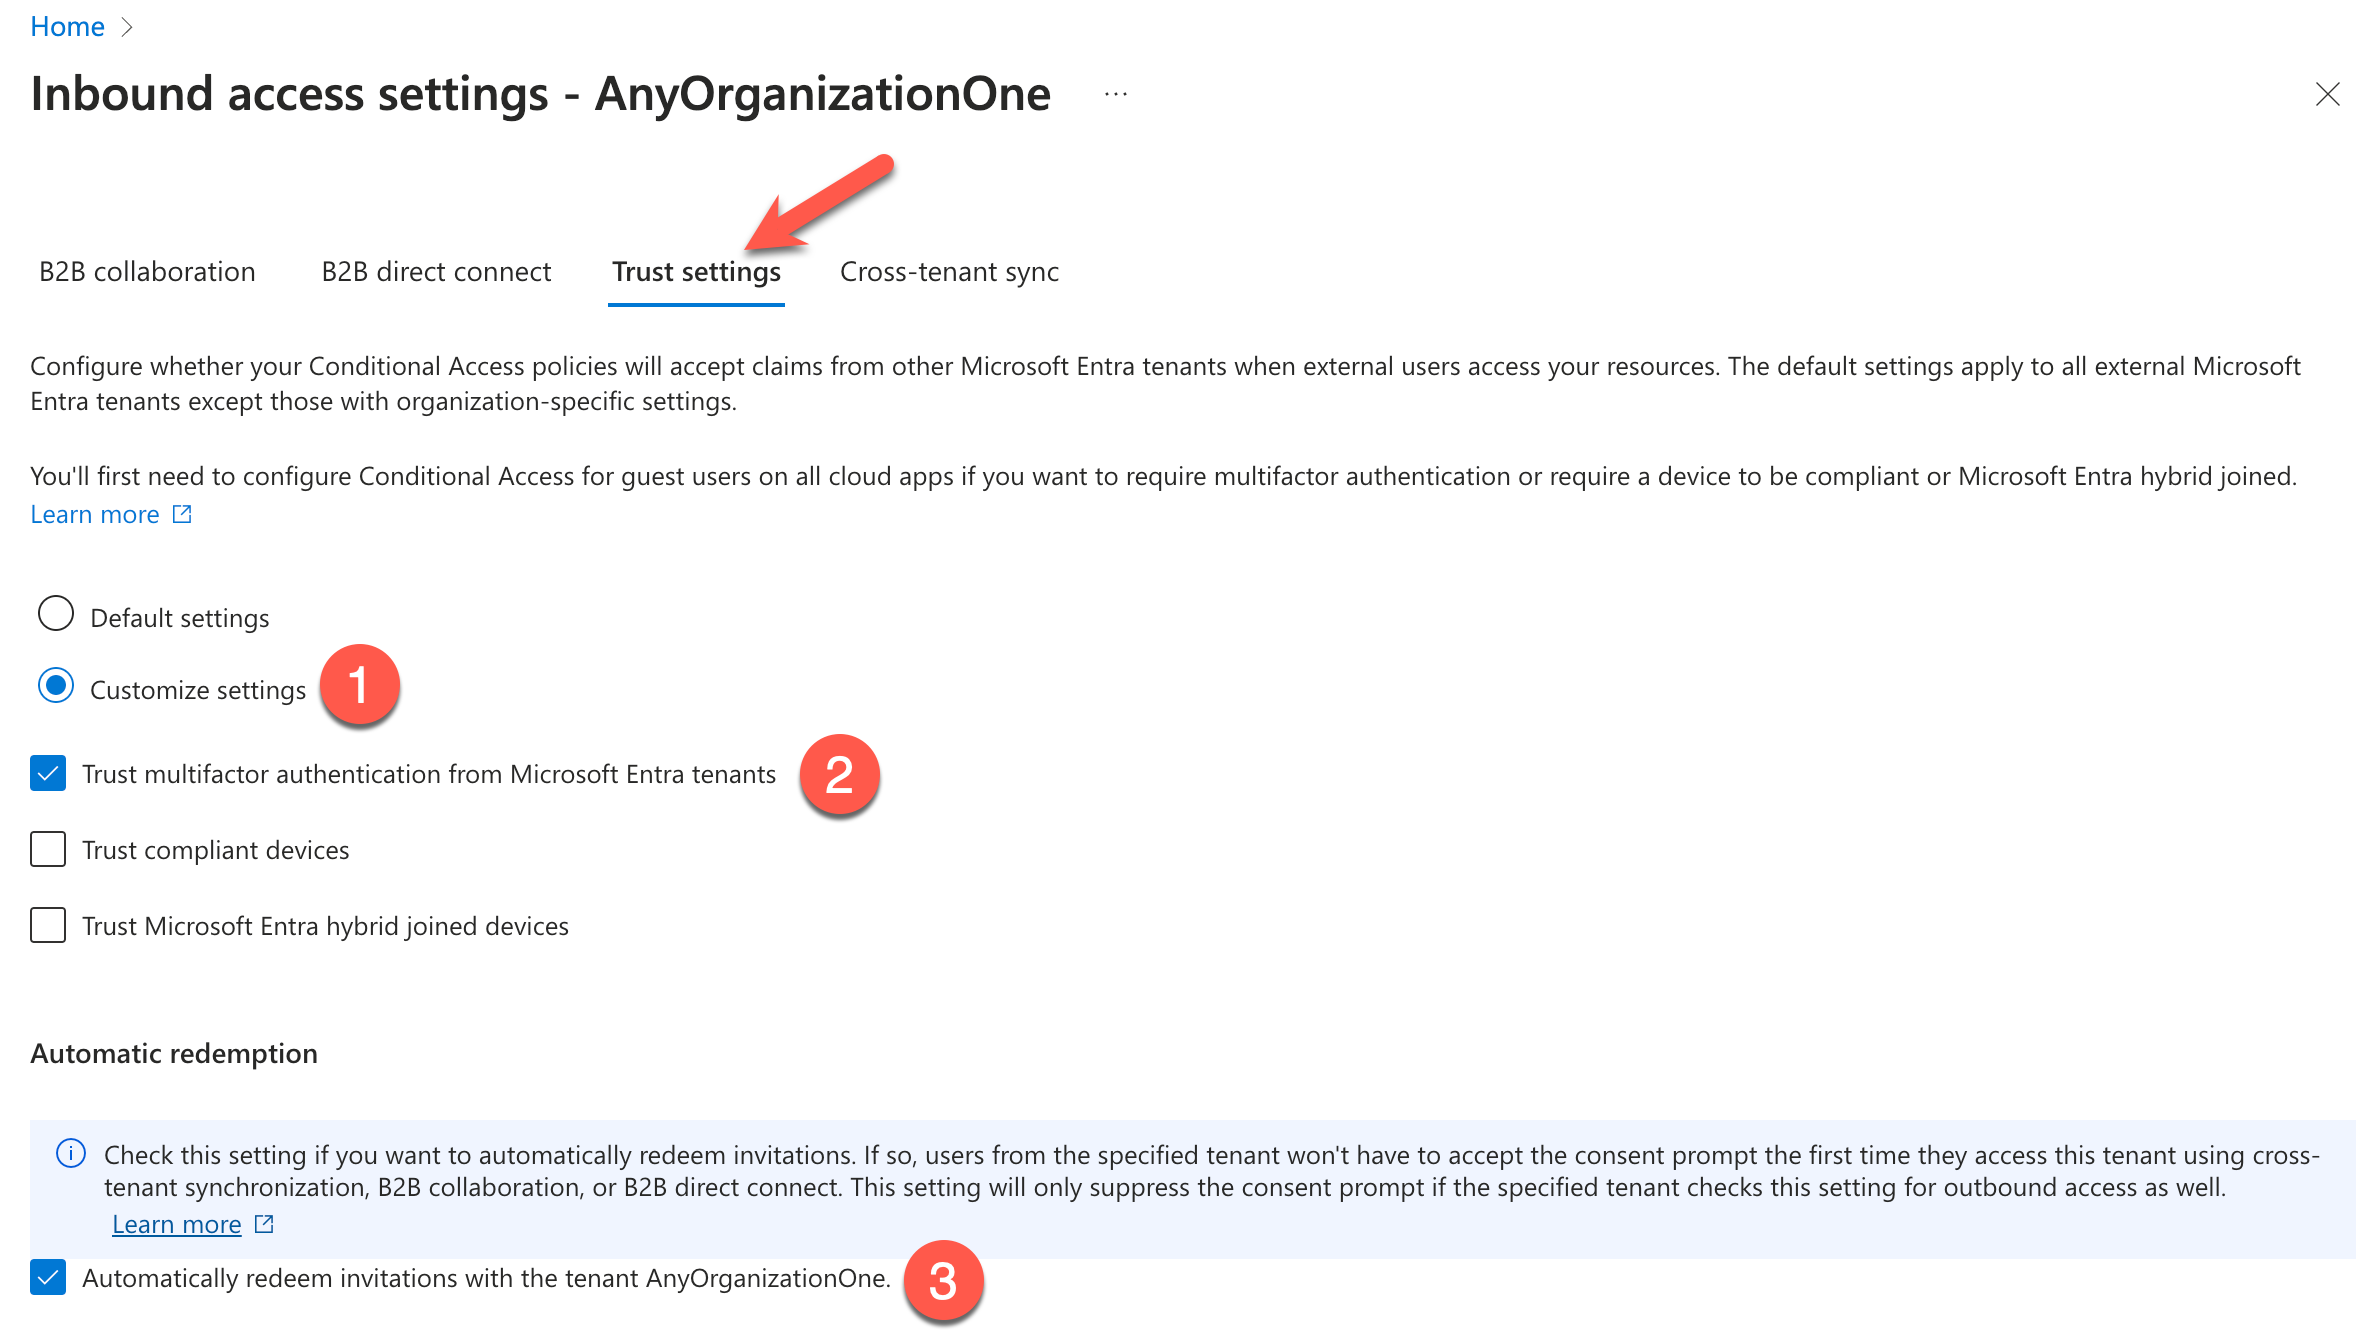
Figure 7 – Inbound access settings, Trust Settings
5. Choose Cross-tenant sync (Figure 8) and select the Allow users sync into this tenant checkbox. Verify the settings and select Save.
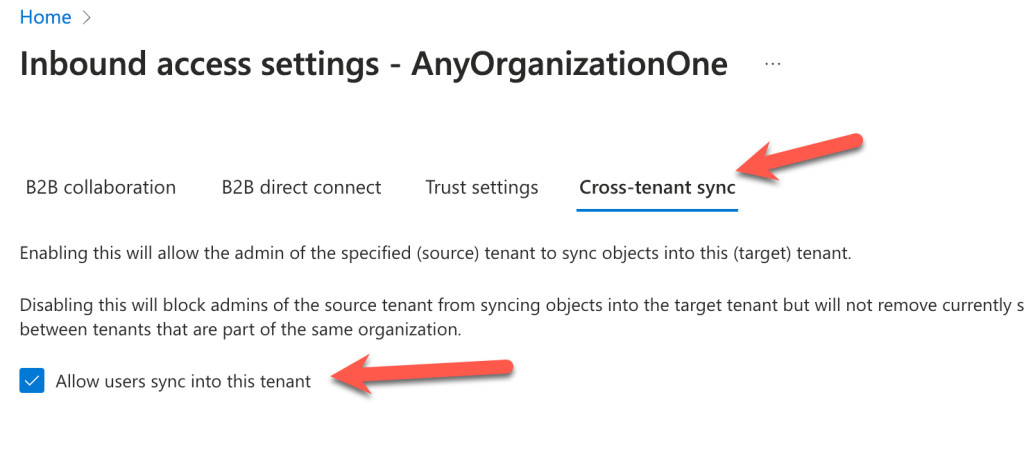
Figure 8 – Verify inbound access settings
Configure the source tenant
That completes the setup in the target tenant. Now we must complete the configuration of the source tenant.
- Choose Cross-tenant access settings (Figure 9) from the navigation menu and select Inherited from default from the Outbound Access field.
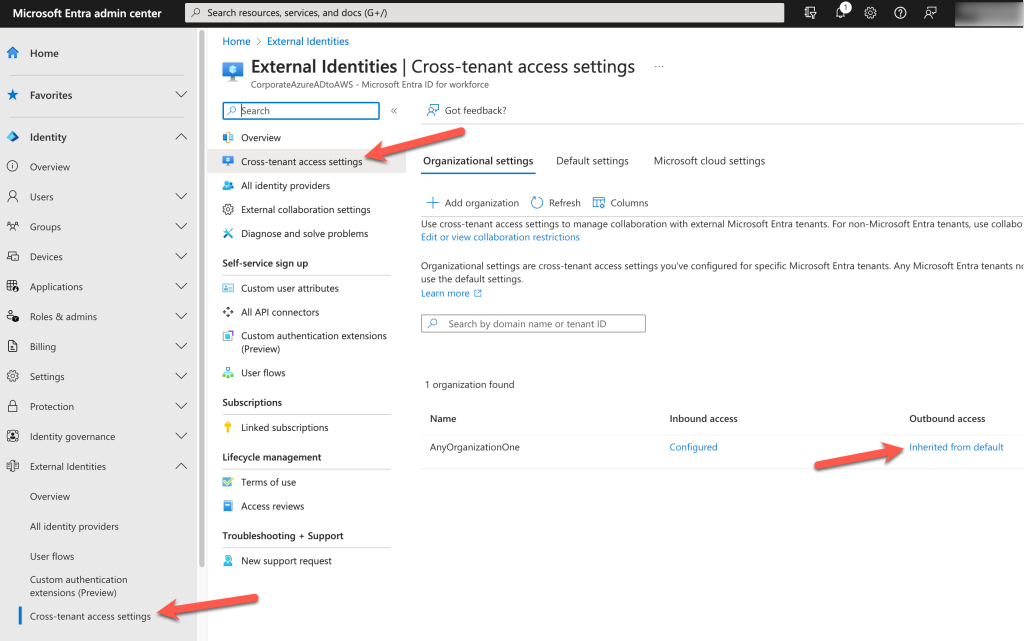
Figure 9 – Cross-tenant access settings
2. Choose Trust settings from the Outbound access settings. Select the Suppress consent prompts… (Figure 10) checkbox and then Save.
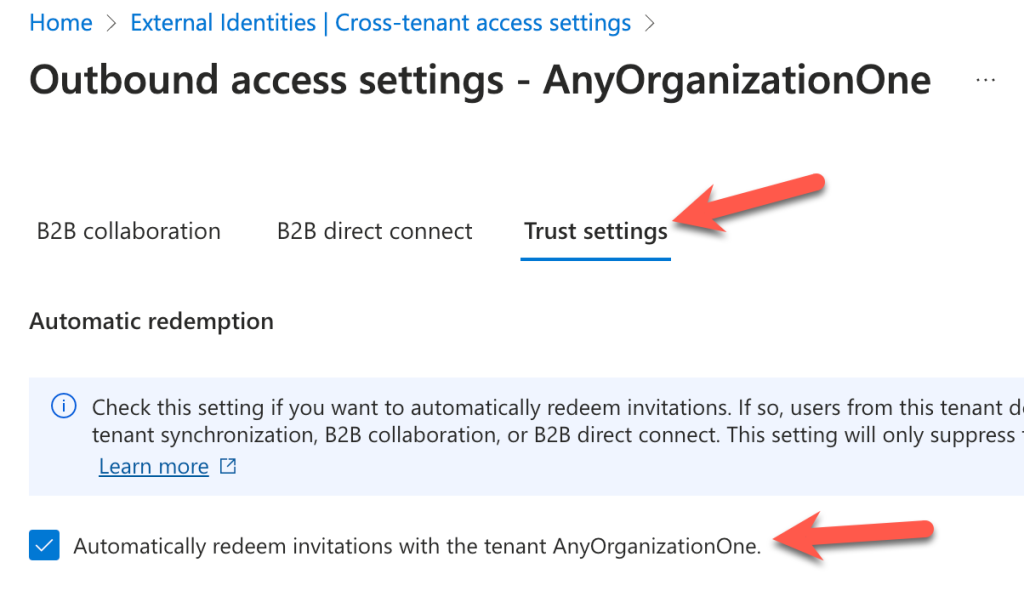
Figure 10 – Suppress consent prompt
Configure user sync settings
Next, we need to establish the synchronization settings for our users. The synchronization process will ensure that we automatically replicate users across tenants, providing access to AWS resources in a timely manner. This same process allows for the automated lifecycle management of the user, removing access when a user leaves the organization.
- Navigate to the Manage tenants screen by selecting Identity – Overview from the left-hand menu. Select the Manage tenants menu option from the top of the screen.
- Select the source tenant from the organization that we added above and click on the Switch menu item at the top of the screen.
- Choose External Identities and Cross-tenant access settings (Figure 11) from the navigation menu on the left.
- Repeat the same steps for adding the Entra ID Shared Identity target tenant Organization. Include the inbound, outbound, and trust settings for Cross-tenant access and both items will show “Configured” when completed.
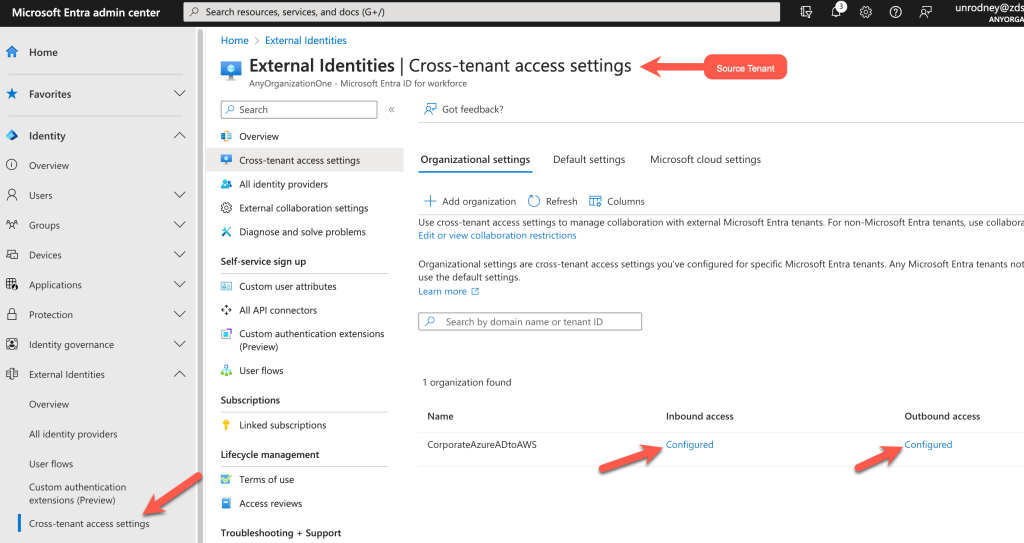
Figure 11 – Cross-tenant access settings
To configure the user sync settings, navigate to Cross-tenant synchronization (Figure 12) from the Entra ID admin center page.
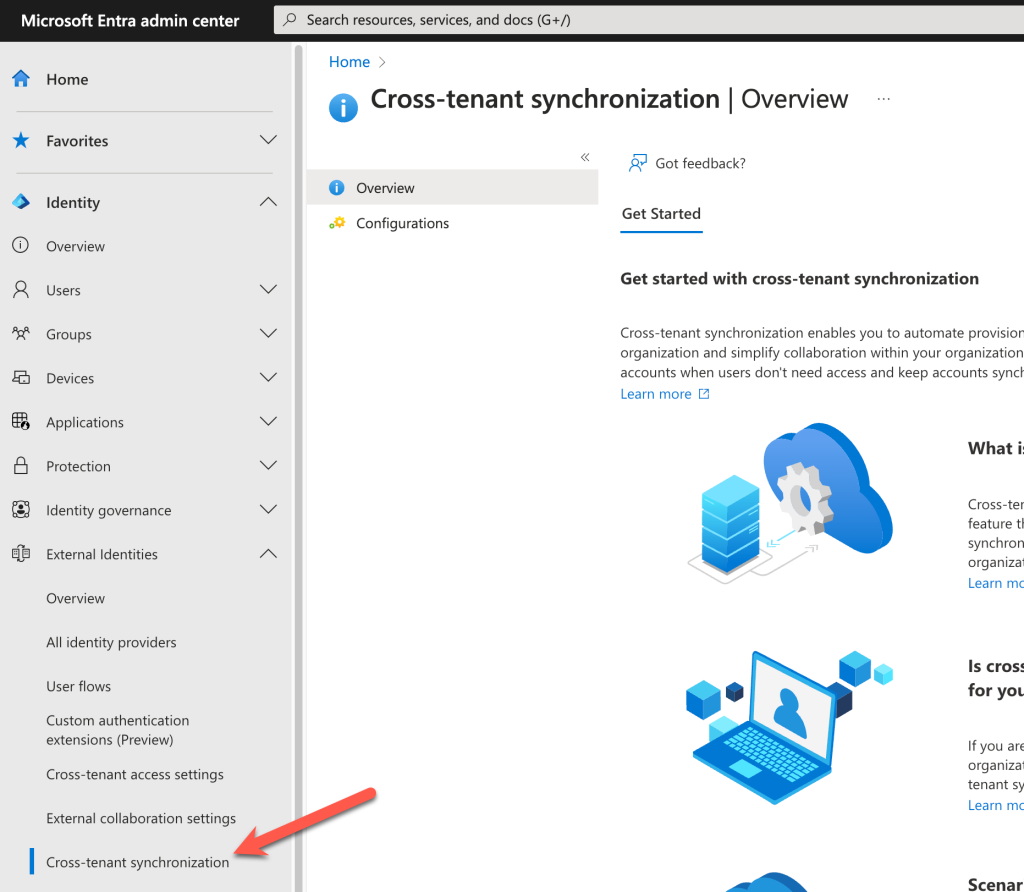
Figure 12 – Cross-tenant synchronization
Choose Configurations (Figure 13) from the navigation menu and then choose New Configuration.
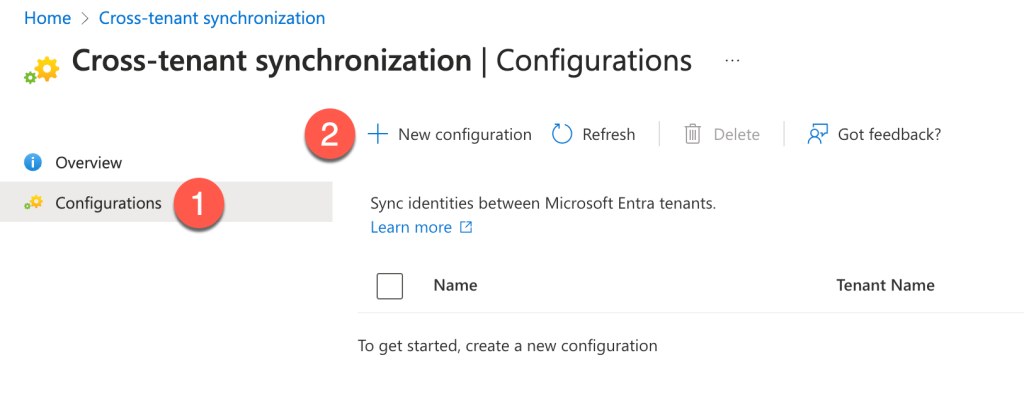
Figure 13 – Cross-tenant Configuration
Add the name for the cross-tenant synchronization configuration and choose Create (Figure 14).
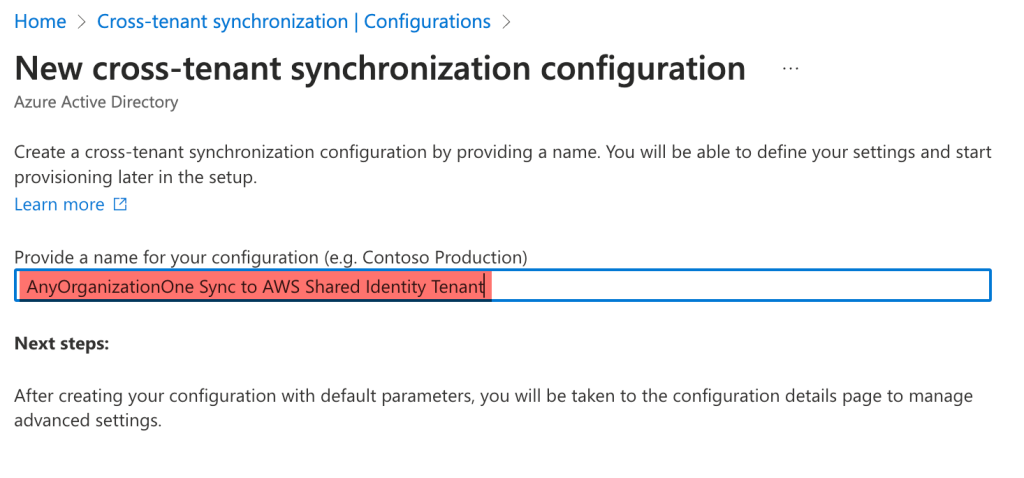
Figure 14 – Create new configuration
It’s important to keep in mind that after creating your configuration, it may take up to 60 seconds for the configuration to appear on the list, as it needs additional time to propagate. Refresh the page until it becomes available.
From the left Navigation menu, select Provisioning (Figure 15), change the mode to Automatic, provide the tenant ID for the Entra ID Shared Identity target tenant, and test the connection between them.
Once you have a successful connection, select Save on the navigation menu.
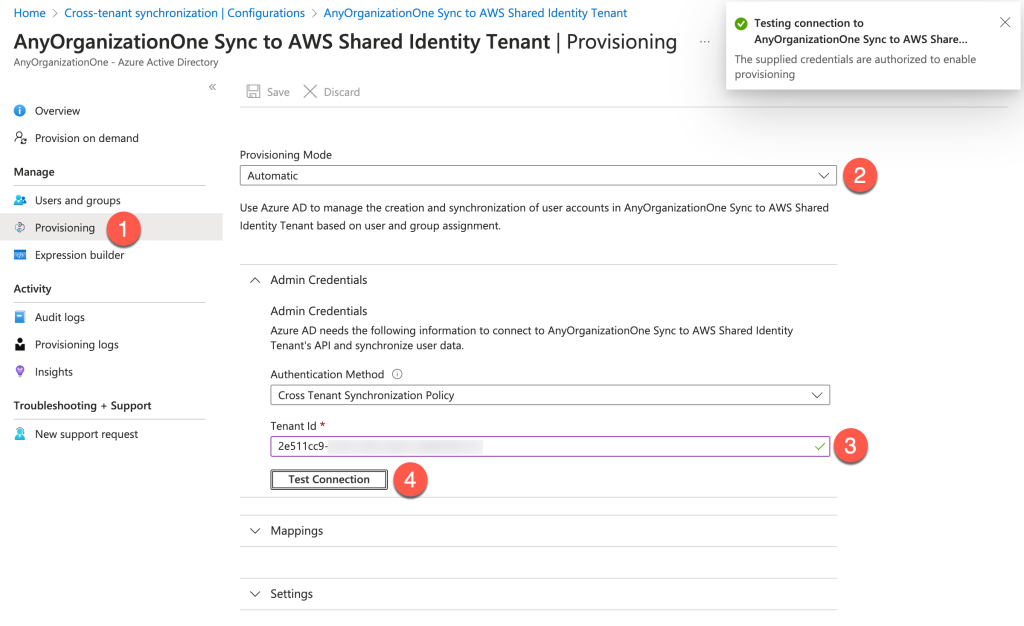
Figure 15– Successful connection to Shared Tenant
Choose Users and groups (Figure 16) from the left navigation menu and add the group or users you want to sync to the Entra ID Shared Identity target tenant. It’s important to note that when you assign a group to an application, only users directly in the group will have access. The assignment does not cascade to nested groups.
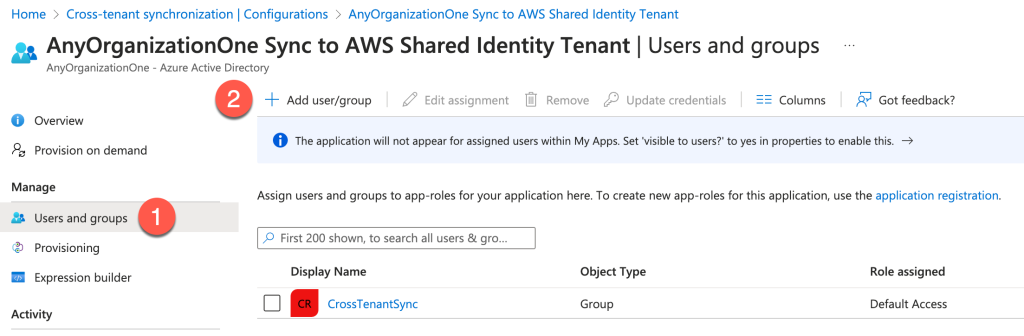
Figure 16 – Add Users and Groups
Select Provisioning from the navigation menu. Expand Settings and select Sync only assigned users and groups (Figure 17) under Scope. Finally, set the Provisioning Status to On and select Save from the menu.
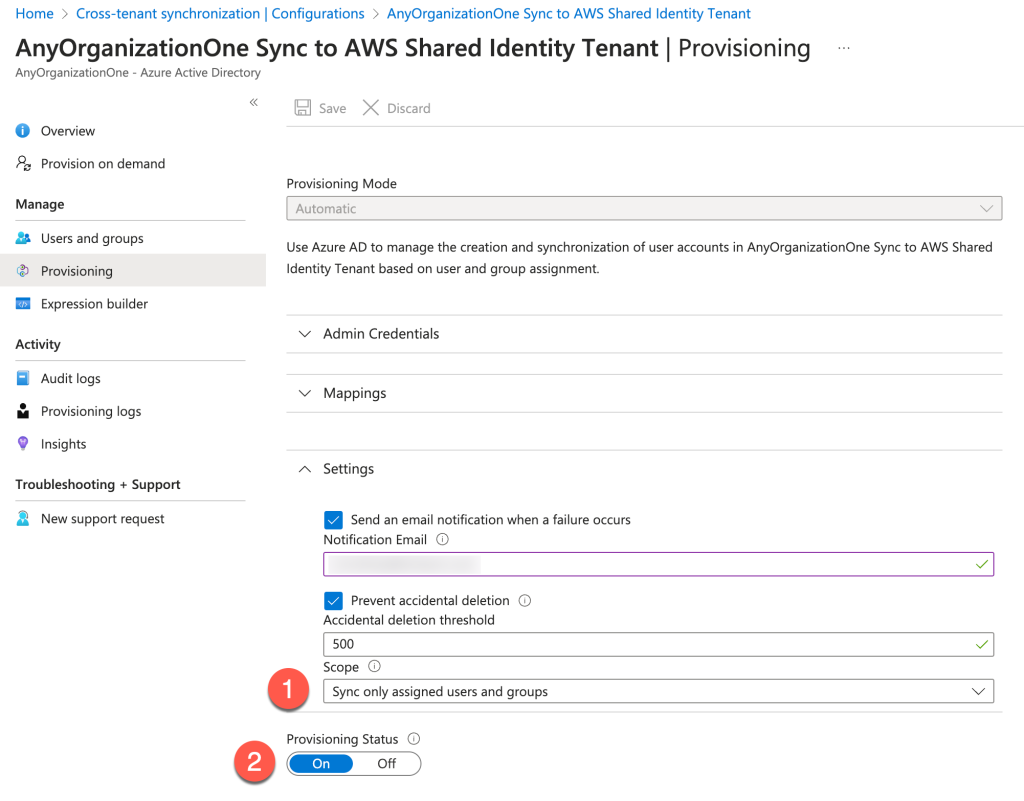
Figure 17 – Enable Provisioning
Configure attribute mappings
Since we have created an additional Entra ID tenant, there are best practices that we recommend for Attribute Mappings. From the left navigation menu, select Provisioning (Figure 18) and then select Provision Azure Active Directory Users from the Mappings section.
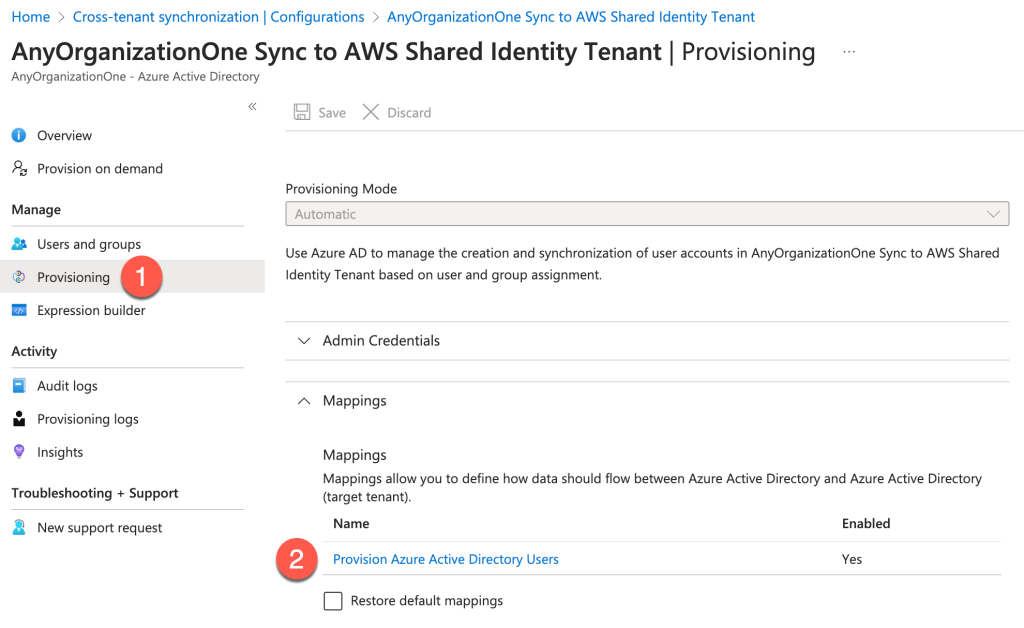
Figure 18 – Configure Attribute Mapping
From Attribute Mapping select showInAddressList (Figure 19).

In the Edit attribute mapping window, verify the Mapping type and Constant Value fields (Figure 20). Mapping type should be set to Constant. The Constant Value should be set to true. Select Save.

Figure 20 – Edit Attributes
Configure the display name of our synced users to include their organization or business unit name. This is helpful for larger organizations with multiple units to enable users and admins to quickly identify the source tenant of the user.
To achieve this, amend the mapping for the displayName attribute. Start by selecting it to open the options. From here (Figure 21), we can update the Mapping Type to “Expression“, and in the Expression, we will use the following syntax:
Append([displayName], “|AnyOrganizationOne”)
Select Ok and Save.
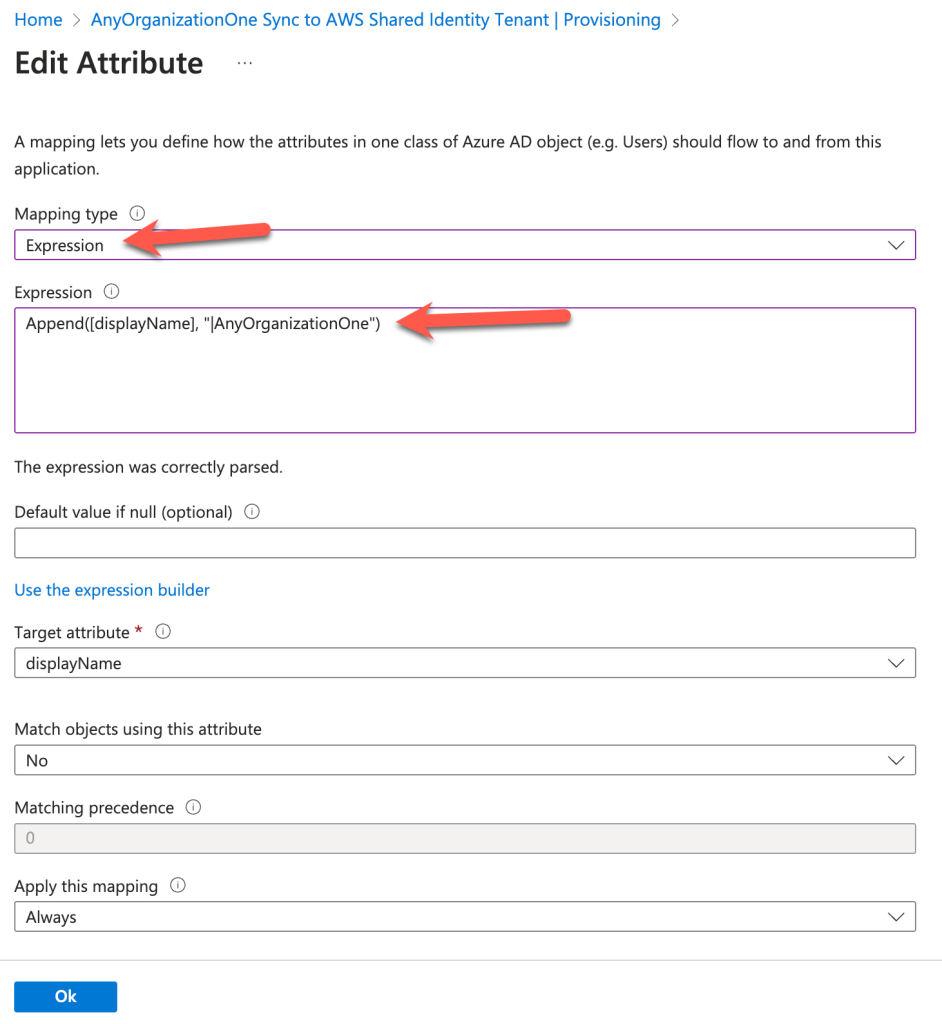
Figure 21 – Edit Attribute
Once the next synchronization occurs, we will see that the user now has the Corp Identifier attribute in their username, which allows us to identify which tenant the users have synced to the Entra ID shared identity tenant from (Figure 22).
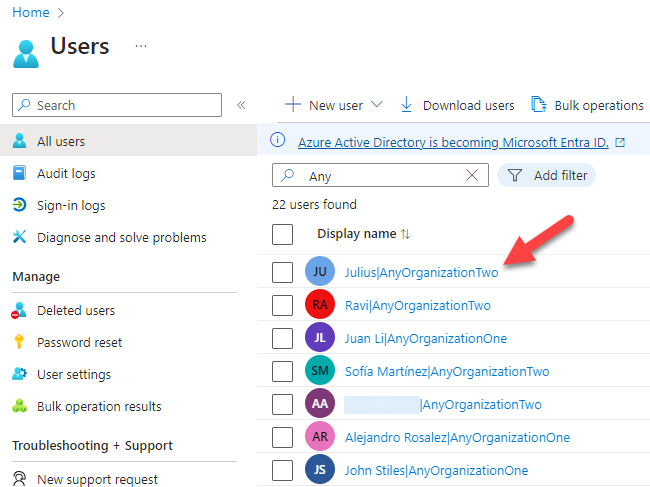
Figure 22 – Attribute Identifier in Display Name
Creating a Dynamic Group to synchronize to AWS IAM Identity Center
Entra ID users can be synchronized between tenants. Groups, devices, and contacts aren’t currently supported. Because of this limitation, we will create Dynamic Groups, which will allow us to synchronize Users and Groups to AWS and simplify management.
In the Entra ID admin center, expand the All Groups menu item and select All Groups. From the Groups page, select the New group (Figure 23) option at the top of the page.
On the New Group page, enter a name and description for the new group. Select Dynamic User from the Membership type dropdown list. Select the Add dynamic query option.
We’re going to create a Group called ‘DevOps – Shared Tenant’ using the following expression:
(user.department -eq “DevOps”)
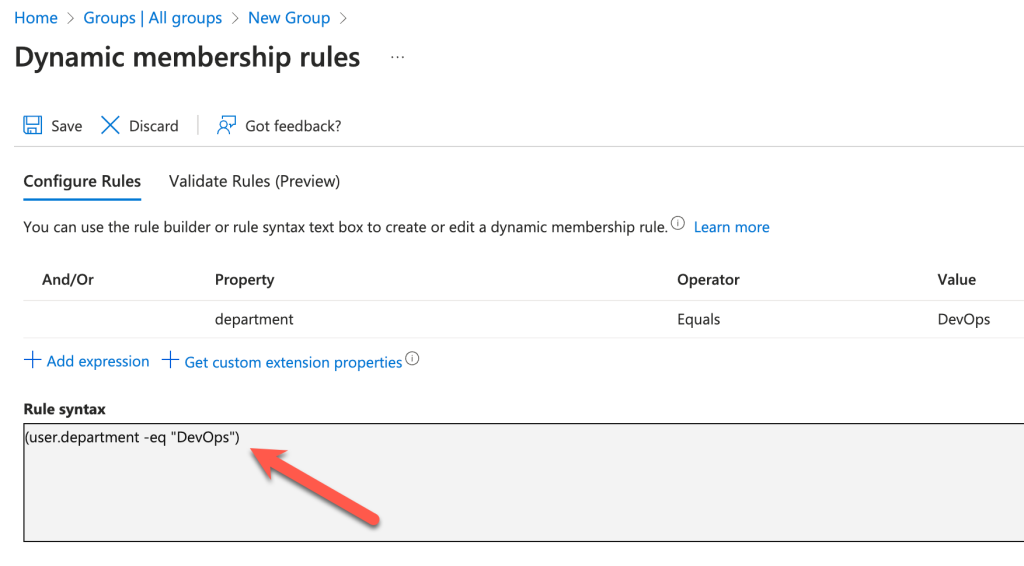
Figure 23 – Create Dynamic Group
After creating the rule, select Save.
Select Create on the New group page to create the group.
This will find our users who have their Department assigned as DevOps in Entra ID (Figure 24).
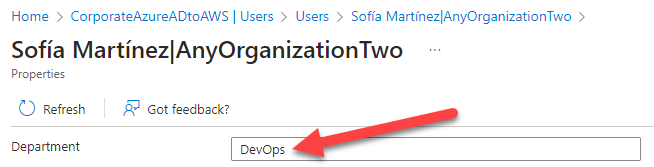
Figure 24 – Update Department
Once the group is created, it will populate with the users who match the expression. We can see that we have 3 members who are assigned by selecting the Group and then selecting Members (Figure 25).
Synchronize users and groups from the Entra ID target tenant to AWS IAM Identity Center

Figure 25 – Members assigned to Dynamic Group
1. In the Entra ID admin center, from the Applications menu item on the left, select Enterprise Applications.
2. Select the New Application option from the menu item at the top of the page.
3. Type Amazon in the Search, select AWS IAM Identity Center (successor to AWS Single Sign-On), and select Create.
4. Once the application is added, select 1. Assign users and groups (Figure 26).
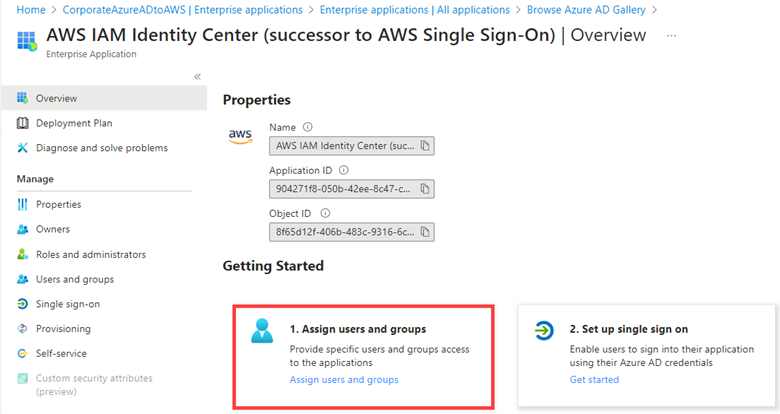
Figure 26 – Assign users and groups
5. Assign the users and groups that will be synced to AWS IAM Identity Center using SCIM.
In our example, we have assigned a few specific users and the DevOps dynamic group that we created (Figure 27).
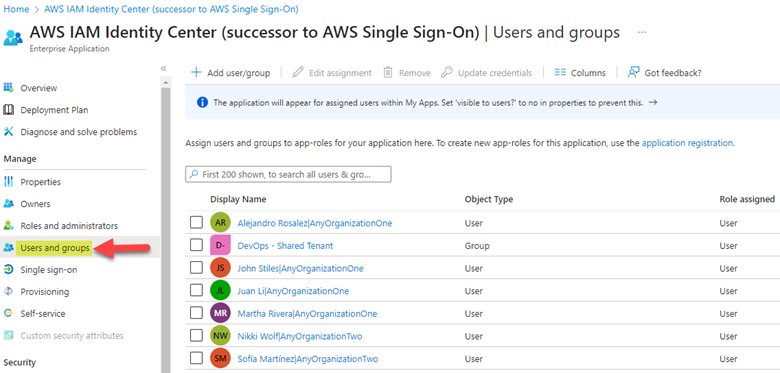
Figure 27 – Display all assigned Users and Groups
Next, we will set up single sign-on. We need to download a metadata file from AWS IAM Identity Center that we will upload to the Entra ID admin center.
In the AWS IAM Identity Center console, select settings, then under Identity Source – Actions, select Change identity source (Figure 28).
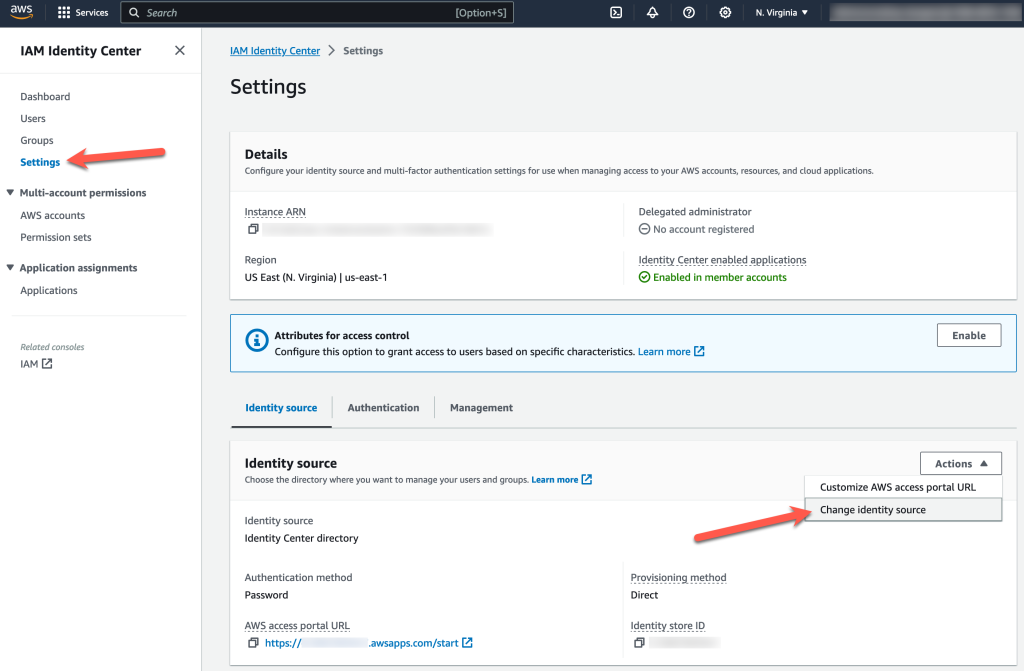
Figure 28 – Manage Authentication
Select External identity provider and click on Next. (Figure 29).
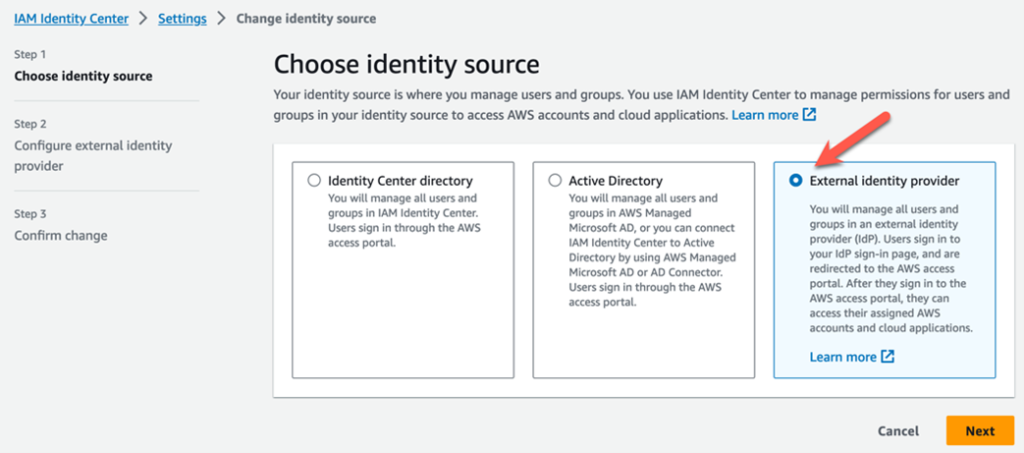
Figure 29 – External identity provider option
Select Download metadata file (Figure 30) and save this file to your local computer.
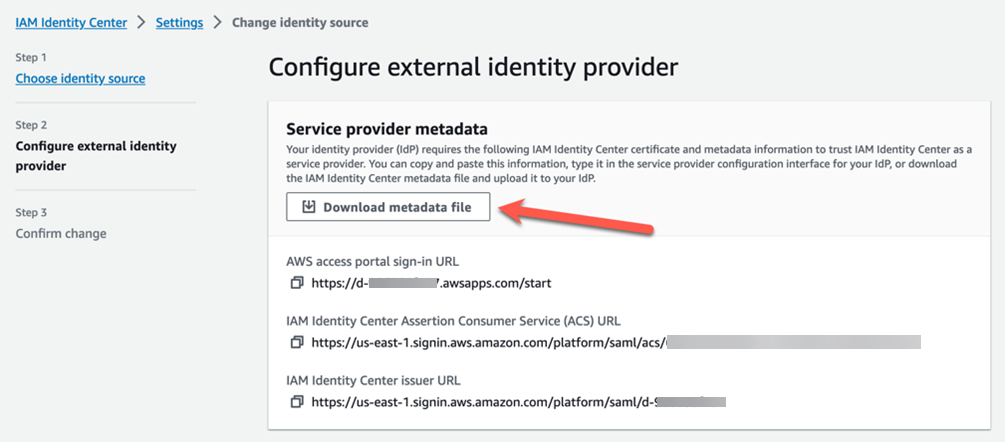
Figure 30 – Download metadata file
In a separate tab in your browser, switch back to the Entra ID admin center. From the Applications menu item on the left, select Enterprise Applications. Select the AWS IAM Identity Center (successor to AWS Single Sign-On) application we created previously.
Select the second option, 2. Set up single sign on (Figure 31).
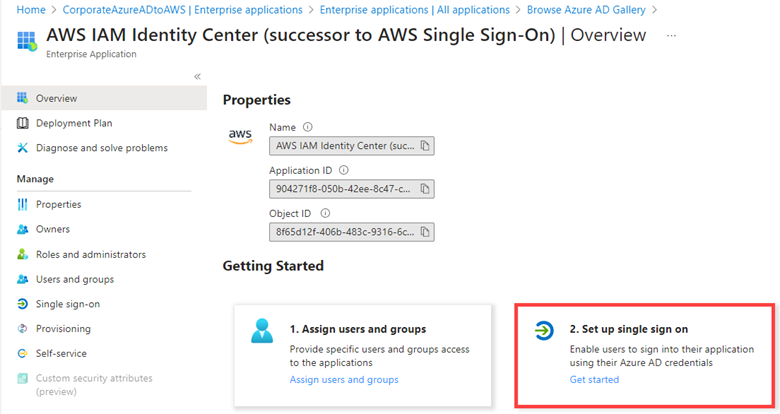
Figure 31 – Set up single sign-on
Select the SAML option from the single sign-on methods list (Figure 32).
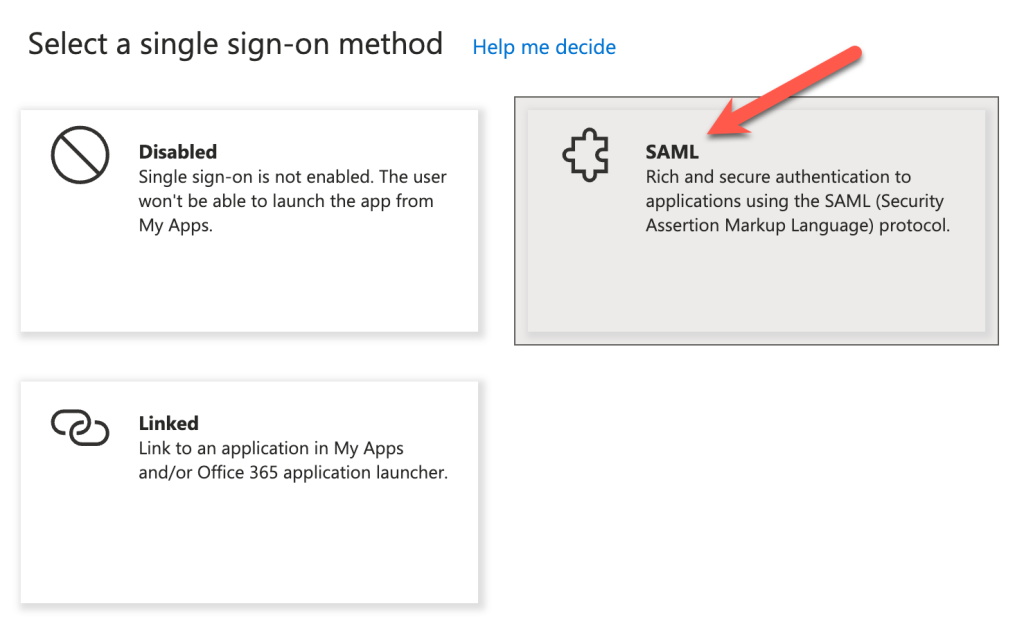
Figure 32 – Select SAML authentication
Select Upload metadata file (Figure 33) from the menu at the top of the page. Upload the XML metadata file that was previously downloaded from AWS IAM Identity Center.
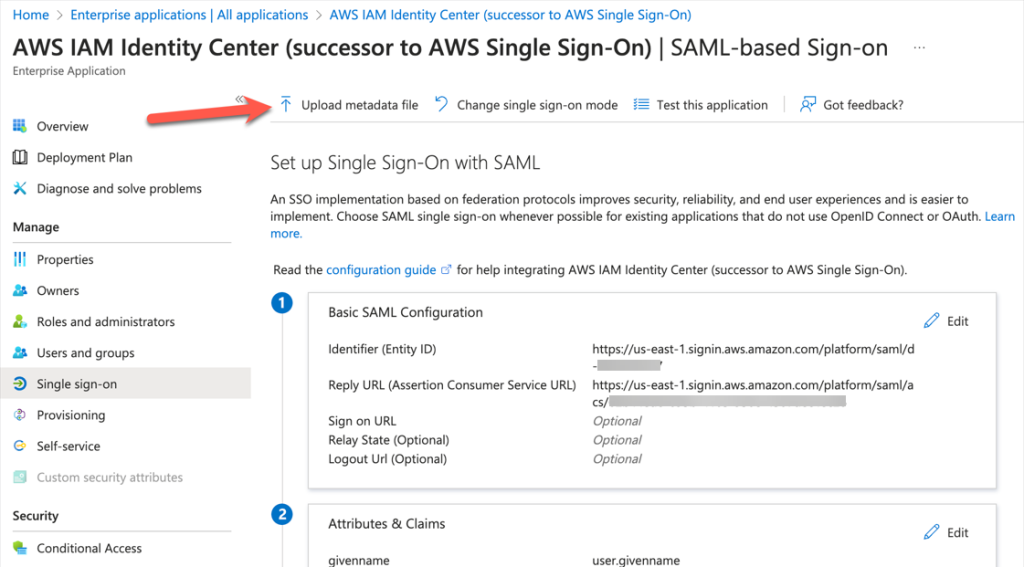
Figure 33 – Upload Metadata file
We will also download an Azure Metadata xml (Figure 34), which is needed to finish the configuration of the external identity provider for AWS IAM Identity Center.
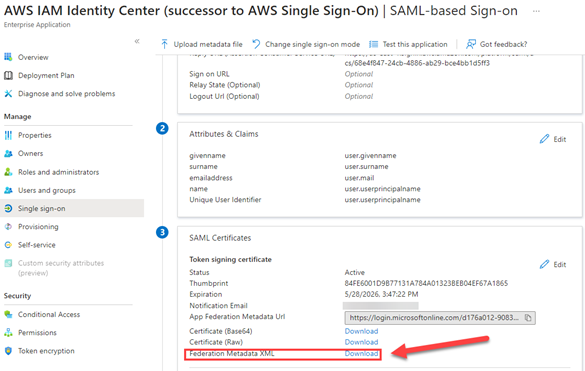
Figure 34– Download Federation Metadata XML
Switch back to the browser tab that was previously opened for the AWS IAM Identity Center configuration. Upload the file with the Azure metadata (Figure 35) from the previous step and select Next.
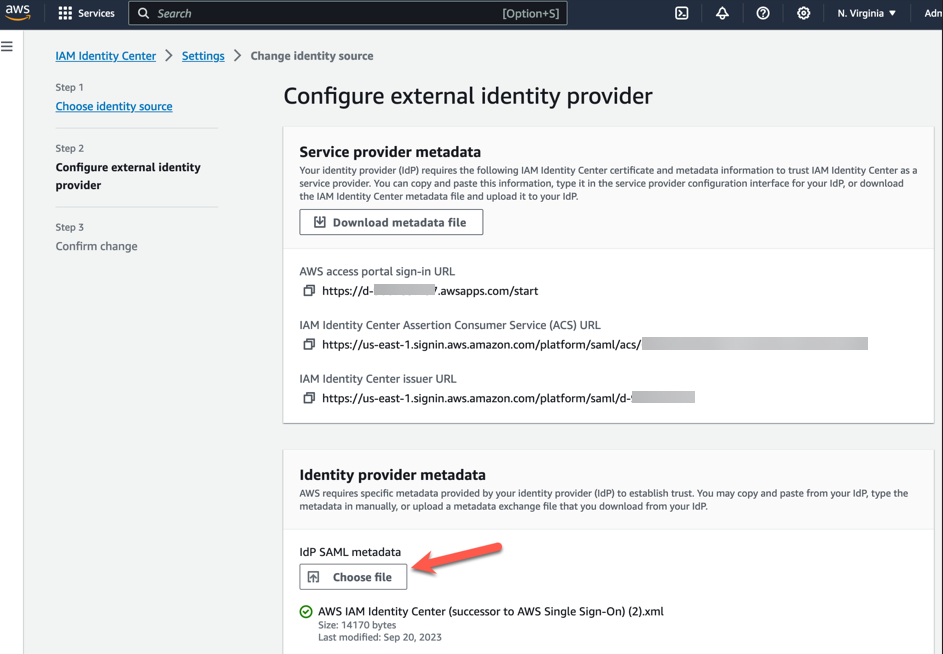
Figure 35 – Configure external identity provider
In the text box, type ACCEPT to change the identity source (Figure 36).
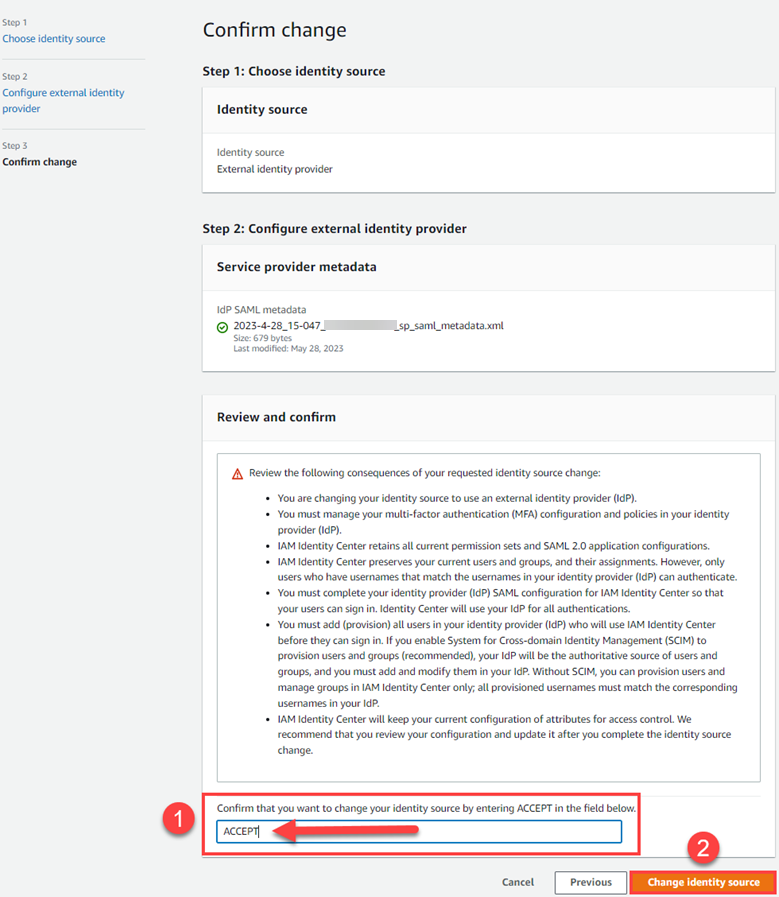
Figure 36 – Confirm change with “ACCEPT”
Next, let’s implement the automatic provisioning of users and groups from Entra ID using the SCIM protocol. From IAM Identity Center, Settings, select Enable (Figure 37) from Automatic provisioning.

Figure 37 – Enable Automatic provisioning
Once this is enabled, we will need the two values from the Inbound automatic provisioning information.
Select the box icon highlighted on the left to copy the values we will be paste into the Azure portal (Figure 38).
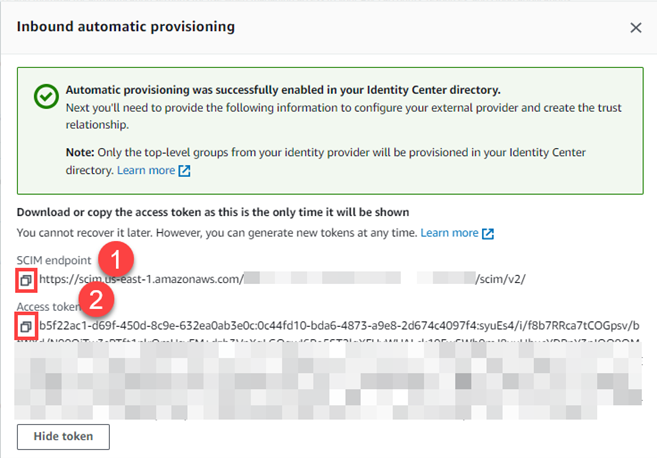
Figure 38 – Copy the SCIM endpoint and Access token
In the Azure portal, select Provisioning (Figure 39) from the left menu in the application and select Get Started. Change the provisioning mode to automatic and paste the copied SCIM endpoint and token that you copied from the AWS console. Select Test Connection and then select Save.
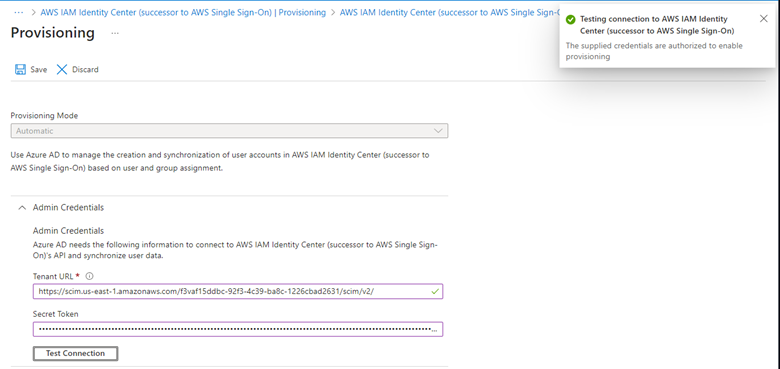
Figure 39 – Test Credentials to verify provisioning
The default provisioning interval is set to 40 minutes. Our users (Figure 40) and group (Figure 41) are successfully provisioned and are now available in the AWS IAM Identity Center console.
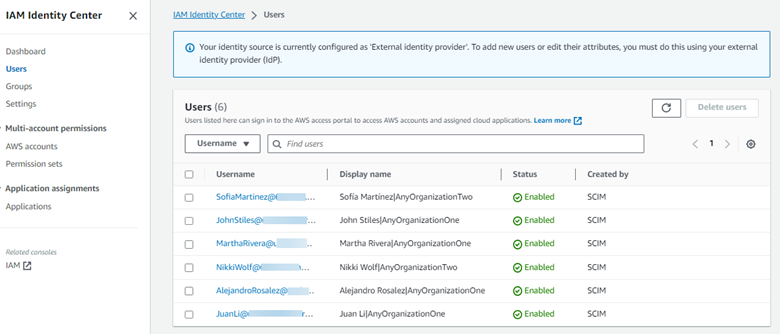
Figure 40 – Users are successfully provisioned with SCIM
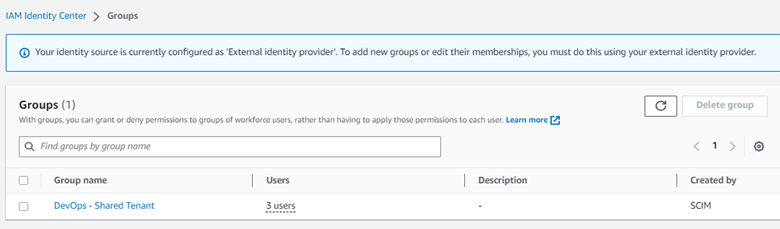
Figure 41 – DevOps Group is successfully provisioned with SCIM
We can now use the customized AWS access portal URL (Figure 42).
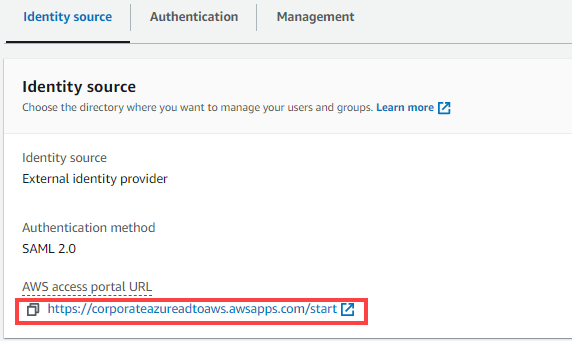
Figure 42 – Custom AWS access portal URL
By using this URL, members who have been synced using SCIM from Entra ID to AWS Identity Center can authenticate to AWS.
We have logged in as Sofia (Figure 43), who has been assigned read-only rights (Figure 44) to the account.
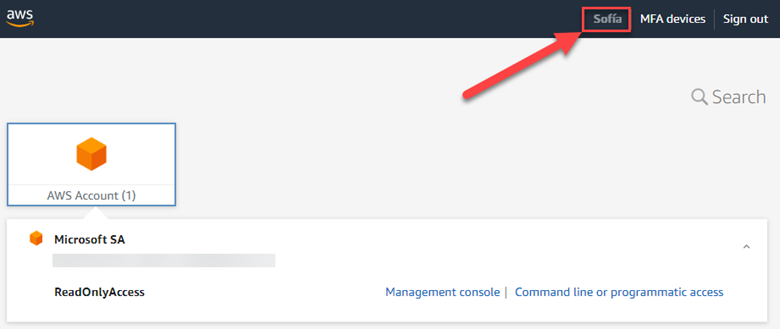
Figure 43 – Verifying User Access
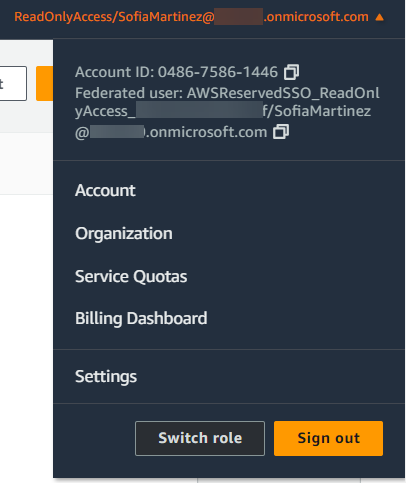
Figure 44 – Verifying User and Role
Cleanup
AWS IAM Identity Center is available at no extra charge.
At the time of this writing, the cross-tenant synchronization feature requires Entra ID Premium P1 licenses in the source tenant for each user that is synchronized. Synchronized users are charged in the target account using the document: Billing model for Azure AD External Identities.
The auto-redemption feature also requires at least one Entra ID Premium P1 license in the target tenant. See the Licensing requirements section of the Microsoft documentation for the latest information on licensing this feature for your organization.
To avoid ongoing charges and maintenance for the resources that you created, follow these steps:
- Delete your cross-tenant synchronization configuration from the source tenants.
- Delete your target Entra ID tenant if it is no longer needed.
- Delete your AWS IAM Identity Center configuration or change the identity source.
Conclusion
In this blog post, we explored how to integrate multiple Entra ID tenants with AWS IAM Identity Center using the cross-tenant synchronization feature. In our step-by-step guide, we created a target Entra ID tenant and configured cross-tenant synchronization to synchronize in-scope user objects from two source tenants to the target tenant. We federated the target tenant with AWS IAM Identity Center and provided simplified access for the source tenant users to AWS resources.
With this solution, you can benefit from easily integrating users from multiple Entra ID tenants with AWS in a scalable manner. This results in the ability to manage user access and authorizations centrally from a single Entra ID enterprise application and AWS IAM Identity Center instance.
Use the following resources to help you get started with AWS IAM Identity Center:
- Whitepapers and what’s new with AWS IAM Identity Center
- AWS IAM Identity Center User Guide
- AWS IAM Identity Center Forums
- Using AWS Single Sign-on to Integrate with Azure Active Directory
Thank you for reading this post on using the cross-tenant synchronization feature with AWS IAM Identity Center. If your organization has multiple tenants and you’re looking for a way to integrate and automate the lifecycle of multiple Entra ID tenants with AWS IAM Identity Center, we encourage you to try this solution today.
AWS has significantly more services, and more features within those services, than any other cloud provider, making it faster, easier, and more cost effective to move your existing applications to the cloud and build nearly anything you can imagine. Give your Microsoft applications the infrastructure they need to drive the business outcomes you want. Visit our .NET on AWS and AWS Database blogs for additional guidance and options for your Microsoft workloads. Contact us to start your migration and modernization journey today.