AWS Cloud Operations Blog
Leverage generative AI to create custom dashboard widgets in Amazon CloudWatch using Amazon CodeWhisperer
Observability describes how well you can understand what is happening in a system, often by instrumenting it to collect metrics, logs, and traces. To achieve operational excellence and meet business objectives, you need to understand how your systems are performing. In order to accomplish this, many customers use Amazon CloudWatch to get real-time monitoring, alerts & alarms, along with customizable dashboards to visualize tailored metrics which can help drive business decisions. Organizations have the ability to leverage custom widgets, which is a CloudWatch dashboard widget that can call any AWS Lambda function with custom parameters. This deeply enhances the possibilities of what data can be analyzed and displayed on in a dashboard. But, what happens if you do not have the expertise to author Lambda functions in your organization? This is where Amazon CodeWhisperer can help by making code suggestions to author these functions which can help achieve better observability.
Amazon CloudWatch dashboards allow you to create a single, centralized location to monitor various metrics and resources across your AWS environment. This helps you gain a holistic view of your applications’ health and performance. Custom Widgets will make these dashboards much more flexible which will allow for an enhanced level of monitoring and visualization. Amazon CodeWhisperer is an artificial intelligence coding companion that generates real-time, single-line or full-function code suggestions in your Integrated Development Environment (IDE) to help you quickly build software.
In this post, we will show you how you can leverage CodeWhisperer to assist with creating code used in development and deployment of custom widgets and CloudWatch dashboards. We will use the AWS Cloud Development Kit (CDK) which is an open-source software development framework for defining cloud infrastructure as code with modern programming languages and deploying it through AWS CloudFormation.
Overview of solution
In this solution, we will use Amazon CodeWhisperer to do the heavy lifting of making code suggestions for writing CDK code. Using the AWS CDK we will code and deploy a dashboard with 3 widgets of various types, our examples will show you how you can create a text widget and 2 custom widgets. The diagram below is an overview of what resources you will create and deploy via the CDK:
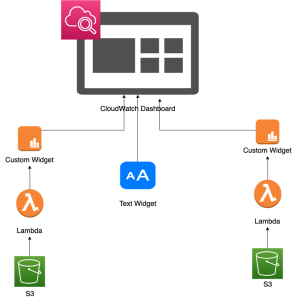
Figure 1. Architecture showing Amazon CloudWatch dashboards using widgets prepared from CDK
After you follow all the steps of this post, your CloudWatch dashboard will look like this, containing two custom widgets and one text widget:
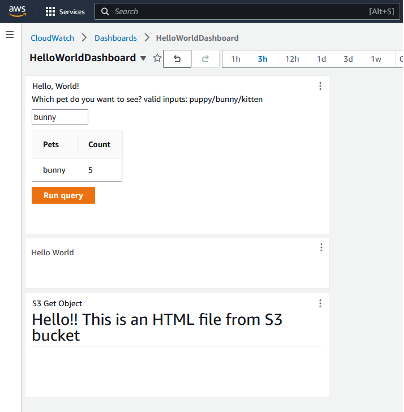
Figure 2. Figure showing screenshot of CloudWatch text widget
At a high level what you will accomplish during throughout this post is the following:
- Set up Amazon CodeWhisperer
- Configure your IDE to use your builder ID
- Configure AWS CLI, AWS CDK, and AWS IAM
- Use Amazon CodeWhisperer to write CDK code and Lambda functions
- Create an Amazon Simple Storage Service (S3) bucket to hold our assets for deployment
- Deploy our dashboard and custom widgets
Prerequisites
To follow along with this blog post, you need to access an Integrated Development Environment (IDE) on your local machine. CodeWhisperer works with multiple IDEs like Visual Studio Code (VS Code), Jetbrains products such as PyCharm. We will be using VS Code for this post. You can find the steps for using one of the other IDE’s in the Amazon CodeWhisperer documentation.
For this walkthrough, you should also have the following prerequisites:
Configure your local IDE to use your builder ID
Let’s set up CodeWhisperer in VS code using an AWS Builder ID, which is a new personal profile for everyone who builds on AWS. The first this we need to do is ensure we have the AWS Toolkit installed.
- Navigate to Extensions on the left-hand pane of your VS Code IDE. In the search bar enter AWS Toolkit and choose Install the extension as shown below
- There should now be an AWS Toolkit icon on the left-hand pane. In the AWS Toolkit for Visual Studio Code, under Developer tools, CodeWhisperer select Start. A dropdown menu will appear at the top of VS Code.
- From the dropdown menu, select Use a personal email to sign up and sign in with AWS Builder ID
- At the prompt Copy Code for AWS Builder ID choose Copy Code and Proceed.
- At the prompt Do you want Code to open the external website? choose Open.
- A browser tab will open, displaying the Authorize request window. The code should have been already added to your copy/paste buffer. Paste it in, and choose Next.
- A browser tab will open to the Create AWS Builder ID page. Enter your email address, and choose Next.
- A field for Your name will appear. Enter your name and choose Next.
- AWS will send confirmation code to the email address that you submitted. On the email verification screen, enter the code and choose Verify.
- On the Choose your password screen, enter a password, confirm it, and choose Create AWS Builder ID.
- A browser tab will open with a message asking you to allow AWS Toolkit for Visual Studio Code to access your data. Choose Allow.
- Return to VS Code. If you have already authenticated into other AWS tools using IAM, you will be asked whether you want to use Builder ID for all AWS services. Choose the option that best suits your situation.
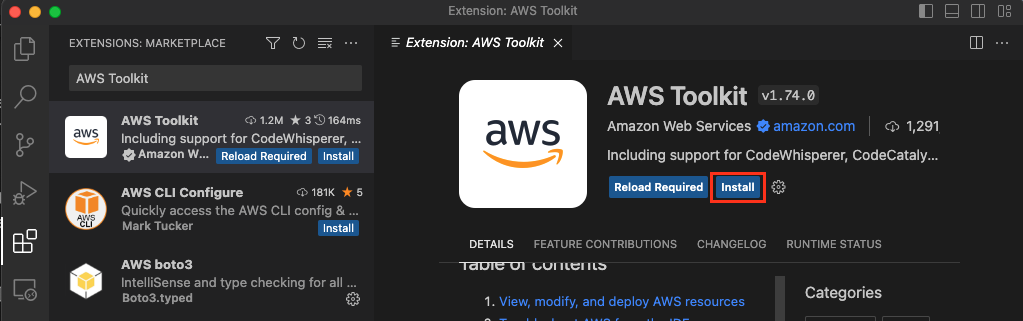
Figure 3. AWS Extension set up in VS Code
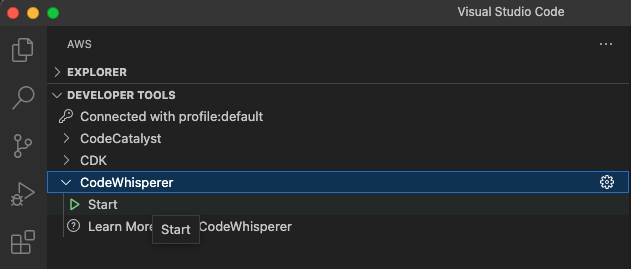
Figure 4. Start CodeWhisperer
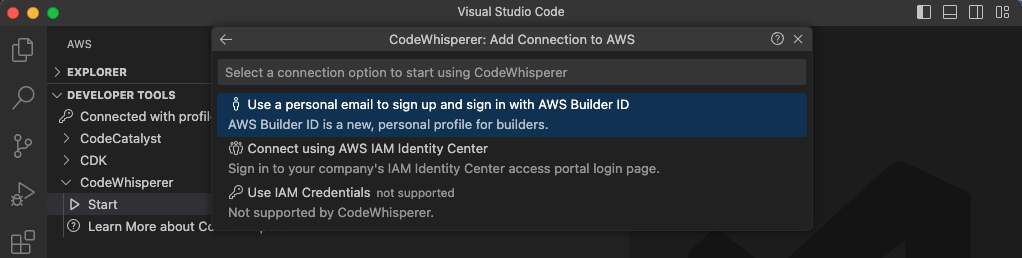
Figure 5. Use personal email
Configure AWS CLI, AWS CDK and AWS IAM
In this section, you will configure AWS CLI, CDK and folder structure for CDK.
- Refer to Configure the AWS CLI to configure your AWS CLI
- Create a new folder and name it sample1, you will create the cdk project in this folder. Change directories to the sample1 folder:
cd sample1 - Bootstrap cdk:
cdk bootstrap aws://<account number>/<region name> - Create the cdk python environment:
cdk init —language python
This will create required python cdk files in the sample1 folder - Activate venv
.\.venv\scripts\activate - Install requirements
pip install -r requirements.txt
Code using CodeWhisperer in VS Code:
This section will guide you on how to write CDK code using CodeWhisperer. We will demonstrate how to create these 6 assets using CDK:
- 2 Lambda functions
- 1 lambda function will take user input and produce corresponding output
- 1 lambda function that fetches the HTML from the S3 bucket
- 3 Cloudwatch widgets
- Custom widget that integrates with 1 of the lambda functions to accept user input and provide an output by reading data from lambda function
- Custom widget that integrates with the second lambda function and reads an html file from an s3 bucket
- Text widget that says ‘Hello World’
- 1 Cloudwatch dashboard
Open Visual Studio Code
- Choose File from top left menu > Open Folder (choose the sample1 folder we created in step 2):
- Create a new folder named assets and create an html file named HelloWorld.html:
<!DOCTYPE html>

 <html>

 <body>

 <h1>Hello!! This is an HTML file from S3 bucket</h1>

 </body>

 </html>
This file will be uploaded to s3 bucket and will be read by a lambda function.
- Go to the Sample1 folder again and look for a sub-folder named sample1:
- Edit the stack file located in the sub-folder:
- Add import statement (CodeWhisperer will help auto complete as you are typing):
from aws_cdk import (

aws_lambda, Stack, App, Duration, aws_iam, aws_cloudwatch, aws_s3, RemovalPolicy, aws_s3_deployment

)
- Once you have the required modules imported, look for the line that reads:
# The code that defines your stack goes here
Delete this line and replace it put your stack code.
- Start typing comments for CodeWhisperer to make suggestions for you to create your first Lambda function using AWS CDK:
# define lambda function that has inline code
As you start typing, CodeWhisperer will start suggesting. Once you start seeing help for lambda function creation, write the lambda function CDK code to look like ours:
	    # define lambda function that has inline code
        lambda_function = aws_lambda.Function(self, 'HelloWorldFunction',
            code=aws_lambda.Code.from_inline("""

def lambda_handler(event, context):
    showme = event['widgetContext']['forms']['all'].get('petType')
    # create a 2D array for pets and count
    data = [['puppy','10'],['bunny','5'],['kitten','6']]
    rowdata = ""
    for row in data:
        if (showme and showme==row[0]):
        # assume only 2 elements in the data
        rowdata += f'''
            <tr>
                <td>{row[0]}</td>
                <td>{row[1]}</td>
            </tr>'''
        response = f'''
            <p>Which pet do you want to see? valid inputs: puppy/bunny/kitten
                <form><input name="petType" value="{showme}" size="10"></form>
            </p>
            <table>
            <tr>
                <th>Pets</th>
                <th>Count</th>
            </tr>
    {rowdata}
            </table>
                <a class="btn btn-primary">Run query</a>
                <cwdb-action action="call" endpoint="{context.invoked_function_arn}"></cwdb-action>
    '''
    return response
                """
            ),
            description="CloudWatch Custom Widget sample: simple hello world",
            function_name=self.stack_name,
            handler='index.lambda_handler',
            memory_size=128,
            runtime=aws_lambda.Runtime.PYTHON_3_9,
            timeout=Duration.seconds(60)'
        )
You will notice CodeWhisperer making suggestions as you add your own inputs to customize your code. In this example we are creating a 2D array of pets count and asking the user to provide an input for what data to retrieve. You can change the data based on your use case.
- Start typing comments to create the first CloudWatch custom widget. That widget will use the code we write to ask for user input and provide a number of puppies as output:
# define custom widget to display lambda function
Using CodeWhisperer suggestions, write the CDK code to create a custom widget
	    # define custom widget to display lambda function
        my_custom_widget = aws_cloudwatch.CustomWidget(
        function_arn=lambda_function.function_arn,
        title="Hello, World!")
- Start typing comments to create a CloudWatch text widget:
# define a text widget that displays "Hello World"
As CodeWhisperer makes suggestions, complete the code for text widget:
	    # define a text widget that displays "Hello World"
        my_text_widget = aws_cloudwatch.TextWidget(markdown='# Hello World',
            width=6,
            height=2
        )
- Let’s start creating an S3 bucket that’s loaded with files from the assets folder:
	    # define parameter for s3 bucket name
        s3_bucket_name = f'helloworld-{self.account}'
        s3_file_name = 'HelloWorld.html'

        # define s3 bucket with account id as suffix for hello world with no public access
        s3_bucket = aws_s3.Bucket(self, "S3Bucket",
            versioned=False,
                block_public_access=aws_s3.BlockPublicAccess.BLOCK_ALL,
                encryption=aws_s3.BucketEncryption.KMS_MANAGED,
                auto_delete_objects=True,
                removal_policy=RemovalPolicy.DESTROY,
                bucket_name=s3_bucket_name
        )

        # define s3 bucket deployment to deploy files under assets folder
        aws_s3_deployment.BucketDeployment(self, "S3BucketDeployment",
                                sources=[aws_s3_deployment.Source.asset("assets")],
                                destination_bucket=s3_bucket
	)
- Let’s create a second lambda function that reads a file from an s3 bucket. We will create a related IAM role also.
	    # define IAM role for lambda that allows to read s3_file_name from s3 bucket with name s3_bucket_name
        s3GetObjectLambda_IAM_role = aws_iam.Role(self, "S3GetObjectLambda_IAM_role",
            assumed_by=aws_iam.ServicePrincipal("lambda.amazonaws.com"),
            inline_policies={
                "S3GetObjectLambda_IAM_role_policy": aws_iam.PolicyDocument(
                    statements=[
                        aws_iam.PolicyStatement(
                            actions=["s3:GetObject"],
                            effect=aws_iam.Effect.ALLOW,
                            resources=[
                                f'arn:aws:s3:::{s3_bucket_name}/{s3_file_name}'
                            ]
                        )
                    ]
                )
            }
        )

        # define lambda function S3GetObject
        s3GetObjectlambda_function = aws_lambda.Function(self, "S3GetObjectLambdaFunction",
            #inline code to read file from s3 bucket
            code=aws_lambda.Code.from_inline("""
import boto3
import json
import os

s3 = boto3.client('s3')
def lambda_handler(event, context):
    #read environment variable S3_BUCKET_NAME
    bucket = os.environ['S3_BUCKET_NAME']
    key = os.environ['S3_FILE_NAME']
    response = s3.get_object(Bucket=bucket, Key=key)
    file_content = response['Body'].read().decode('utf-8')

    return file_content
                """ ),
            runtime=aws_lambda.Runtime.PYTHON_3_9,
            handler="index.lambda_handler",
            timeout=Duration.seconds(60),
            memory_size=128,
            description="Lambda function that reads file from S3 bucket and returns file content",
            # define IAM role for S3GetObject
            role=s3GetObjectLambda_IAM_role,
            #environment variables
            environment={
                'S3_BUCKET_NAME': s3_bucket_name,
                'S3_FILE_NAME': s3_file_name
            },
            # define function name as s3GetObject
            function_name=f's3GetObject-{self.stack_name}'
        )
- Let’s create our second Custom widget:
	    # define s3GetObject custom widget to display s3GetObjectlambda_function
        s3GetObject_custom_widget = aws_cloudwatch.CustomWidget(
            function_arn=s3GetObjectlambda_function.function_arn,
            width=6,
            height=4)
- Now we will create a Cloudwatch dashboard that will host the 3 widgets we created. Start prompting CodeWhisperer with comments to create the code for a dashboard:
# define cloudwatch dashboard
When you get CodeWhisperer code suggestions, complete the code to create a dashboard that uses the widgets we created earlier:
	    # define CloudWatch dashboard
        dashboard = aws_cloudwatch.Dashboard(
            self, 'HelloWorldDashboard',
            dashboard_name='HelloWorldDashboard'
        )
- Finally add the 2 custom widgets and 1 text widget to the dashboard:
	    # add the 3 widgets to the dashboard
        dashboard.add_widgets(my_custom_widget)
        dashboard.add_widgets(my_text_widget)
        dashboard.add_widgets(s3GetObject_custom_widget)
Your code should look like our example below:
from aws_cdk import (
    Stack, Duration, aws_lambda, aws_cloudwatch, aws_s3, RemovalPolicy, aws_iam, aws_s3_deployment
)
from constructs import Construct
import os

class Sample1Stack(Stack):

    def __init__(self, scope: Construct, construct_id: str, **kwargs) -> None:
        super().__init__(scope, construct_id, **kwargs)

        cwd = os.getcwd()
        # define lambda function that has inline code
        lambda_function = aws_lambda.Function(self, 'HelloWorldFunction',
            code=aws_lambda.Code.from_inline(
                """
def lambda_handler(event, context):
    showme = event['widgetContext']['forms']['all'].get('petType')
    # create a 2D array for pets and count
    data = [['puppy','10'],['bunny','5'],['kitten','6']]
    rowdata = ""
    for row in data:
        if (showme and showme==row[0]):
            # assume only 2 elements in the data
            rowdata += f'''
                <tr>
                    <td>{row[0]}</td>
                    <td>{row[1]}</td>
                </tr>'''
    response = f'''
        <p>Which pet do you want to see? valid inputs: puppy/bunny/kitten
          <form><input name="petType" value="{showme}" size="10"></form>
        </p>
        <table>
            <tr>
                <th>Pets</th>
                <th>Count</th>
            </tr>
            {rowdata}
        </table>
        <a class="btn btn-primary">Run query</a>
        <cwdb-action action="call" endpoint="{context.invoked_function_arn}"></cwdb-action>
        '''
    return response
"""
            ),
            # code=aws_lambda.Code.from_asset(os.path.join(cwd, "lambdafolder/package.zip"))
            description="CloudWatch Custom Widget sample: simple hello world",
            function_name=self.stack_name,
            handler='index.lambda_handler',
            memory_size=128,
            runtime=aws_lambda.Runtime.PYTHON_3_9,
            timeout=Duration.seconds(60)
        )

        # define a CustomWidget that uses the Lambda function
        my_custom_widget = aws_cloudwatch.CustomWidget(
            function_arn=lambda_function.function_arn,
            title="Hello, World!")

        # define a text widget that displays "Hello World"
        my_text_widget = aws_cloudwatch.TextWidget(markdown='Hello World',
            width=6,
            height=2
        )

        # define parameter for s3 bucket name
        s3_bucket_name = f'helloworld-{self.account}'
        s3_file_name = 'HelloWorld.html'
        # define s3 bucket with account id as suffix for hello world with no public access
        s3_bucket = aws_s3.Bucket(self, "S3Bucket",
            versioned=False,
            block_public_access=aws_s3.BlockPublicAccess.BLOCK_ALL,
            encryption=aws_s3.BucketEncryption.KMS_MANAGED,
            auto_delete_objects=True,
            removal_policy=RemovalPolicy.DESTROY,
            bucket_name=s3_bucket_name
        )

         # define s3 bucket deployment to deploy files under assets folder
        aws_s3_deployment.BucketDeployment(self, "S3BucketDeployment",
                                sources=[aws_s3_deployment.Source.asset("assets")],
                                destination_bucket=s3_bucket
        )

        # define IAM role for lambda that allows to read s3_file_name from s3 bucket with name s3_bucket_name
        s3GetObjectLambda_IAM_role = aws_iam.Role(self, "S3GetObjectLambda_IAM_role",
            assumed_by=aws_iam.ServicePrincipal("lambda.amazonaws.com"),
            inline_policies={
                "S3GetObjectLambda_IAM_role_policy": aws_iam.PolicyDocument(
                    statements=[
                        aws_iam.PolicyStatement(
                            actions=["s3:GetObject"],
                            effect=aws_iam.Effect.ALLOW,
                            resources=[
                                f'arn:aws:s3:::{s3_bucket_name}/{s3_file_name}'
                            ]
                        )
                    ]
                )
            }
        )

        # define lambda function S3GetObject
        s3GetObjectlambda_function = aws_lambda.Function(self, "S3GetObjectLambdaFunction",
            #inline code to read file from s3 bucket
            code=aws_lambda.Code.from_inline("""
import boto3
import json
import os

s3 = boto3.client('s3')
def lambda_handler(event, context):
    #read environment variable S3_BUCKET_NAME
    bucket = os.environ['S3_BUCKET_NAME']
    key = os.environ['S3_FILE_NAME']
    response = s3.get_object(Bucket=bucket, Key=key)
    file_content = response['Body'].read().decode('utf-8')

    return file_content
                """ ),
            runtime=aws_lambda.Runtime.PYTHON_3_9,
            handler="index.lambda_handler",
            timeout=Duration.seconds(60),
            memory_size=128,
            description="Lambda function that reads file from S3 bucket and returns file content",
            # define IAM role for S3GetObject
            role=s3GetObjectLambda_IAM_role,
            #environment variables
            environment={
                'S3_BUCKET_NAME': s3_bucket_name,
                'S3_FILE_NAME': s3_file_name
            },
            # define function name as s3GetObject
            function_name=f's3GetObject-{self.stack_name}'
        )

        # define s3GetObject custom widget to display s3GetObjectlambda_function
        s3GetObject_custom_widget = aws_cloudwatch.CustomWidget(
            function_arn=s3GetObjectlambda_function.function_arn,
            width=6,
            height=4,
            title="S3 Get Object"
        )

        # define a CloudWatch dashboard
        dashboard = aws_cloudwatch.Dashboard(
            self, 'HelloWorldDashboard',
            dashboard_name='HelloWorldDashboard'
        )

        # add the 3 widgets to the dashboard
        dashboard.add_widgets(my_custom_widget)
        dashboard.add_widgets(my_text_widget)
        dashboard.add_widgets(s3GetObject_custom_widget)
- Verify the code:
In the Visual Studio Code terminal window run:
cdk ls
- Deploy the code:
In the Visual Studio Code terminal window run:
cdk deploy
- You should now have the following resources deployed:
- 2 Lambda functions
- Cloudwatch dashboard with 3 widgets:
- 1 Text widget
- 2 CustomWidget connected to Lambda
- 1 Custom widget that can read from S3 html file
- 1 Custom widget that is asking for a user input and getting related value from lambda
You can try creating other widgets from this link: Creating Dashboard and widgets
Cleaning up
To avoid incurring future charges, delete the resources by running the following command in Visual Studio Code terminal window:
cdk destroy
Conclusion
In this post. you learned how to use Amazon CodeWhisperer to write CDK code to create CloudWatch Dashboards. As you can see CodeWhisperer goes beyond improving developer productivity: it gets more done faster, it accelerates software development, provide suggestions that reduces total development effort and allow more time for ideation, complex problem solving. You can read more in the CodeWhisperer Documentation.