AWS Cloud Operations Blog
Creating ServiceNow incidents for AWS License Manager notifications
AWS License Manager streamlines the process of managing software licenses from software vendors like Microsoft, Oracle, IBM, SAP, and others across AWS and in on-premises environments. Administrators can create customized licensing rules that AWS License Manager enforces when Amazon Elastic Compute Cloud (Amazon EC2) instances are launched. This helps you prevent licensing violations by stopping the instances from launching or by notifying administrators. Administrators have complete visibility of their licenses. License Manager reduces the risk of noncompliance, misreporting, and additional costs due to licensing overages.
ServiceNow is an AWS Partner Network (APN) Advanced Technology Partner with AWS Public Sector Competencies. ServiceNow gives enterprises complete visibility of their entire IT environment, including virtualized and cloud infrastructure. ServiceNow also simplifies service mapping, delivery, and assurance, consolidating IT service and infrastructure data into a single system of record.
The IT Service Management (ITSM) solution from ServiceNow can be used to log incidents, classify them by impact and urgency, assign them to appropriate groups, and escalate, resolve, and report them. Now customers can associate License Manager notifications and alerts with ITSM.
In this blog post, I show you how to set up, configure, and send License Manager notifications and alerts to ITSM using Amazon Simple Notification Service (Amazon SNS). I also discuss how to test your configuration setup with a sample EC2 instance.
Services used in this post
Prerequisites
To follow the steps in this post, you need the following:
- An AWS account
- Access to AWS License Manager with permissions to manage applications.
- A ServiceNow account with permissions to configure ITSM.
Step 1: Configure ServiceNow
If you already have a free ServiceNow developer instance, you can use it. Otherwise, follow these steps to create one.
- Sign in to the ServiceNow developer site and request a developer instance.
- Sign in to the developer instance as an administrator. Be sure to remember your credentials because you’ll need them later when you configure SNS topic subscription URLs.
- Clone this GitHub repository into your own GitHub account as a private repo (for example, https://github.com/shashivj/x_snc_aws_sns). Go to Profile, choose Your Own Repositories, choose New, and then click the link to import the repository.
- In ServiceNow, go to System Applications, choose Studio, and then choose Import From Source Control.
- On Import Application, enter the URL of the newly created repo, your user name and password, and then choose Import.
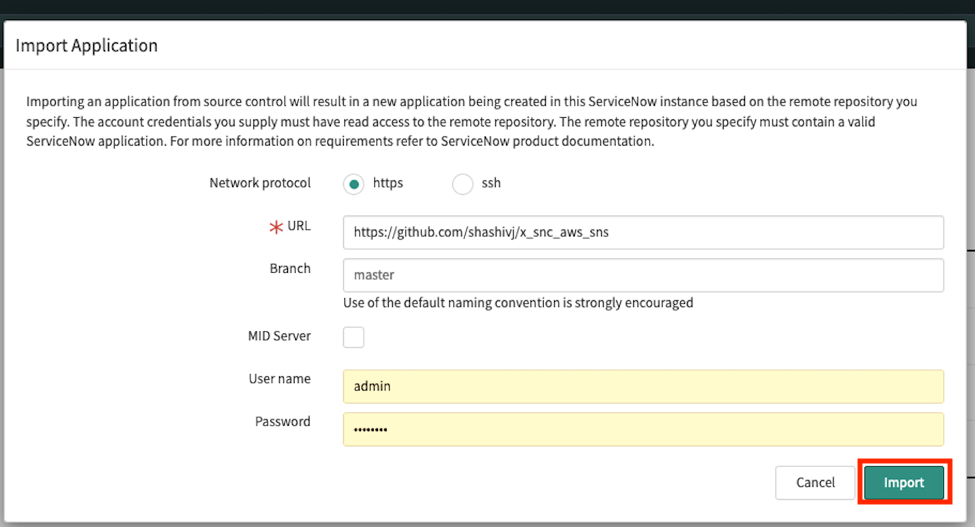
Figure 1: Import Application in ServiceNow
If the import is successful, the a Success message is displayed.
- Close the Studio browser tab.
- Refresh your ServiceNow browser tab, and in the search box, search for “SNS”. You can find three new navigation links in the left pane. In the following image, AWS SNS refers to the app name, not to Amazon SNS.
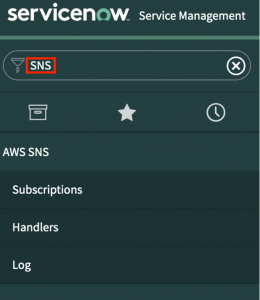
Figure 2: ServiceNow search Navigator
Step 2: Create an SNS topic and subscription
- Sign in to the Amazon SNS console.
- In the left navigation pane, choose Topics, and then choose Create new topic.
- Enter a name and display name, “aws-license-manager-service-admin-notifications”, for your topic. License Manager requires the topic name in this format: aws-license-manager-<custom suffix>.
- Choose Create Topic.
- Choose the Amazon Resource Name (ARN) link for the topic you just created. Be sure to copy the ARN because you will need it later.
- Choose Create subscription.
- For Protocol, choose HTTPS.
- For Endpoint, use the admin password you received when you requested the free ServiceNow developer instance, and then choose the following link: https://admin:<ServiceNow admin password>@<your developer instance>.service-now.com/api/x_snc_aws_sns/aws_sns
- Choose Create subscription.
- Under Subscriptions, you should see Pending confirmation displayed next to your subscription.
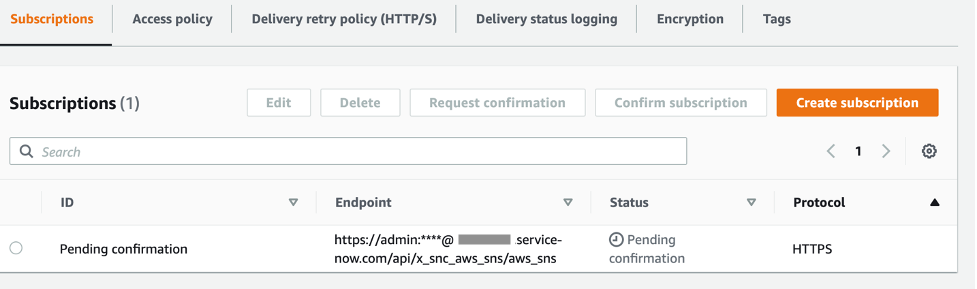
Figure 3: Subscriptions tab of the Amazon SNS console
Step 3: Confirm Amazon SNS subscription on ServiceNow
Before Amazon SNS can send messages to ServiceNow, you must confirm the subscription on ServiceNow. At this point, AWS has already sent a handshake request, and it is awaiting confirmation from your ServiceNow instance.
- On your ServiceNow browser tab, go to SNS, and then choose Subscriptions. You should see that a new record has been created by AWS.

Figure 4: Subscription in ServiceNow
- Choose the aws-license-manager-service-admin-notifications link to open it, and then choose Confirm Subscription.
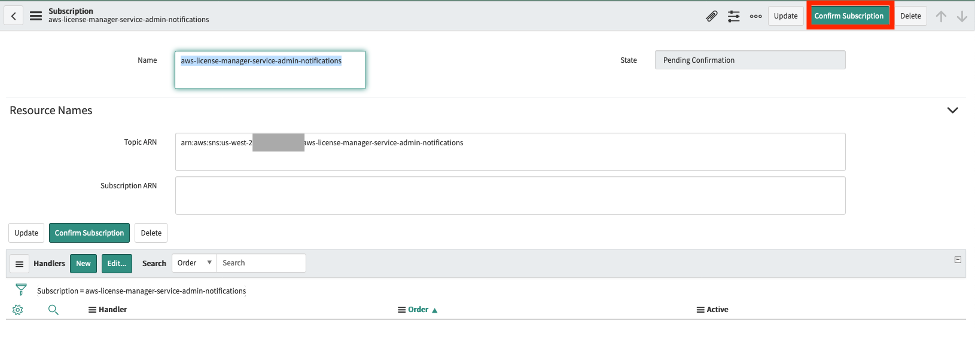
Figure 5: Subscription confirmation in ServiceNow
Stay on this page because you will need to create a handler next.
When Amazon SNS sends an alarm, we want to open an incident when License Manager sends a notification. ServiceNow provides a handler script that is invoked when Amazon SNS sends an alarm message.
- To configure a handler, on the Subscription page, in the Handlers section, choose New.
- Enter a name for the handler, such as “aws-license-manager-service-admin-notifi”.
- At line 3, inside the function, paste the following JavaScript code:
var incident = new GlideRecord("incident");
	incident.initialize();
	incident.short_description = "License Manager Amazon SNS Alarm";
	incident.description = JSON.stringify(message);
	incident.insert();
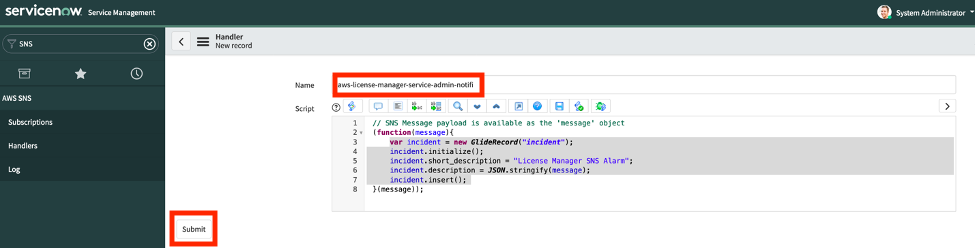
Figure 6: JavaScript code pasted at line 3
- Choose Submit to save the handler. Don’t close the browser. We will come back to it later.
Step 4: Configure AWS License Manager
- Sign in to the AWS License Manager console.
- In the left navigation pane, choose Settings, and then choose Edit.
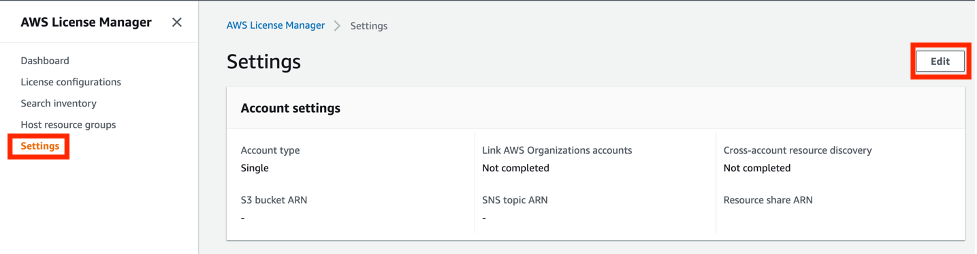
Figure 7: Settings page of AWS License Manager console
- Under Simple Notification Service, enter the SNS topic ARN created in Step 2.
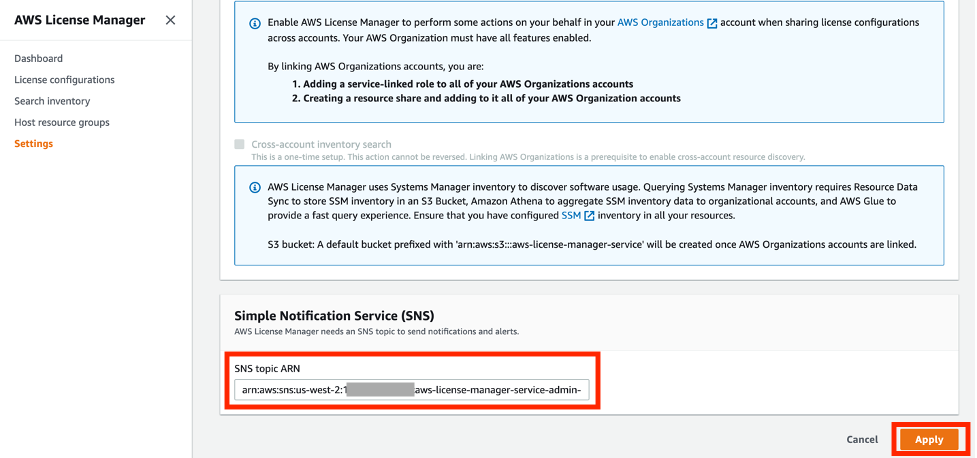
Figure 8: SNS topic ARN in AWS License Manager console
- Choose Apply. The success message will be displayed, “Your settings have been saved successfully.“
- In the left navigation pane, choose License configurations.
- On the Create license configuration page, do the following:
- Enter a name and optional description.
- From License type, choose vCPUs.
- For Number of vCPUs, enter 4.
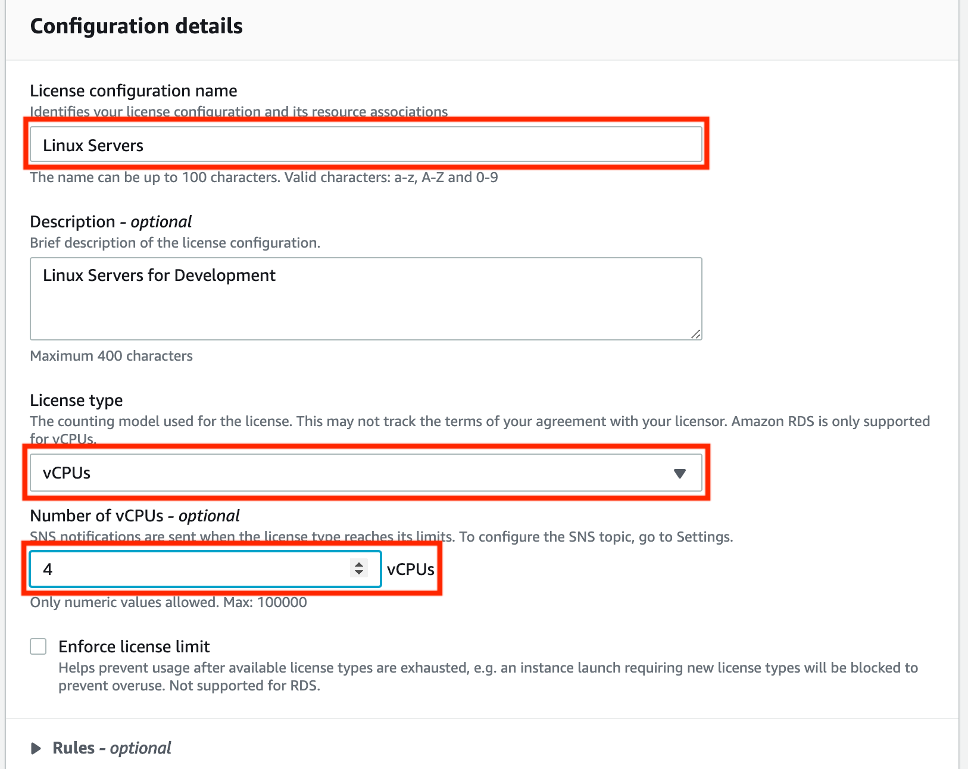
Figure 9: Details for the Linux Servers license configuration
- Keep the other fields blank, and then choose Submit. The success message will be displayed, “Linux Servers was successfully created.”
Step 5: Test License Manager notifications
To test this integration, we create an EC2 instance and then use it to create an AMI. We then associate this AMI with the license configuration (Linux servers) we created. Finally, we launch a new EC2 instance with this AMI with a vCPU of more than 4 so it triggers an Amazon SNS alarm. The alarm, in turn, creates an incident in the ITSM table.
- Sign in to the Amazon EC2 console, and choose Launch instance.
- On Choose AMI, choose Amazon Linux AMI.
- On Choose an Instance Type, select t2.micro. A t2.micro instance type has 1 vCPUs and 1 GiB of memory.
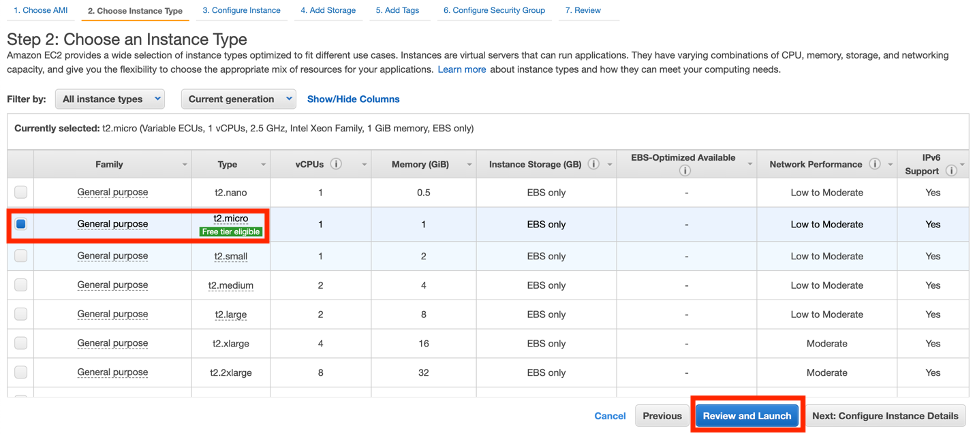
Figure 10: Choose an Instance Type page of the Amazon EC2 console
- Choose Review and Launch.
- On the Review Instance Launch page, choose Launch.
- On Select an existing key pair or create a new key pair, choose Proceed without a key pair. Select the I acknowledge that I will not be able to connect to this instance unless I already know the password build into this AMI check box. Choose Launch Instances.
- Launch Status page is displayed, choose View Instances.
- EC2 Instances page is displayed. After the instance is in a running state, choose the instance.
- From the Actions menu, choose Image, and then choose Create image.

Figure 11: Instances page of the Amazon EC2 console
- In Create image, for Image name, enter “Linux Image”. Enter an optional description, and then choose Create image.
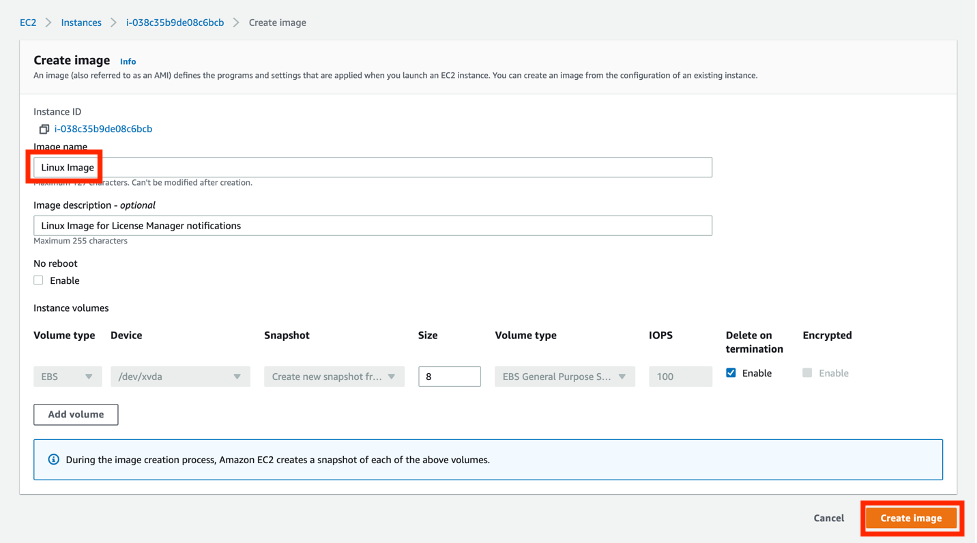
Figure 12: Create image section of the Amazon EC2 console
- If there are no errors, a success message is displayed, “Successfully created ami-xxxxx from instance i-xxxxxxx.“
- In the left navigation pane, under Images, choose AMIs. You can find our new image, Linux Image displayed.
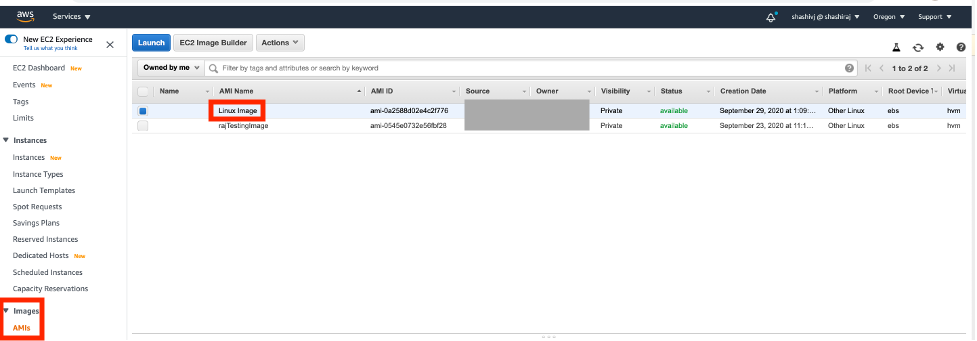
Figure 13: New image displayed on the AMIs page of the Amazon EC2 console
Keep this browser open. We will come back to it later to launch the instance.
- Open another browser window, navigate to the AWS License Manager console, and from the left navigation pane, choose License configurations.
- Choose Linux Servers, and from the Actions menu, choose Associate AMI.
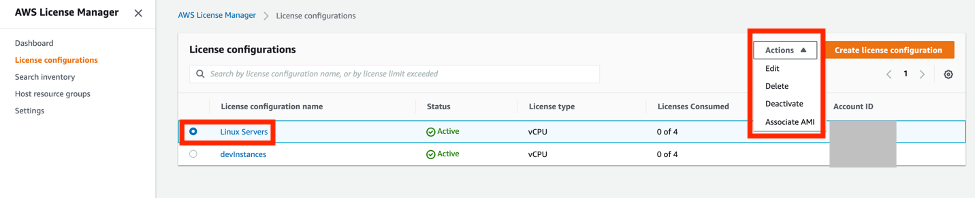
Figure 14: License configurations page showing Actions menu
- On the Associate Linux Servers with AMI page, choose the Linux Image AMI, and then choose Associate.
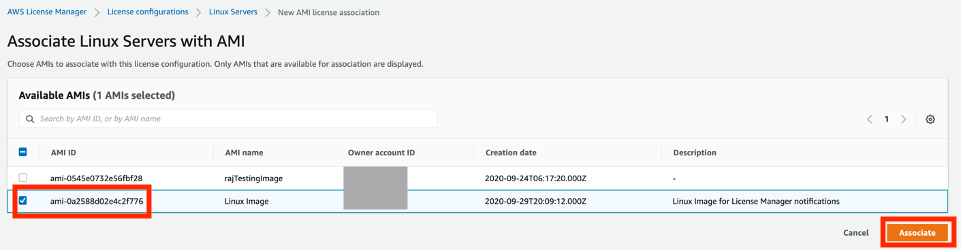
Figure 15: Linux AMI image for License Manager notifications
- A success message is displayed, “Successfully Associated“.
- Go back to the Amazon EC2 console.
- On the AMIs page, choose Linux Image, and then choose Launch.
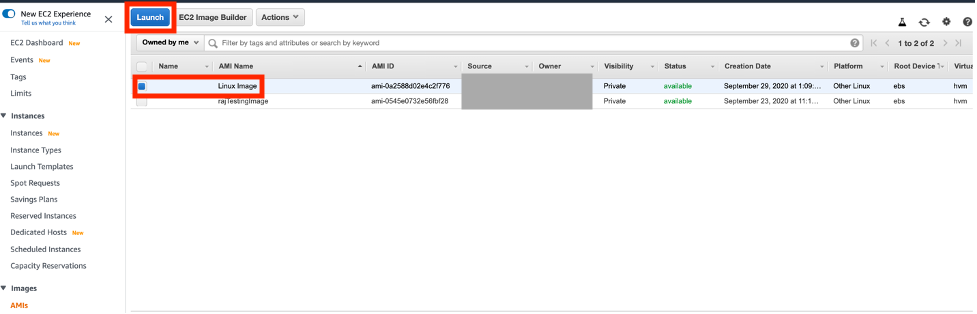
Figure 16: AMIs page with Linux Image selected
- On Choose an Instance Type, make sure t2.micro is selected, and from the top of the page, choose Configure Instance.
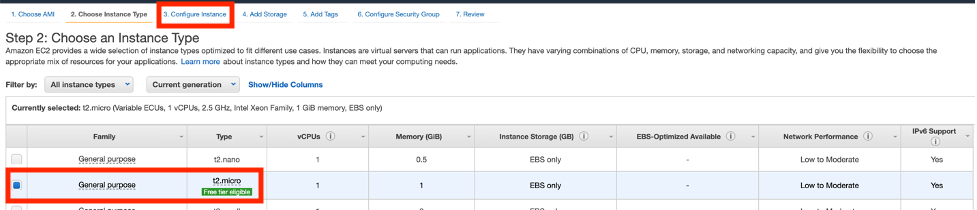
Figure 17: Choose an Instance Type page
- On Configure Instance Details, for Number of instances, enter 5, and then choose Review and Launch.
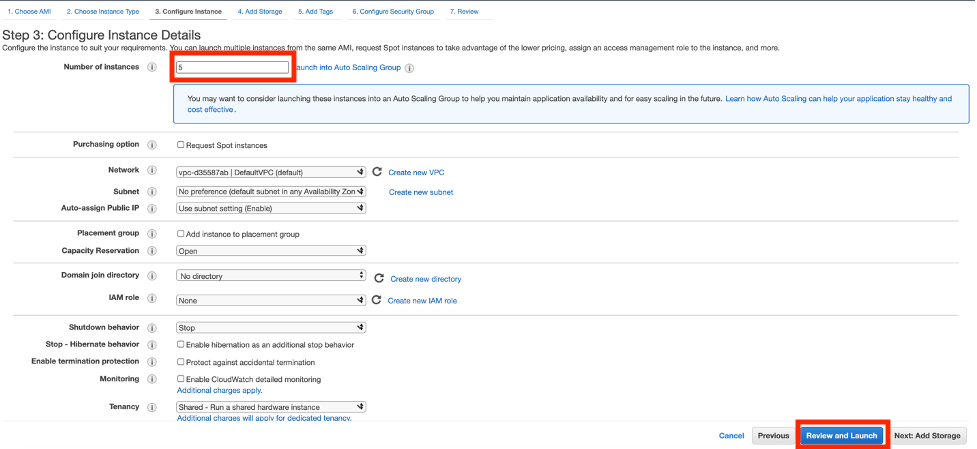
Figure 18: Configure Instance Details page
- On Review Instance Launch, choose Launch.
- On Select an existing key pair or create a new key pair, choose Proceed without a key pair. Then select the I acknowledge that I will not be able to connect to this instance unless I already know the password build into this AMI check box. Choose Launch Instances.
- On Launch Status, choose View Instances.
- Check the Instances page to confirm that the instance is running.
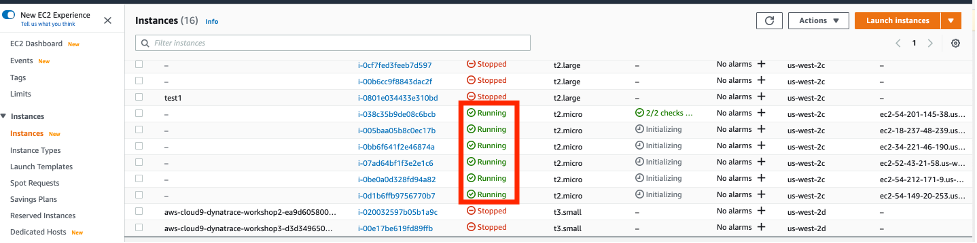
Figure 19: Instances page of the Amazon EC2 console
- On your ServiceNow browser tab, in the search field, enter “incidents”. Under Service Desk, choose Incidents.
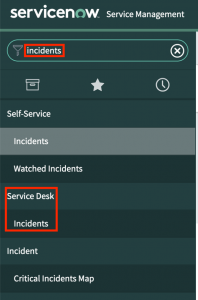
Figure 20: ServiceNow search Navigator
- If a new incident appears, then you have successfully created a ServiceNow incident for the License Manager SNS alarm. You can define a workflow to route the incident to any person or group responsible for addressing it.

Figure 21: License Manager SNS Alarm displayed as an incident in ServiceNow
- Go back to the License Manager console and choose Dashboard. In the Overview section, you can find that there is one usage limit alert. Choose the View exceeded license configurations link.
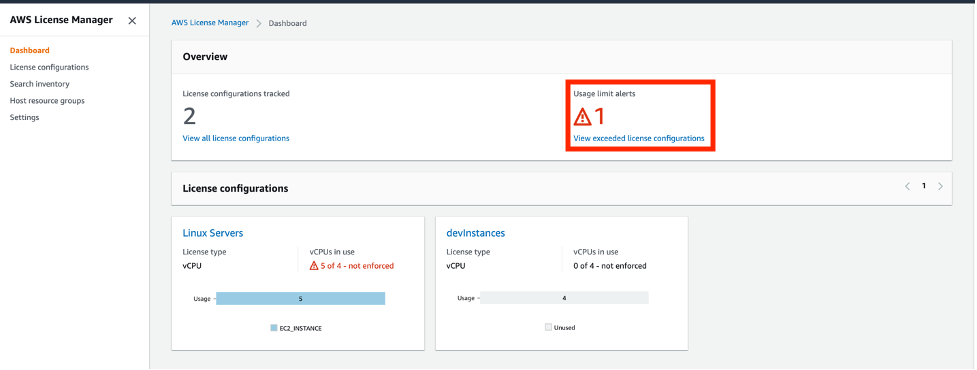
Figure 22: Usage limit alert displayed in the AWS License Manager console
- On the License configurations page, under Licenses Consumed, you can find 5 of 4 have been consumed.

Figure 23: Licenses Consumed displayed on the License configurations page
Conclusion
In this post, I showed you how to configure AWS License Manager to send notifications and alerts to ServiceNow using Amazon SNS.
You can extend this setup to any Amazon SNS topic that notifies ServiceNow whenever anything meaningful happens in your AWS Cloud environment. In the ServiceNow Amazon SNS handlers, you can create any type of ServiceNow record you like. It can trigger an automated workflow or create events, alerts, or notifications. It can also update a configuration management database (CMDB), or even automatically orchestrate a remediation.
To learn more about AWS License Manager, check the AWS License Manager documentation. If you have any questions, post them on Amazon Elastic Compute (EC2) service forum.
About the author

Shashiraj Jeripotula(Raj) is a San Francisco-based Sr. Partner Solutions Architect at AWS. He works with various Independent Software Vendors(ISVs), and partners who specialize in Cloud Management Tools and DevOps to develop joint solutions and accelerate cloud adoption on AWS. While he’s not at work, Raj works with charities that provide education, food, and health support for kids.