AWS Cloud Operations Blog
Use metric name filters in Amazon CloudWatch Metric Streams for finer grained control
Amazon CloudWatch Metric Streams now supports filtering by metric name. This blog will show you how to gain finer control over the metrics you want to stream using Include and Exclude metric name filters in Metric Streams.
Amazon CloudWatch Metric Streams simplifies the way you collect and analyze metric data by providing continuous, near-real-time streams of Amazon CloudWatch metrics to a destination of your choice. You can use metric streams to send metrics to AWS Partner Solutions, including Datadog, Dynatrace, New Relic, Splunk, and Sumo Logic. Alternatively, you can send metrics to your data lake built on AWS, such as to Amazon Simple Storage Service (Amazon S3). You can create a continuous, scalable stream that includes the most up-to-date CloudWatch metrics to power dashboards, alarms, and other tools that rely on accurate and timely metric data.
Traditionally, customers and AWS Partners relied on polling CloudWatch APIs to retrieve metrics that power all sorts of monitoring, alerting, and cost management tools. Since the introduction of Metric Streams in 2021, customers had an alternative way to create low-latency scalable streams of metrics. At launch, Metric Streams included the ability to filter metrics at a namespace level; for example, to include or exclude all metrics from a specific namespace. However, some customers wanted the ability to filter at a more granular level. That’s where Metric Name Filtering in Metric Streams comes into play, addressing the need for more precise filtering capabilities.
Customers want the flexibility to be fast and specific based on their use case and needs when streaming their metrics. To address the customer need of being more specific on what metrics to stream, CloudWatch Metrics Streams added support for filtering by metric name in May 2023 (Amazon CloudWatch Metric Streams adds support for filtering by metric name). This additional filtering capability provides specific metric name selection in addition to the existing option to filter metrics by namespace. You can now select what metrics to include or exclude for each streamed namespace. Now Metric Streams gives customers both things: The low latency and reduced operational overhead already offered by Metric Streams, plus the additional specific control to choose what specific metric names to stream. As Metric Streams pricing is based on the quantity of Metric Stream updates being egressed, metric name filtering is also a great mechanism for finer cost control. For more information, see Amazon CloudWatch pricing.
Metric Streams Filtering by Metric Name: Include Vs Exclude
The filtering by metric name feature of Metric Streams allows you to choose a list of metrics to include or exclude from the stream for each metric namespace. The “Include” and “Exclude” are mutually exclusive, you can’t have both in a single stream. However, both types of filters provide valuable additional control over your streamed metrics depending on your use case.
The “Include” filters have the benefit of allowing you to exactly choose what metrics to stream. However, it requires you to maintain an updated list of metric names you need, and you will not automatically receive any new metric added by AWS services unless you manually update your list of included metric names.
In contrast, the “Exclude” filters have the benefit of maintaining a likely shorter list of metrics you don’t want and also the fact that you will automatically receive any new metrics added to your streamed namespaces with no further action.
Additionally, Metric Streams allows you to create metric name filters on metrics that may not exist yet in your AWS account. For example, you may know your application will produce metrics from the “AWS/EC2” namespace, but that application might not have been deployed yet in that account. If that is the case, those metrics will not exist yet in your CloudWatch account.
The drop-down selectors in the Metric Streams console will only show metrics that currently exist in CloudWatch. However, the CloudWatch Metric Streams console allows you to free type whatever combination of namespace and metric names you might need for your filters, allowing you to create filters on metrics that may not exist. Likewise, you can also create metric name filters on non-existing metrics via AWS CloudFormation. The same applies to custom metrics and namespaces. This functionality is further explained in the following walkthrough.
Walkthrough using the AWS Management Console
In this section, we will demonstrate how you can gain finer control over metrics you want to stream using include and exclude metric name filters using console.
Steps to use “Include” metric name filter while creating Metric Stream:
1. Open the Amazon CloudWatch console.
2. In the navigation pane, choose Metrics Streams. Then choose Create metric stream.
3. Under Select namespaces you wish to stream section, choose Selected namespaces and then select the namespaces to include to include only a few metric namespaces in the metric stream.
4. Under the Select metrics for the metric stream, choose Include metrics by metric name. Specify each metric to include by selecting its namespace and then its metric name. As mentioned above, the console will only show metrics that currently exist in CloudWatch. For that reason, some or all of the metrics shown in the below screenshot may not show in your console, depending on what resources you have deployed in your account at the moment.
However, you can still add the filters shown in this example by free typing the namespace and metric names in their respective drop-down menus. After you select one metric, you can repeat this step to include another metric from the same namespace or a different one.
If you don’t select any metric name for one of your included namespaces, then all metrics from that namespace will be included in the metric stream.
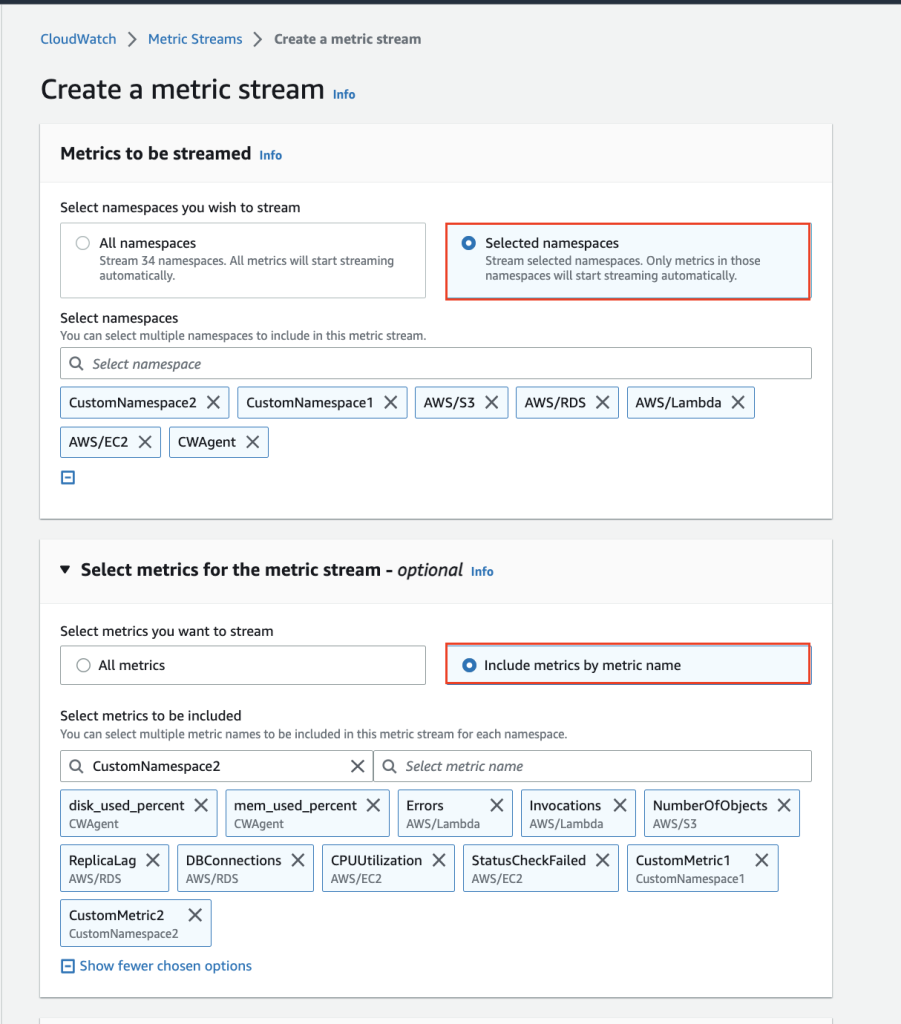
Figure 1: Stream creation using include metric name filters
5. Under Configuration section, select Quick S3 setup option.
6. Keep the rest of the configuration as default and then choose Create metric stream button. Your stream with the desired filters will be created in a few seconds.
Steps to use “Exclude” metric name filters while creating a Metric Stream
Now you are going to create a completely new stream, but this time using “Exclude” metric name filters. These steps are independent from the previous section about “Include” filters.
1. Open the Amazon CloudWatch console.
2. In the navigation pane, choose Metrics Streams. Then choose Create metric stream.
3. To demonstrate the “Exclude” use case, we will exclude multiple metrics across different namespaces. For that, select “All namespaces” under the Select namespaces you wish to stream section.
4. In the “Select metrics for the metric stream” section, choose the option to “Exclude metrics by metric name”. Specify each metric to exclude by selecting its namespace and then its metric name.
Similar to the “Include” example before, some or all of the metrics shown in the screenshot below for this particular example may not show in your console, depending on the existence of those metrics in your CloudWatch account. However, you can still add the filters shown in this example by free typing the namespace and metric names in their respective drop-down menus.
After you select one metric, you can repeat this step to exclude another metric from the same namespace or a different one. You can check Figure 2 for further reference.
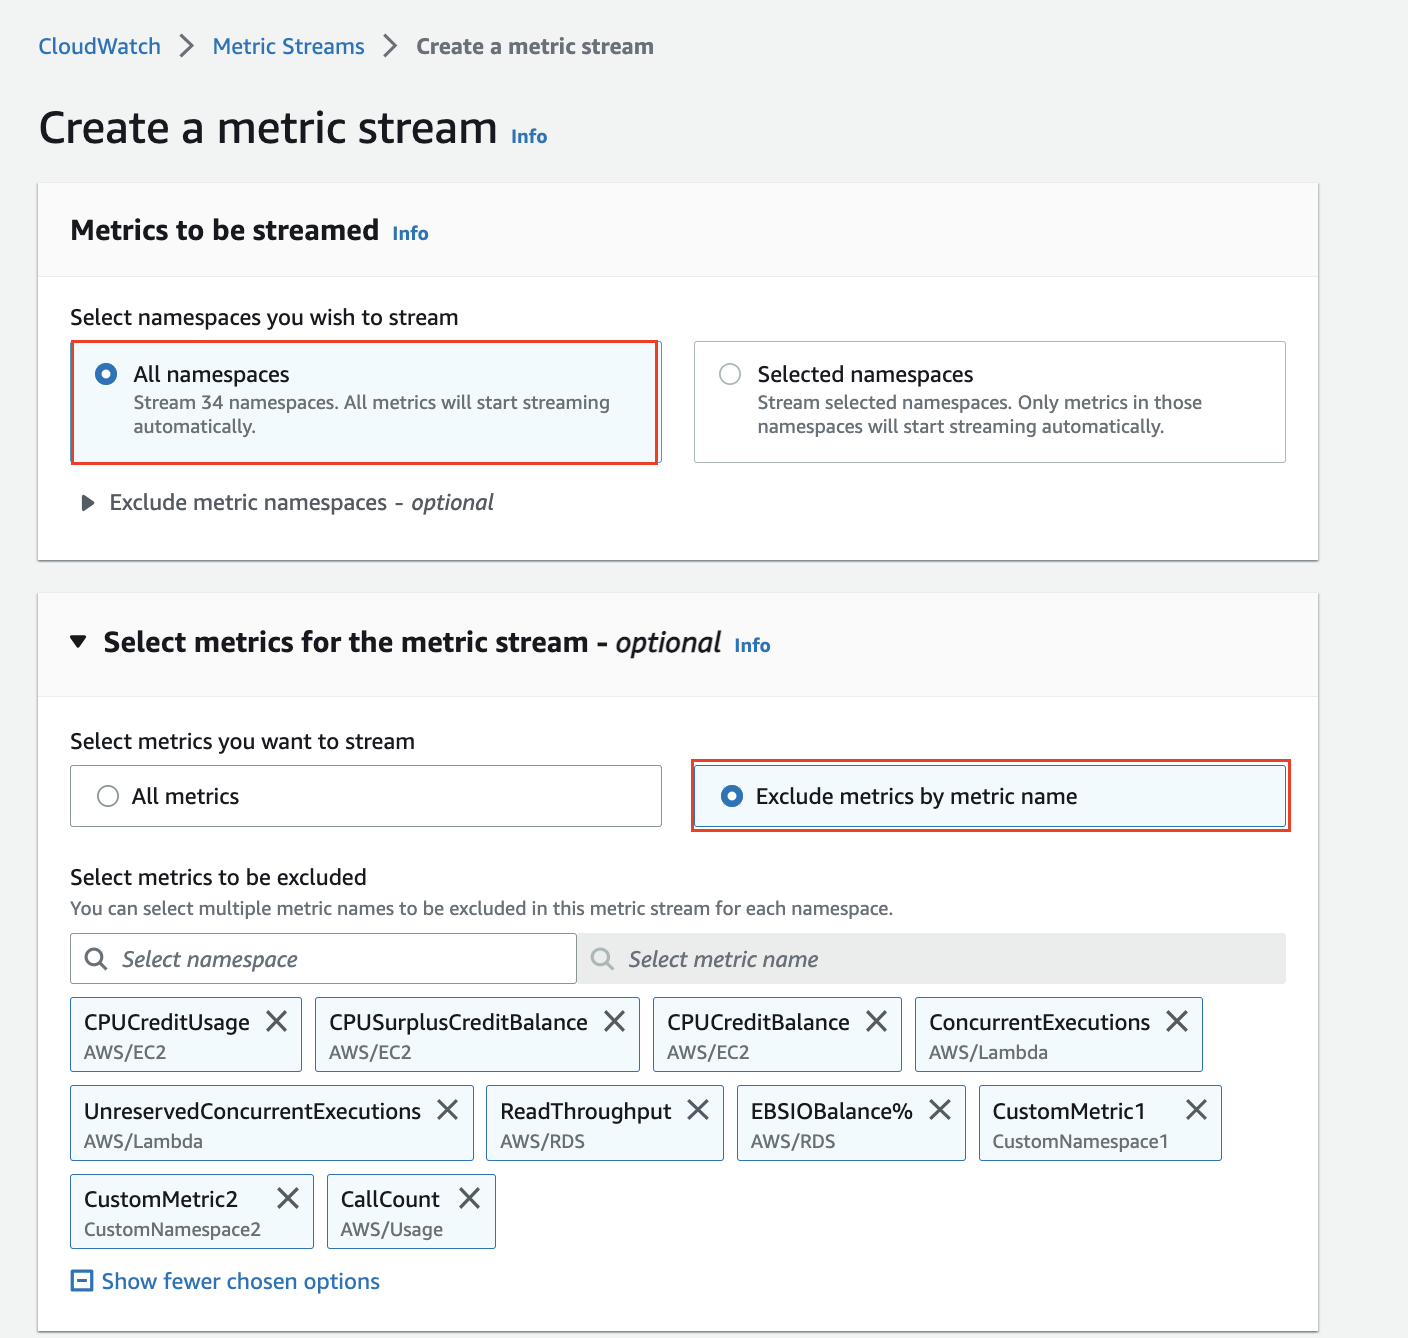
Figure 2: Stream creation using exclude metric name filters from a specific namespace
5. Under Configuration section select Quick S3 setup option.
6. Keep the rest of the configuration as default and then choose Create metric stream button. Your stream with the desired filters will be created in a few seconds.
Now we will explore another use case for “Exclude” filters where we exclude a subset of namespaces entirely and then specify certain metric names to exclude from the remaining namespaces. The steps to configure this remain the same as explained above. The only additional configuration you need to add is to expand the optional menu “Exclude metric namespaces” and select the namespaces to be excluded entirely as shown in Figure 3.
In Figure 3 below, we demonstrate the exclusion of two namespaces entirely (AWS/Usage and AWS/Billing), resulting in no metrics being streamed from these namespaces. Additionally, we can exclude specific metrics from the other namespace by selecting “Exclude metric by metric name” in the optional menu “Select metrics for the metric stream”.
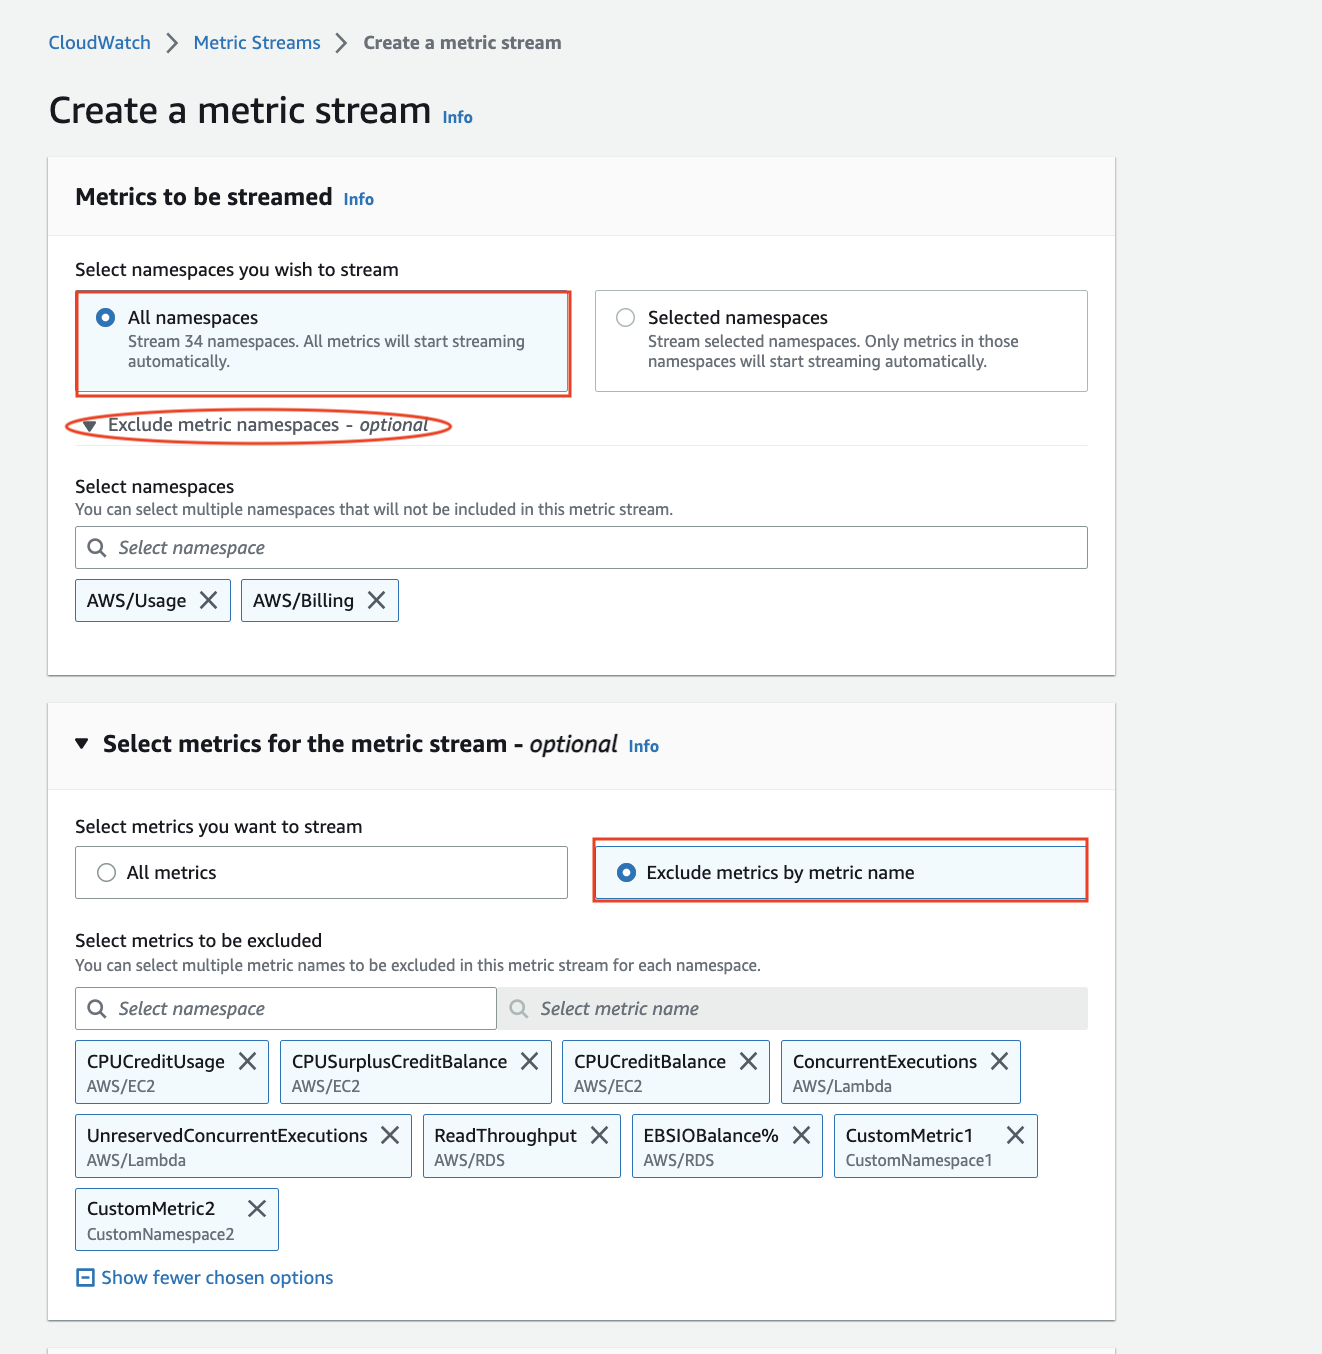
Figure 3: Example showing how to exclude namespaces fully and specific metrics from the remaining namespaces
Viewing metrics stream details and metric data being streamed to Amazon S3 destination
You can open the newly created metric streams by selecting the specific metric stream in the CloudWatch Metric Streams console, and then choose View details button as shown below:
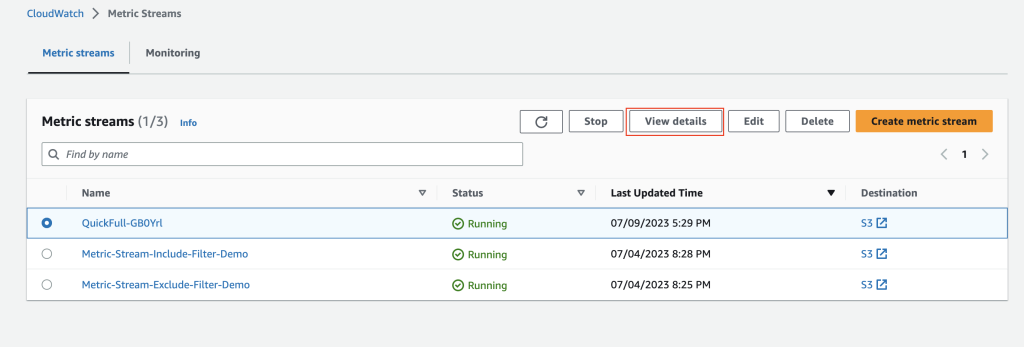
Figure 4: Metric Stream console page
You can check the implemented metric name filters by scrolling down on the same page under “Selected metrics” section, as shown in the screenshot below.
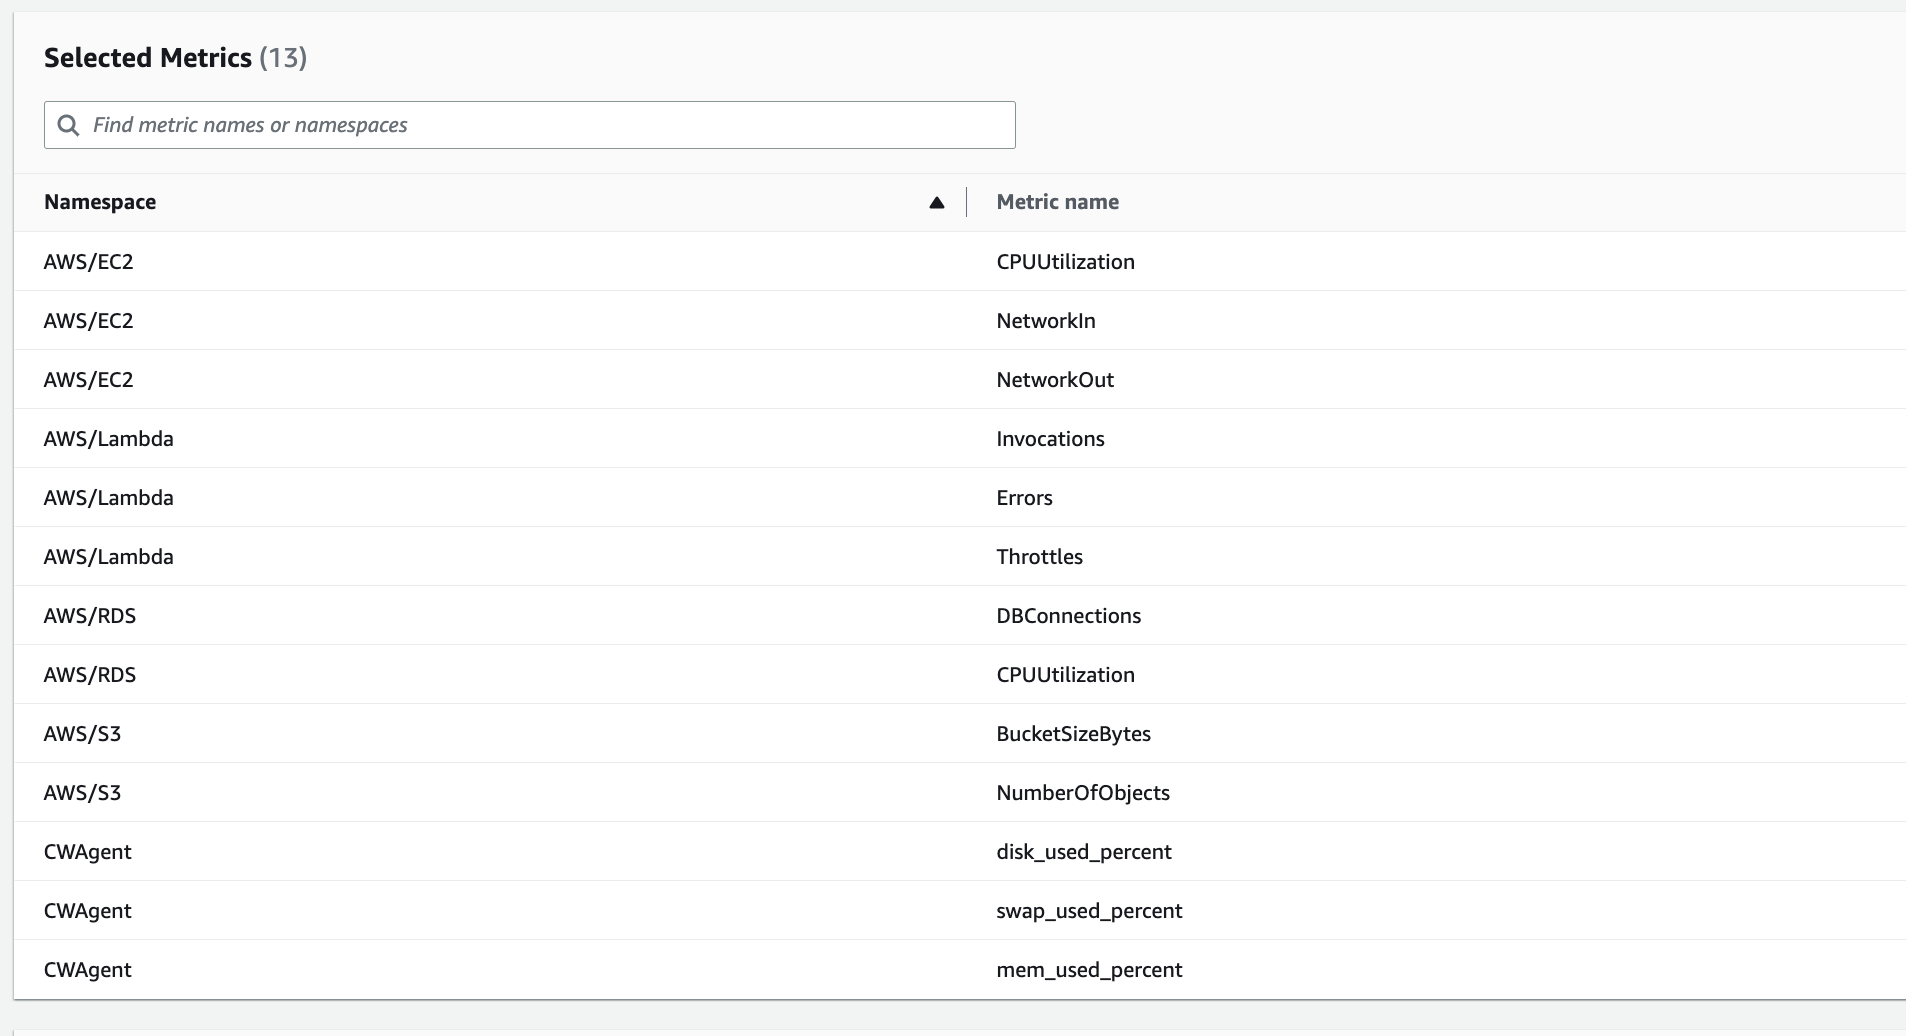
Figure 5: Implemented metric name filters in the metric stream detail page
CloudWatch Metric Streams will create the following resources on your behalf when you create the stream using the console:
- An Amazon S3 bucket: Destination for Kinesis Firehose delivery stream
- Amazon S3 write role: Role to allow a firehose write an Amazon S3 bucket
- Firehose write role: Role to allow a metric stream put metrics into a firehose
- Kinesis Firehose: Delivery stream to which metrics would be pushed
You can view the associated resources created in the metric stream detail page, as shown in the screenshot below.
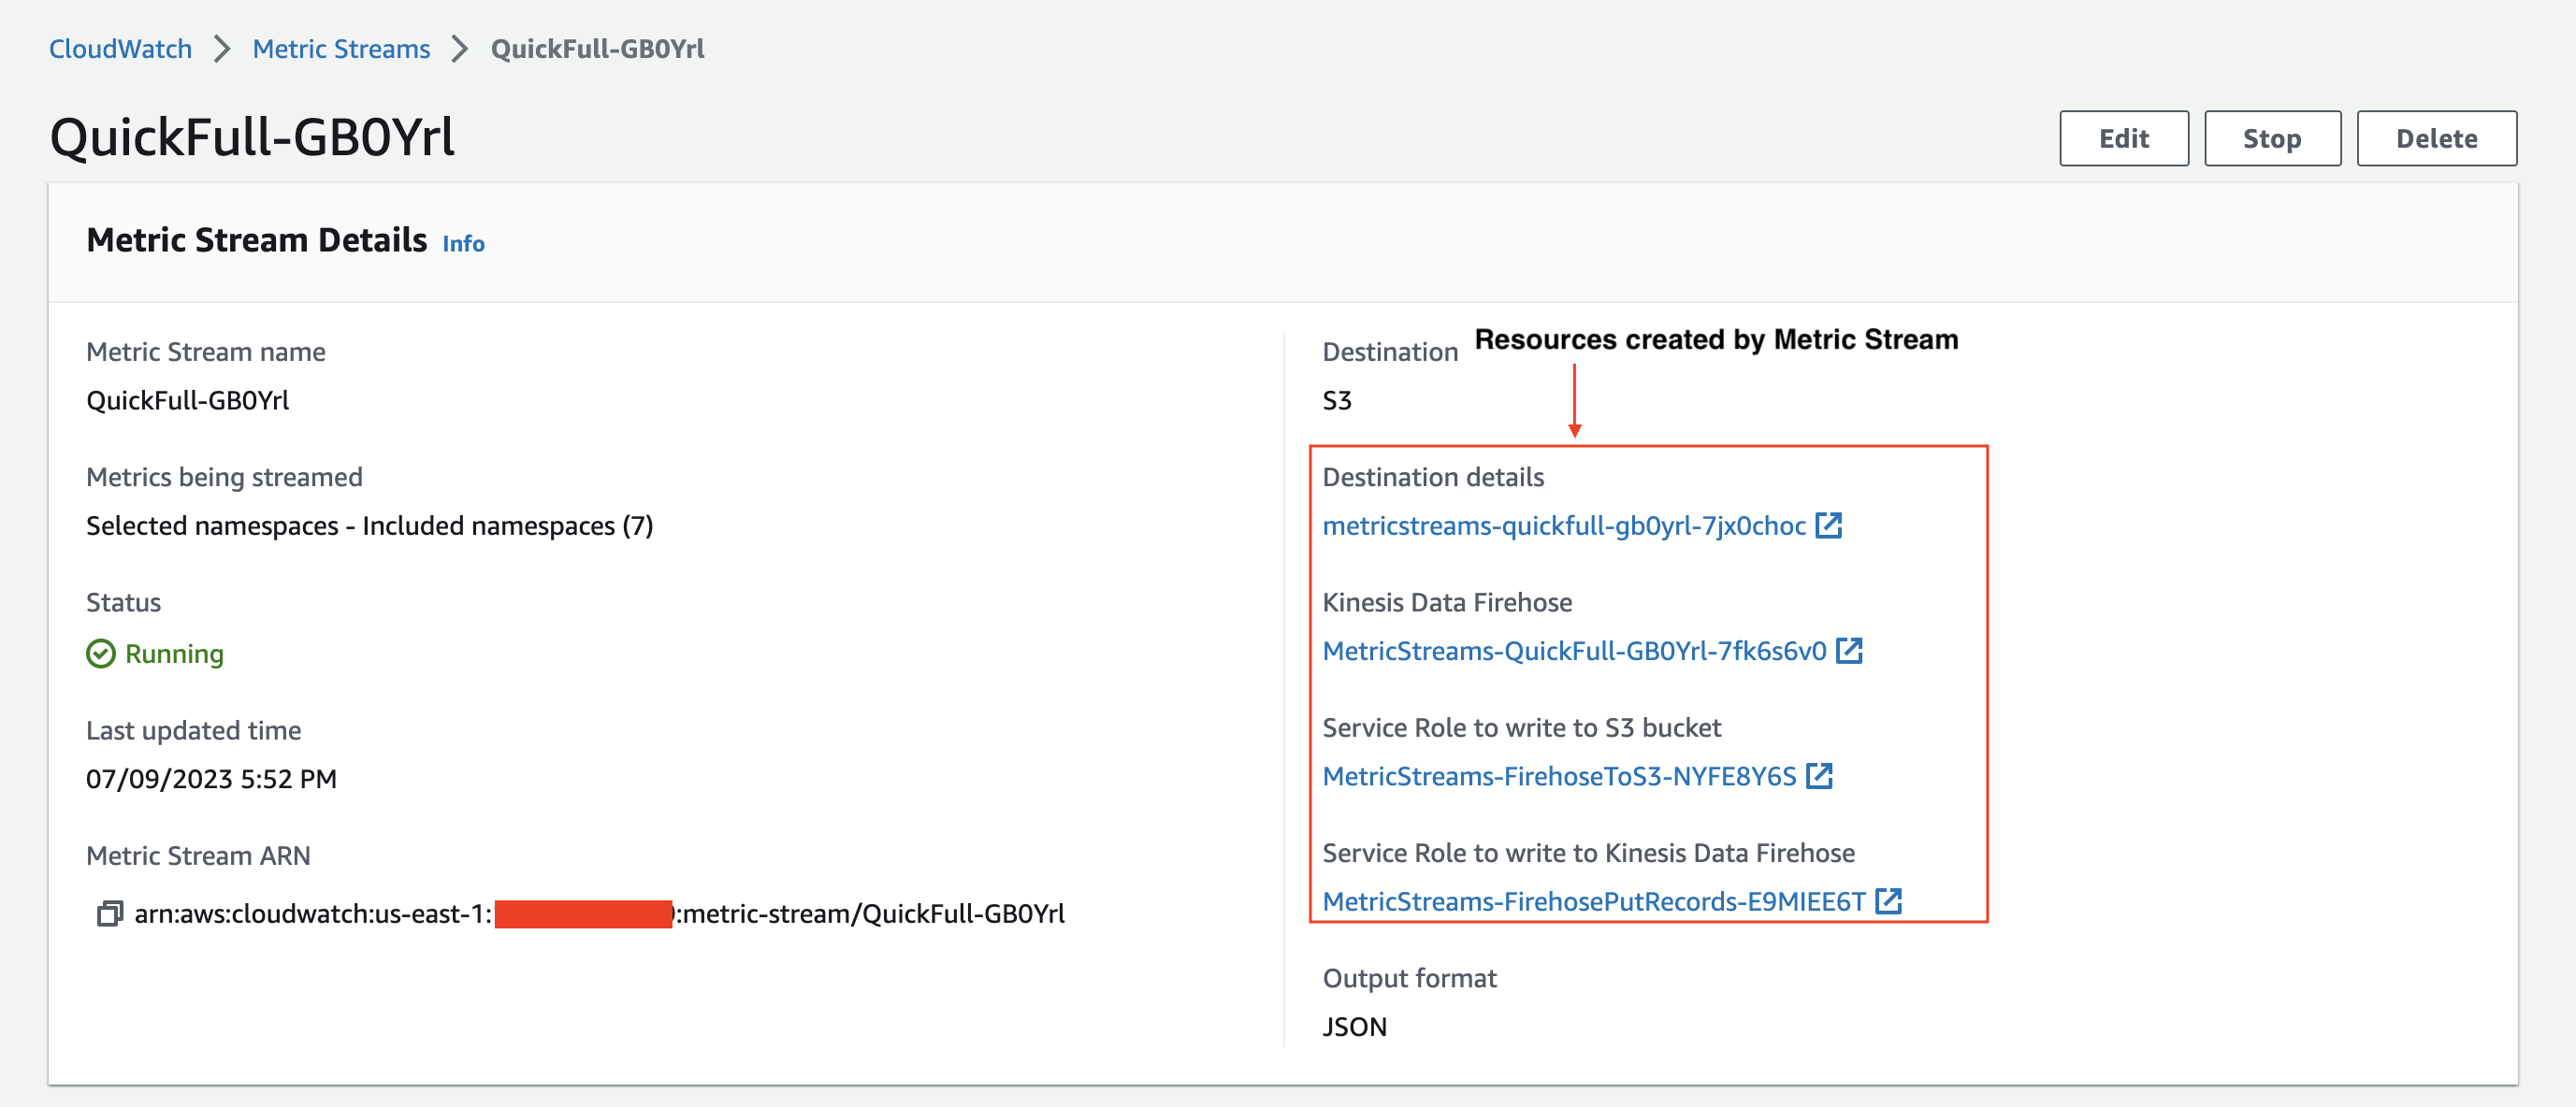
Figure 6: Resources created by Metric Streams in the metric stream detail page
Finally, on the same page, you can explore the Amazon S3 bucket in order to view the metric data being streamed using the link under “Destination details”. It may take few minutes for metric data to be streamed to Amazon S3 bucket.
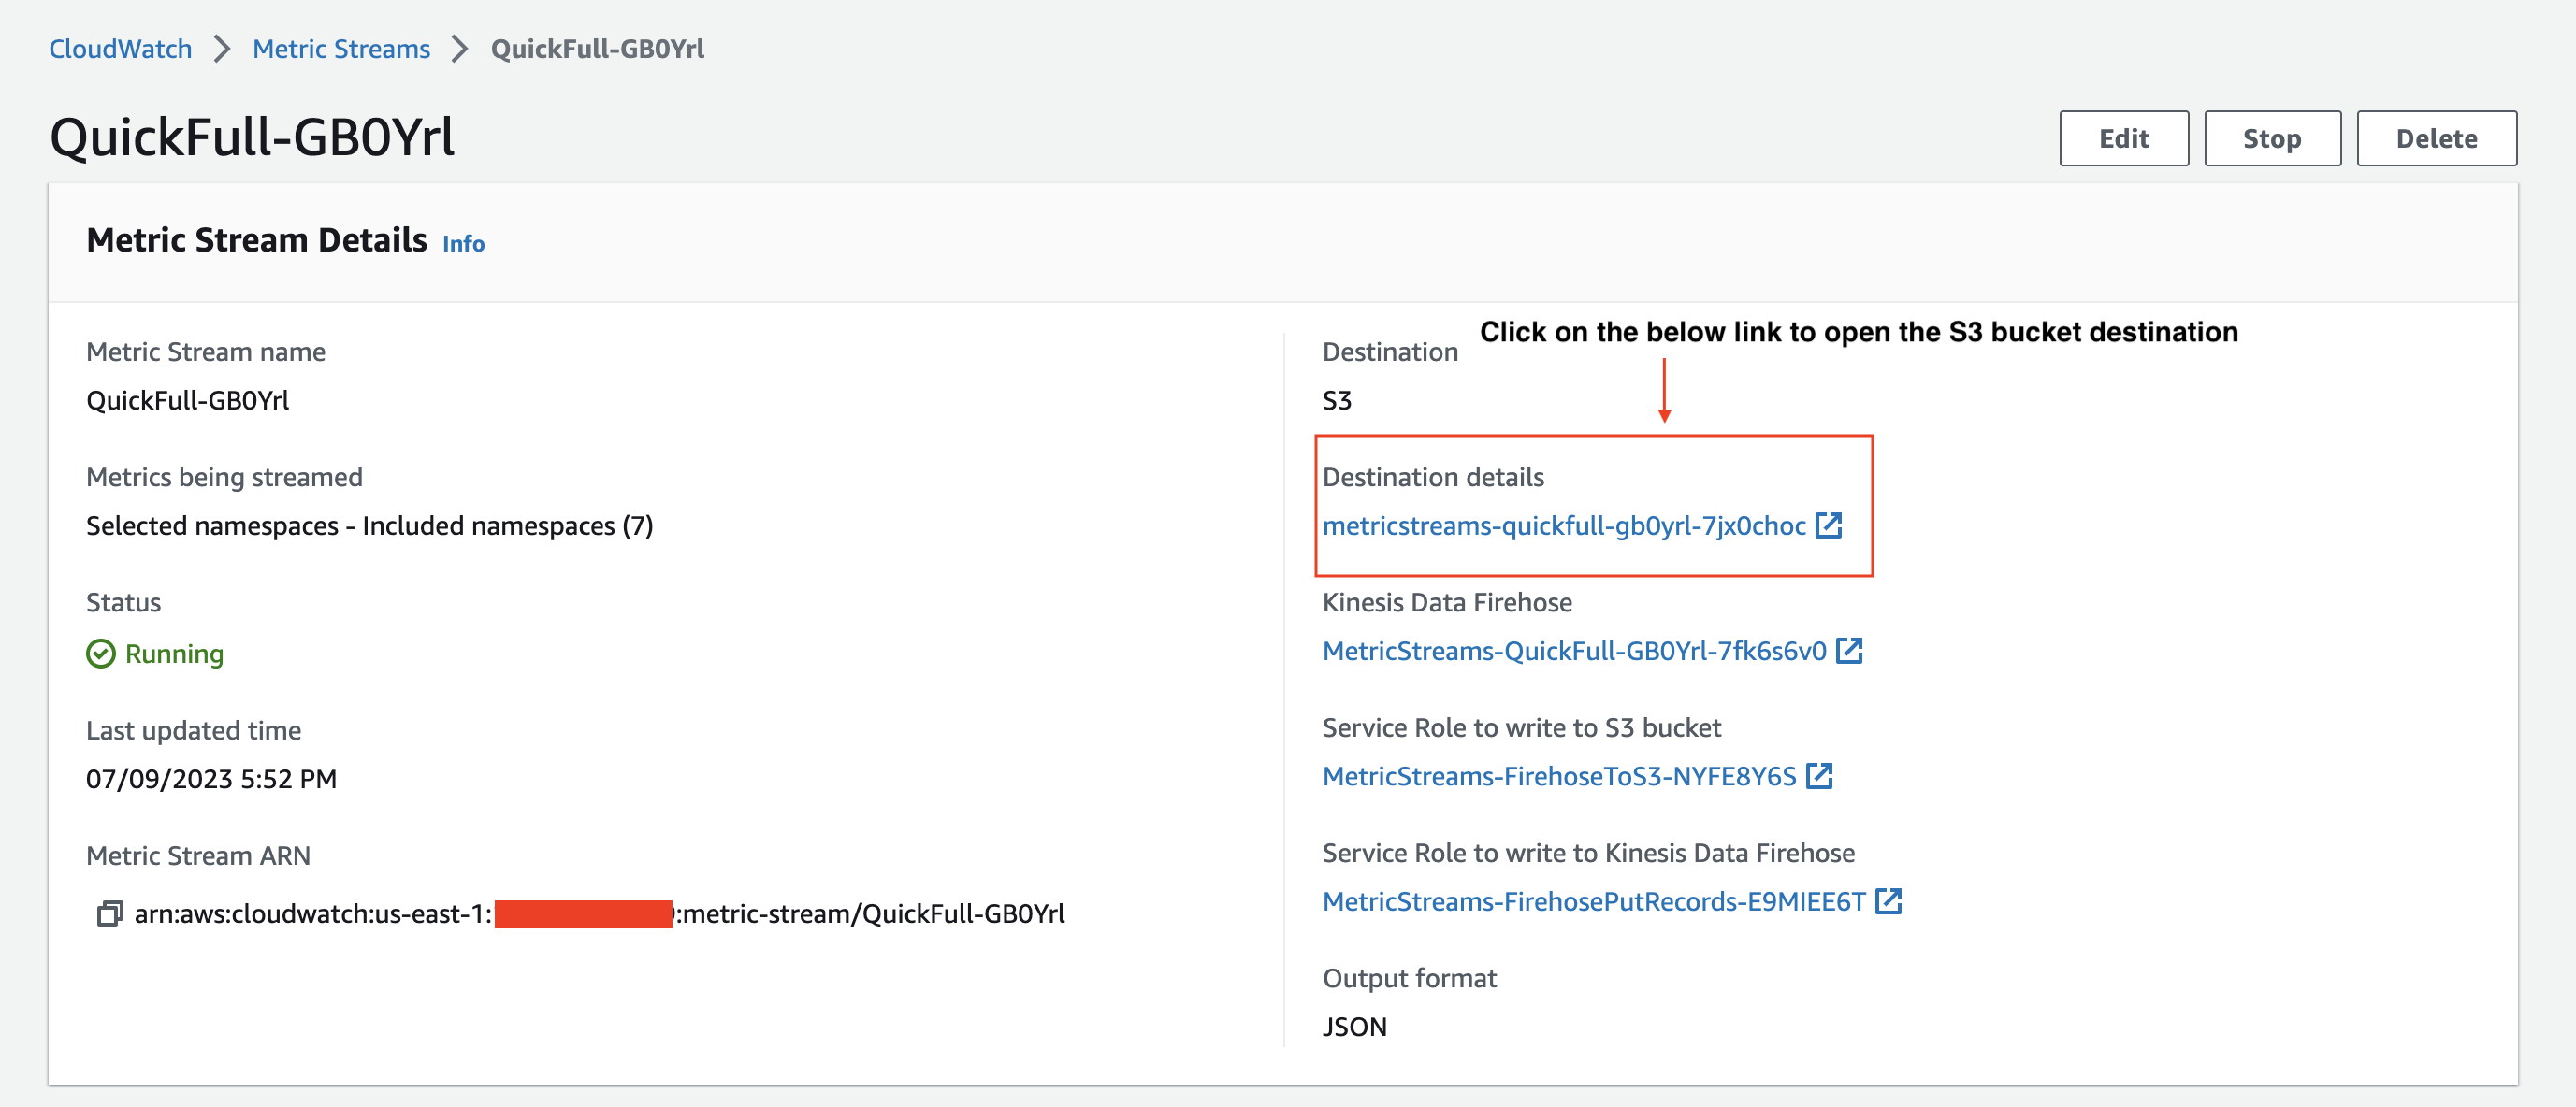
Figure 7: Amazon S3 bucket destination link in the metric streams detail page
You will be redirected to the Amazon S3 bucket console page where you can see the metric data being stored as shown below.

Figure 8: Metric Data stored in the Amazon S3 bucket
Walkthrough using AWS CloudFormation
You can also configure the include or exclude filters while creating Metric Streams using AWS CloudFormation.
Steps to create CloudFormation stacks
The following step shows you how to create a metric stream with either “Exclude” or “Include” metric name filters programmatically, using AWS CloudFormation.
1. Download the below CloudFormation templates and save them to your local machine. Choose one depending on your use case: Include or Exclude filters.
a. MetricStreams_ExcludeFilter_CFN.yaml – Use this CloudFormation template to create a metric stream with “Exclude” metric name filters.
b. MetricStreams_IncludeFilter_CFN.yaml – Use this CloudFormation template to create a metric stream with “Include” metric name filters.
2. Navigate to the AWS CloudFormation service in the AWS Management Console. From the Stacks list, select Create Stack > With new resources (standard) to get started with stack creation.
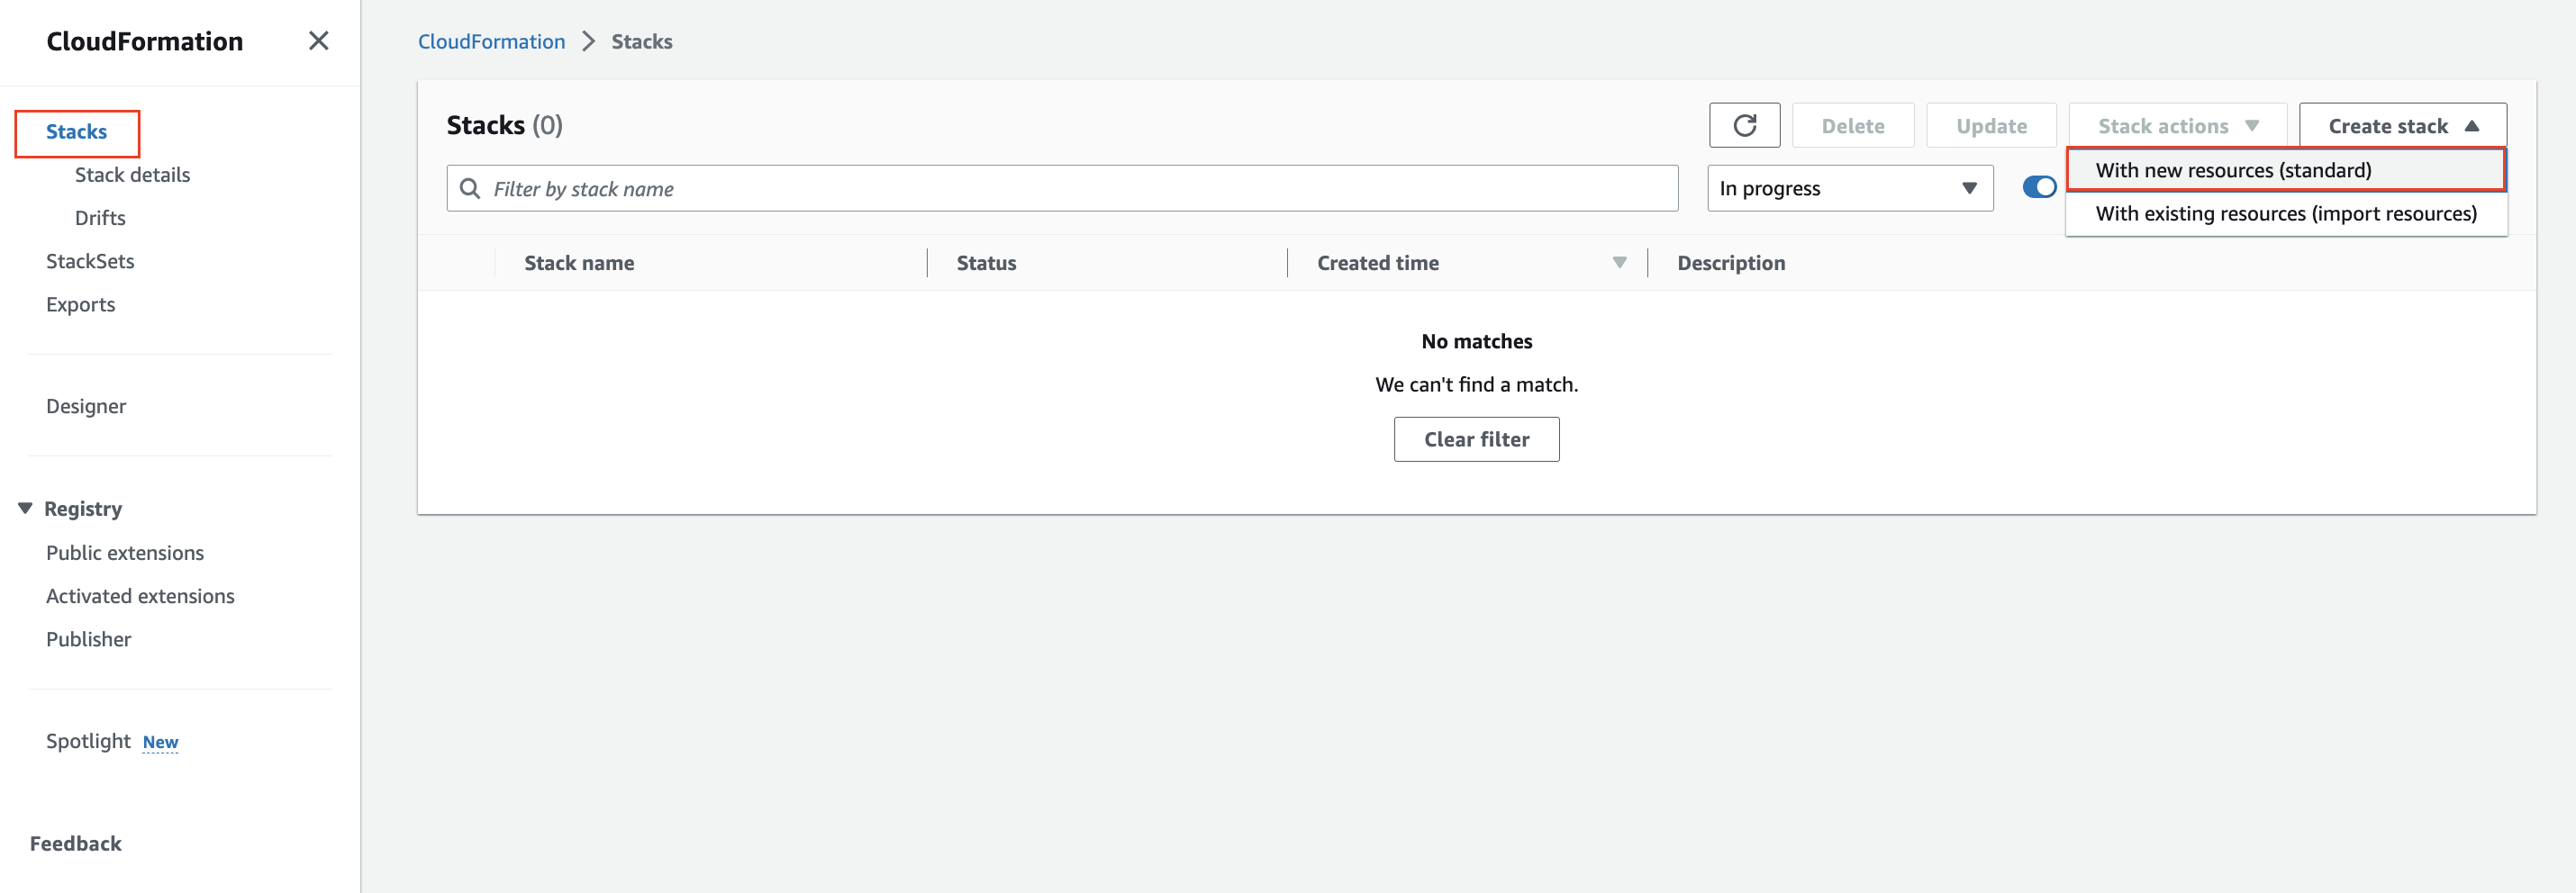
Figure 9: AWS CloudFormation console. Create a new stack.
3. Select Template is ready and select Upload a template file. Choose Choose file and upload the template “MetricStreams_ExcludeFilter_CFN.yaml” you downloaded in step one. Once successfully uploaded, choose Next.
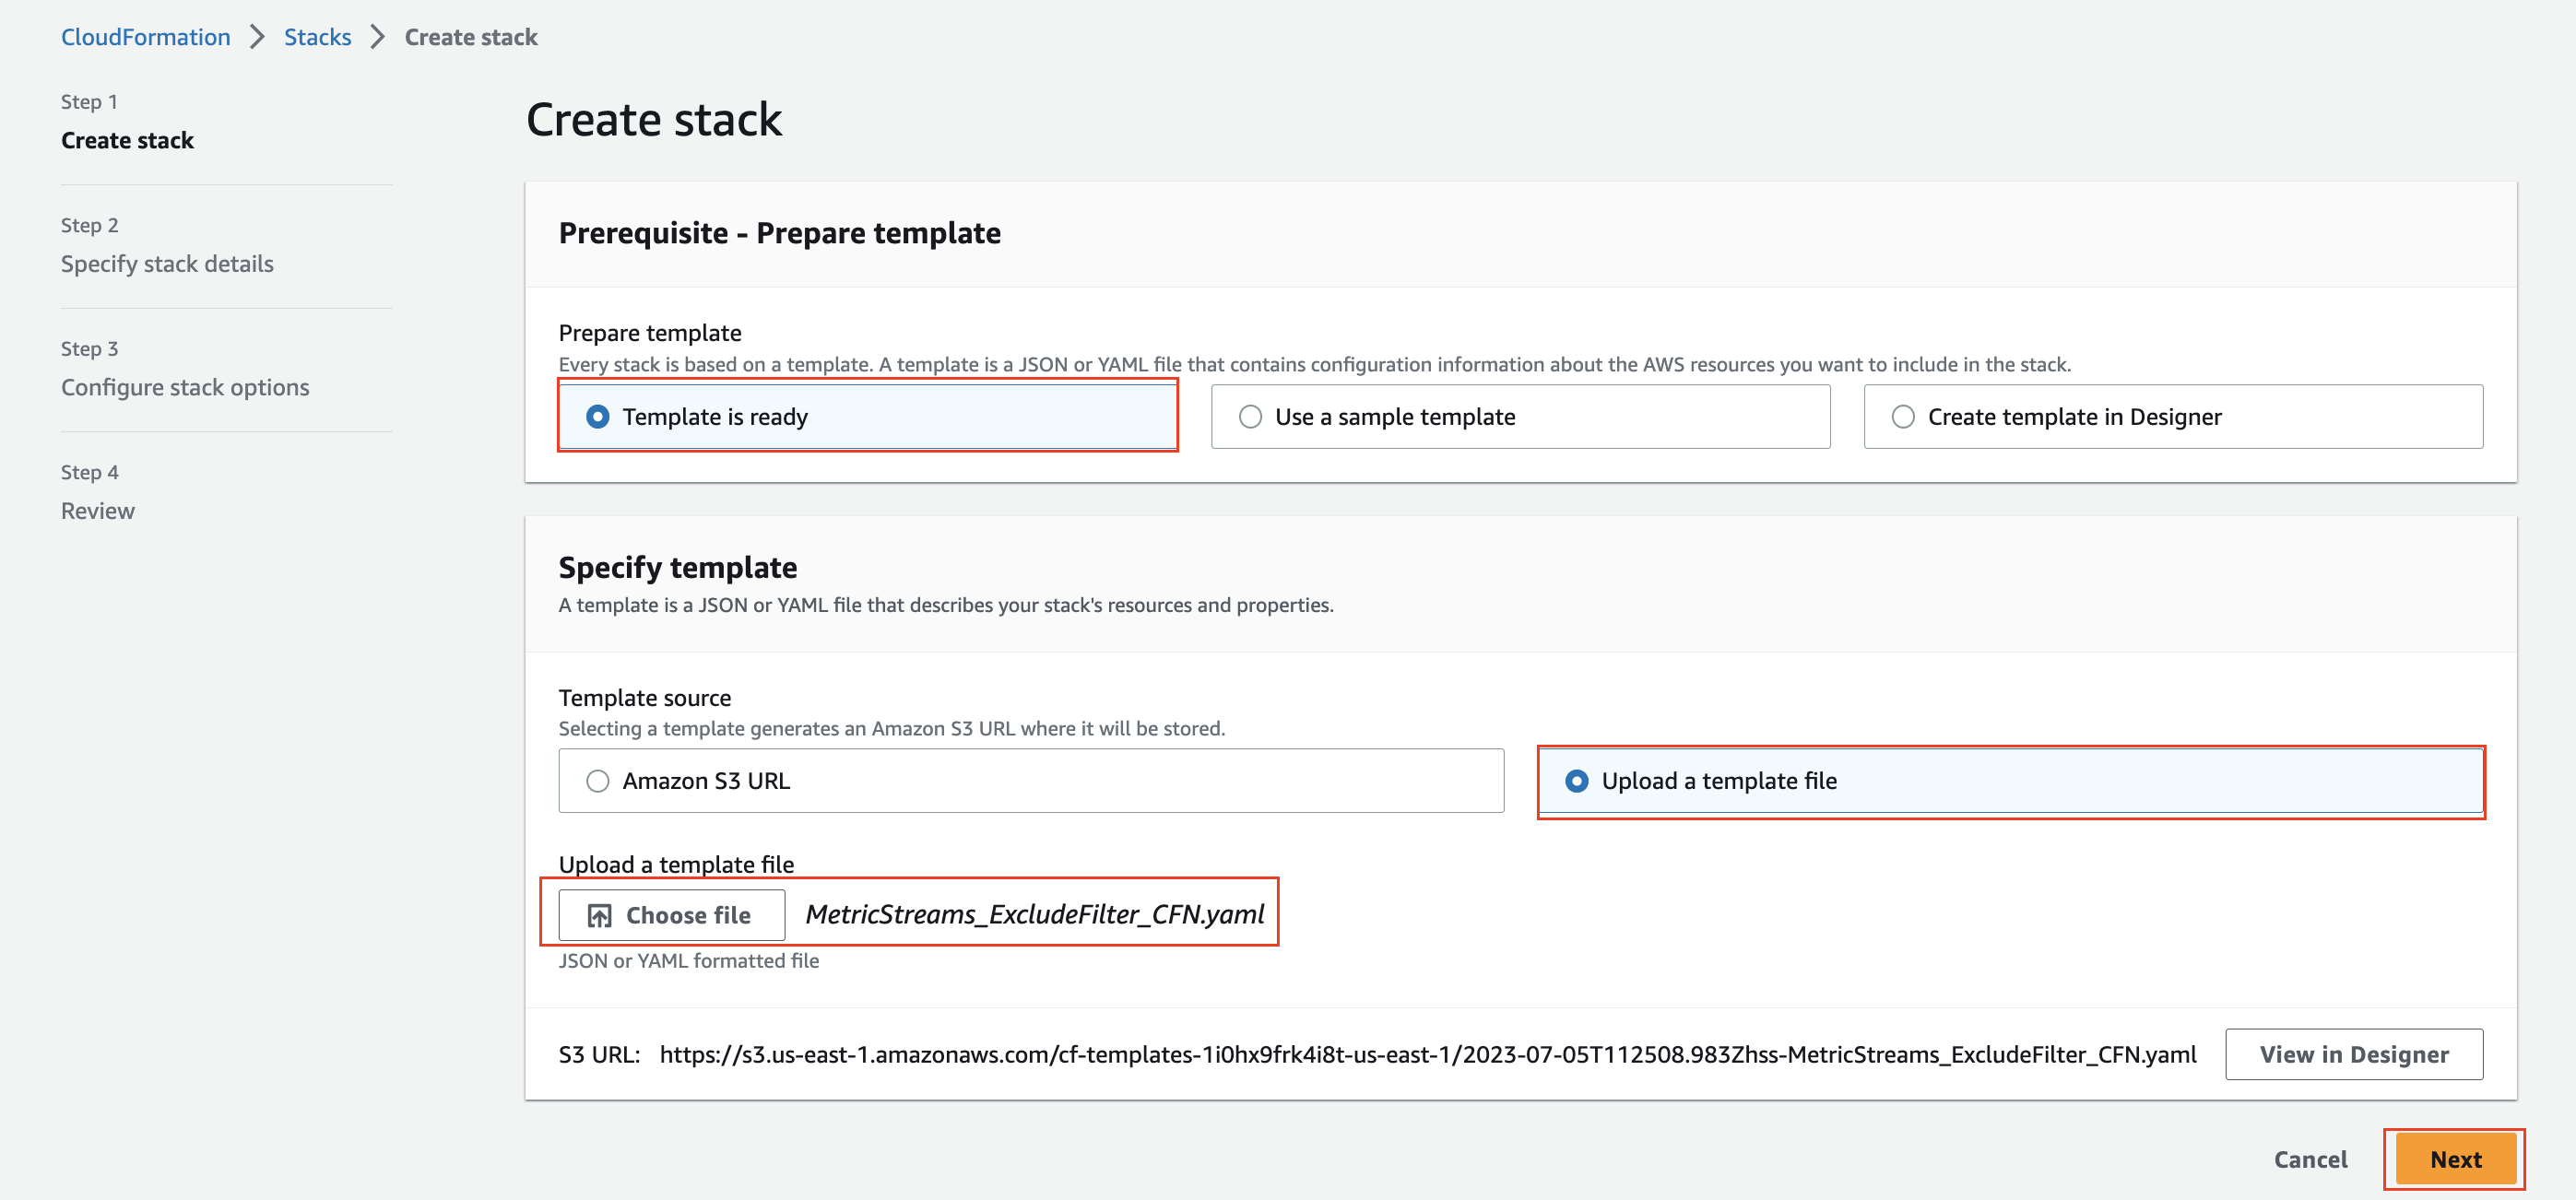
Figure 10: Uploading the template file
4. Name the CloudFormation stack as “exclude-metric-name-filter-demo” and choose Next.
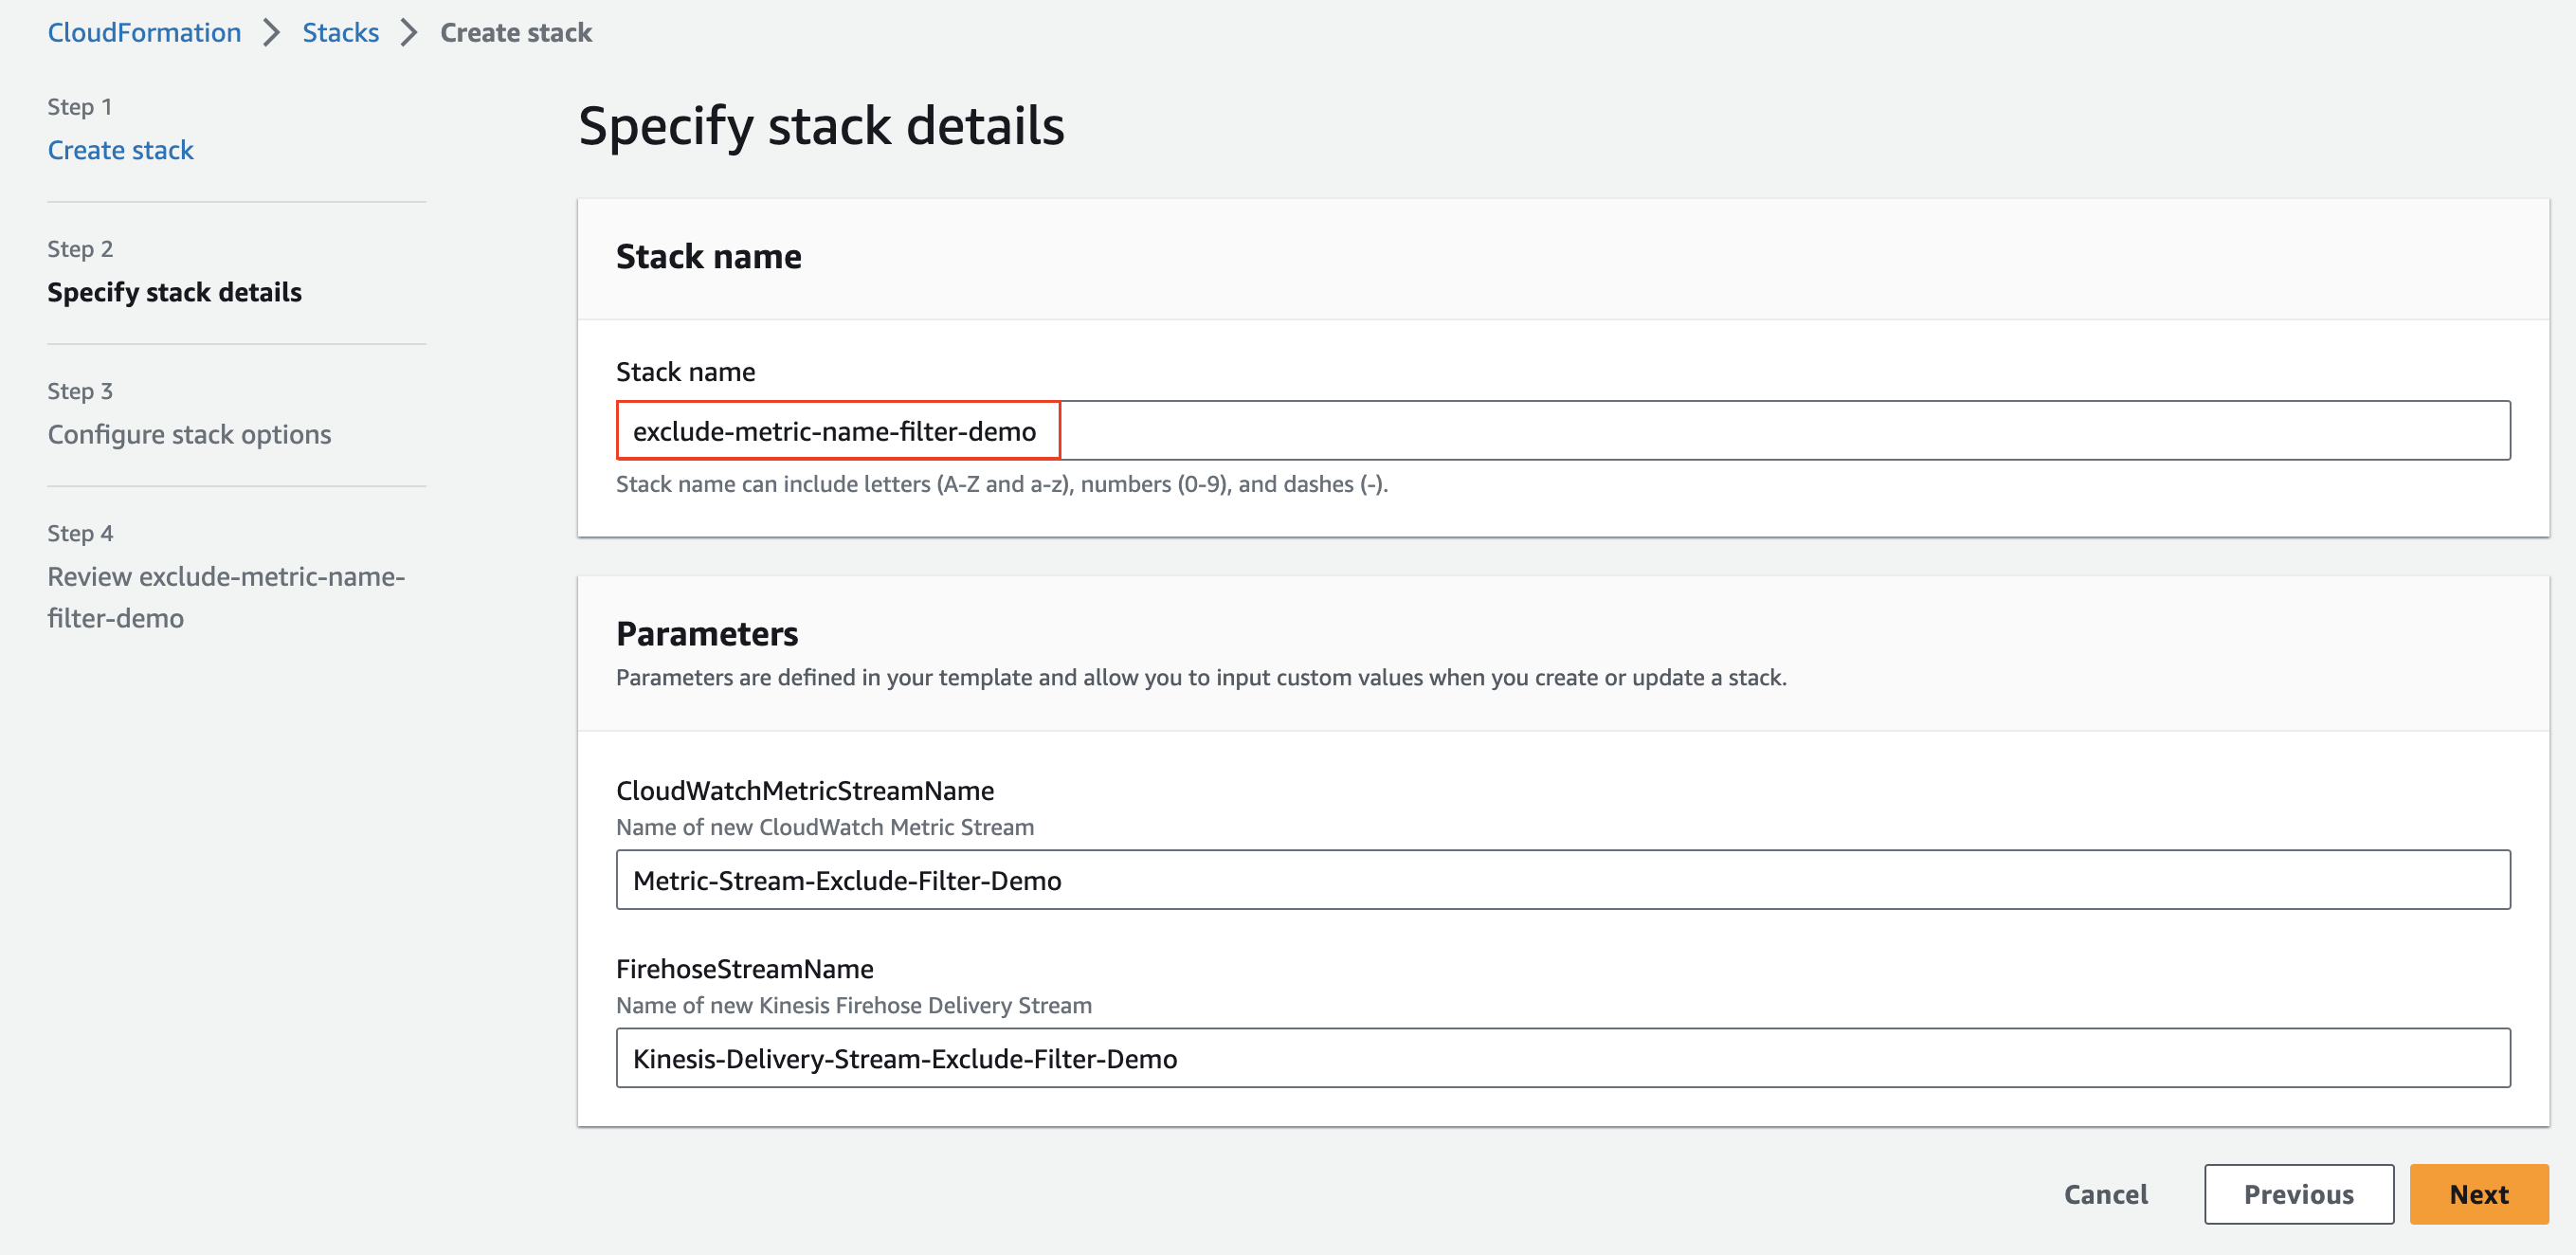
Figure 11: Providing Stack name
5. Use default settings for the Configure Stack Options and choose Next.
6. Review the stack options and select the “I acknowledge that AWS CloudFormation might create IAM resources” check box and then choose Submit. Your CloudFormation stack status should now be showing CREATE_IN_PROGRESS indicating that the resources defined within the stack are being provisioned.
7. When the CloudFormation stack has finished creating resources (this will take few minutes), the status will change to CREATE_COMPLETE.
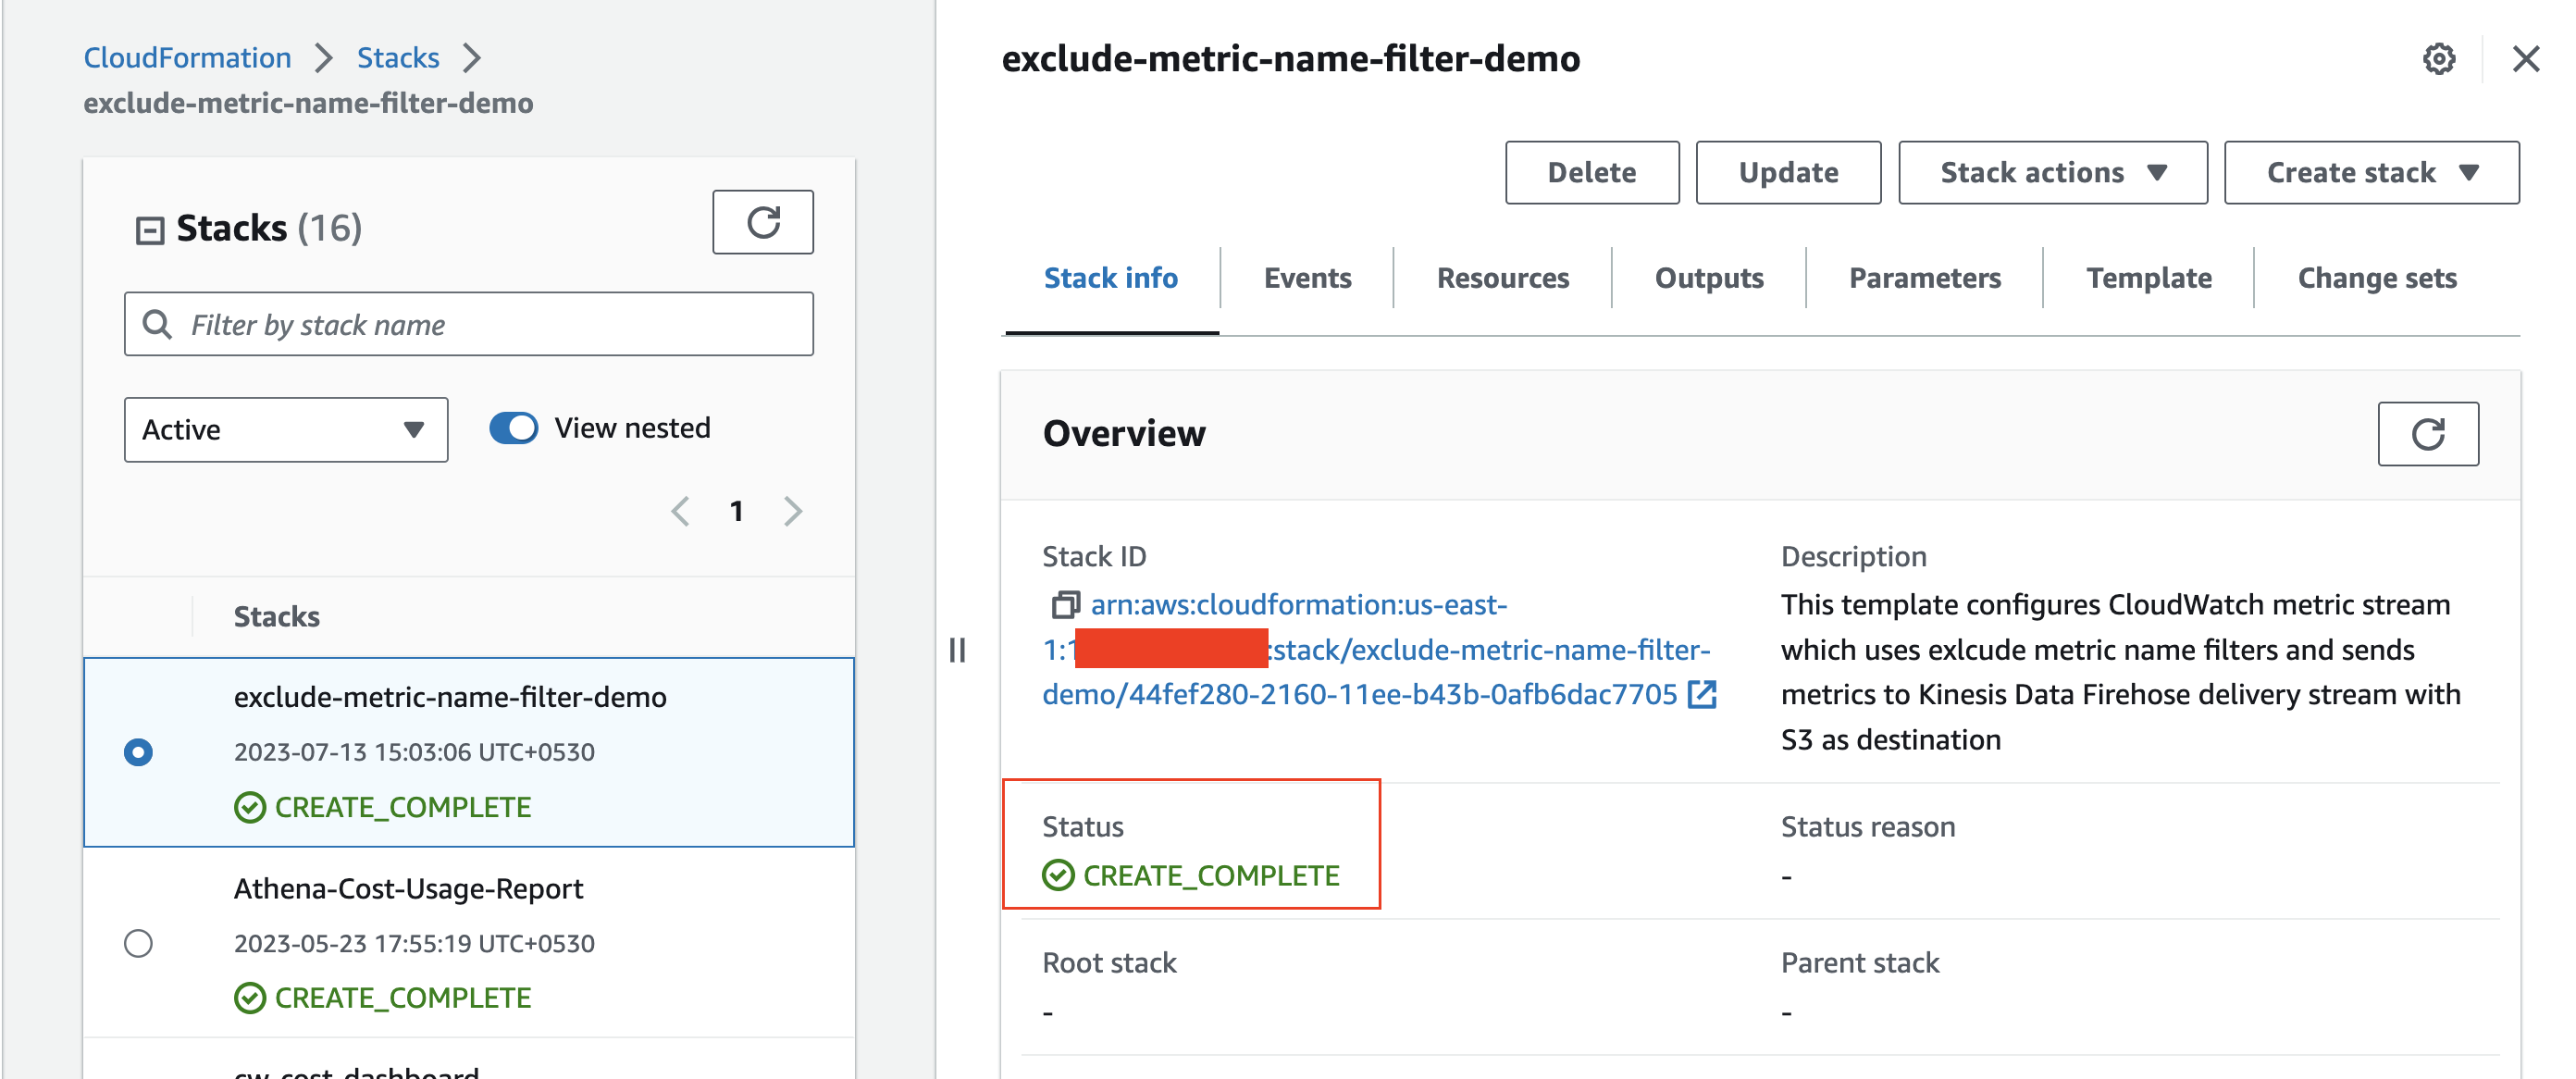
Figure 12: Stack creation complete status
You can follow the above same steps in order to create another stack by using “MetricStreams_IncludeFilter_CFN.yaml” template downloaded in step one in order to create metric stream with include metric name filter resources. You can name this second stack as “include-metric-name-filter-demo” as shown below.
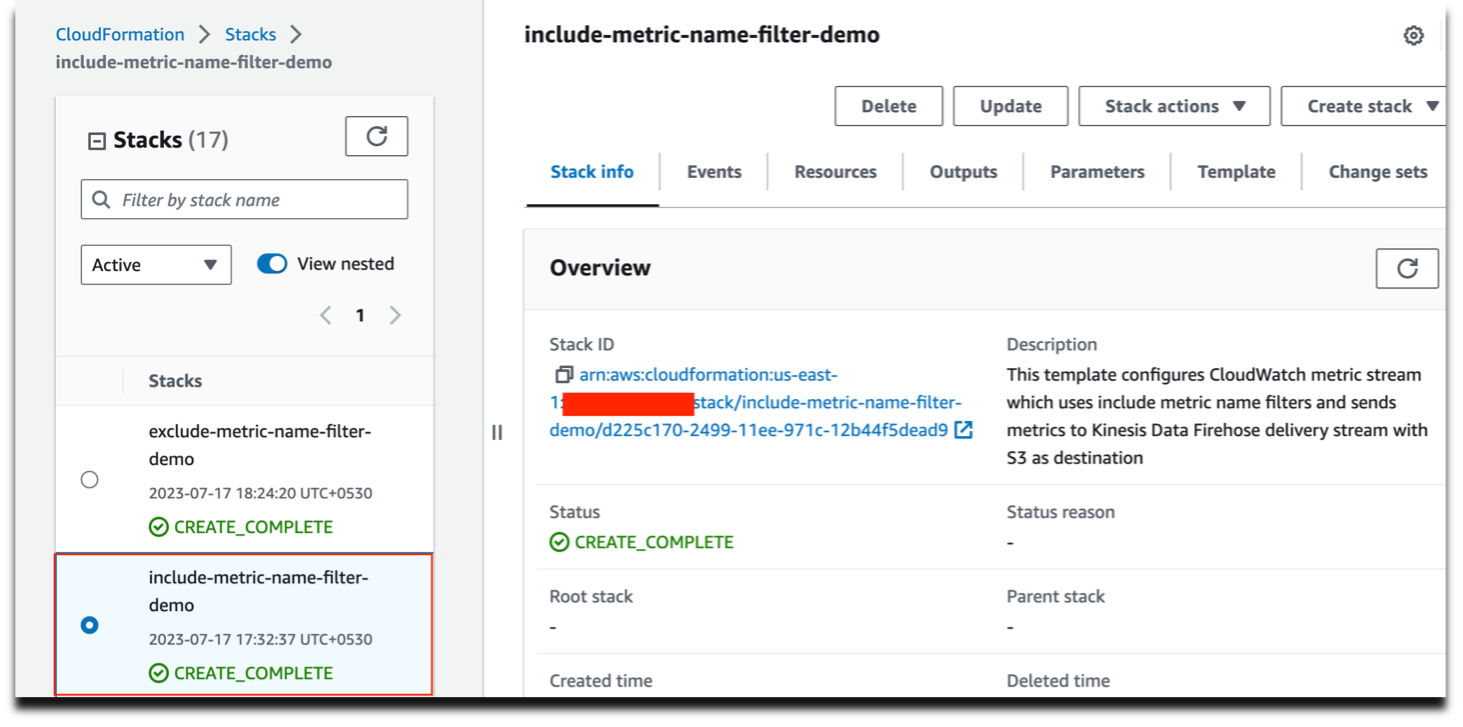
Figure 13: Screenshot of stack created using MetricStreams_IncludeFilter_CFN.yaml template
8. Let’s verify the creation of the desired resources. Open the Amazon CloudWatch console. In the navigation pane, choose Streams under the Metrics tab. You can then open the newly created metric stream by selecting the metric stream and then choose “View details” button as shown below.
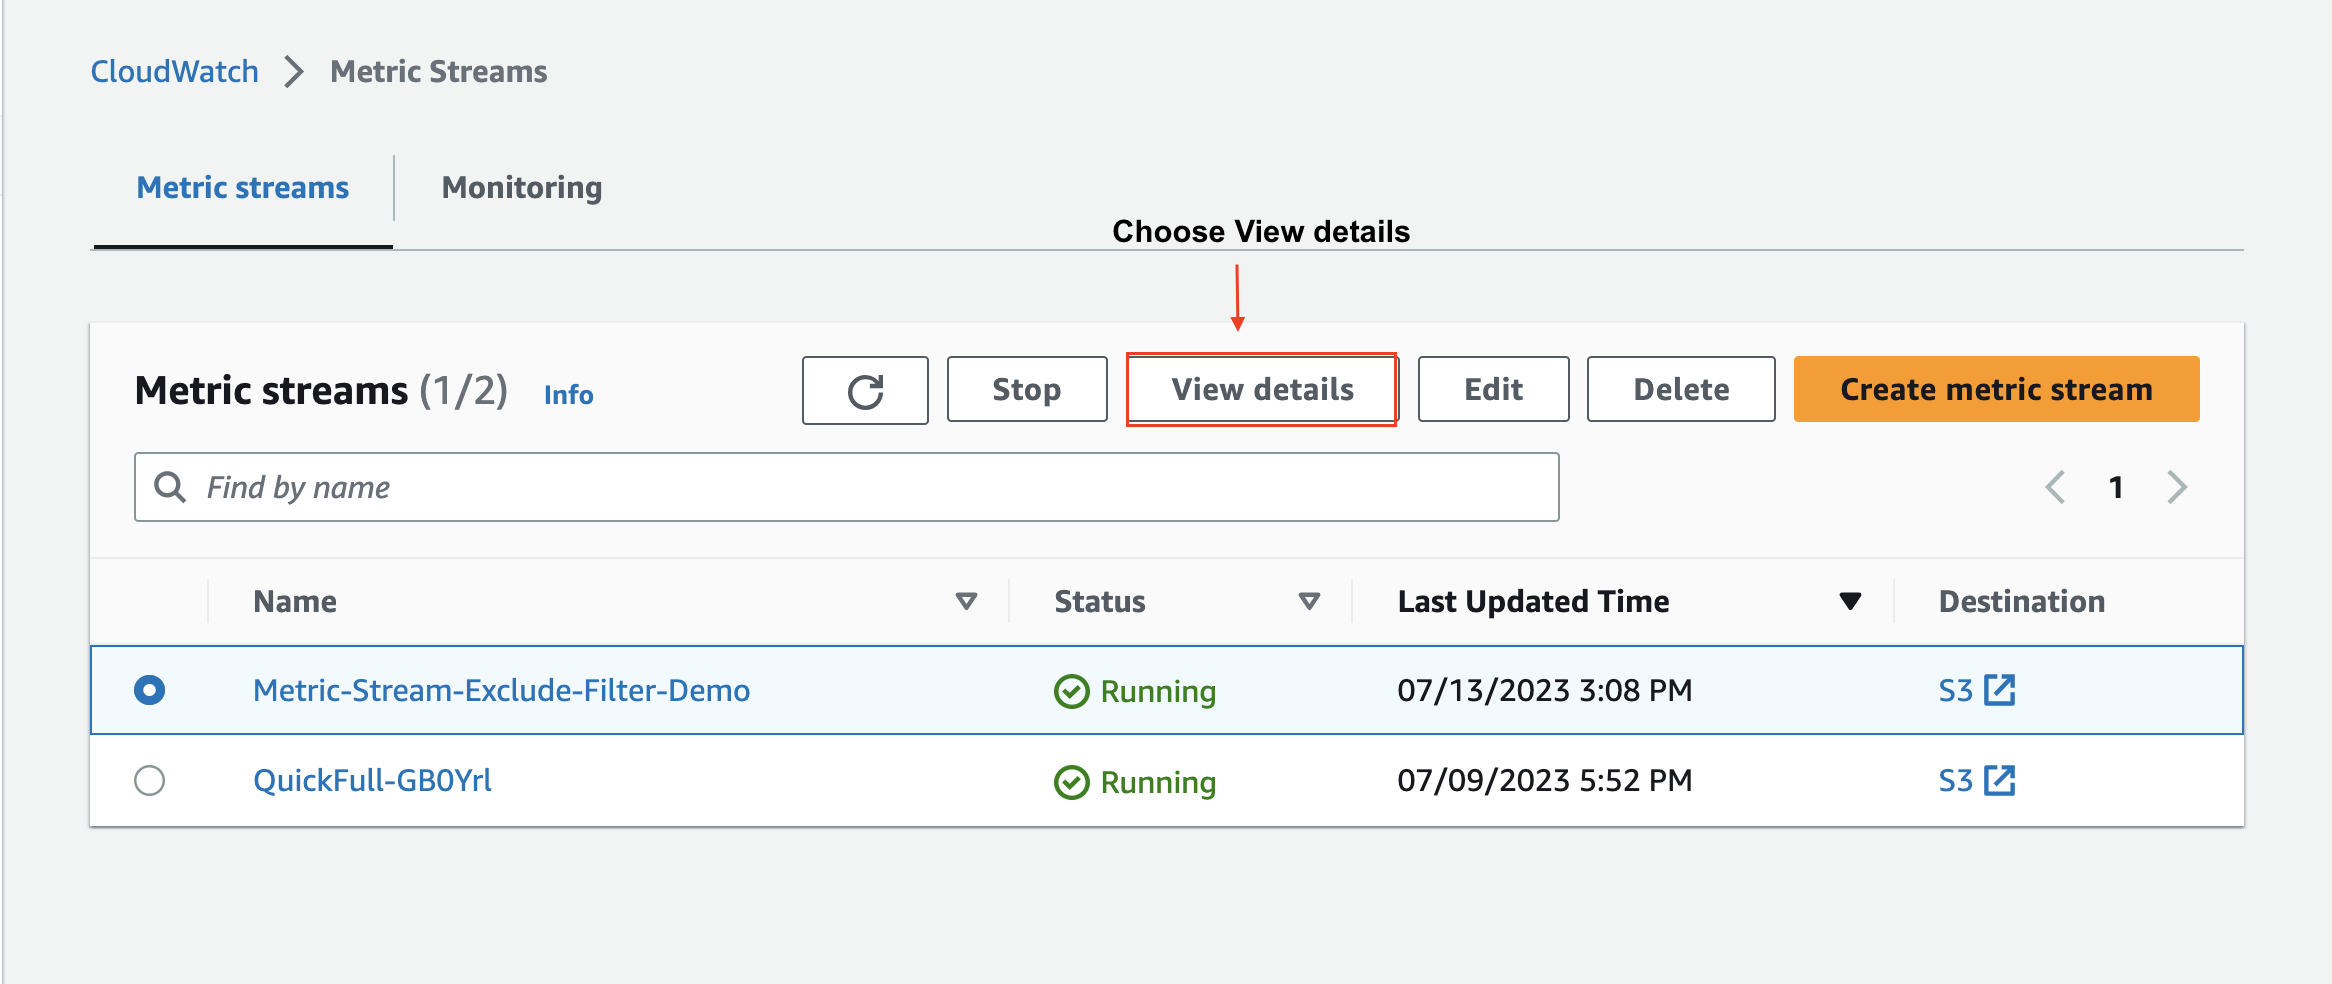
Figure 14: Viewing details of a newly created metric stream using AWS CloudFormation
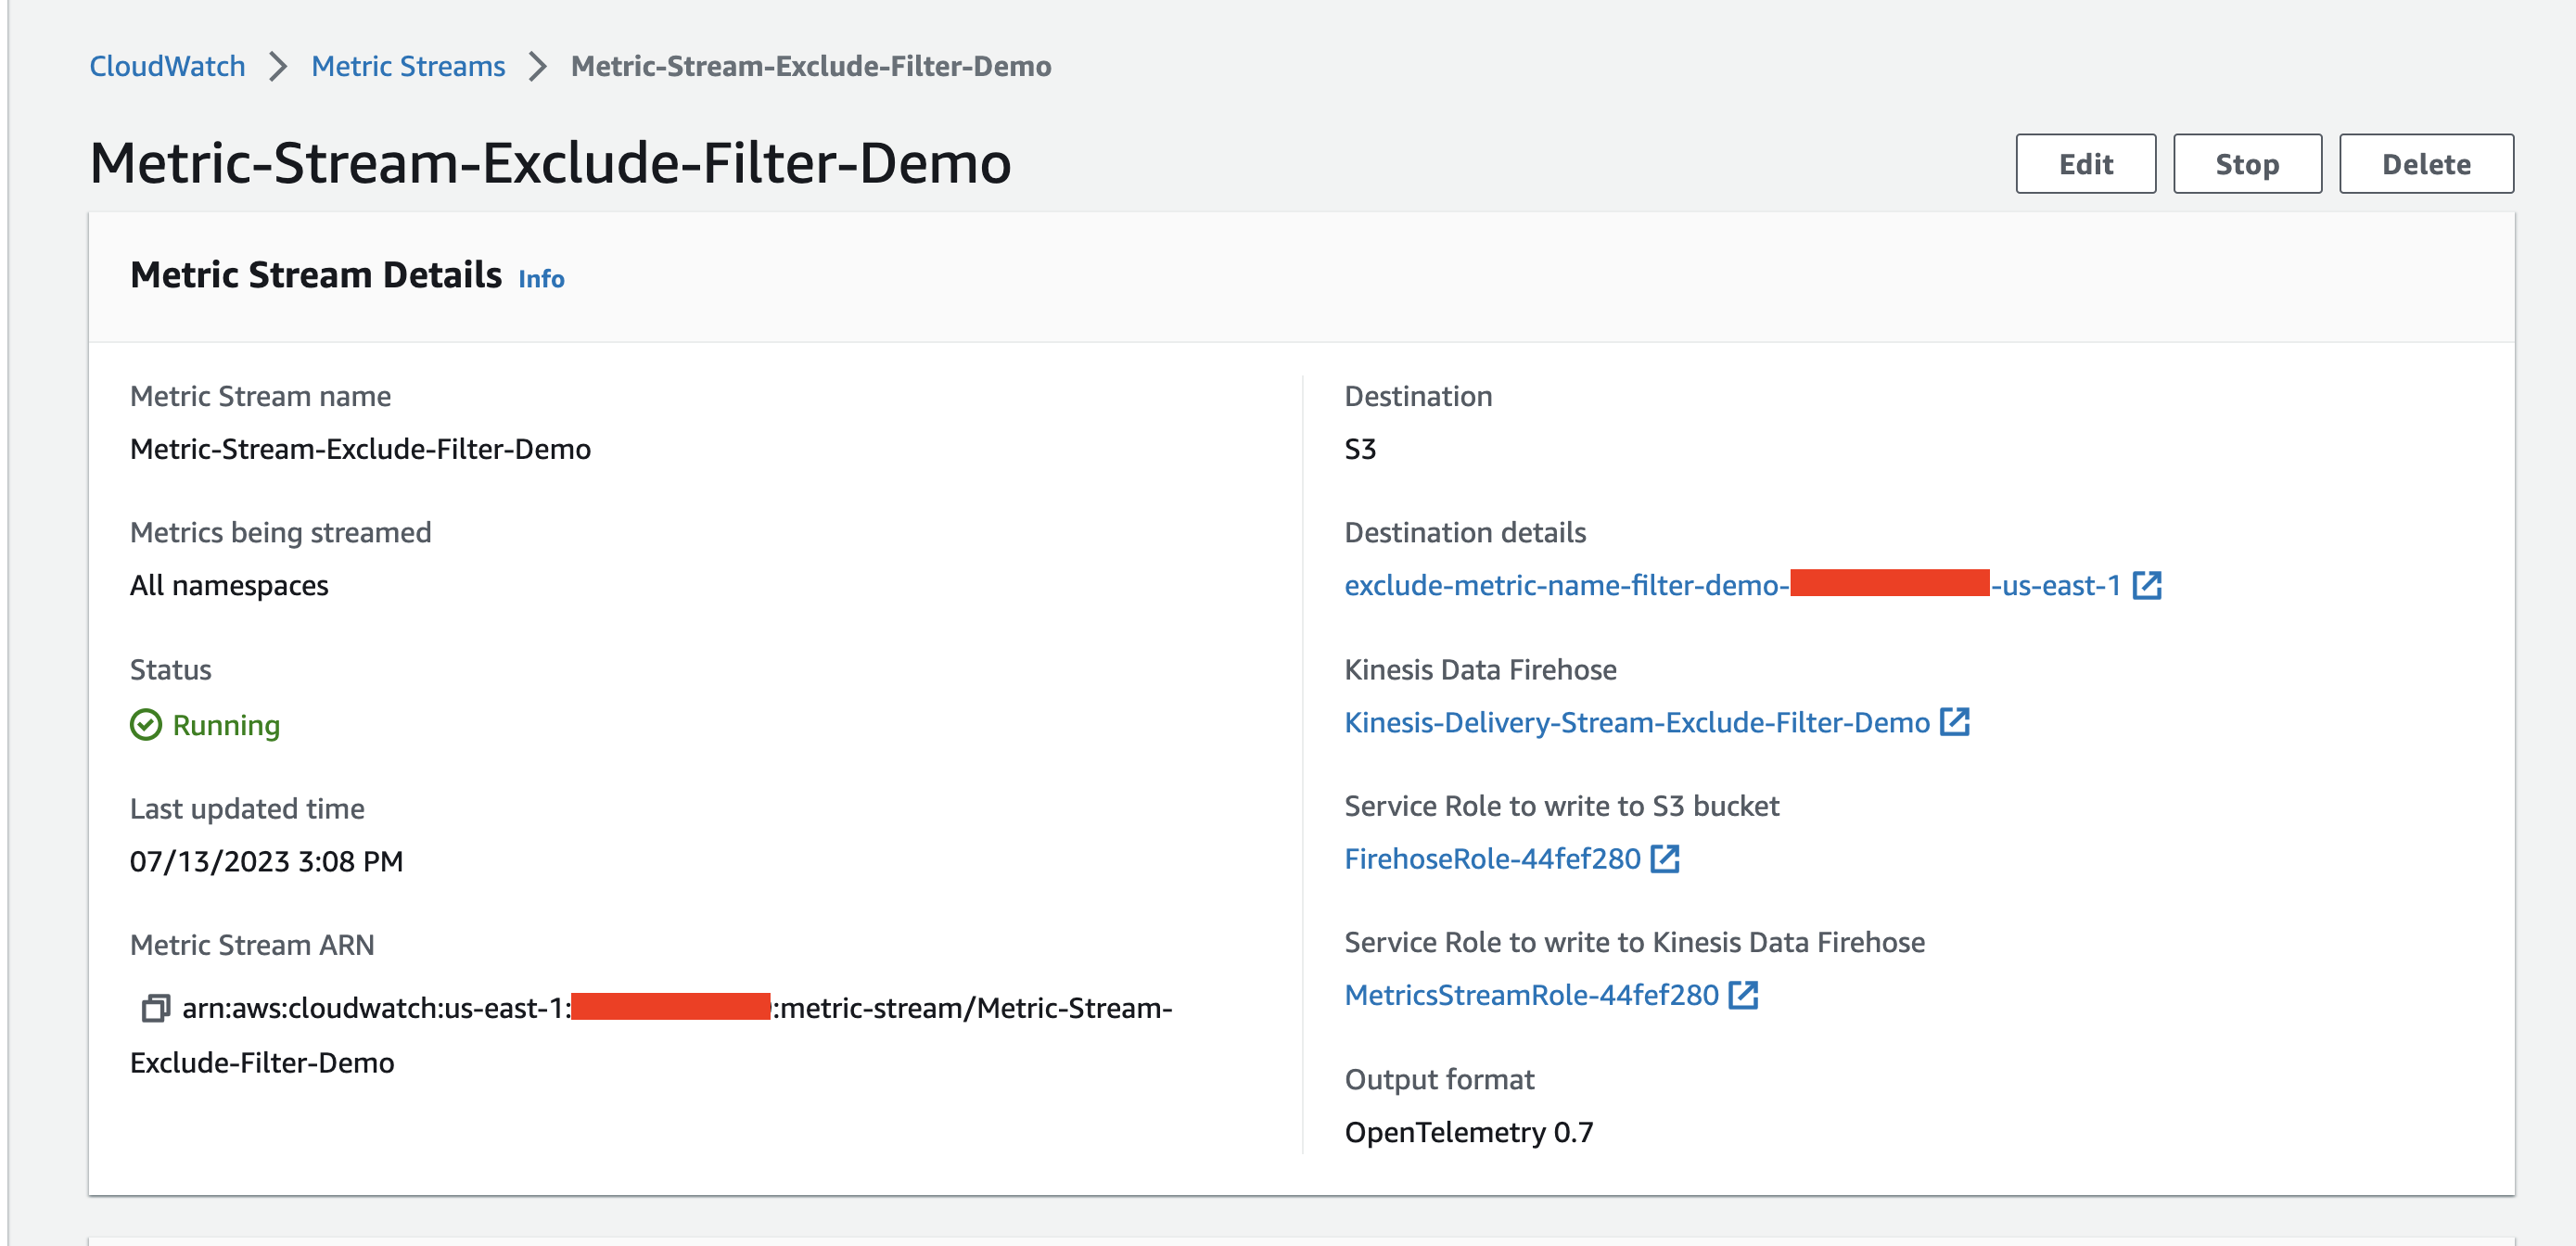
Figure 15: Viewing details of a newly created metric stream
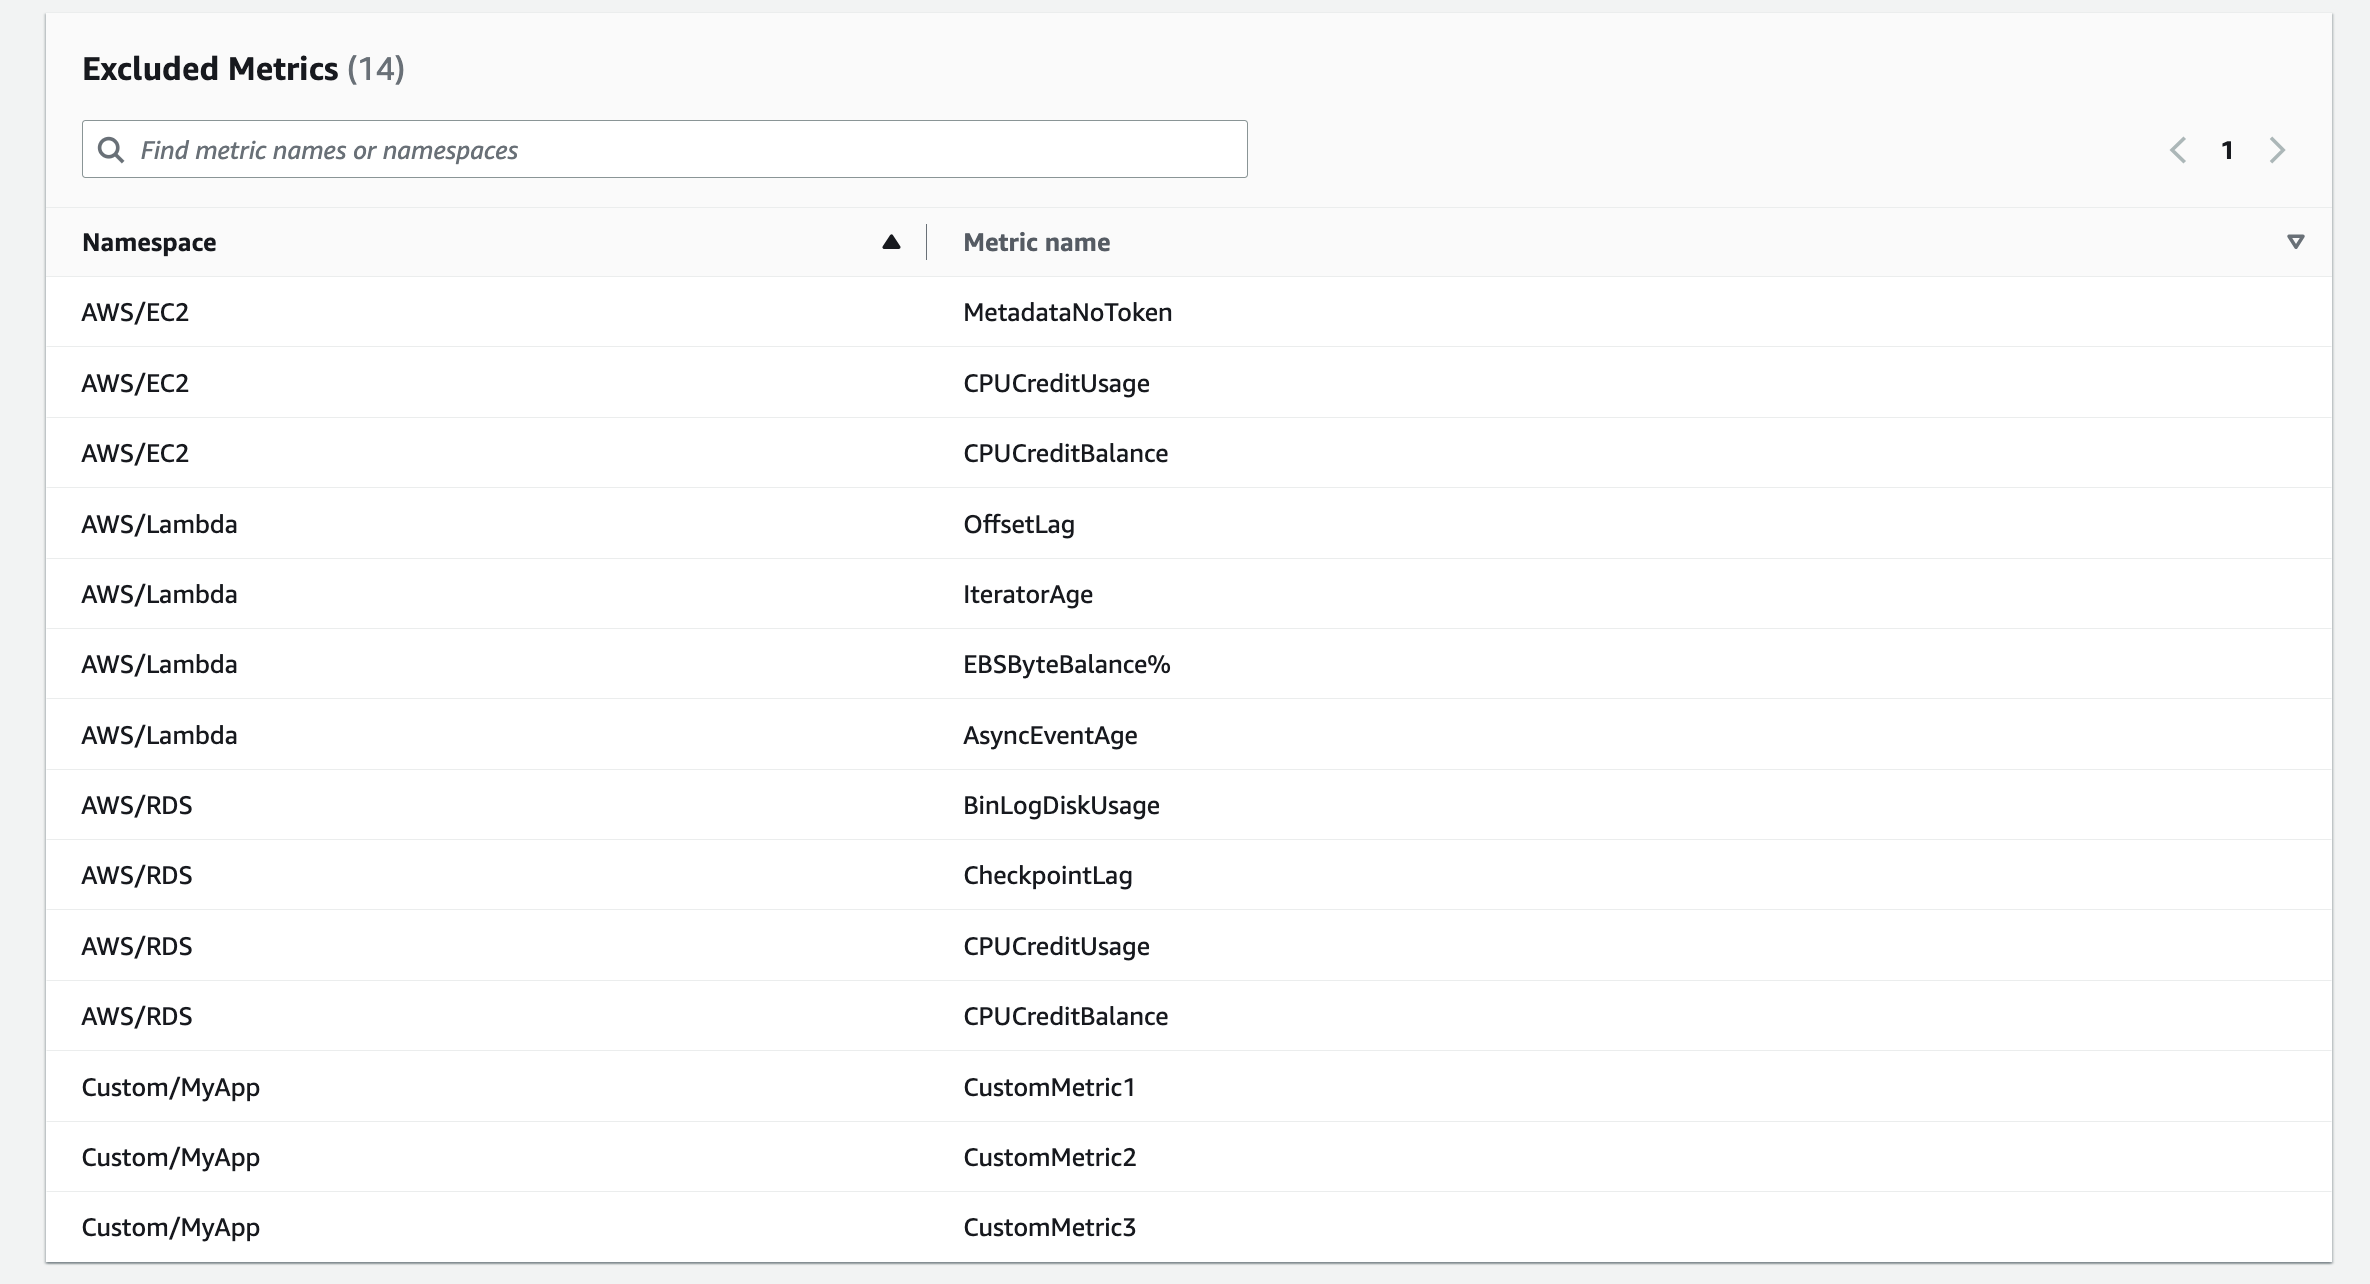
Figure 16: Implemented metric name filters
Cleaning up the resources created
In order to clean up the resources created by Metric Streams using the AWS Management console walkthrough steps, please follow the steps below.
1. Open the Amazon CloudWatch console.
2. In the navigation pane, choose Metrics Streams. Then choose the metric stream that you want delete and choose “Delete” button as shown below.
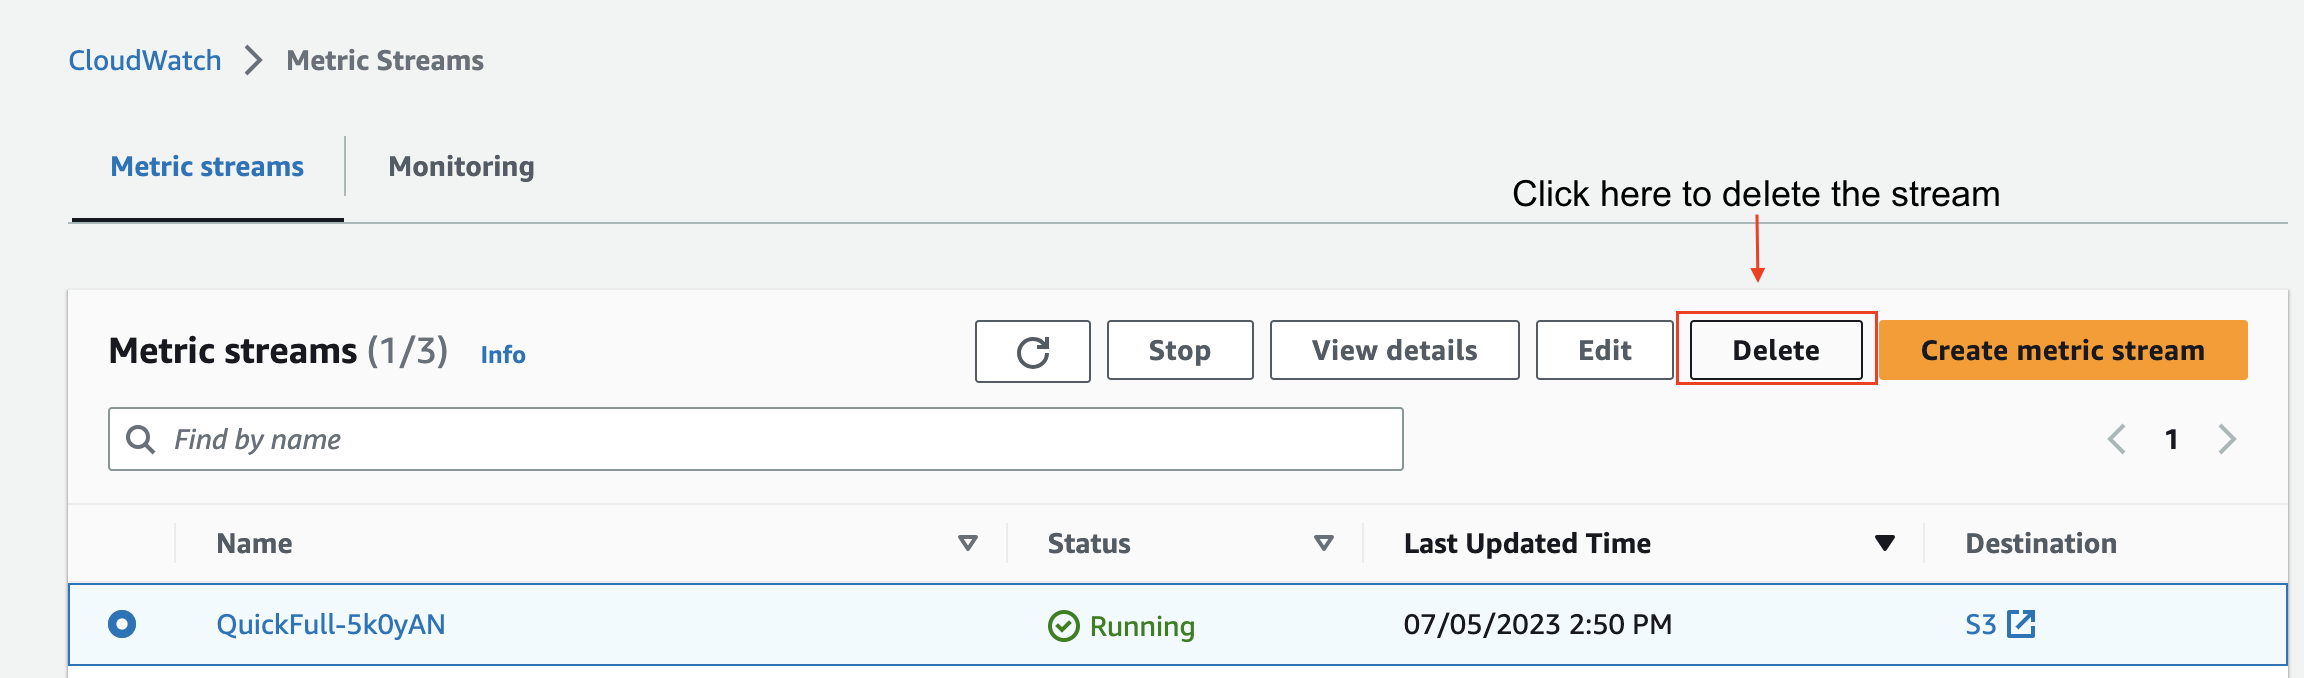
Figure 17: Deleting metric stream resource created using AWS Management Console
3. To confirm deletion, type delete in field.
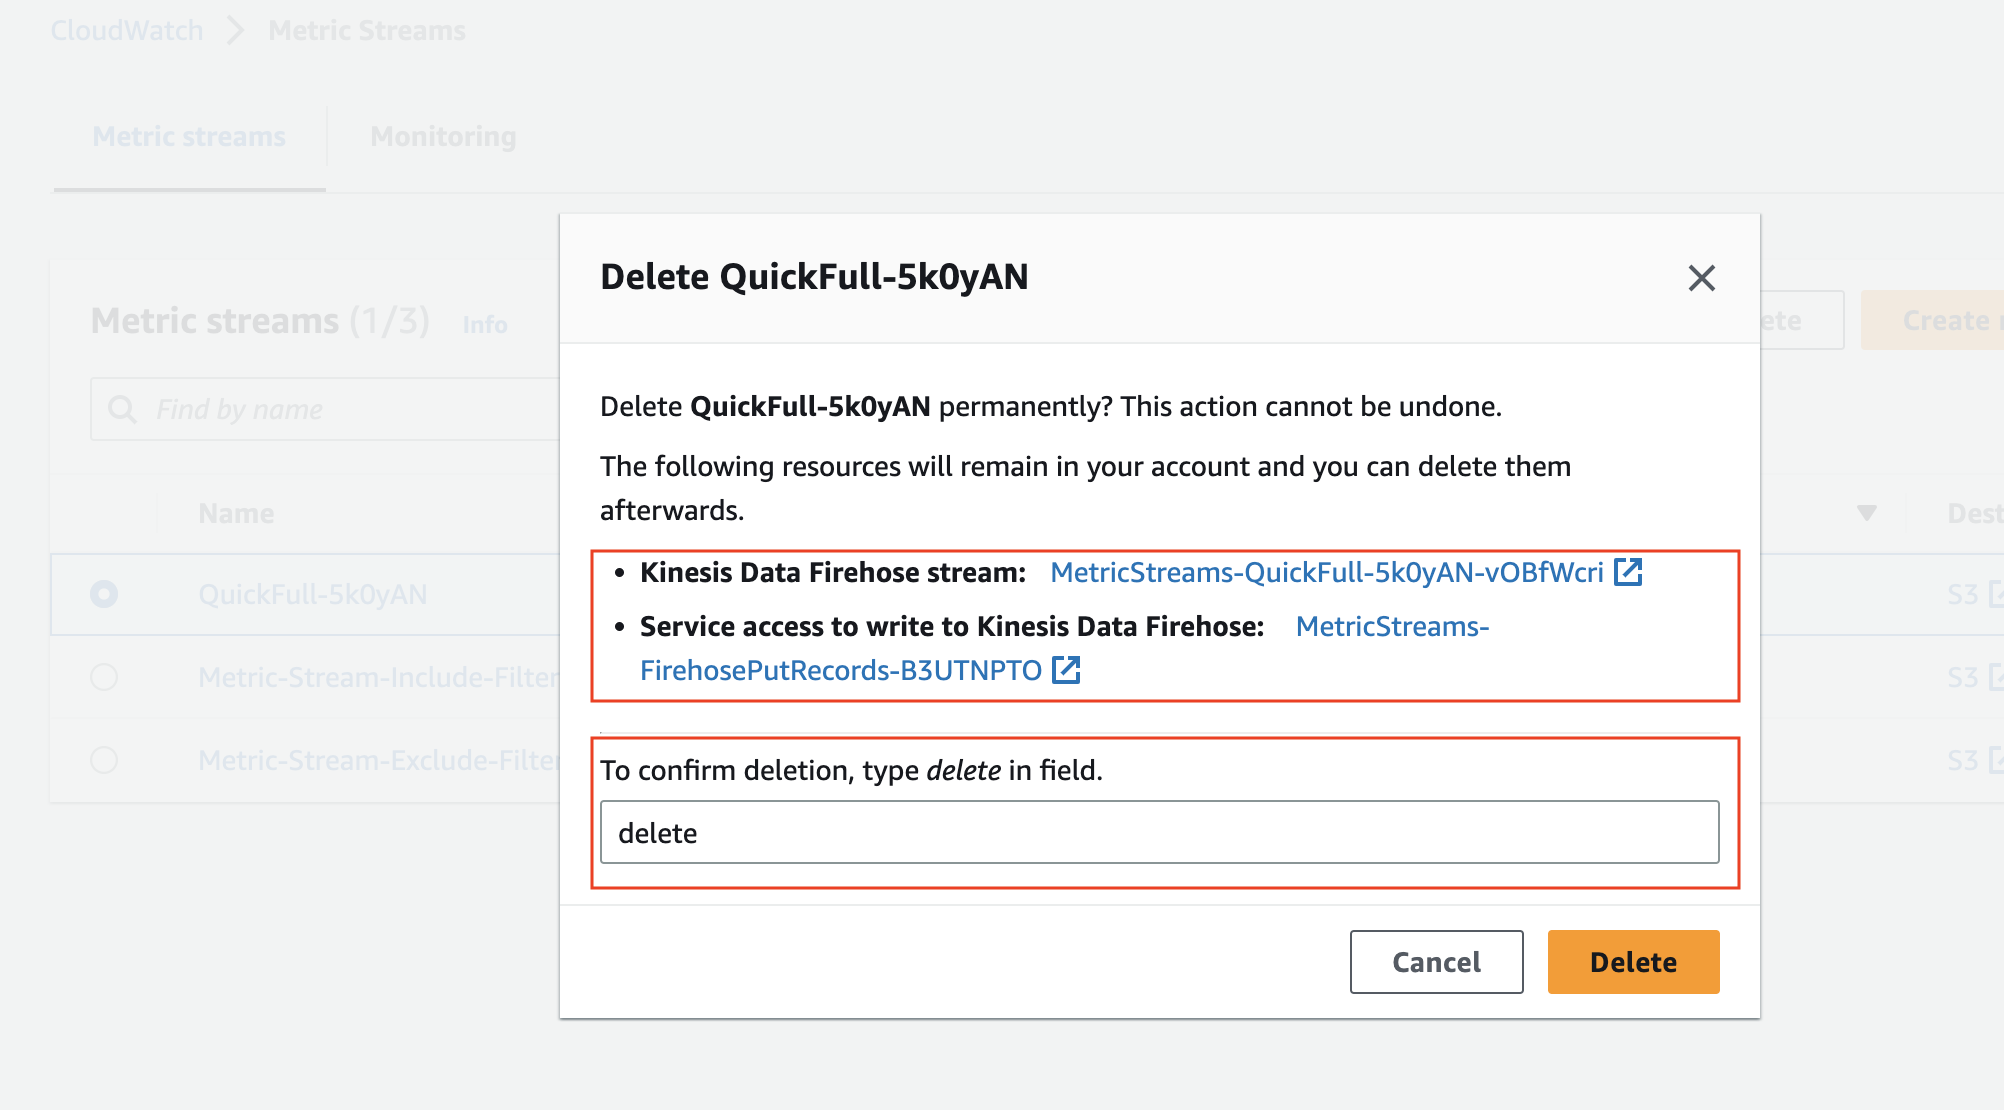
Figure 18: Confirm deletion
Note: The resources mentioned in the above screenshots are not deleted when you delete the metric stream using console. You need to explicitly delete them in their associated consoles.
In order to clean up the resources created by metric stream using the AWS CloudFormation walkthrough, please follow the steps below.
There are couple of prerequisites that you need to complete before deleting the resources created by AWS CloudFormation stacks.
Prerequisite 1
Navigate to the Amazon CloudWatch console and select the metric stream created using AWS CloudFormation. Choose “Stop” to stop streaming any new metric updates to Amazon S3 bucket.
Prerequisite 2
Once you have stopped streaming metrics to Amazon S3 bucket you need to empty it. Please follow the below steps to locate your Amazon S3 bucket and then empty it:
- Navigate to the AWS CloudFormation console. From the Stacks list, select stack that you want to delete and go to “Outputs” section. Copy the Amazon S3 bucket name.
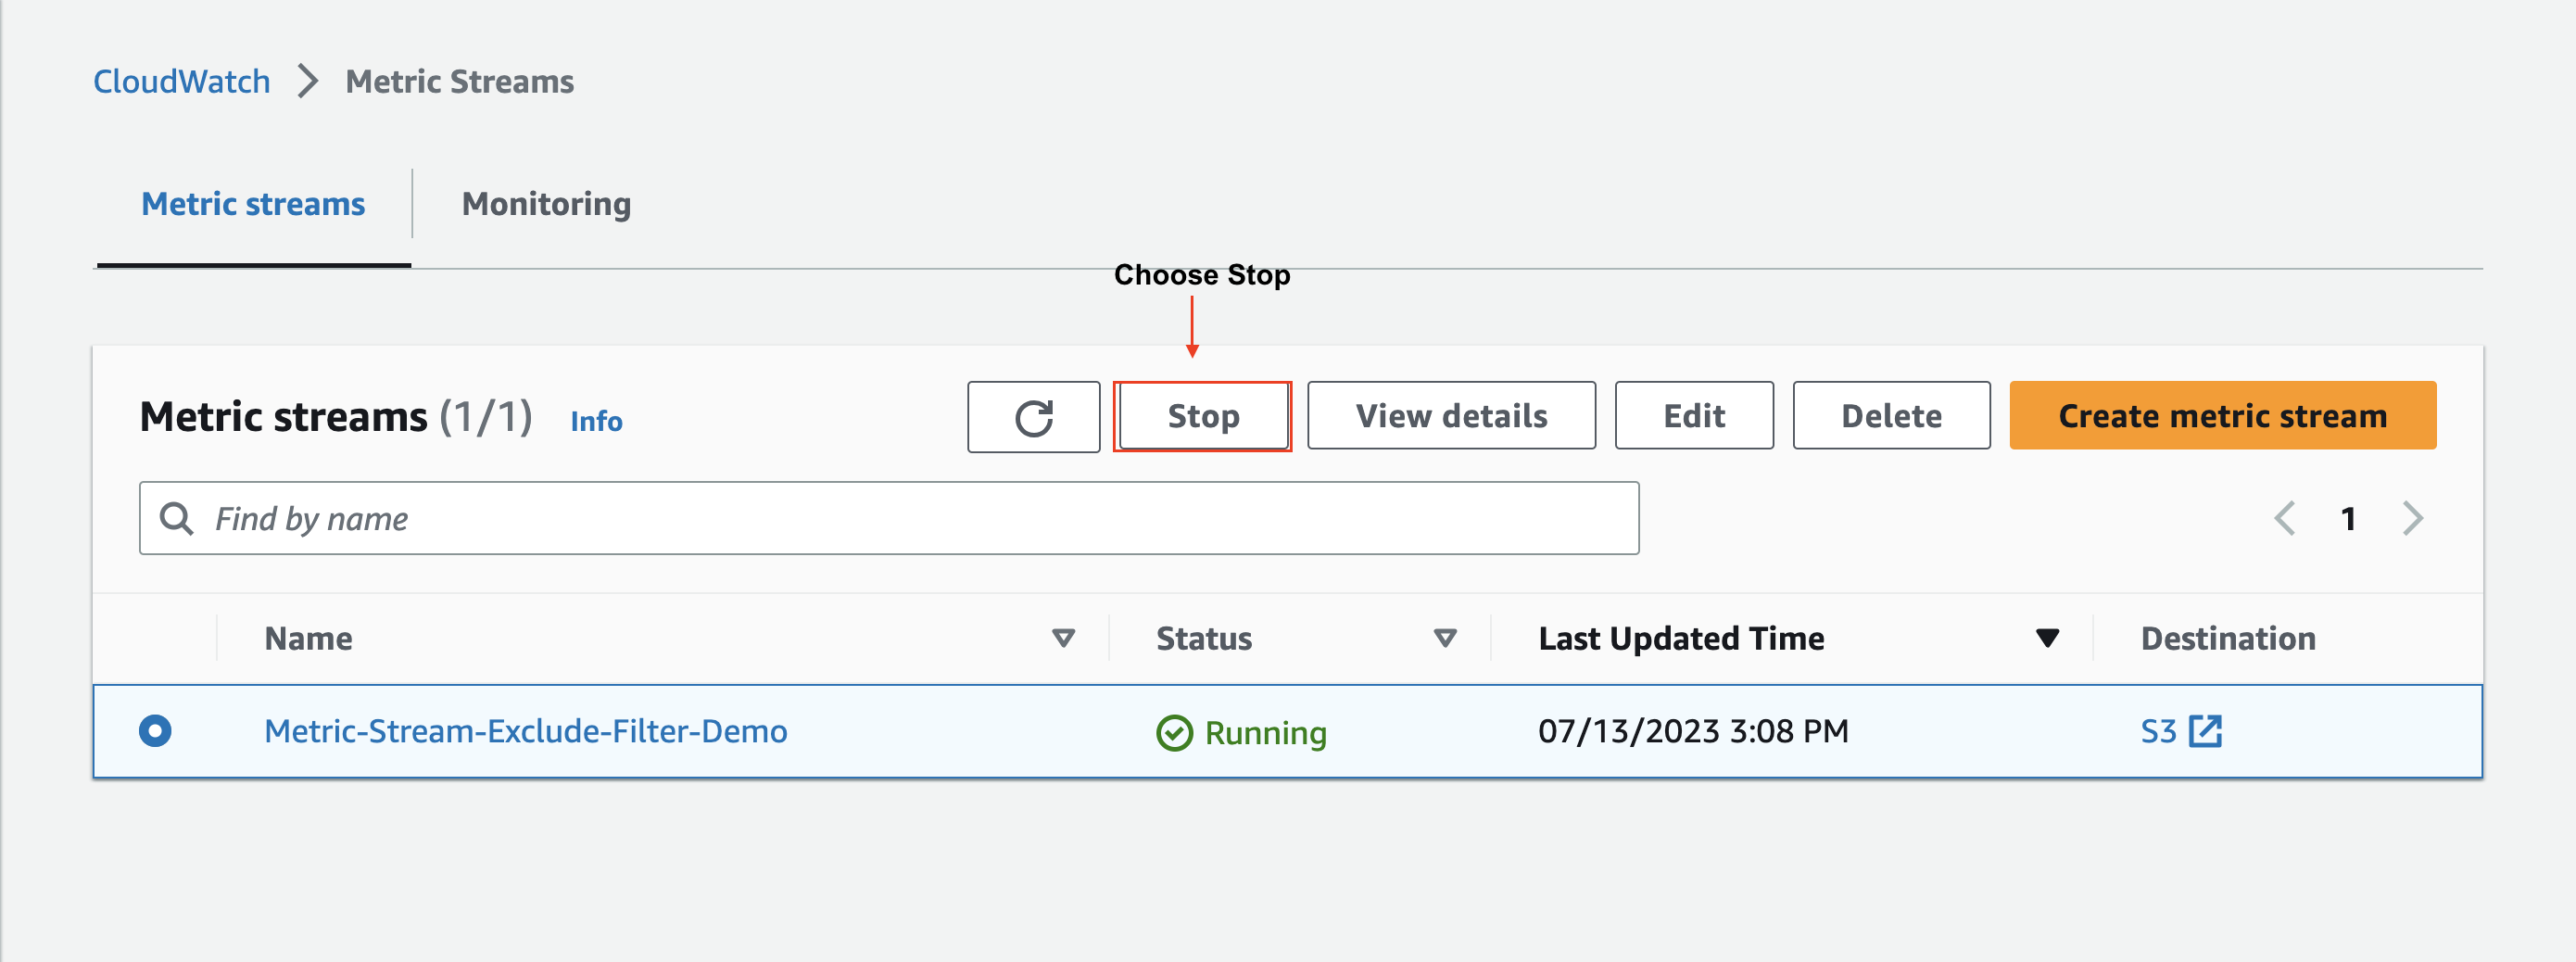
Figure 19: Copying Amazon S3 bucket name
- Navigate to the Amazon S3 console, locate the Amazon S3 bucket name that you copied in the previous step and then choose Empty. Once the bucket is emptied move on to the next steps.
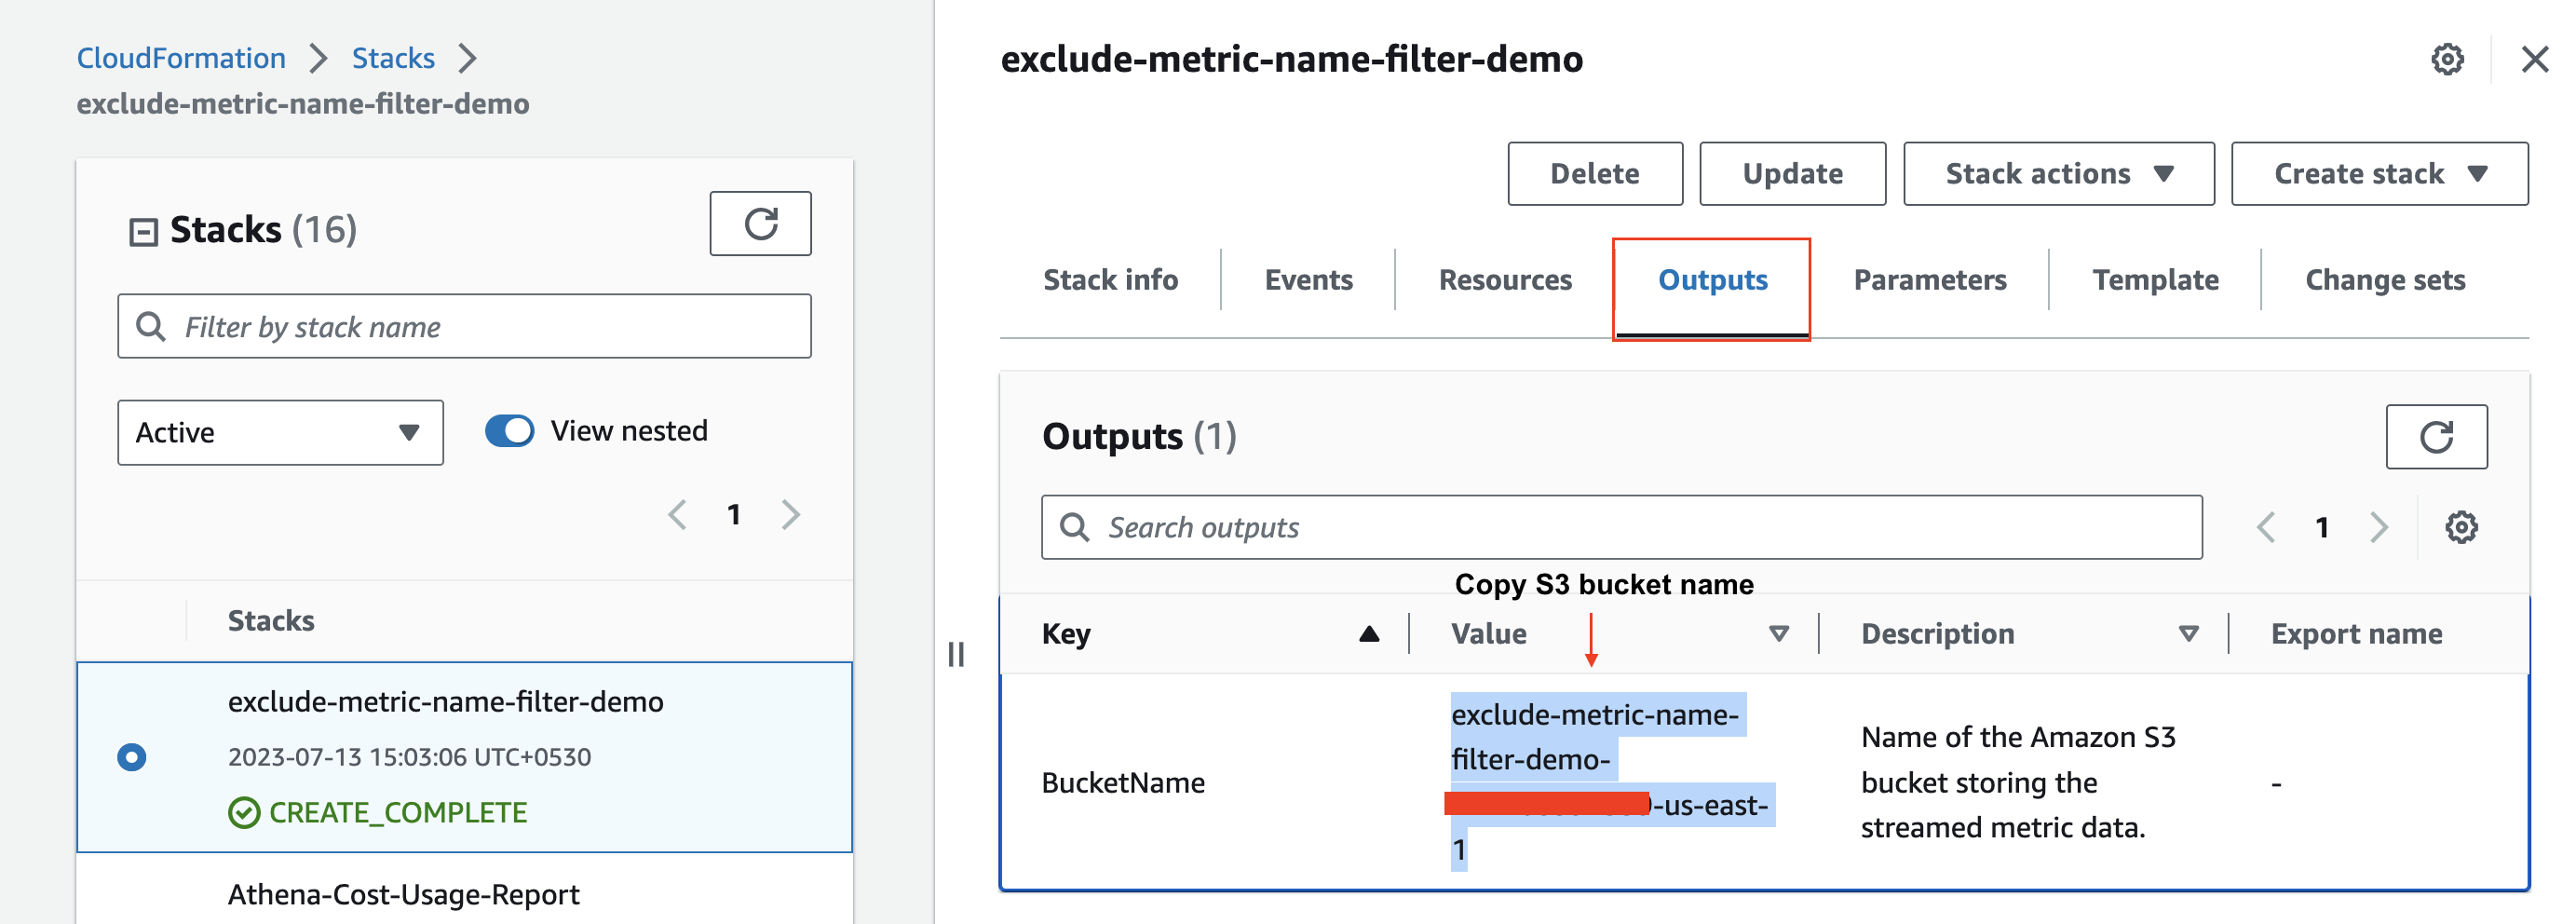
Figure 20: Filter Amazon S3 bucket name
Steps to delete AWS CloudFormation stacks
1. In the AWS CloudFormation console, select the stack named “exclude-metric-name-filter-demo”.
2. In the top right corner, choose Delete.
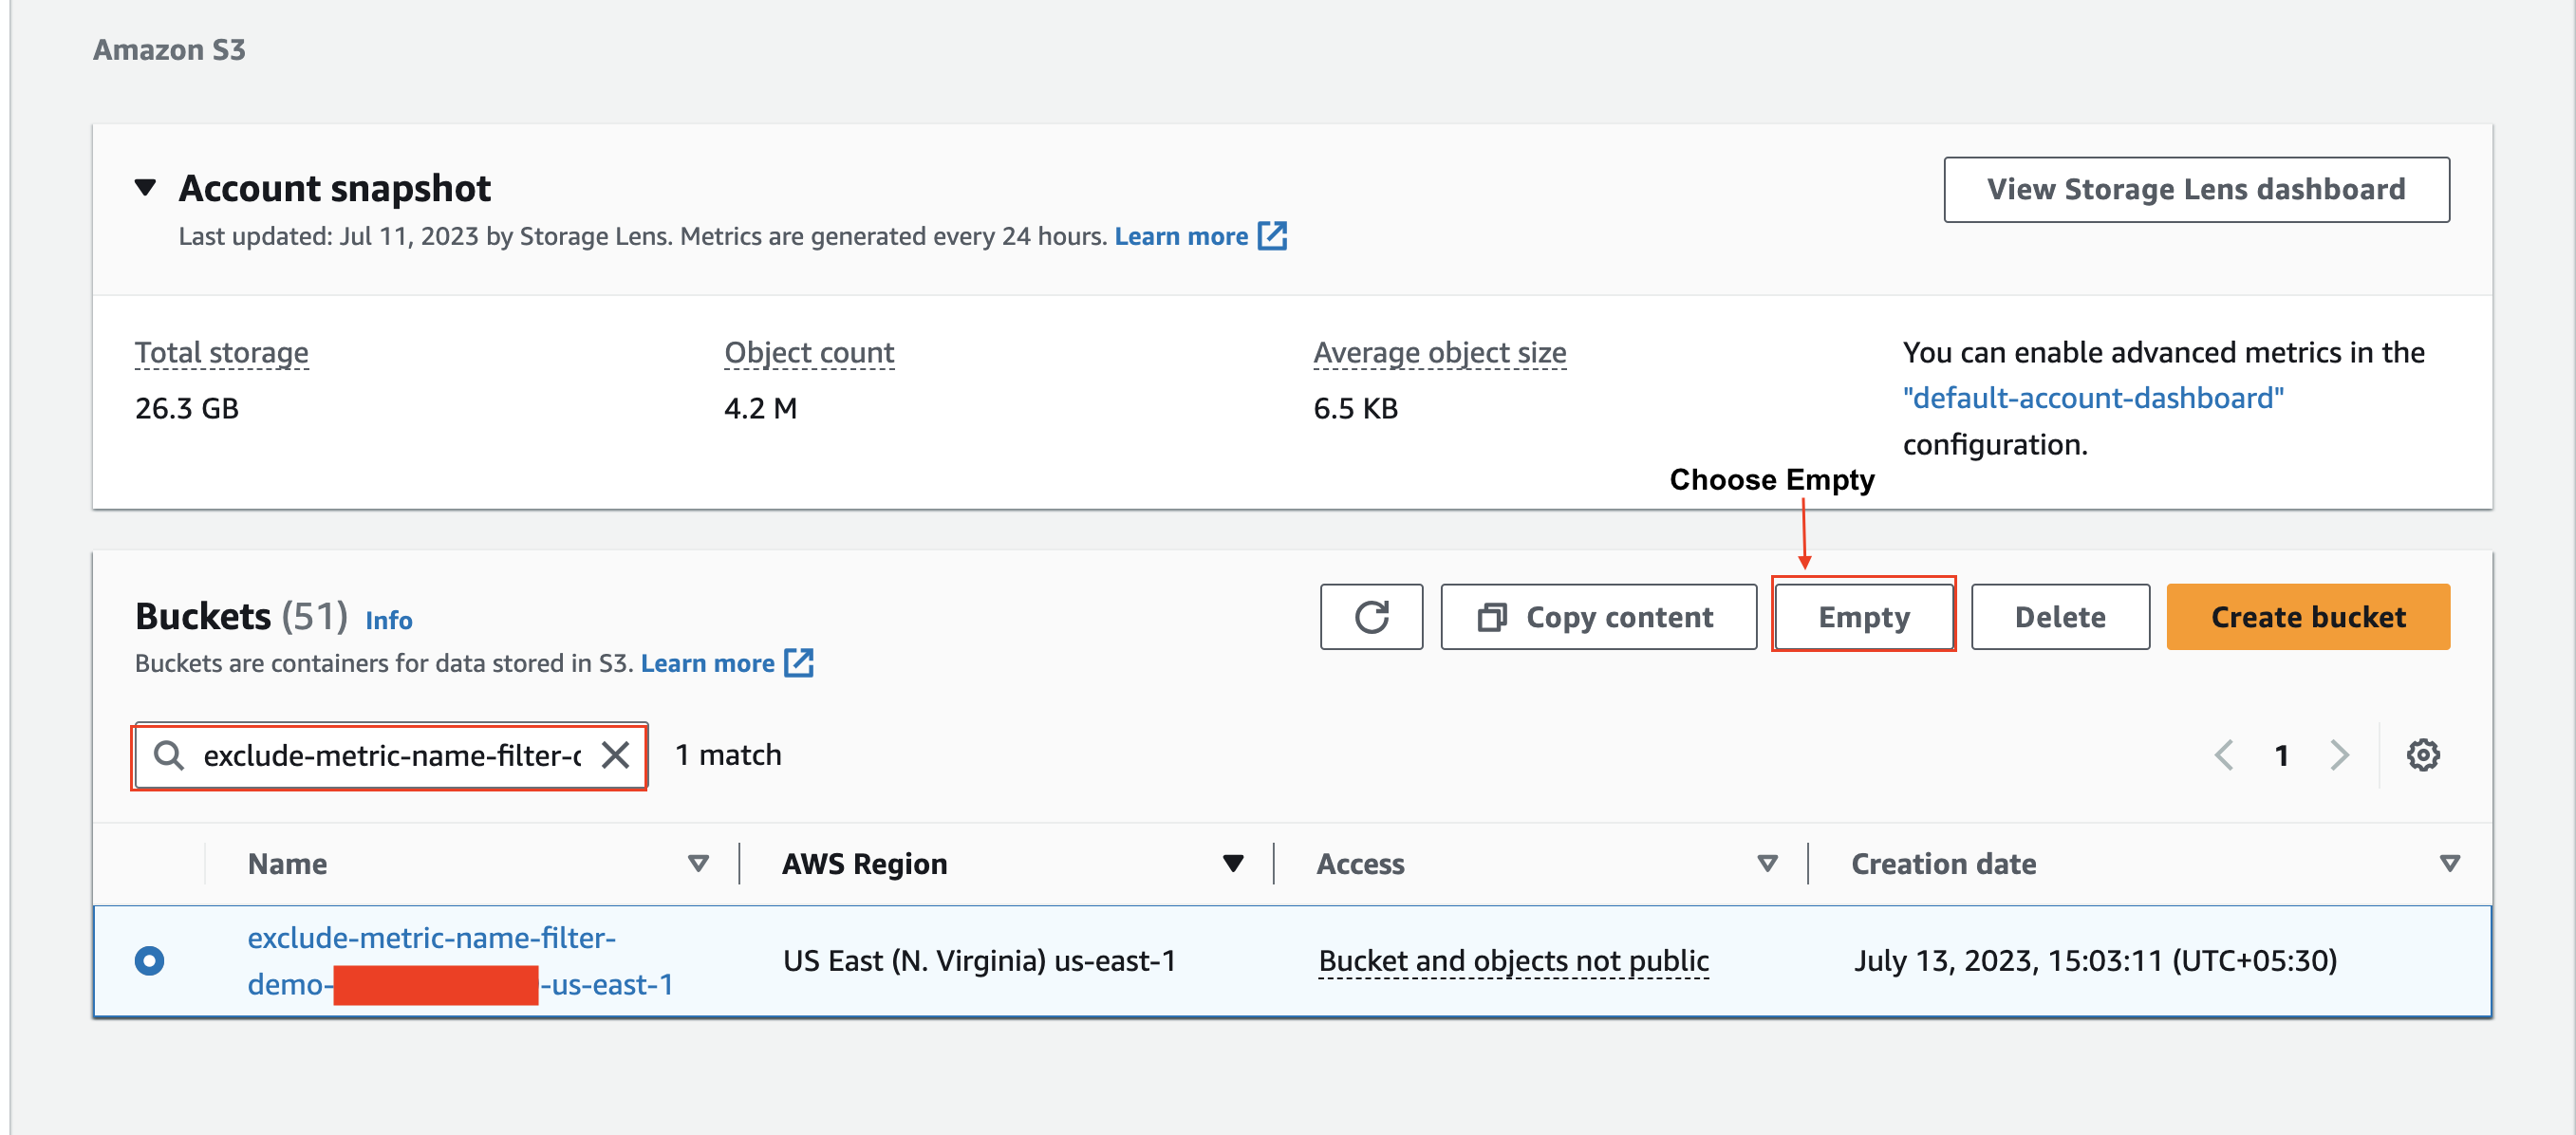
Figure 21: Delete AWS CloudFormation stack
3. In the pop-up window, select Delete.
4. Wait for the stack to reach the DELETE_COMPLETE status. You need to periodically select Refresh to see the latest stack status.
Similarly, by following the steps above, you can also delete the second stack created with name “include-metric-name-filter-demo”.
Conclusion
CloudWatch Metric Streams now offers enhanced filtering capabilities through metric name filtering, providing finer grained control over the metrics you stream. Whether you choose to stream all your metrics, or include or exclude some metrics by namespace or metric name, Metric Streams helps provide low-latency streaming of metrics to your chosen destination, while reducing operational overhead. Start leveraging the capabilities of metric name filtering in CloudWatch Metric Streams today and unlock the full potential of your telemetry data and observability workflows.