AWS Cloud Operations Blog
Using Amazon CloudWatch RUM with a React web application in five steps
In this post we will explain how you can use Amazon CloudWatch RUM to monitor a single-page web application built using React.
CloudWatch RUM is a real user monitoring (RUM) capability which helps you identify and debug client-side issues and enhance the end user’s digital experience. The data that you can visualize and analyze includes page load times, client-side errors, and user behavior. This helps application developers and DevOps engineers to reduce the mean time to resolve (MTTR) for client-side performance issues. Please refer to blog post An Observability Journey with Amazon CloudWatch RUM, Evidently, and ServiceLens for more on the benefits of RUM and other features of CloudWatch.
Solution Overview
To use RUM, you create an app monitor, then you then install the CloudWatch RUM web client in your application via npm, and paste the JavaScript or TypeScript snippet into your application’s source code.
In the first three steps of this blog post, you will create a RUM application and a basic React app.
Once your React application is integrated with RUM, you will start to see custom page argument e.g userid in your RUM page views. In step four, you will remove arguments from the URL paths collected in RUM; this aggregates similar URL paths.
Finally step five, shows you how to use React Error Boundaries to catch your errors and still send the error information to RUM.
Step 1: Create RUM App Monitor
In step two, you will create a web server on your local machine (localhost) to host the React web application but first we will create a RUM App Monitor to monitor localhost in the AWS console.
- Open the CloudWatch console and select RUM under the “Application monitoring” heading
- Click “Add app monitor” (you may need to click “Getting started” if this is your first visit)
- Add a name for your app monitor, I used “localhost”.
- Under application domain, specify “localhost”
- If you are not using localhost, please update the application domain to match the URL you will be using or your application will be unable to post data to RUM.
- Under Configure RUM data collection, leave Performance telemetry, JavaScript errors and HTTP errors selected
- Leave “Allow cookies” selected
- Leave sessions samples at 100%
- Under Data storage, leave the option to store application telemetry data in CloudWatch logs not selected
- Under Authorization, ensure “Create a new identity pool” is selected
- Leave the remaining settings as Default and click “Add app monitor”
- You will be presented with a script, change the code format to JavaScript and copy or download the script, you will need this for Step 3.
- If you need to retrieve the script later, you can browse into the app monitor and navigate to the Configuration tab.
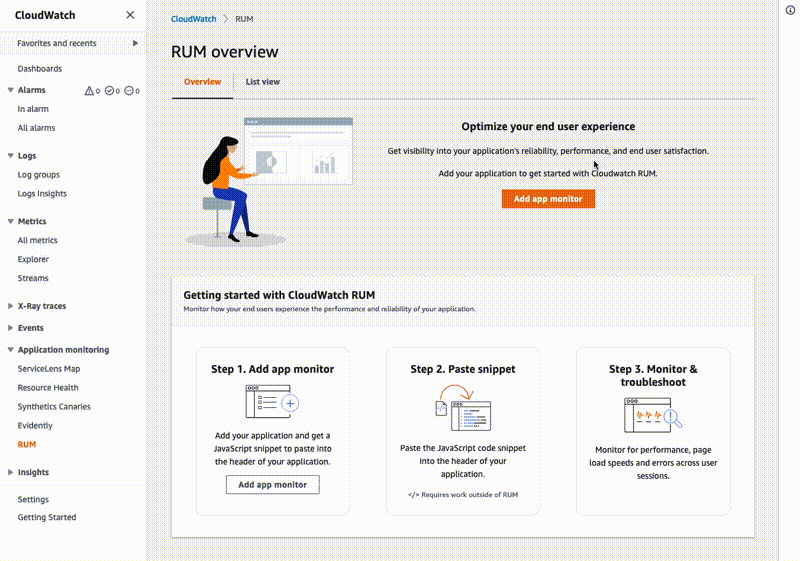
Figure 1: Application creation process
Step 2: Create a local React application
In this step we will create a simple React Singe Page Application (SPA) and install the RUM NPM module but not configure it.
From the command line on your workstation follow the steps below to create the new local React application:
1. Create Default React App in a new directory.
2. Install the npm CloudWatch RUM and React Router modules.
React Router will allow us to add url based routing to our SPA and CloudWatch RUM will allow us to easily integrate our SPA with the CloudWatch Rum service.
3. Create the local app.
In the src folder, replace all contents of the App.js file with the code below and save. This code is a basic React application using React Router, with a few routes created, no integration with CloudWatch RUM has yet been configured:
4. Start and test the development server.
- Type “npm start” which will open a new browser tab and navigate to http://localhost:3000
- Browse the page and click on the links, note that the “Welcome” link is broken deliberately, you will need to reload the page after clicking Welcome
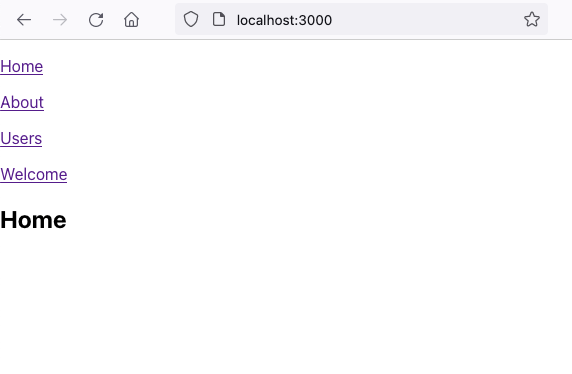
Figure 2. Sample application
Step 3: Instrument Application with CloudWatch RUM web client
Now you will configure the RUM module to automatically instrument PageViews in our sample application.
- Edit the src/App.js file
- Take the sample code you generated earlier in Step 1 and add it after the last “import”.
- Initialise the awsRum variable before the try block (let awsRum = null), and remove the const before awsRum inside the try block. This will allow us to access awsRum globally in the application and we’ll use this in steps four and five.
- When you are done save the changes and it should look similar to this:
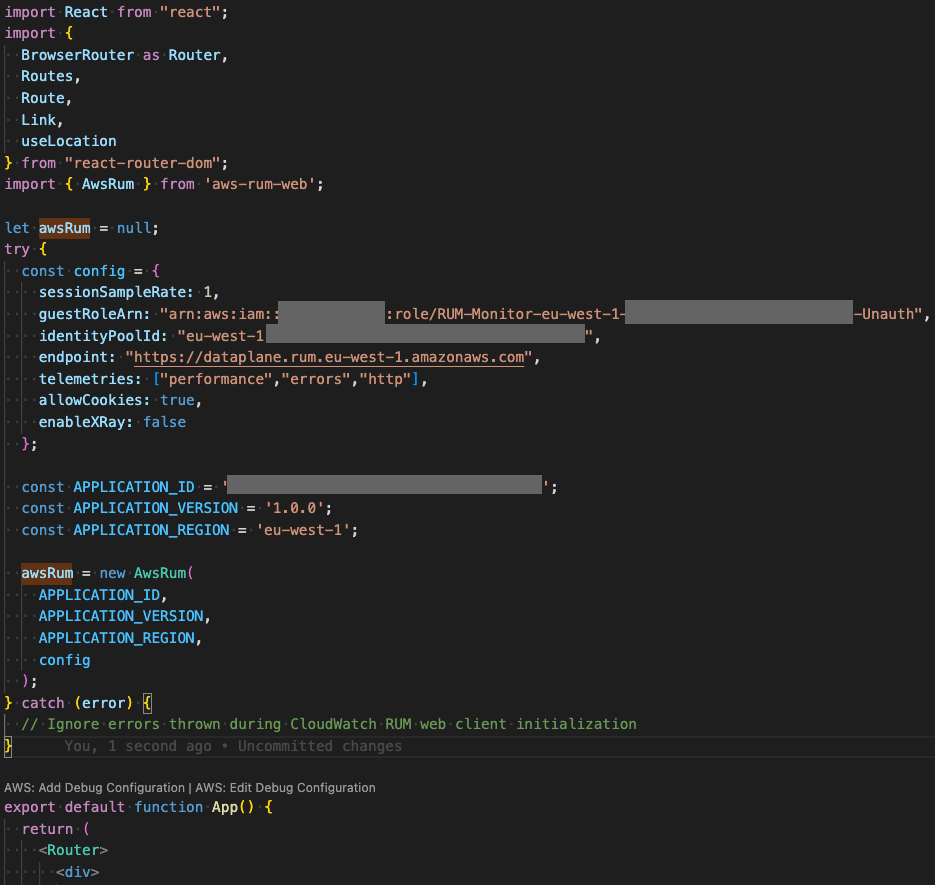
Figure 3: Snippet of App.js file
Note, none of the items in the config object are secret – they are publicly accessible by design.
- Now you can see RUM in action: browse to your application, http://localhost:3000, using ‘Web Developer Tools’ open the Network Tab. You will see the additional POST requests to the RUM dataplane (dataplane.rum.eu-west-1.amazonaws.com), including at least one ‘page_view_event’.
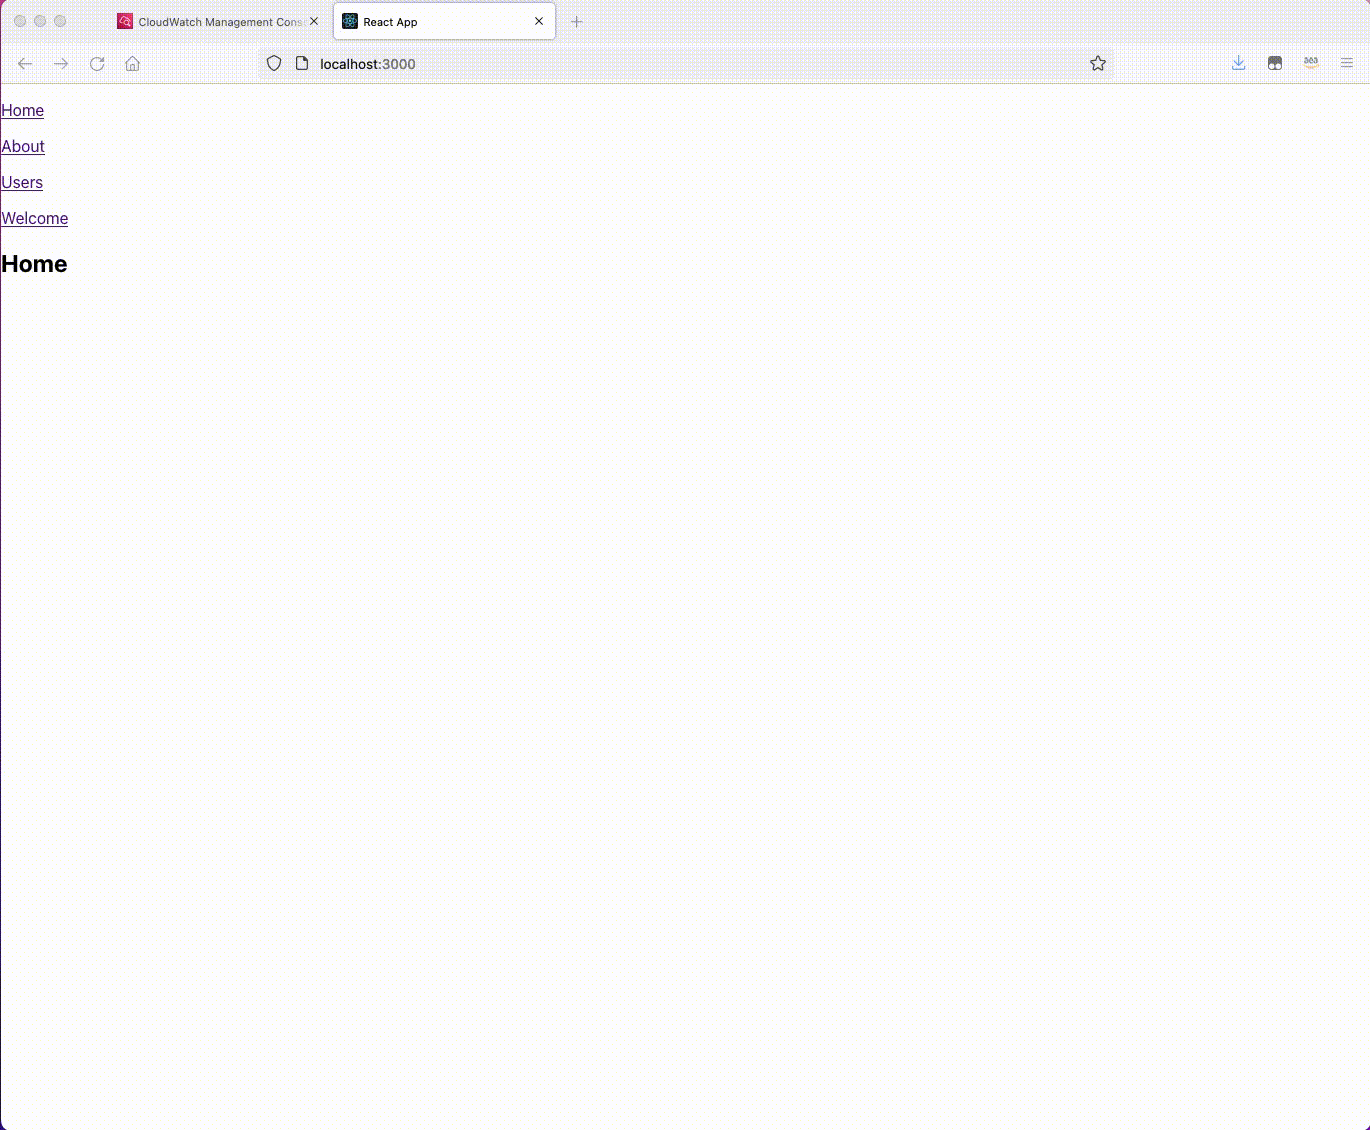
Figure 4. Network Section of Developer tools
- If you would like to browse around your application and click on the various sections, including Users, you will be able to see the pageviews in the AWS CloudWatch RUM Console. Notice that when you browse Users, what is reflected in RUM contains the userid for every user page that you click on.
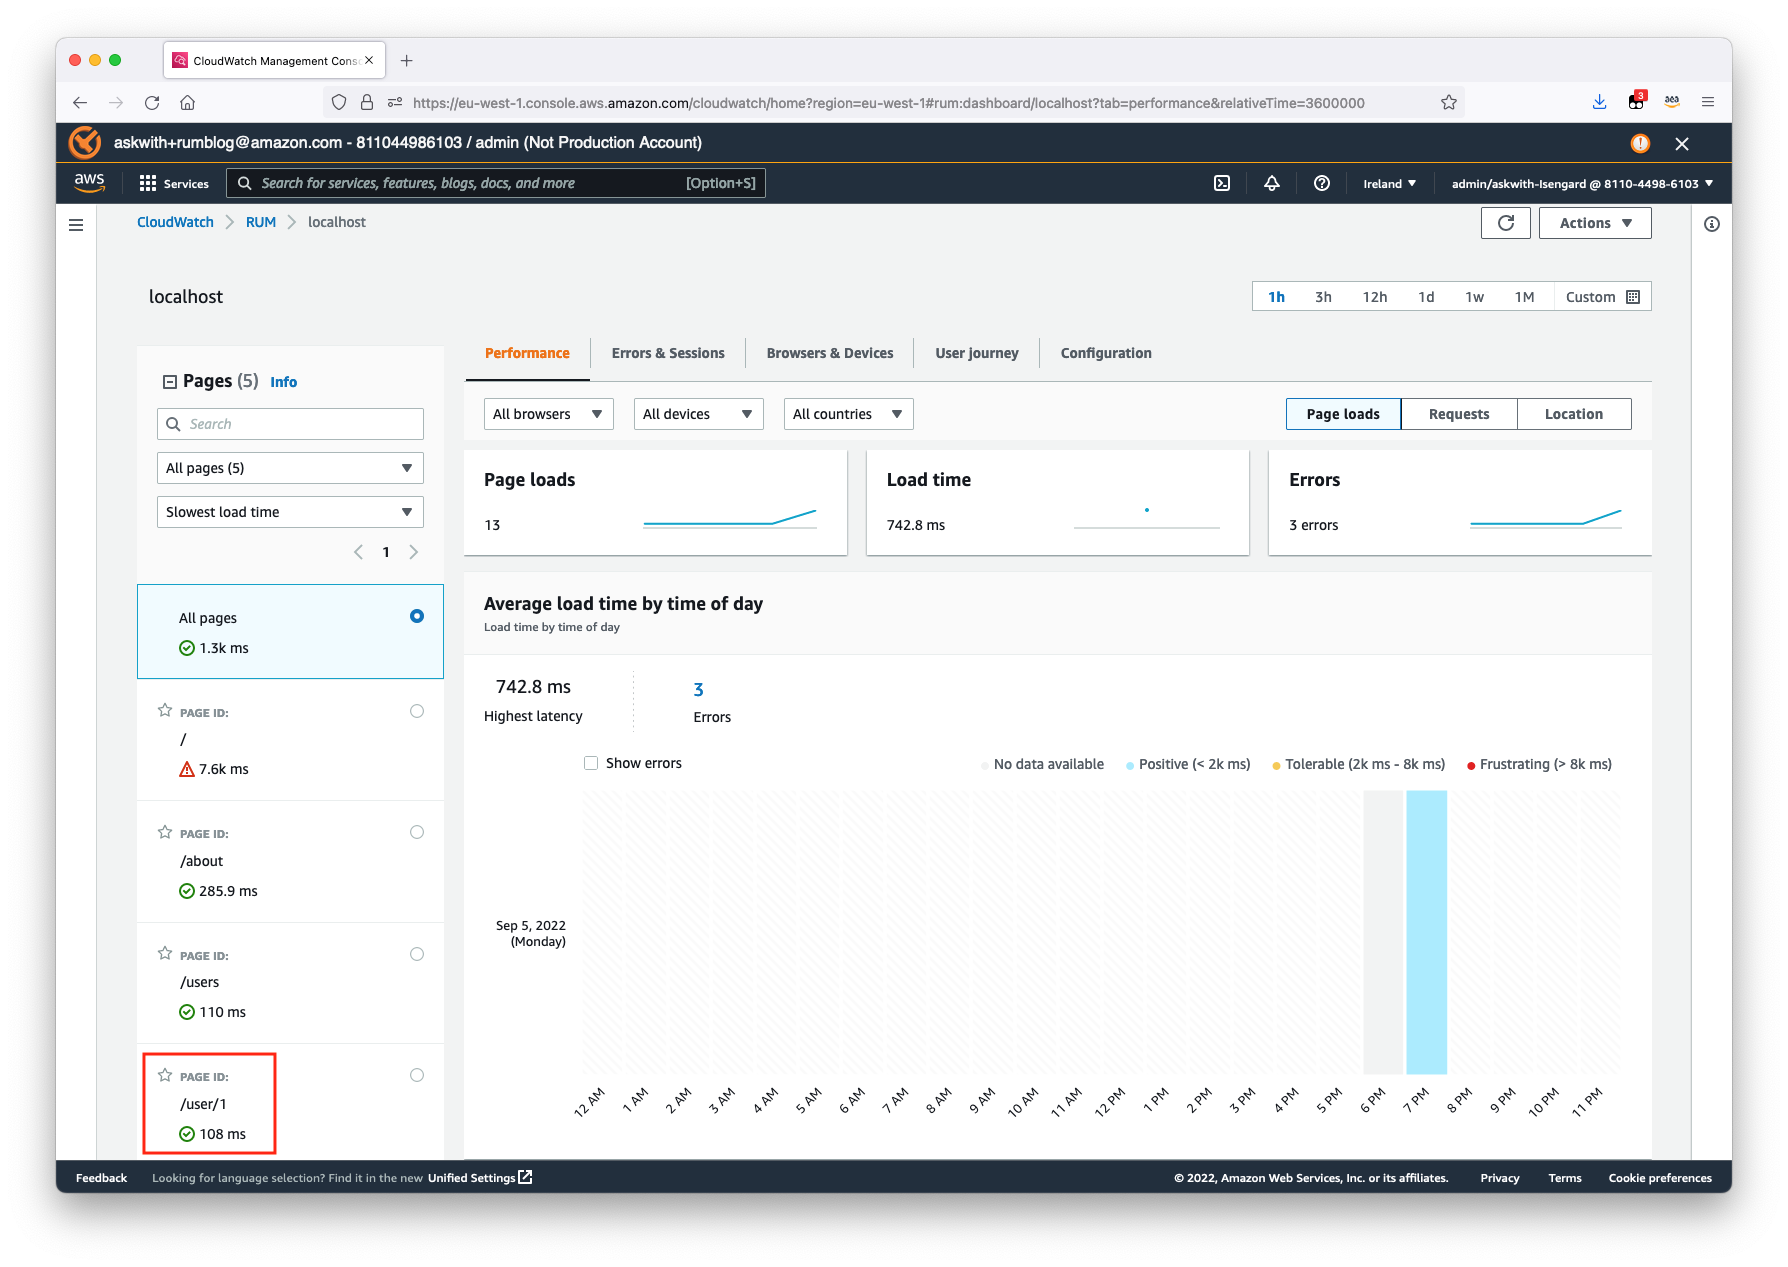
Figure 5: RUM console
Step 4: Omit user ID from page views
If your application contains arguments in the URL’s path, you may want to record custom page IDs so that the arguments can be removed and the pages will be aggregated in CloudWatch. For example, if you have two URLs https://localhost/user/1 and https://localhost/user/2, you can remove the user ID from the path so that the page ID is /user for both URLs.
To do this, you will update the sample application as follows:
- Disable automatic logging of all page views to RUM by adding disableAutoPageView:true to the config section in src/App.js. Note, you will need to add a comma on the previous line.
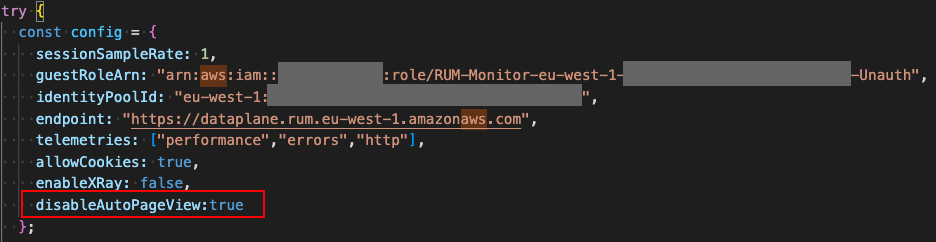
Figure 6: Code snippet
- To handle the recording of page views, we add 2 new functions:
- RecordPageView(): Records page views normally
- RecordPageViewWithoutUserId(): Removes the “user id” from the recorded page views.
Add the following before the default function export in src/App.js and save:
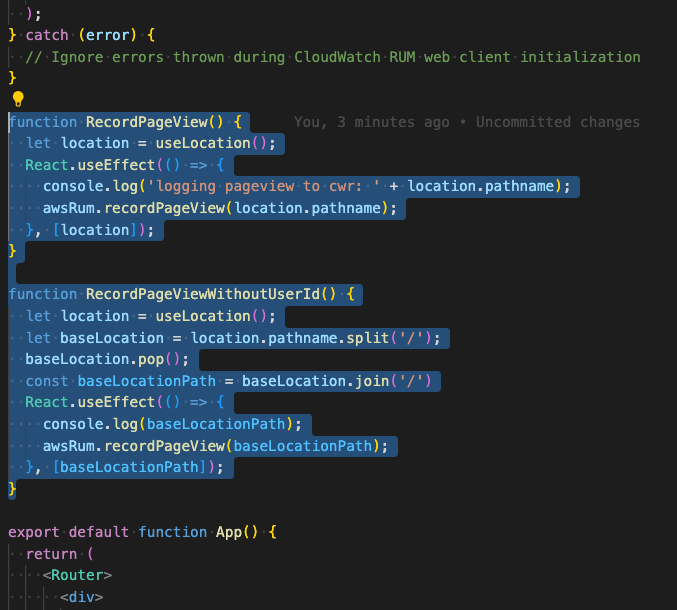
Figure 7: Two new functions in the App.js file
We will now instrument our React components to invoke the new functions. Sections – Home, About, Users and Welcome should use RecordPageView() but the User section should use RecordPageViewWithoutUserId() to strip the user id from the recorded URLs. Once updated and you have saved your code, your App.js should look like this:
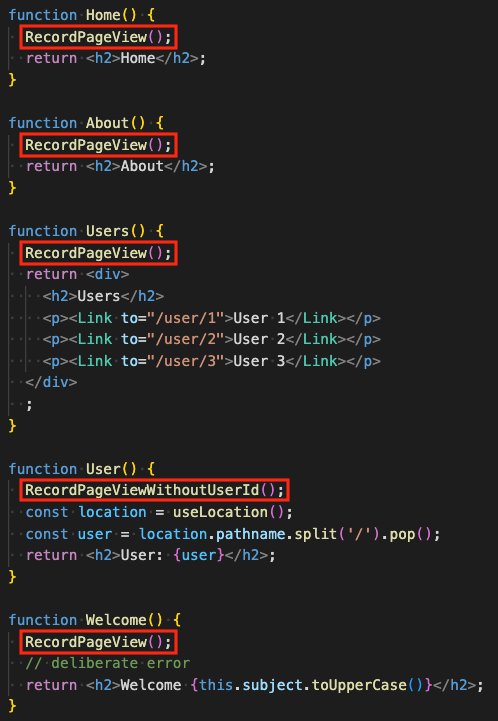
Figure 8: Updated React components in the App.js file
- If you now browse your site again (you may need to refresh the page if you already had it open) and open the user pages and examine the Network Tab with Web Developer Tools, you will see in the POST request to the RUM dataplane that the path logged is /user not /user/1 or /user/2. Before and After screenshots are shown below.
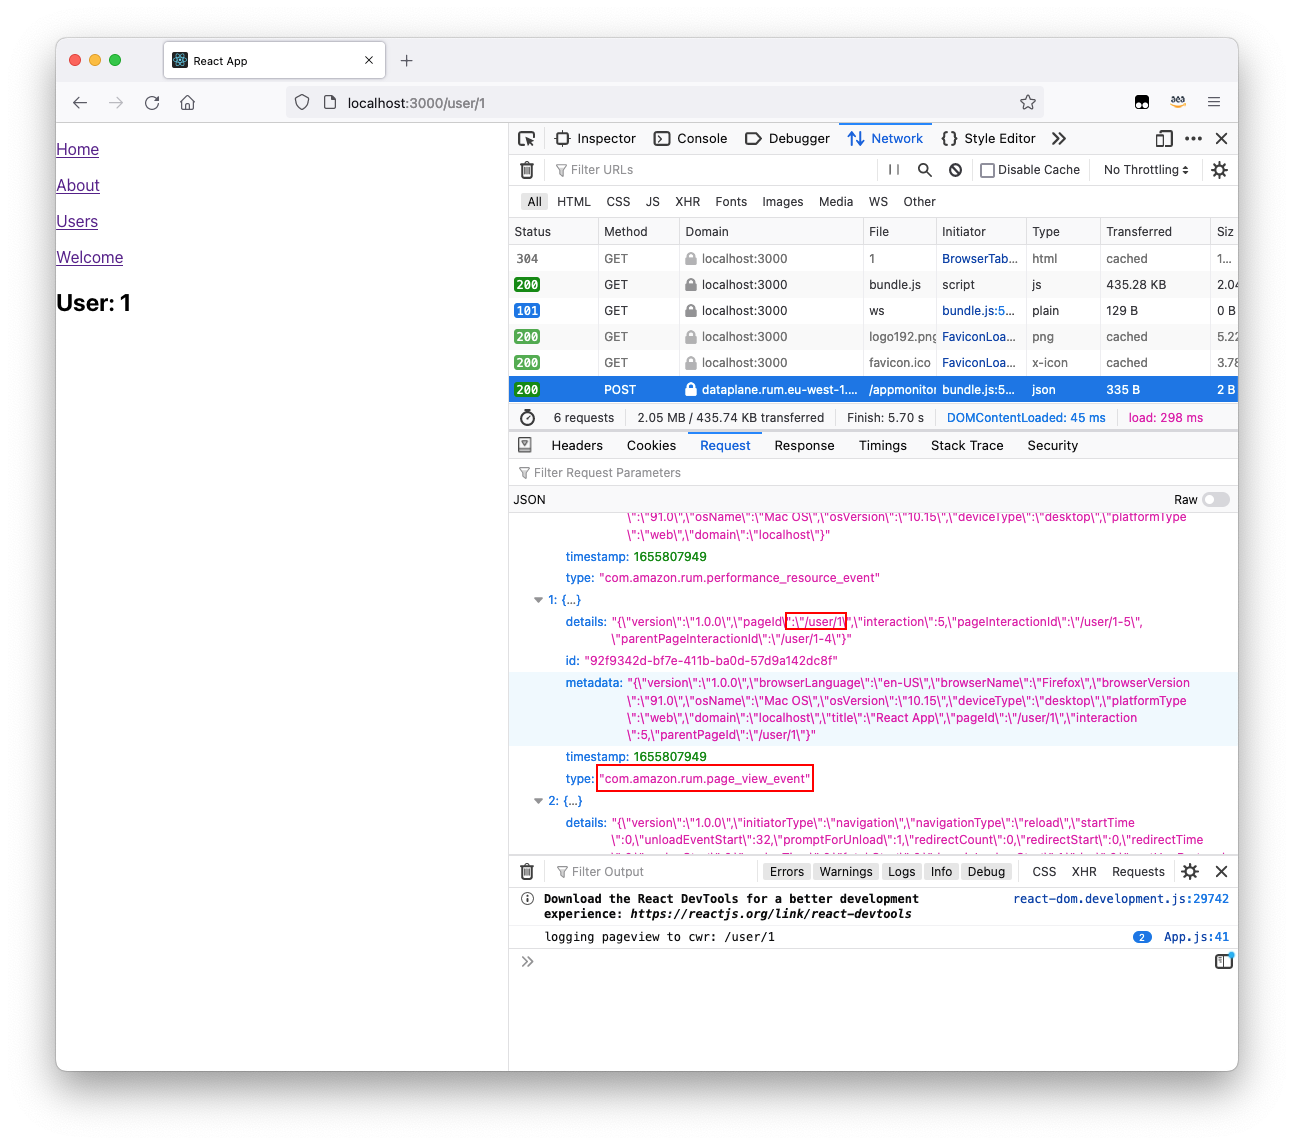
Figure 9: Network section in Developer Tools before changes
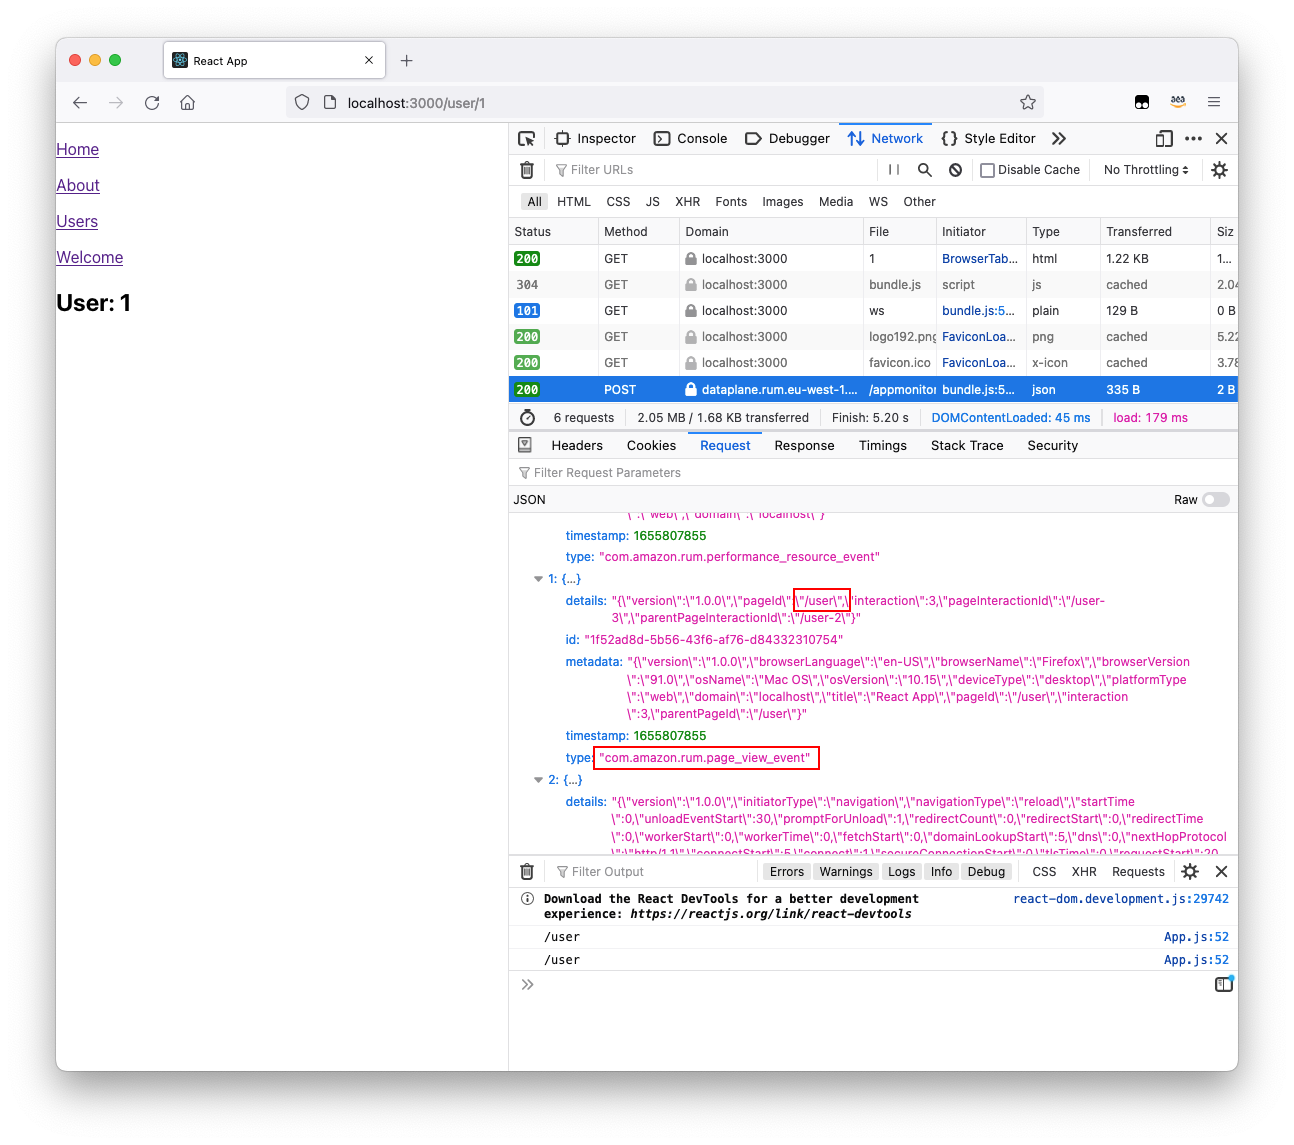
Figure 10: Network section in Developer Tools after changes
- Now that you have seen the data being posted, take a look in RUM and you will see page views for the Users page without the corresponding ids.
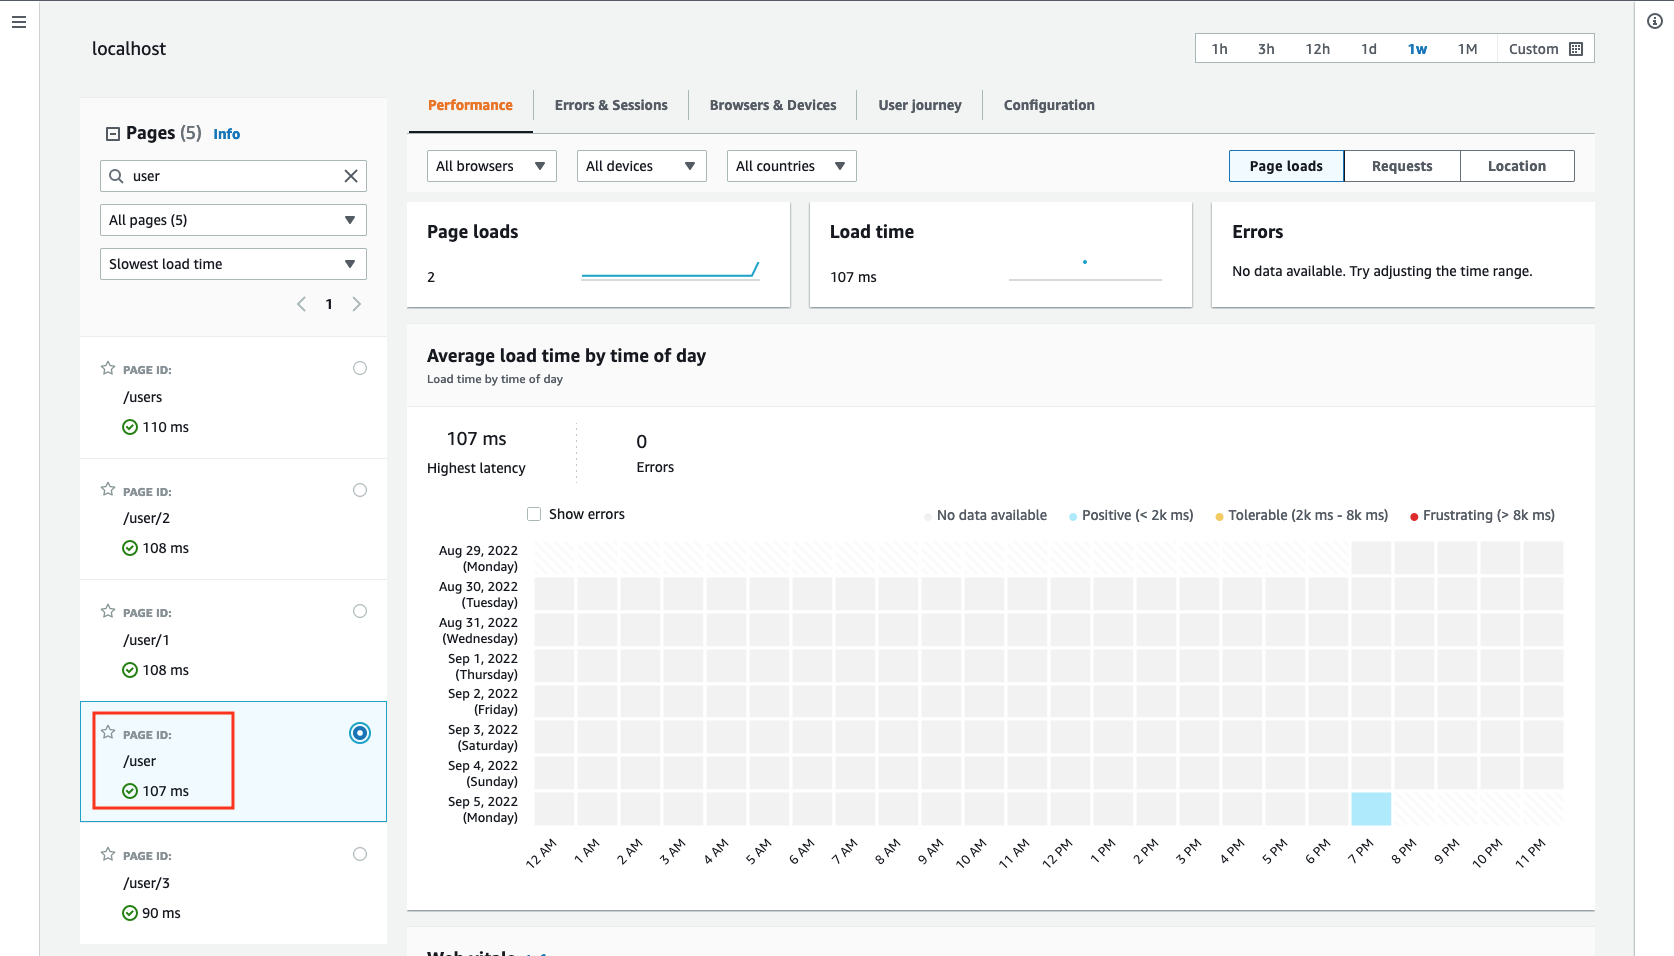
Figure 11: RUM console
- As a recap, in this step, we have turned off RUMs automatic page recording (disableAutoPageView:true) and manually implemented our own page recording using the awsRum.recordPageView method so we can choose exactly how are pages are recorded in RUM.
Step 5: Instrument Error Handling to Record Errors
Now if you browse to the Welcome page, you will notice that we have an error on this page that is not being caught by the application or React, resulting in a blank page and an error in the browser console for users, but it is sending the error information to RUM.
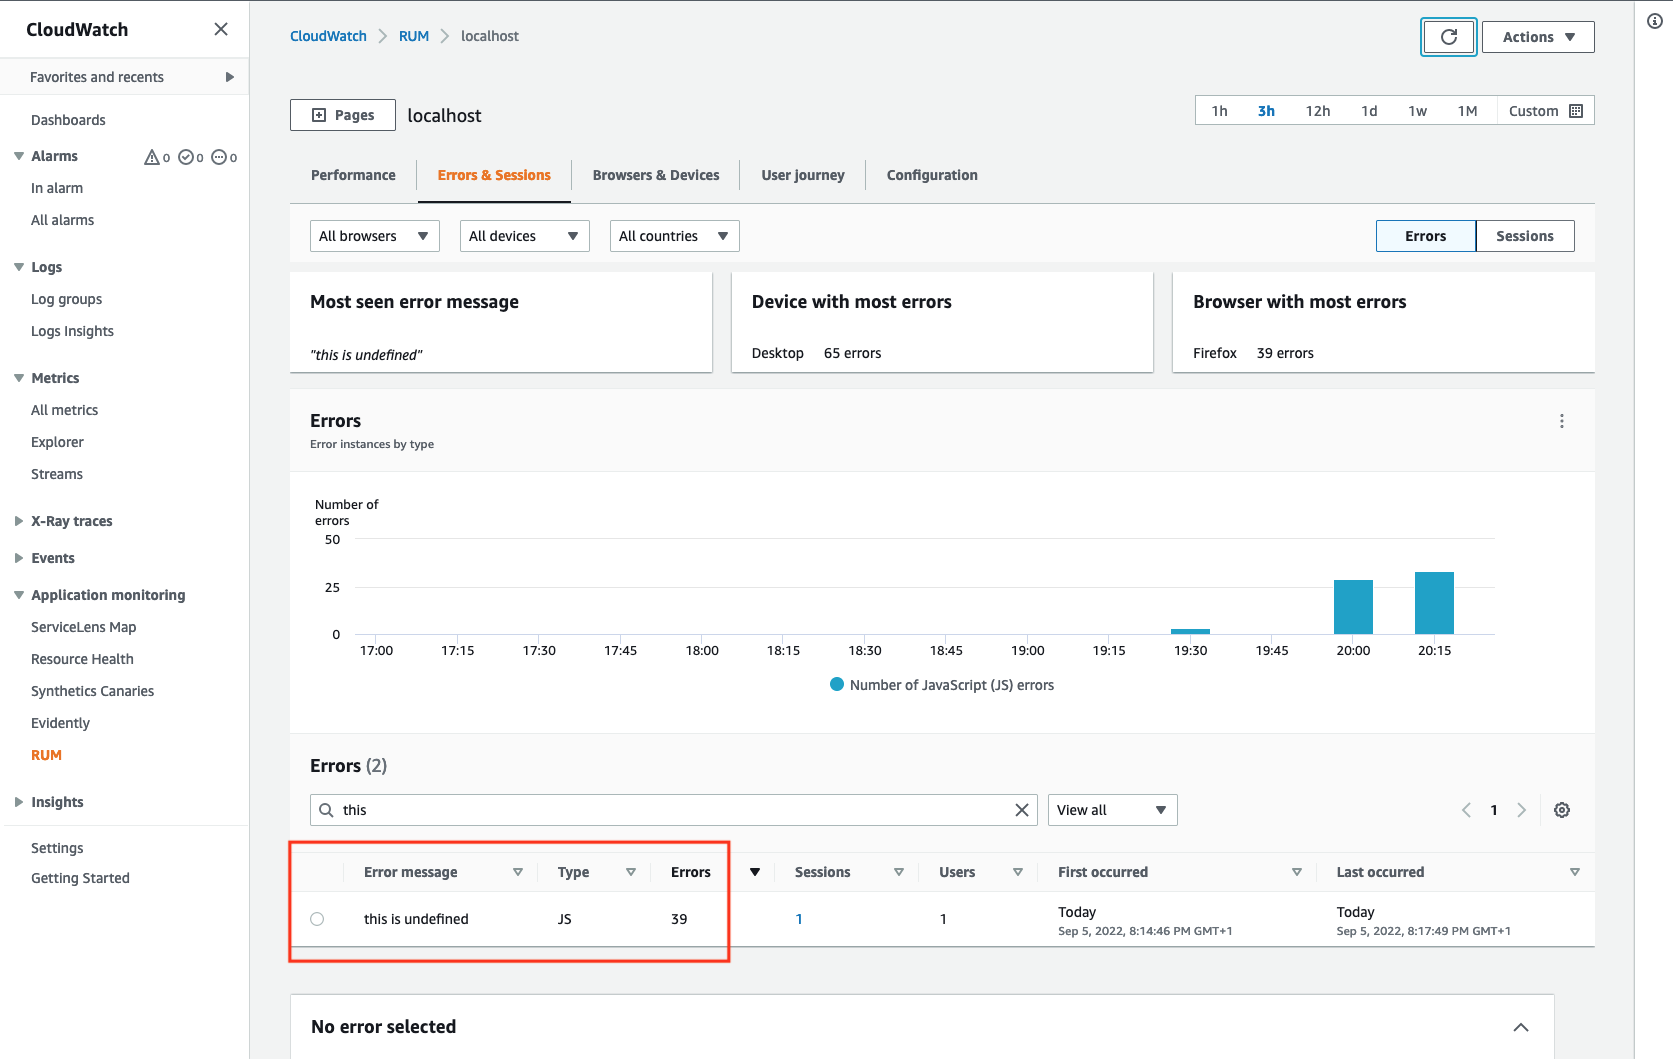
Figure 12. RUM console showing error
React Error Boundaries can be used to catch this error but, by default, errors would not be emitted to RUM, so you must also instruct the Error Boundary to emit the captured error to RUM. You will also have the Error Boundary render a helpful message for the user.
- In
src/App.js,add an ErrorBoundary class after the two new PageView functions you added earlier:
Note the awsRum.recordError(error) in componentDidCatch – this statement sends captured errors to RUM.
- So that the new code is used we will add <ErrorBoundary>..</ErrorBoundary> around our <Routes>…</Routes> and save the changes to App.js, your updated code in should look like this:
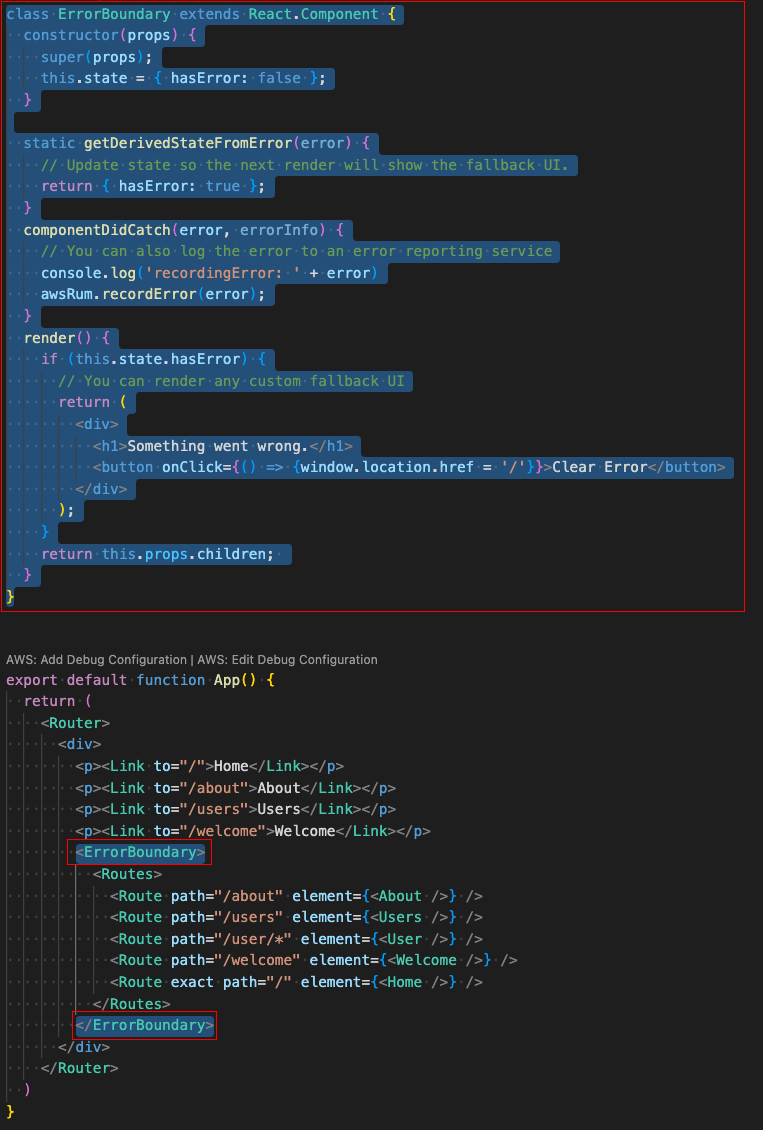
Figure 13: Code snippet highlighting the addition of ErrorBoundary
- Now browse to the localhost site again and open the Welcome page, a graceful error message will now be displayed.
- Using your browsers Web Developer Tools to look at the POST to CloudWatch RUM (the url will be similar to dataplane.rum.eu-west-1.amazonaws.com), you will see that a com.amazon.rum.js_error_event has been logged with an error of “this is undefined” which is the expected error message in this example. Note, if you are not using the Firefox browser, you may see a different error.
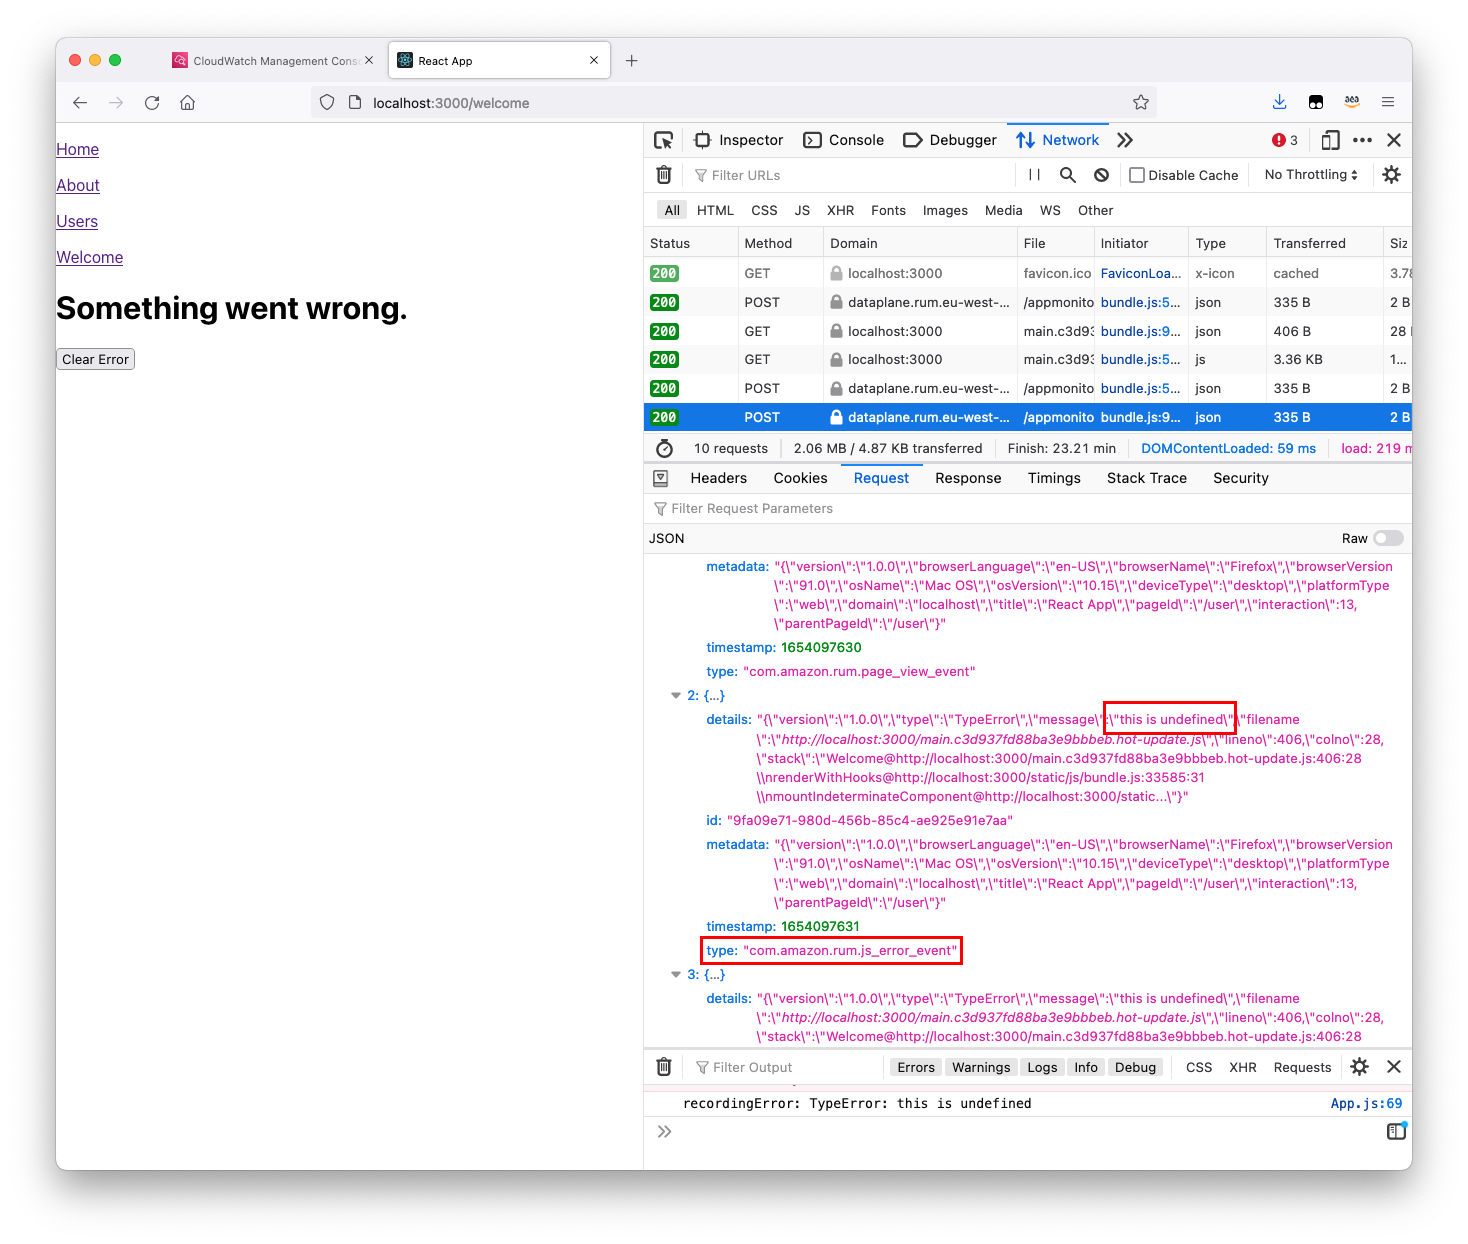
Figure 14: Network section of Developer Tools showing error page
- If you now look in RUM, you will see these errors recorded, which would not occur if the error boundary had not been configured to emit the error to RUM correctly:
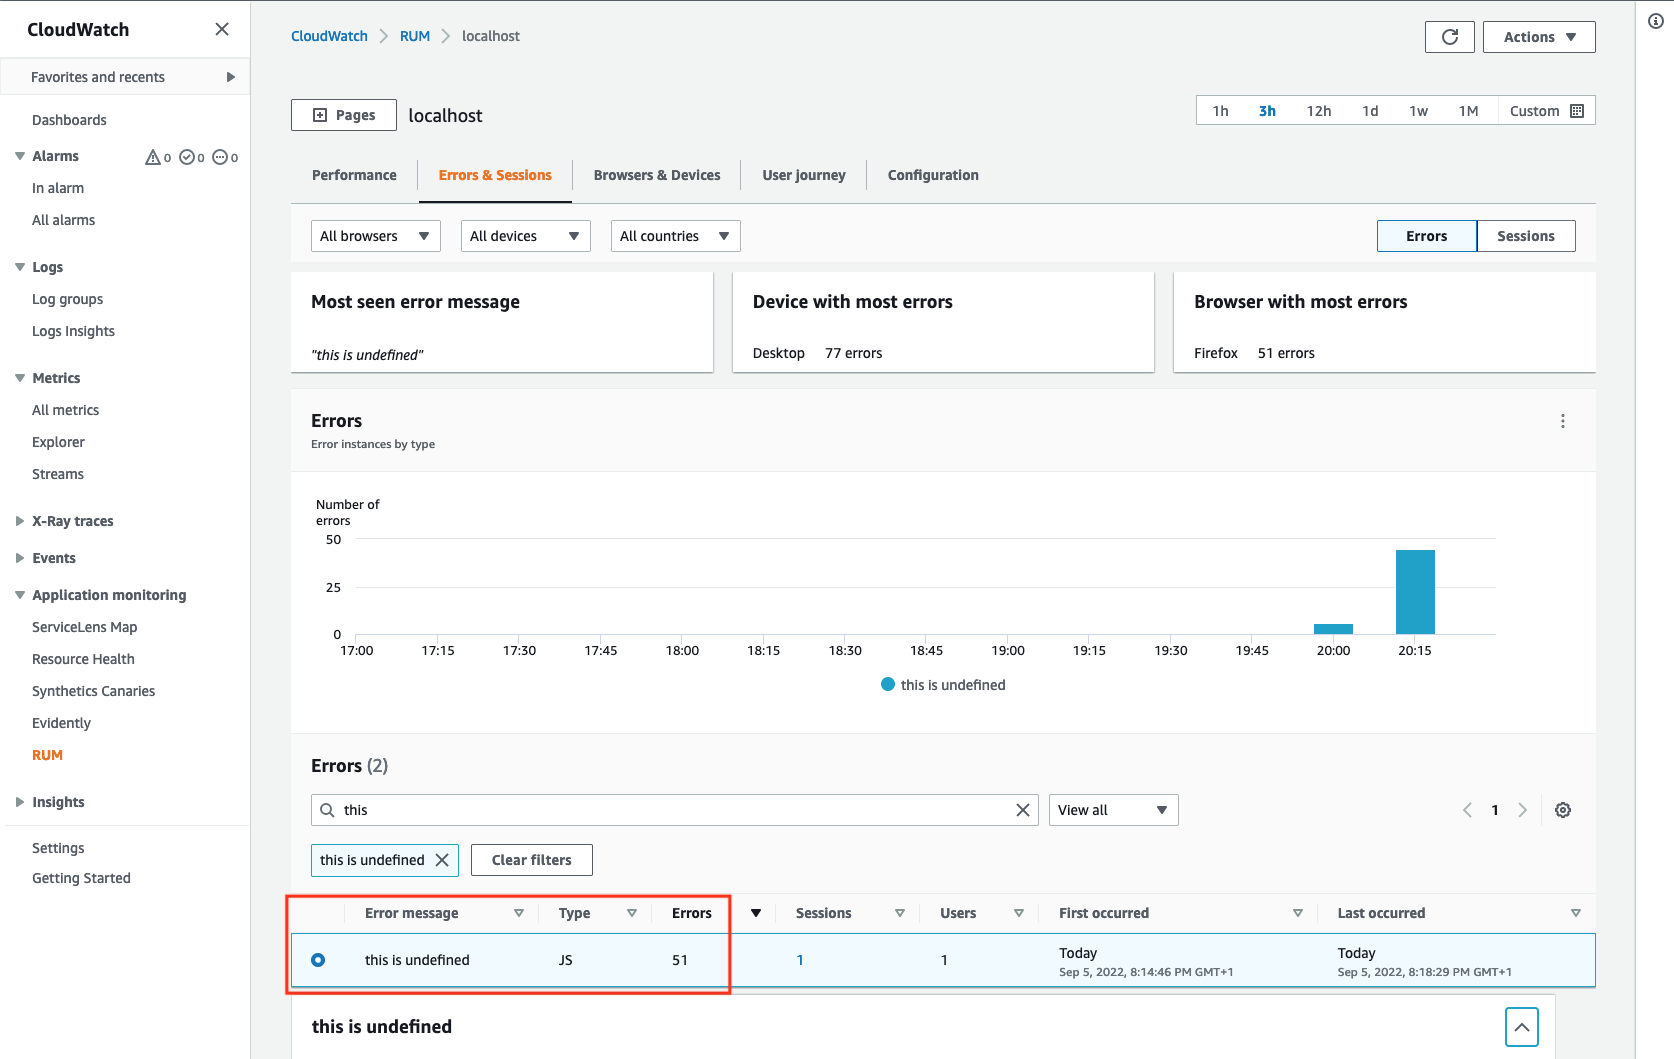
Figure 15. RUM console showing error
To recap – In this step, you have used React Error Boundaries to catch errors and used awsRum.recordError to send records to RUM.
Clean-up
- Stop your local site (Control+C) and delete files if no longer required.
- Remove the RUM app monitor:
- Open RUM from CloudWatch console and select List View
- Select the app monitor you created earlier
- Click Actions and click Delete
- Confirm Deletion.
Conclusion
In this post, we created a new CloudWatch RUM App monitor and a basic React site. You added the CloudWatch RUM NPM module to the React site to record page views, you used disableAutoPageView:true and the awsRum.recordPageView method to configure page recording to remove the userid from the recorded URL. Finally, you added React error handling with CloudWatch RUM integration using Error Boundaries. For more information, refer to the CloudWatch RUM documentation and CloudWatch RUM Web Client github repo here. All sample code is for demonstration purposes only.
Visit the One Observability Workshop for more examples and a deeper dive into synthetic testing, log correlation, custom metrics, advanced dashboarding, anomaly detection models, and more.
About the authors: