Networking & Content Delivery
Building Multi-Region AWS Client VPN with Microsoft Active Directory and Amazon Route 53
Introduction
Organizations often require a secure connection between their users and resources on internal networks. For organizations with a global workforce, traditional virtual private network (VPN) solutions can be difficult to scale. Providing a single VPN endpoint creates a single point of failure: an outage would mean loss of connectivity to critical IT infrastructure.
Authenticating users to a VPN usually requires an identity provider (IdP). Microsoft Active Directory is a popular choice of IdP for many organizations. Because Microsoft Active Directory has existed for nearly two decades, an IT organization’s domain usually represents a significant investment of time and effort. Organizations often look to integrate Microsoft Active Directory as the authentication layer for business applications to maximize that investment. However, configuring traditional VPN solutions to authenticate against Microsoft Active Directory can be a complex process.
In this post, you will learn how to create AWS Client VPN endpoints across multiple AWS Regions, and allow users across all endpoints to authenticate against a single directory.
Services Brief
Let’s begin with a summary of the AWS services used in this solution.
AWS Client VPN is a scalable, fully managed VPN service. It provides an endpoint for users to establish a secure connection to the AWS network using OpenVPN-based VPN client software. With the right networking configuration, users connect to Client VPN to access both AWS and on-premises resources.
Client VPN also supports Microsoft Active Directory authentication. You can integrate self-managed directories, or use AWS Directory Service Managed Microsoft AD. AWS Managed Microsoft AD lets you run fully-featured Microsoft Active Directory with automatic data replication, snapshots, and software updates. This solution also utilizes Active Directory Connector, a managed gateway that proxies directory requests to other domain controllers.
Amazon Route 53 is a highly available and scalable DNS web service that can intelligently route users based on latency (among other routing policies), allowing for fault-tolerant, low-latency solutions.
AWS Certificate Manager (ACM) lets you easily provision, manage, and deploy public and private Secure Sockets Layer/Transport Layer Security (SSL/TLS) certificates for use with AWS services, including Client VPN.
Architecture
The architecture in Figure 1 implements a fault tolerant solution for remote user access with AWS services. When a user starts a VPN connection, Route 53 determines which Client VPN endpoint to use by finding the endpoint that is currently providing the lowest latency. Route 53 responds to the DNS request with the address of that endpoint. The VPN user is then prompted for their Microsoft Active Directory credentials. The Client VPN endpoint authenticates these credentials against a multi-Region Managed Microsoft AD, and if they are valid, the VPN user establishes a secure connection to AWS.
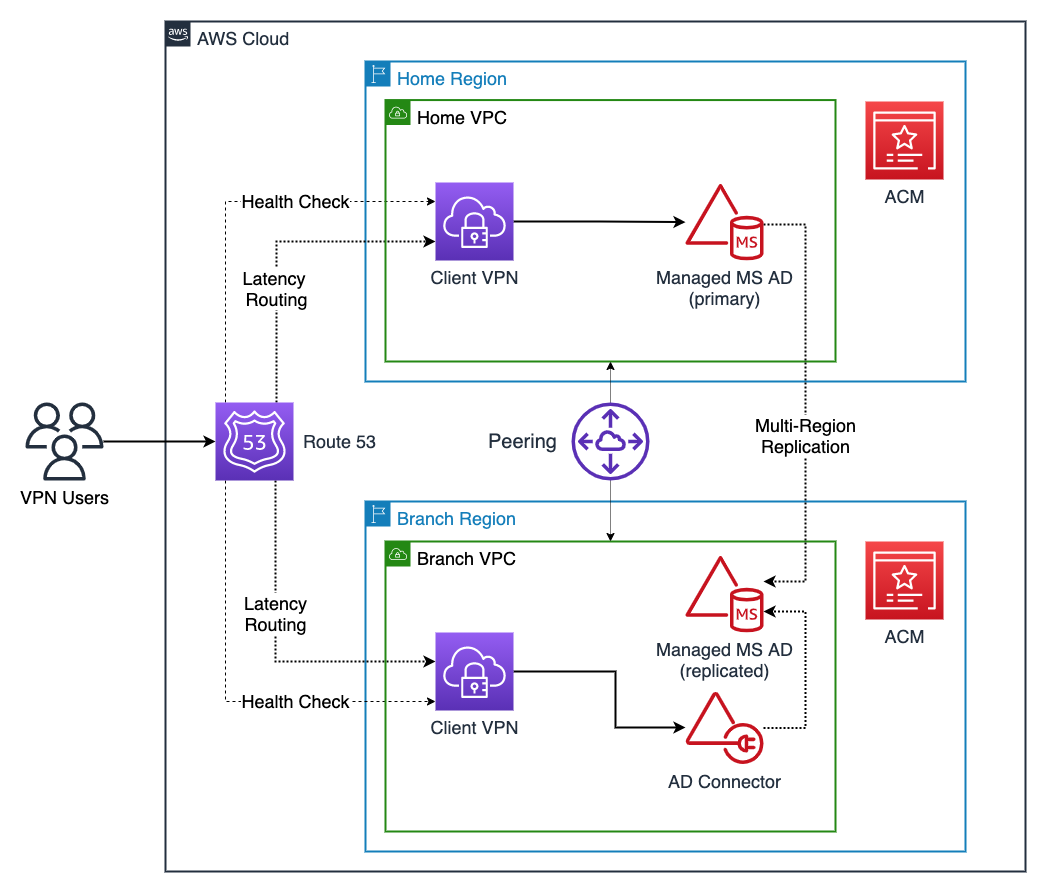
Figure 1: Multi-Region Client VPNs with AD Authentication, the Home Region and one Branch Region
At a regular interval, Route 53 performs health checks attempt to establish a TCP connection to the Client VPN endpoints. (For this solution, the Client VPN endpoints must use TCP as the transport protocol instead of the default UDP.) If the check to one endpoint fails, Route 53 deems that endpoint unhealthy and stops directing users to the unhealthy endpoint until service is restored. Route 53 then sends VPN users to one of the remaining healthy endpoints.
We’ll explore the components in further detail by stepping through the deployment.
This solution offers several advantages over traditional options:
- Agility: You have a single control plane for directory management
- Improved user experience: It routes VPN users to the endpoint with the lowest latency, giving a more responsive user experience when interacting with private IT resources
- Reliability: In the event of a Regional disruption to the Client VPN service, Route 53 routes VPN users only to healthy VPN endpoints
- Cost optimization: The AD Connector facilitates authentication for a Branch Region, which is less expensive than running a separate Managed Microsoft Active Directory
- Scalability: You can configure multiple Branch Regions similarly, scaling as your organization enters new geographies
Step 1: Select a Home Region and Branch Region(s)
Begin by reviewing the available AWS Regions and designate a Home Region and one or more Branch Regions. The convention used for the rest of this post is to name resources based on the Region that hosts the resource, e.g., “Home VPC” or “Branch VPC”.
This example uses US East (N. Virginia) as the Home Region, and US West (Oregon) as the sole branch Region. Any AWS Region that offers the requisite services can fill the role of Home or Branch Region. The Home Region is so designated because it hosts the primary AWS Managed Microsoft AD instance. To provide the best VPN user experience, customers can reduce average network latency by implementing this architecture in Regions close to users. For example, a US-based customer that also has employees based in Europe could select N. Virginia as the Home Region and Ireland as a Branch Region.
Step 2: Create VPCs and subnets in each Region
For each selected Region, create an Amazon Virtual Private Cloud (VPC). Ensure that the VPC IPv4 CIDRs do not overlap, otherwise they cannot be peered as mentioned in Step 3. In each VPC, create two subnets in separate Availability Zones (AZs). Be sure not to have any overlapping IPv4 CIDR blocks for your subnets.
Step 3: Peer Regional networks
Join the Home and Branch VPCs with VPC peering or AWS Transit Gateways. Since VPN users might connect to any endpoint, network peering gives them a network path to IT resources beyond the Region to which they connect. Configuring this connectivity is beyond the scope of this solution.
Step 4: Provision primary and replicated directories
To maintain a single control plane for authentication, you use multi-Region replication on an AWS Managed Microsoft AD instance. This way of using Microsoft Active Directory automatically replicates AWS Managed Microsoft AD directory data across multiple Regions, eliminating the heavy-lifting typically required by a global Active Directory infrastructure.
Step 4a: Home Region
Create an Enterprise Edition of AWS Managed Microsoft AD as shown in Figure 2, and configure it with both Home subnets. Creation can take up to 45 minutes.
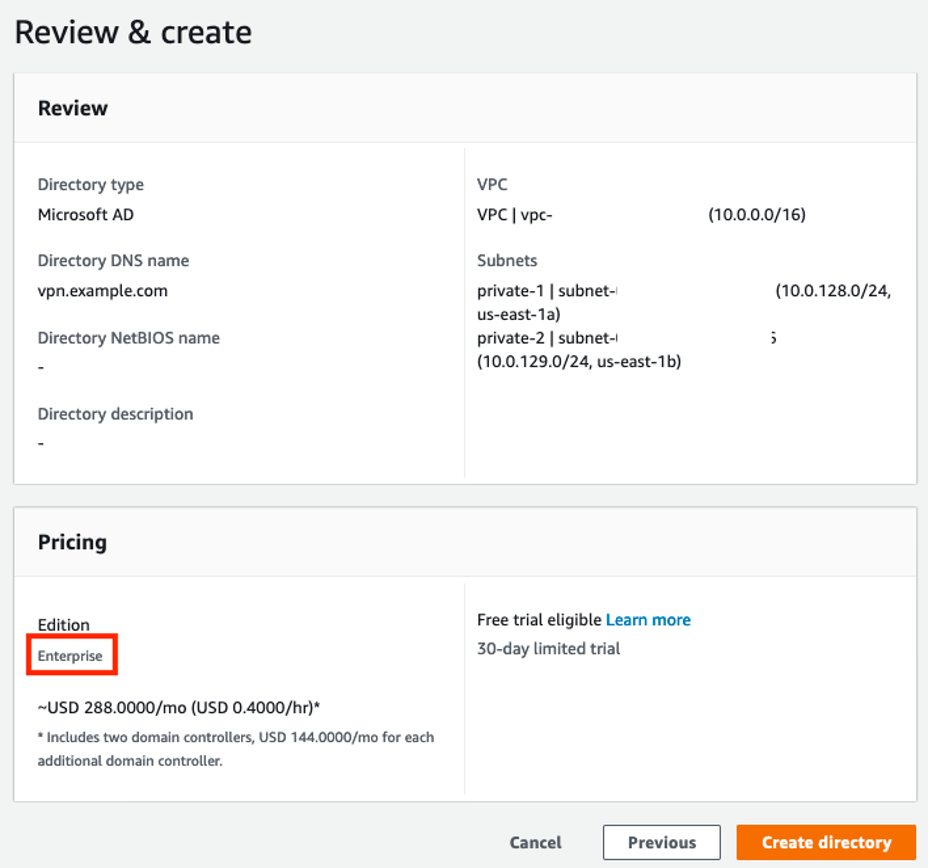
Figure 2: Creating an AWS Managed Microsoft AD instance in the Home Region
Step 4b: Branch Region(s)
After the AWS Managed Microsoft AD has been created, add each of your Branch Regions as replicated Regions as shown in Figure 3, configuring networking on both Branch subnets in each Region. The AWS Managed Microsoft AD instance configures the networking connection between Regions that enables replication. Any change to Active Directory objects from the home Region gets replicated to all other Regions, making management of VPN users easier.
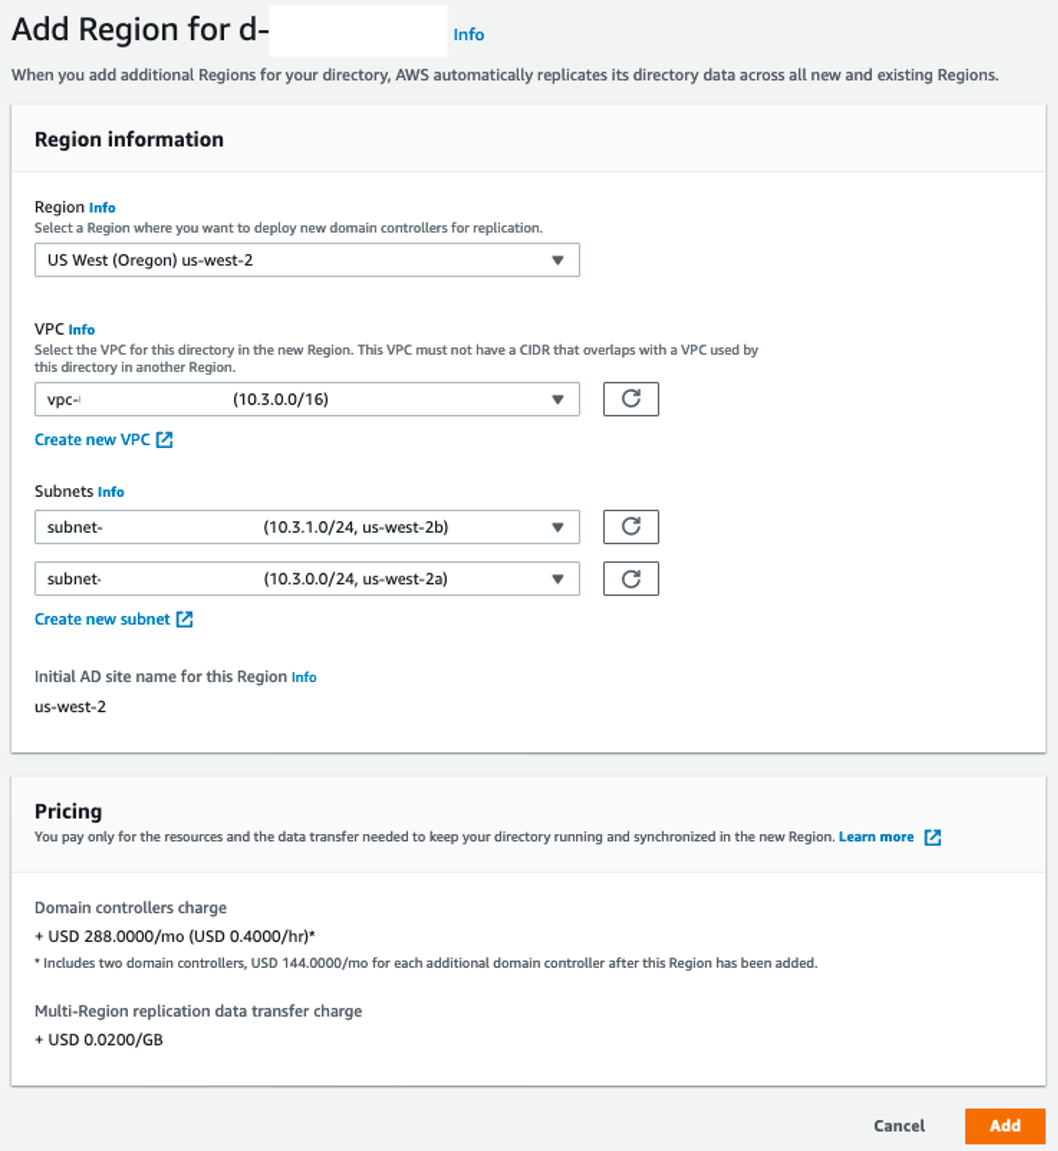
Figure 3: Adding the AWS Managed Microsoft AD to a Branch Region
Step 5: Create AD Active Directory Connectors in the Branch Region(s)
As of this writing, you cannot configure a Client VPN endpoint to authenticate against a replicated AWS Managed Microsoft AD instance. However, you can configure authentication against an AD Connector. In each Branch Region, create an AD Connector instance as shown in Figure 4. Connect it to the replicated Managed Microsoft AD AWS Managed Microsoft AD instance in the same Region. Notice that you do not need to complete this step for the Home Region, since the Home endpoint can be associated directly with the primary AD Active Directory instance.
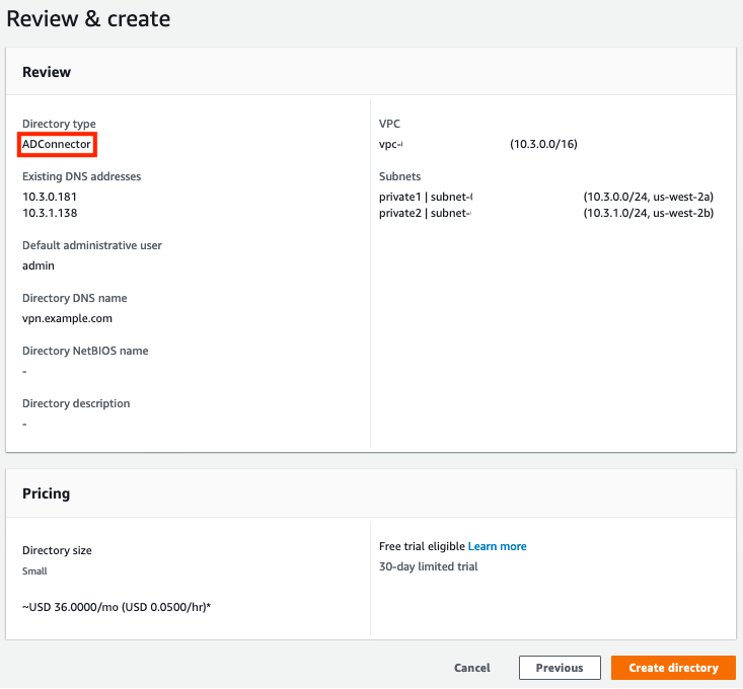
Figure 4: Creating an Active Directory Connector in a Branch Region
Step 6: Create and import server certificate
A Client VPN endpoint needs a server certificate provisioned through AWS Certificate Manager (ACM), regardless of the authentication method we use. Create a certificate and import it into ACM in the Home and all Branch Regions.
If you need to use unique certificates per endpoint, and those certificates have different certificate authorities (CAs), then VPN users will need to use the OpenVPN option capath instead of the option ca. This instructs the client to attempt certificate verification against multiple authorities and allows the client to verify the authenticity of the server certificate no matter which endpoint the user is routed to.
Step 7: Create Client VPN endpoints
Create a Client VPN endpoint in the Home Region and in all Branch Regions, as shown in Figures 5 and 6. All endpoints should use user-based authentication only: in the Home Region, associate with the primary AWS Managed Microsoft AD instance; in Branch Regions, associate with the corresponding Regional Active Directory Connector. All endpoints must use TCP as the transport protocol. Ensure that you are aware of limitations and rules of Client VPN. Most importantly, client CIDR ranges cannot overlap with the local CIDR of the VPC that in which the associated subnet is located within. Once an endpoint is created, take note of its DNS name.
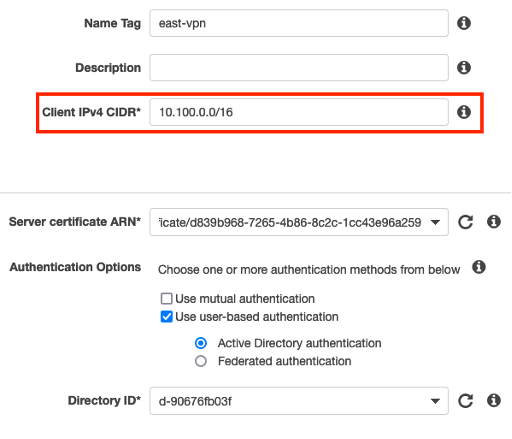
Figure 5: Choosing a CIDR that does not overlap with the Home VPC IP space when creating a Client VPN endpoint
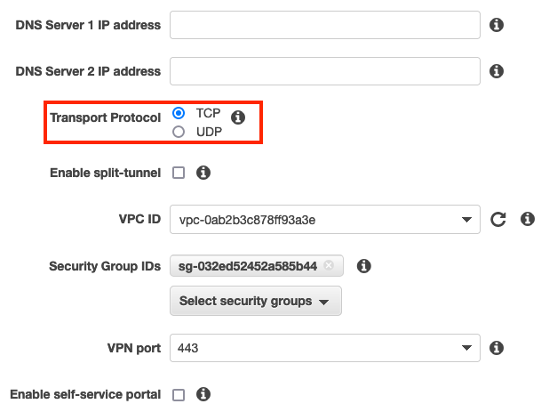
Figure 6: Selecting TCP as the transport protocol when creating a Client VPN endpoint
Associate each endpoint with both subnets (target network) in the corresponding Region. This gives you resiliency against AZ failures: if one AZ in a Region fails, the Client VPN service will continue serving VPN users from the other, healthy AZ. You must also configure a security group and an authorization rule to control the segments of the network VPN users have permission to use. (For the purposes of testing the solution, use a security group that allows all outbound traffic.) Configure the endpoint route table to allow VPN user traffic to cross the peering connection.
Step 8: Create a public hosted zone for your multi-Region VPN
If you stopped here, you could simply provide the Client VPN configuration files (.ovpn) to your VPN users, distributing them based on geography. For example, if you have an office in London and use Ireland as a Branch Region, you could give your London VPN users the configuration file from the Ireland endpoint. However, this approach has several drawbacks. For one, geographic proximity is only an approximation for network latency. For the best experience, VPN users should route to the lowest latency Region, regardless of location. In addition, in the event of a regional outage of Client VPN, VPN users would need to modify their configuration with a new DNS name to connect to a healthy endpoint, a cumbersome process.
Amazon Route 53 latency-based routing with health checks addresses both concerns. You provide a single DNS name that routes VPN users to the healthy Client VPN endpoint with the lowest historical latency.
Begin by creating a Route 53 public hosted zone, or pick an existing hosted zone, and decide on a VPN subdomain. Because we need to use CNAME records, it must be a subdomain, like vpn.example.com.
Step 9: Monitor Client VPN endpoint health
For every endpoint, create a Route 53 health check as shown in Figure 7, to monitor the endpoint. Select TCP as the protocol, and 443 as the port. For the domain name, use the endpoint’s DNS hostname and substitute the wildcard (*) character replaced with alphanumeric characters. In Figure 7, I use “healthcheck”, but any alphanumeric string will work.
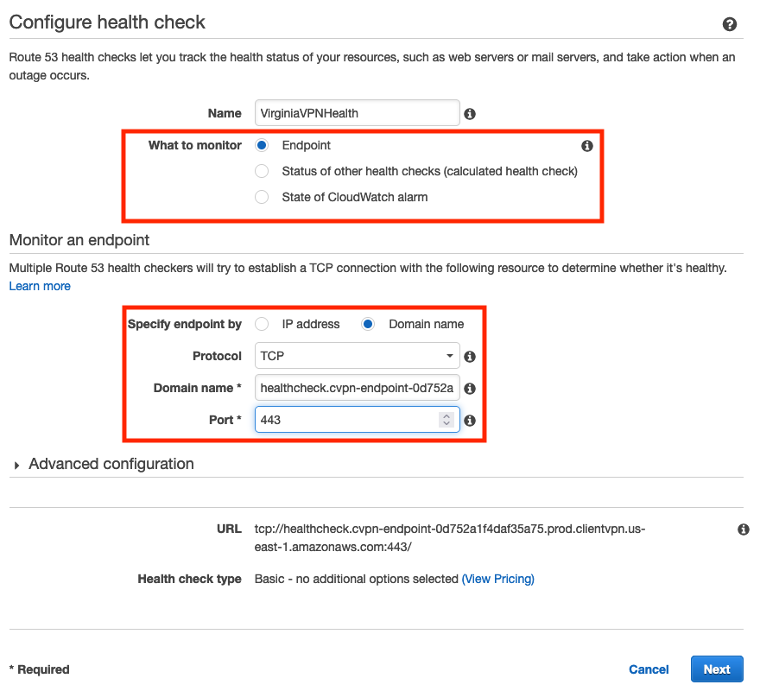
Figure 7: Creating a Route 53 health check that monitors Client VPN endpoint health
Step 10: Create CNAME records
Step 10a: Create CNAME records with latency routing policies
For every Client VPN endpoint, create a CNAME record that points your VPN subdomain to the DNS name of the endpoint, as seen in Figure 8. Use a latency routing policy based on the same region as the location of the endpoint and select the corresponding health check.
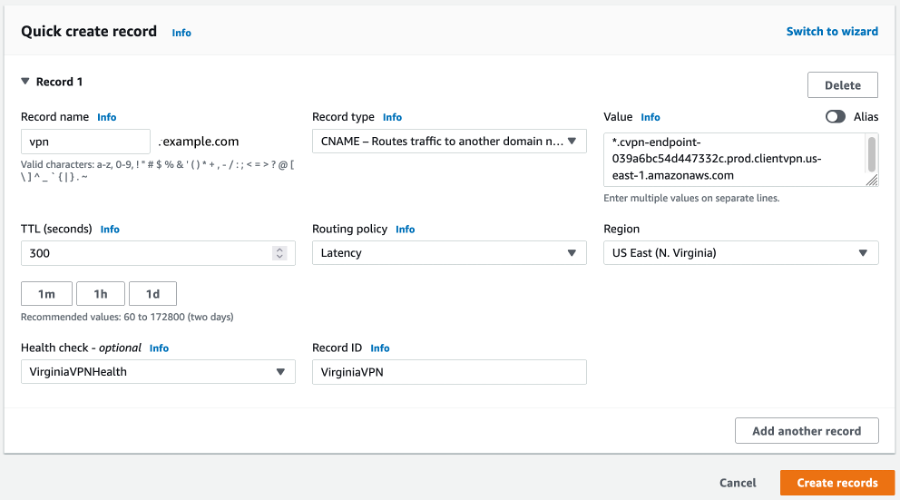
Figure 8: Creating a CNAME record and latency-based routing policy using a health check
Step 10b: Create a catch-all, wildcard route
The OpenVPN directive remote-random-hostname forces client software to prepend a random string to the hostname to prevent DNS caching. This means that if a VPN user attempts a connection to vpn.example.com, the client would attempt to connect to XXXXXX.vpn.example.com, where XXXXXX is a random string.
To support this directive, create a wildcard CNAME record for your VPN subdomain with a simple routing policy that is an alias to the VPN subdomain. Figure 9 shows a properly configured domain for vpn.example.com. Alternately, if you do not want to create the extra wildcard CNAME for the subdomain, comment out or remove the remote-random-hostname statement from the client config .ovpn file that’s in there by default before sharing with the users.

Figure 9: A DNS configuration for a two-region VPN with the vpn.example.com domain
Testing the Setup
You can test the setup using an Amazon EC2 instance running Amazon Linux 2. Create the instance in any of the VPCs used in the solution. During creation, specify a private key pair, create a key pair if you don’t have one, or ensure that you have access to the private key of the key pair you select. The instance’s security group must allow inbound traffic on port 22 from the Client IPv4 CIDRs.
Download a Client VPN configuration file from any of the endpoints. Change the remote directive by replacing the default hostname with your selected VPN subdomain, e.g., vpn.example.com. The next step is to import the configuration file into any OpenVPN-based client software. (One option is the AWS Client VPN software client offered free of charge.)
Disconnect your system from any other VPNs. Then use the configuration file you just imported into the client to connect to the multi-Region VPN. When prompted for credentials, provide the username “admin” and the password you used when setting up the directory. It should connect you to the closest Region Home or Branch based on Route53 latency-based routing as setup previously.
Connect to the EC2 instance using the private IP address and key pair. Congratulations! You successfully connected to a private network using a multi-Region VPN. It routed you to the lowest-latency endpoint and authenticated to the network using a multi-Region AWS Managed Microsoft AD.
Cleanup
To avoid unnecessary charges, delete the resources created during the deployment. This includes the Client VPN endpoints, ACM certificates, AWS Microsoft Managed AD (replicated and primary), Active Directory Connector, Route 53 health checks, and Route 53 hosted zone.
Conclusion
In this post, you learned about an architecture for creating a fault tolerant, multi-Region VPN with Client VPN, in which all users authenticate against one Microsoft Active Directory domain. You walked through its deployment, your IT resources remain secure on the AWS network, and you can scale your global operations with confidence by leveraging AWS Client VPN and AWS Directory Service Managed Microsoft Active Directory.
For additional information, explore the following resources:
- AWS Virtual Private Cloud Connectivity Options – Amazon VPC-to-Amazon VPC connectivity options
- Active Directory Domain Services on AWS – Design and Planning Guide
- Route 53: Choosing a routing policy

George Gallo
George is a Solutions Architect at AWS based in New Jersey. He works with early-stage customers to design and build scalable, secure cloud workloads so they can adopt cloud successfully. Prior to AWS, he worked with organizations to accelerate their cloud journeys. He has a passion for showing customers the art of the possible on AWS.