AWS Open Source Blog
Running Dicoogle, an open source PACS solution, on AWS (part 2)
This blog post is the second part of a two-part series that describes how to host a secure Digital Imaging and Communications in Medicine (DICOM) server on AWS using Dicoogle open source software.
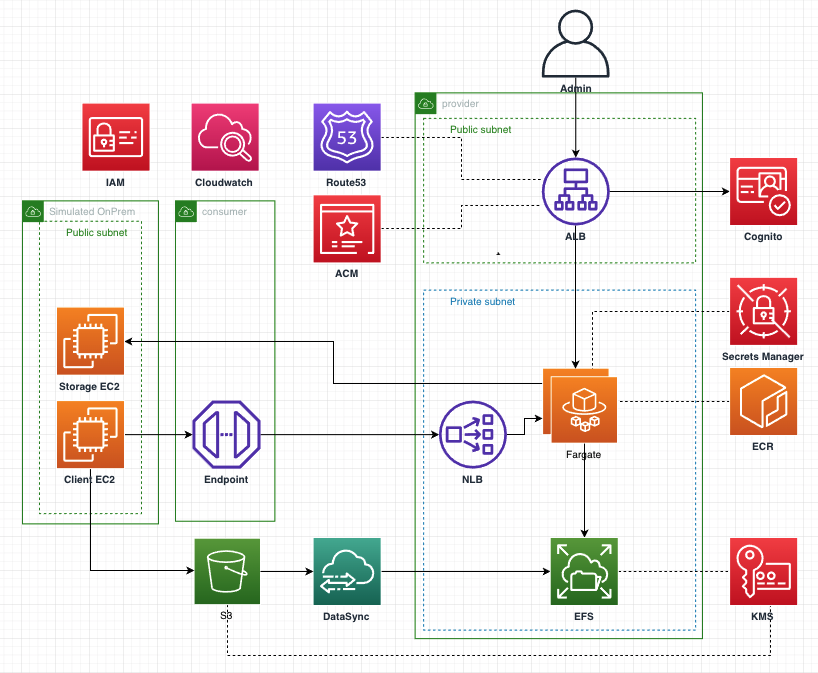
In part one of this blog series, I introduced DICOM, explained the functionalities the solution provides, highlighted the AWS services used, and illustrated how to host a secure DICOM server, as seen in the architecture diagram below.
In this blog, I’ll cover how to deploy the solution on AWS and perform testing in four sections:
- Set up prerequisites.
- Prepare artifacts required for deployment.
- Deploy an AWS CloudFormation template to stand up the solution.
- Perform the test.
The code is available in a GitHub repository.
Prerequisites
For this solution, you should have the following prerequisites:
- An AWS account.
- An AWS region in aws partition. Note that the solution does not support aws-cn partition/China Regions or aws-us-gov partition/AWS GovCloud (US) Regions
- An existing Amazon Route53 public hosted zone (or follow these instructions to create one).
- A sufficient AWS service quota to allow the creation of three Amazon Virtual Private Clouds (Amazon VPCs), three internet gateways, four NAT gateways, and four Elastic IPs.
- Five sets of SSL certificates and keys: one each for the certificate authority, the nginx reverse proxy running in AWS Fargate, the ghostunnel reverse proxy and forward proxy running in Fargate, the ghostunnel forward proxy running in client Amazon Elastic Computer Cloud (Amazon EC2), and the storescp running in storage Amazon EC2.
How to prepare for solution deployment
- Log in to the AWS Cloud9 service console. Click “Create environment” to create an AWS Cloud9 environment. Enter a name of your choice in step one and then click “Next step.” Use the default settings in step two “Configure settings” and click “Next step.” Lastly, click “Create environment.”
- Wait until the AWS Cloud9 environment is created, then go to the terminal window at the bottom of the screen.

- Run the following commands to create a keypair, which will be used from the AWS Cloud9 terminal to ssh into Amazon EC2 instances. Then, save the output (private key) to a file.
sudo yum install -y jq
aws ec2 create-key-pair --key-name "dicoogle" | jq -r ".KeyMaterial" > ~/dicoogle.pem
chmod 400 ~/dicoogle.pem
- Run the following commands to create a Amazon Simple Storage Service (Amazon S3) bucket. Note the bucket name in the output.
SUFFIX=$( echo $RANDOM | md5sum | head -c 20 )
BUCKET=dicoogle-$SUFFIX
aws s3 mb s3://$BUCKET
echo “Bucket name: $BUCKET”
- Run the following commands to create an AWS Key Management Service (AWS KMS) key first and then three Amazon Elastic Container Registry (Amazon ECR) repositories: one for Dicoogle, one for Nginx, and one for Ghostunnel.
KMS_KEY=$( aws kms create-key | jq -r .KeyMetadata.KeyId )
aws ecr create-repository --repository-name dicoogle --encryption-configuration encryptionType=KMS,kmsKey=$KMS_KEY
aws ecr create-repository --repository-name nginx --encryption-configuration encryptionType=KMS,kmsKey=$KMS_KEY
aws ecr create-repository --repository-name ghostunnel --encryption-configuration encryptionType=KMS,kmsKey=$KMS_KEY
- Run the following commands to clone the GitHub code repository.
cd ~/environment
git clone https://github.com/aws-samples/dicoogle-on-aws
- Run the following commands to build docker images and push to Amazon ECR. Note each image name in the output. We’ll use them in step 12.
cd ~/environment/dicoogle/docker/dicoogle
./build.sh
cd ~/environment/dicoogle/docker/nginx
./build.sh
cd ~/environment/dicoogle/docker/ghostunnel
./build.sh
- Run the following commands to package the AWS Lambda function and upload all deployment artifacts to an Amazon S3 bucket. The uploaded deployment artifacts include all AWS CloudFormation templates, as well as the Lambda function packaged in zip format. They will be used to deploy the solution. Note the Amazon S3 template URL in the output – it will be used in step 11.
cd ~/environment/dicoogle
chmod 755 ./artifacts.sh
./artifacts.sh $BUCKET
- The next step requires you to generate and bring your own SSL certificates and keys when setting up your environment. Then, you need to create entries in AWS Secrets Manager and populate them with your SSL certificates and keys.
For demonstration purposes, I’ll provide instructions to generate self-signed SSL certificates. Note that self-signed certificates are not for production use.
cd ~/environment/dicoogle/certFor the instructions below, accept all the default values when prompted. Choose “y” when prompted to sign the certificate or commit.
Generate root CA certificate:
openssl req -x509 -config openssl-ca.cnf -newkey rsa:4096 -sha256 -nodes -out cacert.pem -outform PEMGenerate nginx certificate signing request (CSR):
openssl req -config openssl-nginx.cnf -newkey rsa:2048 -sha256 -nodes -out nginxcert.csr -outform PEMSign the CSR for nginx certificate
openssl ca -config openssl-ca.cnf -policy signing_policy -extensions signing_req -out nginxcert.pem -infiles nginxcert.csrGenerate ghostunnel certificate signing request (CSR)
openssl req -config openssl-ghostunnel.cnf -newkey rsa:2048 -sha256 -nodes -out ghostunnelcert.csr -outform PEMSign the CSR for ghostunnel certificate
openssl ca -config openssl-ca.cnf -policy signing_policy -extensions signing_req -out ghostunnelcert.pem -infiles ghostunnelcert.csrGenerate client EC2 certificate signing request (CSR)
openssl req -config openssl-client.cnf -newkey rsa:2048 -sha256 -nodes -out clientcert.csr -outform PEMSign the CSR for client EC2 certificate
openssl ca -config openssl-ca.cnf -policy signing_policy -extensions signing_req -out clientcert.pem -infiles clientcert.csrGenerate storage EC2 certificate signing request (CSR)
openssl req -config openssl-storage.cnf -newkey rsa:2048 -sha256 -nodes -out storagecert.csr -outform PEMSign the CSR for storage EC2 certificate
openssl ca -config openssl-ca.cnf -policy signing_policy -extensions signing_req -out storagecert.pem -infiles storagecert.csrCreate entries in Secrets Manager
chmod 755 ./secrets.sh
./secrets.sh
Note each secret ARN (Amazon Resource Name) in the output. We’ll use them in step 12.
- Go to the AWS Route 53 service console. Locate an existing public hosted zone to use for the solution. Make a note of the “Domain name” and “Hosted zone ID.” We’ll use them in step 12.

How to deploy the solution
- Go to the CloudFormation service console. Click “Create stack” and select “With new resources (standard).” In “Prerequisite – Prepare template,” choose “Template is ready.” In “Specify template,” select “Amazon S3 URL,” and enter the S3 template URL noted in step 8. Click “Next.”

- Enter “dicoogle” in “Stack name.” For parameters under “Require input” section, Select “dicoogle” in “KeyName.” Enter the bucket name from step 4 in “S3BucketName.” Enter each image name from step 7 in “DicoogleImage,” “NginxImage,” and “GhostunnelImage.” Enter each secret ARN from step 9 in “NginxCert,” “NginxKey,” “GhostunnelCert,” “GhostunnelKey,” and “CACert.” Enter the domain name from step 10 in “DomainName” and select the hosted zone id from step 10 in “HostedZone.” Select two availability zones from “AvailabilityZones.”


- For the parameters under the “Contain default value. Input is optional” section, leave the default values as is. Click Next to proceed to “Configure stack options.” Then click “Next” to proceed to “Review.” Select the two checkboxes to acknowledge that CloudFormation might create IAM resources with custom names and might require CAPABILITY_AUTO_EXPAND capability. Then click “Create stack.” The deployment should take about 20 minutes.

How to test bulk upload images to Dicoogle
- Open three additional AWS Cloud9 terminal windows. We are going to use the first terminal window to access the client Amazon EC2 instance, the second terminal window to launch the DataSync task and perform DNS lookup, and the third terminal window to access the storage Amazon EC2 instance. Note that the client and storage Amazon EC2 instances are placed in an Amazon Virtual Private Cloud (Amazon VPC) that simulates an on-premises environment. They are allowed access from AWS Cloud9 over the internet and have access to the internet to download the required packages for demonstration purpose only. It is best practice to restrict access from and to the internet as much as possible.
In each terminal window, run the following command to get all the CloudFormation stack outputs we need and populate environment variables for subsequent use.
source ~/environment/dicoogle/output.shNote the output values.
- In the first terminal, run the following command to copy sample image files to the client Amazon EC2 instance and then ssh to the client Amazon EC2 instance.
scp -i ~/dicoogle.pem ~/environment/dicoogle/data/1*.dcm ec2-user@$ClientEC2Stack_PublicDNS:/home/ec2-user/Enter “yes” to the question “Are you sure you want to continue connecting (yes/no)?”
Run the following commands to copy the client certificate, private key, and CA certificate to the client Amazon EC2 instance.
scp -i ~/dicoogle.pem ~/environment/dicoogle/cert/client*.pem ec2-user@$ClientEC2Stack_PublicDNS:/home/ec2-user/
scp -i ~/dicoogle.pem ~/environment/dicoogle/cert/cacert.pem ec2-user@$ClientEC2Stack_PublicDNS:/home/ec2-user/
Then run the following command to ssh to the client Amazon EC2 instance.
ssh -i ~/dicoogle.pem ec2-user@$ClientEC2Stack_PublicDNSYou are now on the client Amazon EC2 instance.
- In the first terminal, which is now on the client Amazon EC2 instance, run the following command to upload a sample image (as a simulation of image bulk upload) to the images bucket. The reason we need to upload the sample image from the client Amazon EC2 instead of AWS Cloud9 is because we have defined a bucket policy to deny upload to the bucket unless the upload is coming from the Amazon VPC that simulates an on-premises environment.
aws s3 cp ~/1-01.dcm s3://<images bucket from step 14 output>/
- In the second terminal, run the following command to start task execution to copy the image file from Amazon S3 to Amazon Elastic File System (Amazon EFS).
TASK_EXECUTION_ARN=$( aws datasync start-task-execution --task-arn $DataSyncStack_TaskArn | jq -r .TaskExecutionArn )Run the following command to check the execution status until it shows success.
aws datasync describe-task-execution --task-execution-arn $TASK_EXECUTION_ARN | jq -r .Status
How to test indexing uploaded images
- Now we are going to leave the AWS Cloud9 terminal environment temporarily and switch to our desktop or laptop. The deployment made possible by CloudFormation has created a Amazon Cognito user pool for us. We are going to create a user in the Amazon Cognito user pool as a Dicoogle administrator.
Launch a browser, go to the Amazon Cognito service console, click “Manage User Pools,” and then select the user pool that has the “Pool Id” that matches the UserPool value noted in step 14.

Go to “General settings,” go to “Users and groups” and click “Create user.” Fill out the form to create a user.

- From your desktop or laptop, open a new browser tab and go to https://<ALBDnsRecord> where ALBDnsRecord is from the step 14 output. In the sign-in window, enter the user name and password from step 18 to authenticate to Amazon Cognito.

The first time you sign in you will be prompted to change your password. Enter new password and click “Send.”
It will then allow access to the Dicoogle web UI sign in window. Login with the default “dicoogle” as the user name and “dicoogle” as the password.

- Click “Indexer” on the left-hand side. Enter “file:/opt/dicoogle/Dicoogle_v3.0.2/images” in the index directory. Select “lucene” from the Index providers. Click “Start” to index image files.

How to test C-FIND and C-MOVE
- Now switch back to AWS Cloud9. From the third AWS Cloud9 terminal, run the following commands to copy storage certificate, private key, and CA certificate to the storage Amazon EC2 instance.
scp -i ~/dicoogle.pem ~/environment/dicoogle/cert/storage*.pem ec2-user@$StorageEC2Stack_PublicDNS:/home/ec2-user/
scp -i ~/dicoogle.pem ~/environment/dicoogle/cert/cacert.pem ec2-user@$StorageEC2Stack_PublicDNS:/home/ec2-user/
Run the following command to ssh to the storage Amazon EC2 instance.
ssh -i ~/dicoogle.pem ec2-user@$StorageEC2Stack_PublicDNSEnter “yes” to “Are you sure you want to continue connecting (yes/no)?”
You are now on the storage Amazon EC2 instance.
- From the third AWS Cloud9 terminal, which is now on the storage Amazon EC2 instance, run the following command to start a storage class provider service using the storescp utility from the dcmtk package. Note that during deployment of the storage Amazon EC2 instance, we have supplied user data to install the dcmtk package. This package provides utilities for us to interact with Dicoogle for testing.
storescp -d -aet CONSUMER -od "/home/ec2-user" 7777 -su study -fe .dcm --fork +tls storagekey.pem storagecert.pem +cf cacert.pem
- From the second AWS Cloud9 terminal, using the ProviderEndpoint from the step 14 output, run the following command to get the IP address associated with the provider endpoint. The endpoint has two associated IP addresses. Pick one of the two IP addresses and make a note for later use in step 25, 26, and 28.
nslookup $PrivatelinkStack_ProviderEndpoint
- Now switch to your desktop or laptop, go back to the Dicoogle admin web console, and click “Management” on the left-hand side. Go to the “Storage Servers” tab and click “Add New” to add a storage server.

Enter “CONSUMER” in “AE Title.” Enter “127.0.0.1” in “IP Address.” Enter 17777 in “Port.” Click “Add.” Port 17777 on 127.0.0.1/localhost is where Ghostunnel forward proxy listens on. The CloudFormation stack deployment automatically configures the Ghostunnel forward proxy to point to the storage Amazon EC2 instance as the destination.

- From the first AWS Cloud9 terminal, which is now in the client Amazon EC2 instance, run the following command to query Dicoogle for the sample image using findscu utility from the dcmtk package. Similar to the storage Amazon EC2 instance, we’ve also installed dcmtk package on the client Amazon EC2 instance during its deployment.
findscu -S -k 0008,0052=STUDY -aec DICOOGLE-STORAGE <ip address of provider endpoint from step 23> 1045 -k 0010,0020=* -k 0020,000d -k 0008,1030 -k 0008,0020 -k 0008,0050We get this response back from Dicoogle. Note the StudyInstanceUID in the square bracket of the output. We will use it in step 26.

- From the first AWS Cloud9 terminal, run the following command to retrieve the sample image from Dicoogle using the movescu utility from the dcmtk package and have it sent to the storage Amazon EC2 instance (DICOM destination node).
movescu -v -S -P -aec "DICOOGLE-STORAGE" -aet CONSUMER -aem CONSUMER -k StudyInstanceUID=<StudyInstanceUID from step 24> <ip address of provider endpoint from step 23> 1045 +xa
- From the third AWS Cloud9 terminal, which is now on the storage Amazon EC2 instance, press <ctrl>C to interrupt the storescp process. Run the following command to verify that the retrieved image is now available.
ls -lt ~/study*
How to test C-STORE
- From the first AWS Cloud9 terminal, which is now on the client Amazon EC2 instance, run the following commands to first launch a ghostunnel forward proxy and then send a sample image to Dicoogle using the dcmsend utility from the dcmtk package. This is done to simulate a modality that sends an image directly to Dicoogle as a PACS system.
sudo su –
echo ‘<ip address of provider endpoint from step 23> ghostunnel.example.com’ >> /etc/hosts
exit
ghostunnel client --listen localhost:16666 --target ghostunnel.example.com:16666 --cert=clientcert.pem --key=clientkey.pem --cacert=cacert.pem > /dev/null 2>&1 &
dcmsend -v 127.0.0.1 16666 1-02.dcm
- Switch to your desktop or laptop, go back to the Dicoogle admin web console, and click “Search” on the left-hand side. Select “lucene” from the provider drop down list and click “Search.” It should return one patient. Click the returned patient record, then click the study record, and finally click the series record. It should return two images. One is from the first sample image uploaded through datasync task to Dicoogle and indexed by Dicoogle in step 20. The other is from the second sample image uploaded from the client Amazon EC2 instance to Dicoogle in step 28.

How to clean up the deployed solution
To avoid incurring future charges, delete the resources created in the deployment and preparation sections:
- CloudFormation stack
- Amazon ECR repository
- AWS KMS key
- Secret
- Amazon S3 bucket
- Keypair
- AWS Cloud9 instance
Go to the original AWS Cloud9 terminal window (where steps 3-9 were run) and run the following commands:
-
source ~/environment/dicoogle/output.sh -
aws cloudformation delete-stack --stack-name dicoogleNote that the dicoogle-LogBucketStack and dicoogle-ImagesBucketStack may fail to delete when they contain log and image files. In that case, run the following commands to force the bucket deletion including all the objects in it.
aws s3 rb s3://$LogBucketStack_LogBucket --forceaws s3 rb s3://$ImagesBucketStack_ImagesBucket --forceThen rerun the previous command to delete the main dicoogle stack.
-
aws ecr delete-repository --repository-name dicoogle –force -
aws ecr delete-repository --repository-name nginx --force -
aws ecr delete-repository --repository-name ghostunnel --force -
aws kms schedule-key-deletion --key-id $KMS_KEY --pending-window-in-days 7 -
aws secretsmanager delete-secret --secret-id CACERT -
aws secretsmanager delete-secret --secret-id NGINXCERT -
aws secretsmanager delete-secret --secret-id NGINXKEY -
aws secretsmanager delete-secret --secret-id GHOSTUNNELCERT -
aws secretsmanager delete-secret --secret-id GHOSTUNNELKEY -
aws s3 rb s3://$BUCKET --force -
aws ec2 delete-key-pair --key-name dicoogle
Finally, go to the AWS Cloud9 service console and click “Delete” to remove the AWS Cloud9 environment.
Conclusion
In this post, I described the steps to deploy Dicoogle on AWS using a CloudFormation template, as well as the steps to test 1) bulk upload images to Dicoogle 2) index uploaded images in Dicoogle 3) DICOM’s C-FIND, C-MOVE, and C-STORE functionalities. Check out the Dicoogle documentation to learn more about the features and latest development. Visit the GitHub repository to contribute to the Dicoogle community.