AWS Security Blog
7 ways to improve security of your machine learning workflows
In this post, you will learn how to use familiar security controls to build more secure machine learning (ML) workflows. The ideal audience for this post includes data scientists who want to learn basic ways to improve security of their ML workflows, as well as security engineers who want to address threats specific to an ML deployment. Figure 1 shows a basic ML workflow.

Figure 1. Example of a basic machine learning workflow
To defend each stage of your ML workflow, from data source to prediction API, we will introduce basic security measures that are applicable to one or more ML workflow stages. These security measures could protect against the following ML-specific vulnerabilities:
- Data poisoning, which occurs when ML models are trained on tampered data, leading to inaccurate model predictions.
- Membership inference, which is the ability to tell whether a data record was included in the dataset used to train the ML model. This could lead to additional privacy concerns for personnel data.
- Model inversion, which is the reverse-engineering of model features and parameters. Knowledge on how the model makes predictions could lead to the generation of adversarial samples, such as those shown in Figure 2.
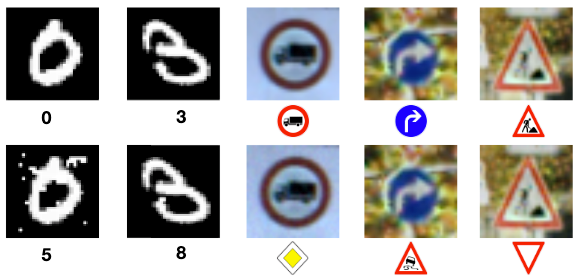
Figure 2: Comparison between neural network classifications of legitimate samples (top row) and their corresponding adversarial samples (bottom row). Source: Papernot, et al.
In the following sections, we will cover seven ways to secure your ML workflow, and how these measures are relevant in addressing ML-specific vulnerabilities.
1. Launch ML instances in a VPC
A secure ML workflow begins with establishing an isolated compute and network environment. Amazon SageMaker notebook instances are ML compute instances used by data scientists for model prototyping. They are internet-enabled by default, as shown in Figure 3, to allow you to download popular packages, sample notebooks, and easily customize your development environment. While no inbound access is permitted by default on these instances, the outbound access can be exploited by third-party software to allow unauthorized access to your instance and data.
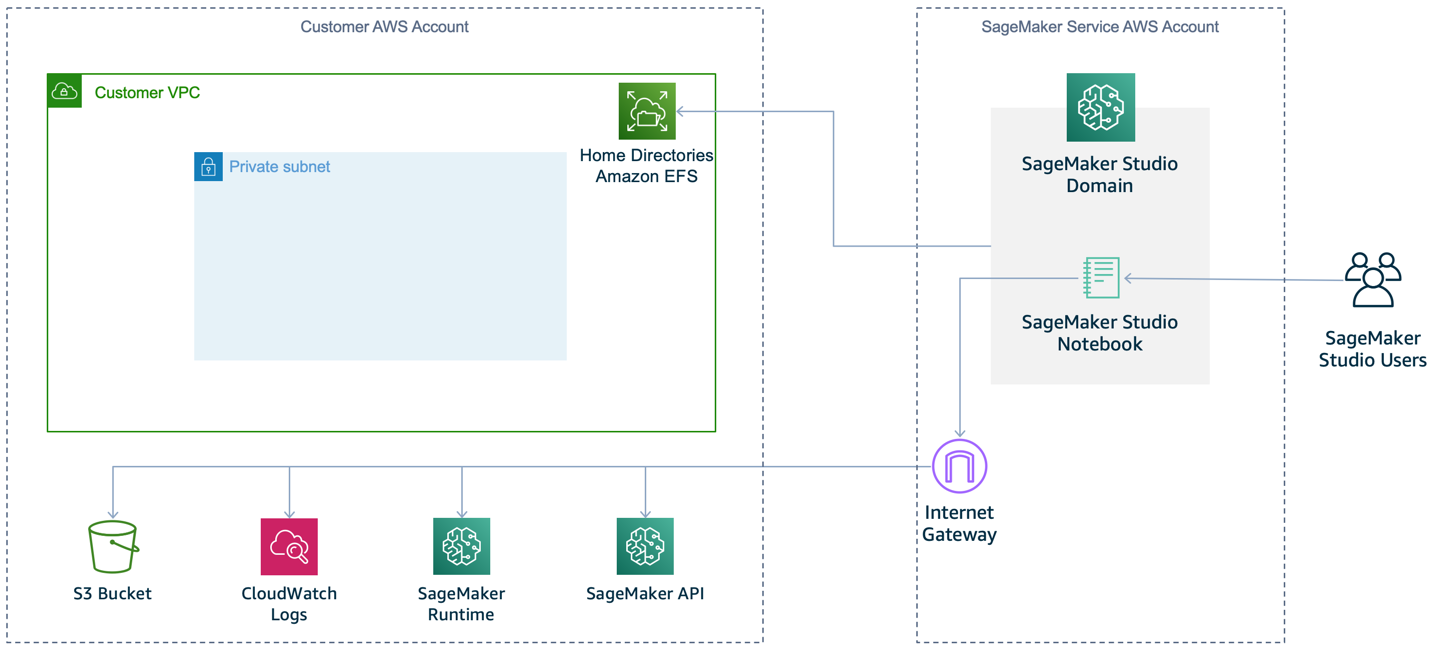
Figure 3: Default SageMaker setup (no VPC)
To prevent SageMaker from providing internet access by default, we recommend that you specify a VPC for your notebook instance, as shown in Figure 4. Note that the notebook instance won’t be able to train or host models unless your VPC’s network access controls allow outbound connections.
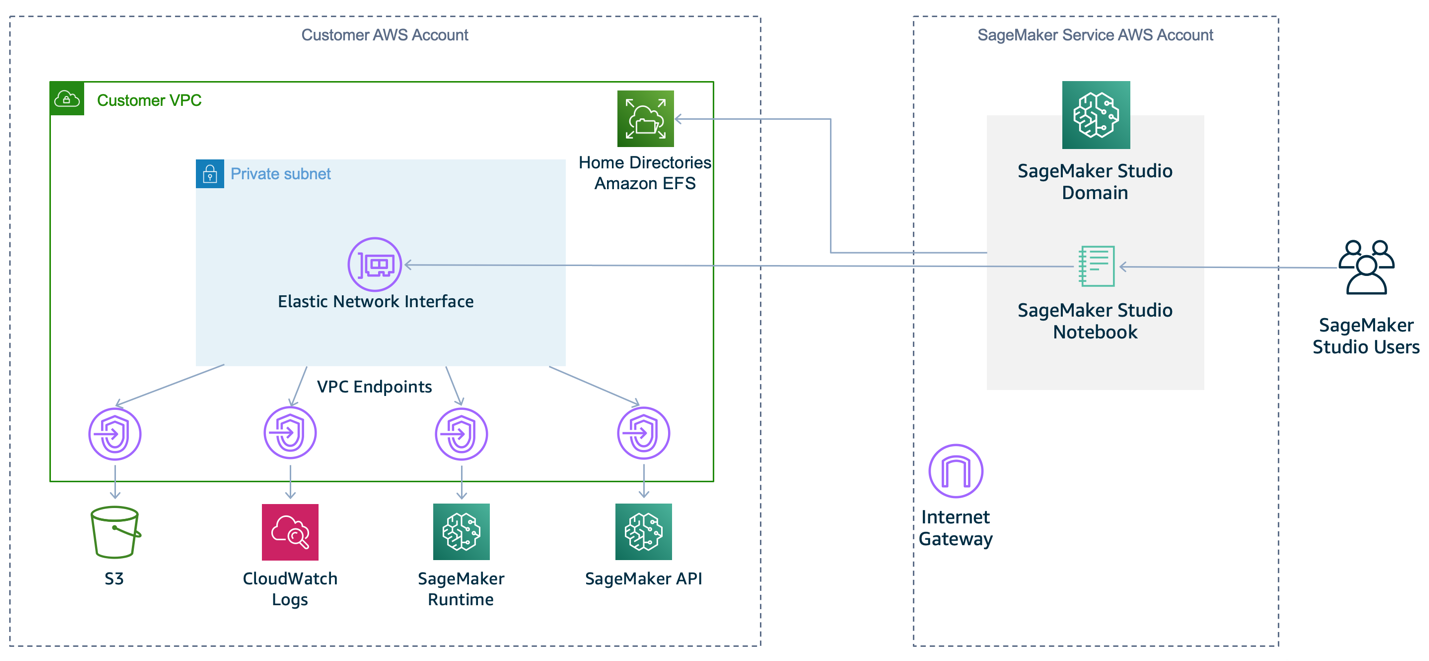
Figure 4: Recommended SageMaker setup within a VPC
Deploying your ML workflow in a VPC provides defense in depth with the following features:
- You can control traffic access for instances and subsets, using security groups and network access control lists (network ACLs) respectively.
- You can control connectivity between AWS services by using VPC endpoints or AWS PrivateLink with associated permission policies.
- You can monitor all network traffic into and out of your training containers by using VPC Flow Logs.
For the convenience of downloading libraries seamlessly from the internet for development work, we recommend that you import your required external libraries into a private repository such as AWS CodeArtifact before you isolate your environment. For more information on setting up a private network environment as shown in Figure 4, see the Amazon SageMaker Workshop module Building Secure Environments.
2. Use least privilege to control access to ML artifacts
In an ML workflow, several artifacts are used and produced: training data, ML models, model parameters, and model results. These artifacts could be confidential in nature, especially if they contain personally identifiable or commercially valuable information. To protect these artifacts, you should follow the security practice of granting least privilege, which is granting only the permissions required to perform a task. This limits unintended access and helps you audit who has access to which resources.
AWS Identity and Access Management (IAM) enables you to manage access to AWS services and resources. Using IAM, you can create and manage AWS users and groups, then use policies to define permissions for managing their access to AWS resources. Two common ways to implement least privilege access are identity-based policies and resource-based policies:
- Identity-based policies are attached to an IAM user, group, or role. These policies let you specify what that identity can do. For example, by attaching the AmazonSageMakerFullAccess managed policy to an IAM role for data scientists, you grant them full access to the SageMaker service for model development work.
- Resource-based policies are attached to a resource. These policies let you specify who has access to the resource, and what actions they can perform on it. For example, you can attach a policy to an Amazon Simple Storage Service (Amazon S3) bucket, granting read-only permissions to data scientists accessing the bucket from a specific VPC endpoint. Another typical policy configuration for S3 buckets is to deny public access, to prevent unauthorized access to your data.
To design these policies for least privilege access, we recommend two ways to determine the minimum required access for different users. The first way to achieve this is to use AWS CloudTrail to view your account’s events in Event history. These logs help to track the actions and resources that your IAM entities have used in the past. You can filter the logs by user name to get the identity of the IAM user, role, or service role that is referenced by the event. You can also download the results as CSV or JSON. Figure 5 shows an example of Event history filtered by user name.
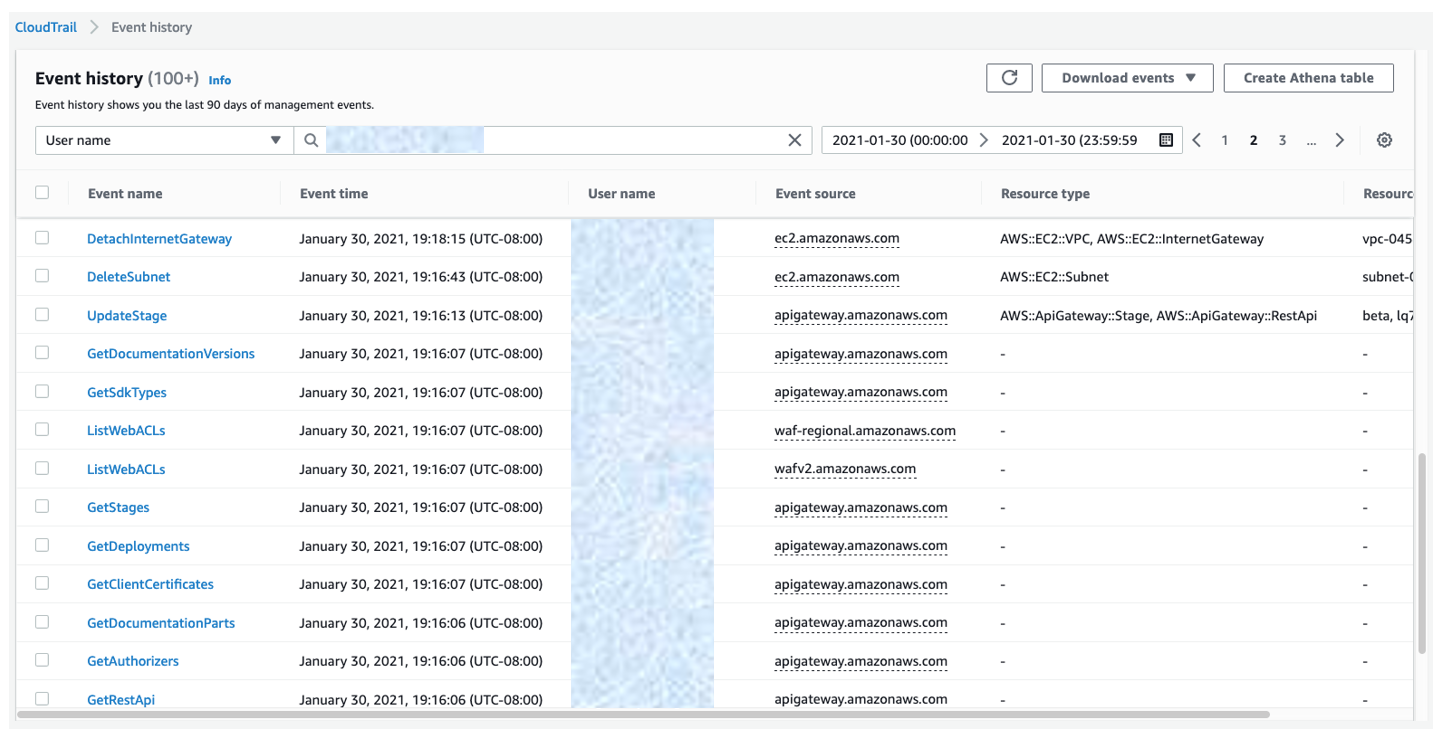
Figure 5: CloudTrail event history log filtered by user name
Another way you can determine necessary access would be to use the Access Advisor tab in the IAM console. Access Advisor shows you the last-accessed information for IAM groups, users, roles, and policies. Figure 6 shows an example of Access Advisor displaying the service permissions granted to the AdministratorAccess managed policy, and when those services were last accessed.
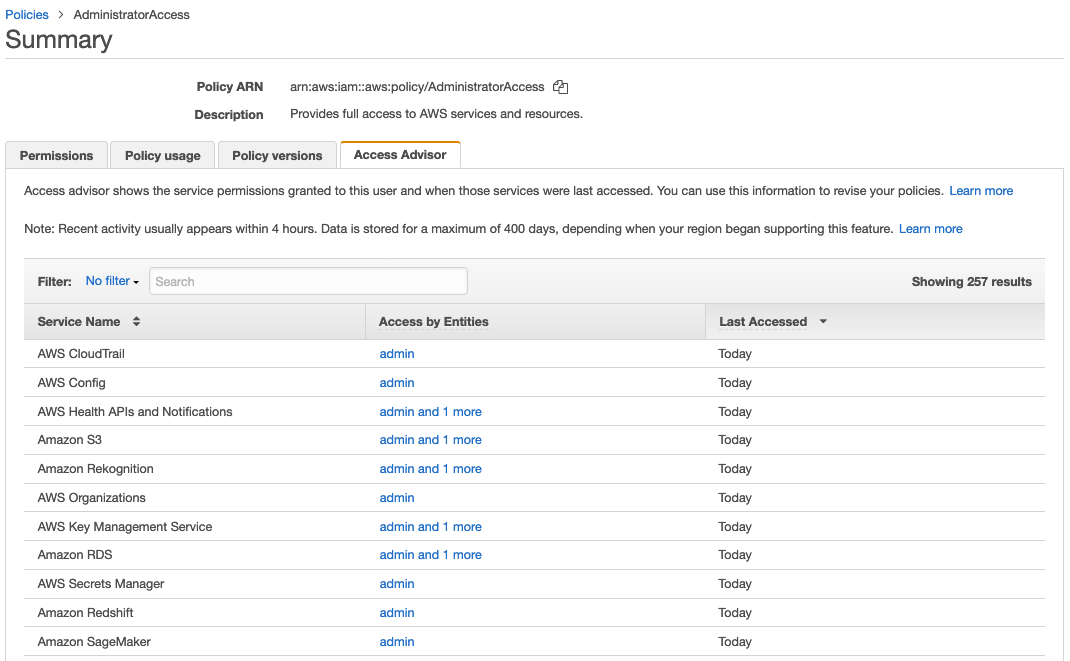
Figure 6: Access Advisor displaying AdministratorAccess managed policy
For more information about how you can use CloudTrail Event history and IAM Access Advisor together to refine permissions for an individual IAM user, see the example Using information to reduce permissions for an IAM user in the AWS IAM user guide.
3. Use data encryption
We recommend that you use encryption as the first line of defense to block unauthorized users from reading your data and model artifacts. You should encrypt data both while it is in transit and at rest.
To provide secure communication for data in transit within an AWS VPC, you can use Transport Layer Security (TLS), a widely used cryptographic protocol. TLS version 1.2 encryption is supported in API calls to AWS services.
For encryption at rest, you can use either client-side encryption, where you encrypt your data before uploading it to AWS, or server-side encryption, where your data is encrypted at its destination by the application or service that receives it. For server-side encryption, you can choose among three types of custom master keys (CMK) provided by AWS Key Management Service (KMS). The following table provides a comparison of their features.
| AWS owned CMK | AWS managed CMK | Customer managed CMK | |
| Creation | AWS generated | AWS generated on customer’s behalf | Customer generated |
| Rotation | Once every three years automatically | Once every three years automatically | Once a year automatically through opt-in or manually on-demand |
| Deletion | Can’t be deleted | Can’t be deleted | Can be deleted |
| Visible within your AWS account | No | Yes | Yes |
| Scope of use | Not limited to your AWS account | Limited to a specific AWS service within your AWS account | Controlled with KMS/IAM policies |
If your security and compliance requirements allow it, server-side encryption is more convenient, because authenticated requests with the required permissions can access encrypted objects in the same way as unencrypted objects. If you use AWS KMS CMK to encrypt your source and output S3 buckets, then you also need to make sure that your notebook execution role has the necessary permissions to encrypt and decrypt using the CMK. When creating a notebook instance, you can specify the required role, and also enable AWS KMS CMK encryption for data volumes, as shown in Figure 7. As of this writing, encryption can be enabled only at the time the notebook is created.
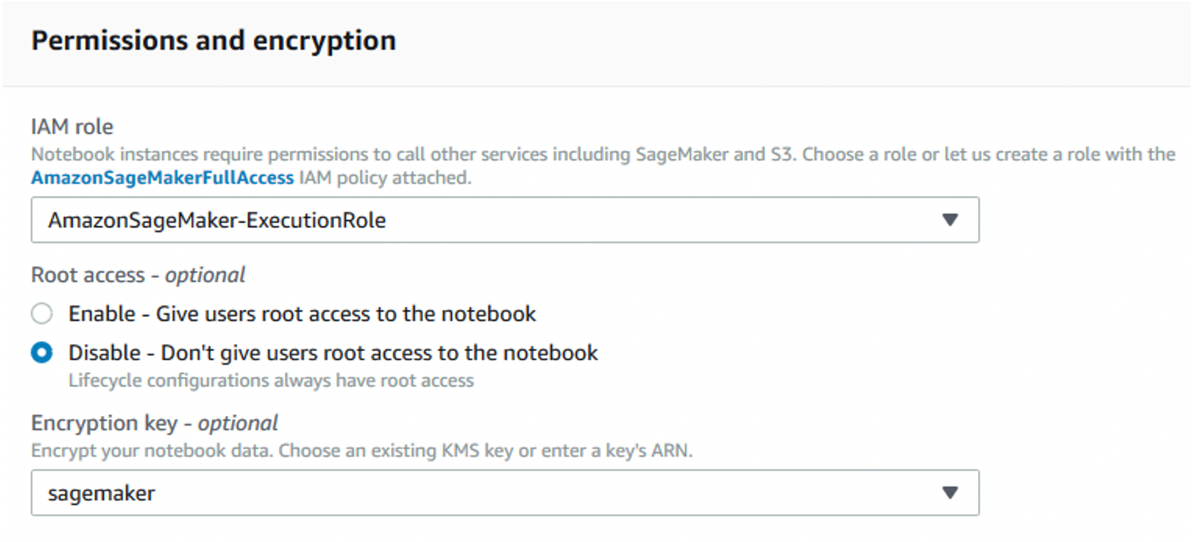
Figure 7: Specify an execution role with encrypt/decrypt permissions, and enable encryption for attached data volumes
S3 offers default encryption, which encrypts all new objects using server-side encryption. In addition, we recommend that you use S3 bucket policies to prevent unencrypted objects from being uploaded.
As the size of your data grows, you can automate the process of identifying and protecting sensitive data at scale by using Amazon Macie. Macie continually evaluates your S3 buckets and automatically generates an inventory of their size and state, which includes private or public access, shared access with other AWS accounts, and the encryption status. Macie also uses ML and pattern matching to identify and alert you to sensitive data, such as personally identifiable information (PII), and these alerts can be integrated into your ML workflow to take automated remediation actions. We recommend turning on Amazon GuardDuty to monitor S3 API operations in CloudTrail events for suspicious access to data in your S3 buckets. GuardDuty also analyzes VPC Flow Logs and DNS logs to detect unauthorized or unexpected activity in your environment.
4. Use Secrets Manager to protect credentials
To access data for training, a novice data scientist might inadvertently embed the credentials for accessing databases directly in their code. These credentials are visible to any third party examining the code.
We recommend that you use AWS Secrets Manager to store your credentials, and then grant permissions to your SageMaker IAM role to access Secrets Manager from your notebook. Figure 8 shows an example of storing credentials in Secrets Manager in the console.
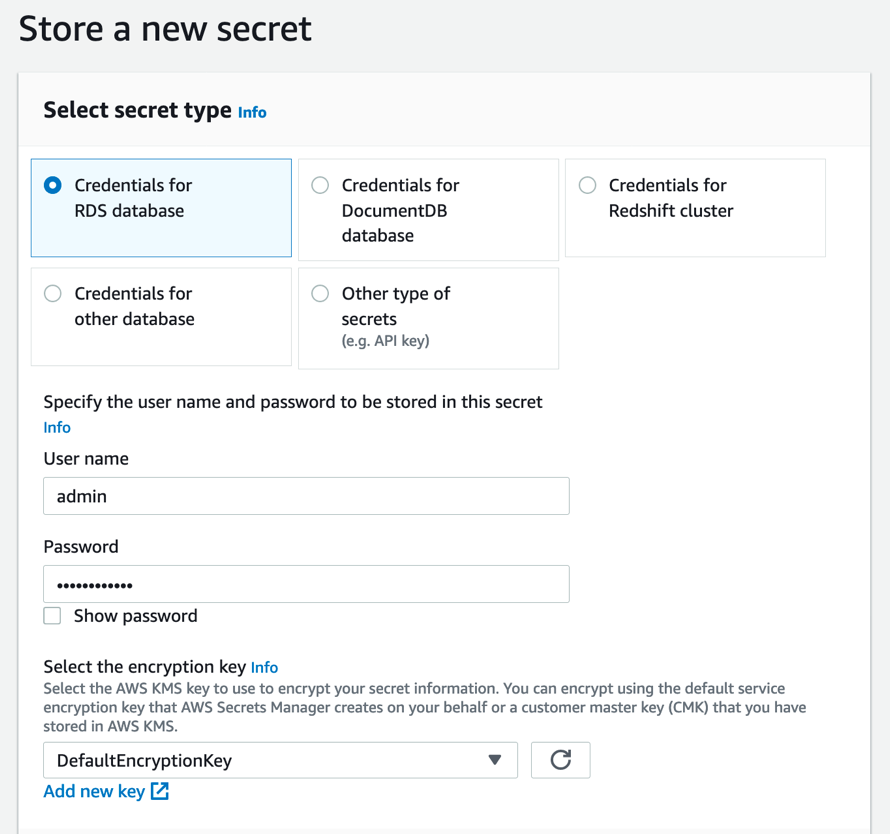
Figure 8: Storing credentials for an RDS database in the Secrets Manager console
Secrets Manager enables you to replace hardcoded secrets in your code, such as credentials, with an API call to Secrets Manager to decrypt and retrieve the secret programmatically. The console provides sample code that retrieves your secret within your application, as shown in Figure 9.
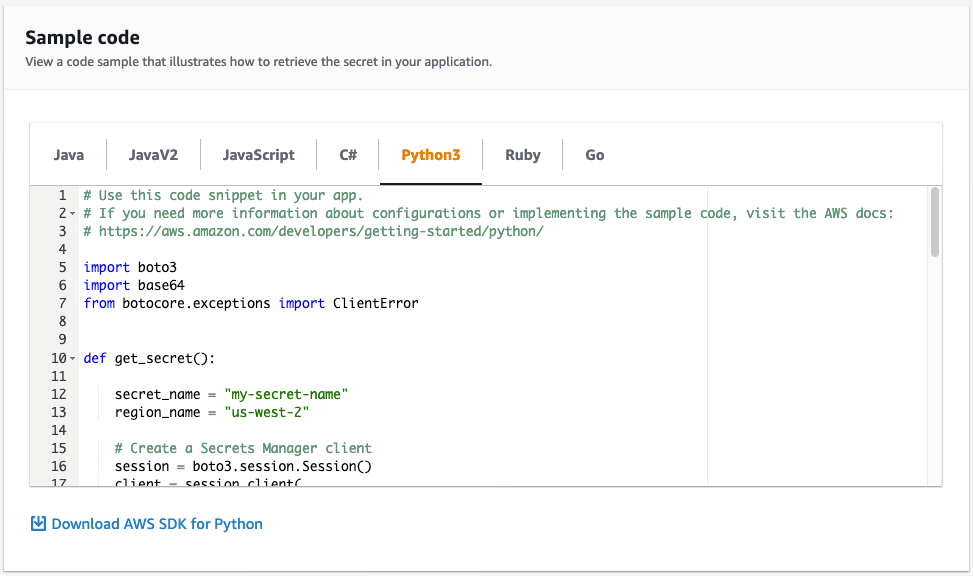
Figure 9: Sample code in the Secrets Manager console to retrieve your secret
You should also configure Secrets Manager to automatically rotate credentials for you, according to a schedule that you specify. This enables you to replace long-term secrets with short-term ones, which can significantly reduce the risk of the secrets being compromised.
5. Monitor model input and output
After you have deployed your ML model, it is essential that you continuously monitor both its input and output. The model can lose accuracy in its predictions when the statistical nature of the input that your model receives while in production drifts away from the statistical nature of the data it was trained on. Further investigation is required to determine if these drifts reflect actual changes in the real world or indicate the possibility of data poisoning.
To monitor your models in production, you should use Amazon SageMaker Model Monitor to detect and alert you to drifts in your data and model performance. After you calculate initial baselines, you can schedule monitoring jobs for both your model input and output. To help you with data quality, SageMaker Model Monitor offers predefined statistics, such as counts of missing data, as well as statistics specific to each variable type (e.g., mean and standard deviation for numeric variables, category counts for string variables). You can also define your own custom statistics. To help you with model quality, SageMaker Model Monitor offers common evaluation metrics for regression, binary classification, and multiclass problems. Figure 10 shows an example of how results of your monitoring jobs appear in Amazon SageMaker Studio.
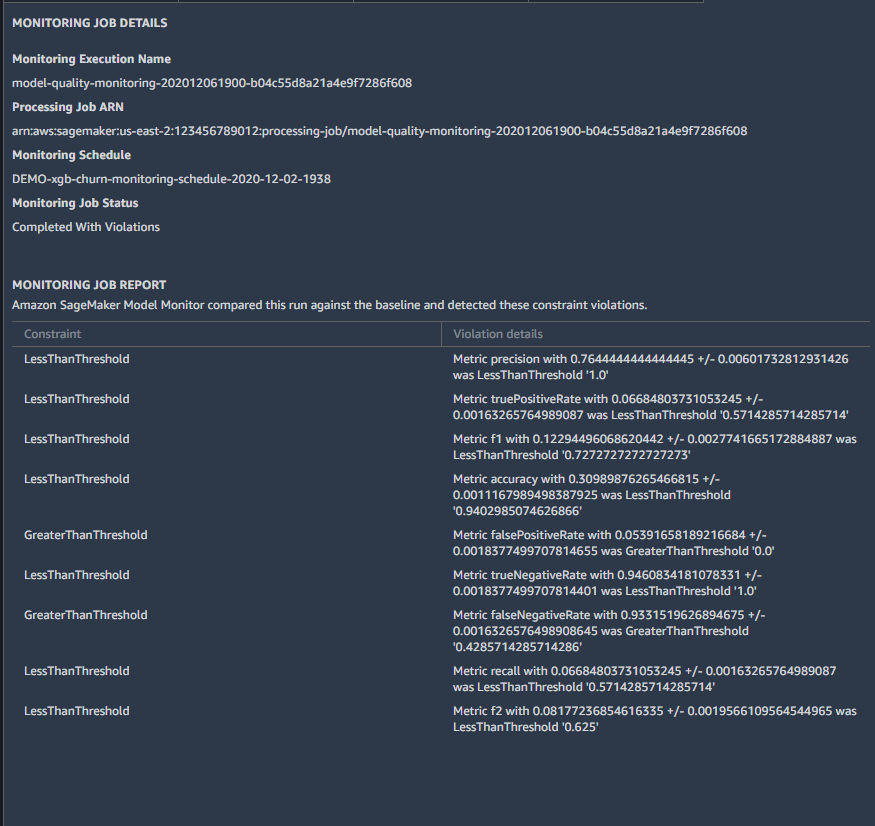
Figure 10: SageMaker Model Monitor performance drifts viewed in SageMaker Studio
For more information about how to use SageMaker Model Monitor, including instructions to specify the baseline statistics and the metrics you would like to monitor, see Monitor Data Quality and Monitor Model Quality in the Amazon SageMaker Developer Guide.
SageMaker Model Monitor stores the monitoring results in Amazon CloudWatch. You can set up CloudWatch alarms by using either the CloudWatch console or SageMaker notebook, to notify you when the model quality drifts from the baseline thresholds. You can view the status of CloudWatch alarms from the console, as shown in Figure 11.

Figure 11: Newly-created CloudWatch alarm in INSUFFICIENT_DATA state
A CloudWatch alarm shows an initial INSUFFICIENT_DATA state when it is first created. Over time, it will display either an OK or ALARM state, as shown in Figure 12.

Figure 12: CloudWatch alarm in ALARM state
After the alarm has been created, you can set remedial actions to take on these alerts, such as retraining the model or updating the training data.
6. Enable logging for model access
After your ML model has been built and deployed, you can serve it using Amazon API Gateway to enable end users to invoke it for real-time predictions. To examine access patterns of your API, you should grant API Gateway permission to read and write logs to CloudWatch, and then enable CloudWatch Logs with API Gateway. Access logging keeps a record of who has accessed your API, and how the caller accessed the API. You can either create your own log group or choose an existing log group that can be managed by API Gateway. The following is an example output of an access log:
You can enable access logging by using the API Gateway console, as shown in Figure 13. For more information, see Setting up CloudWatch logging for a REST API in API Gateway.
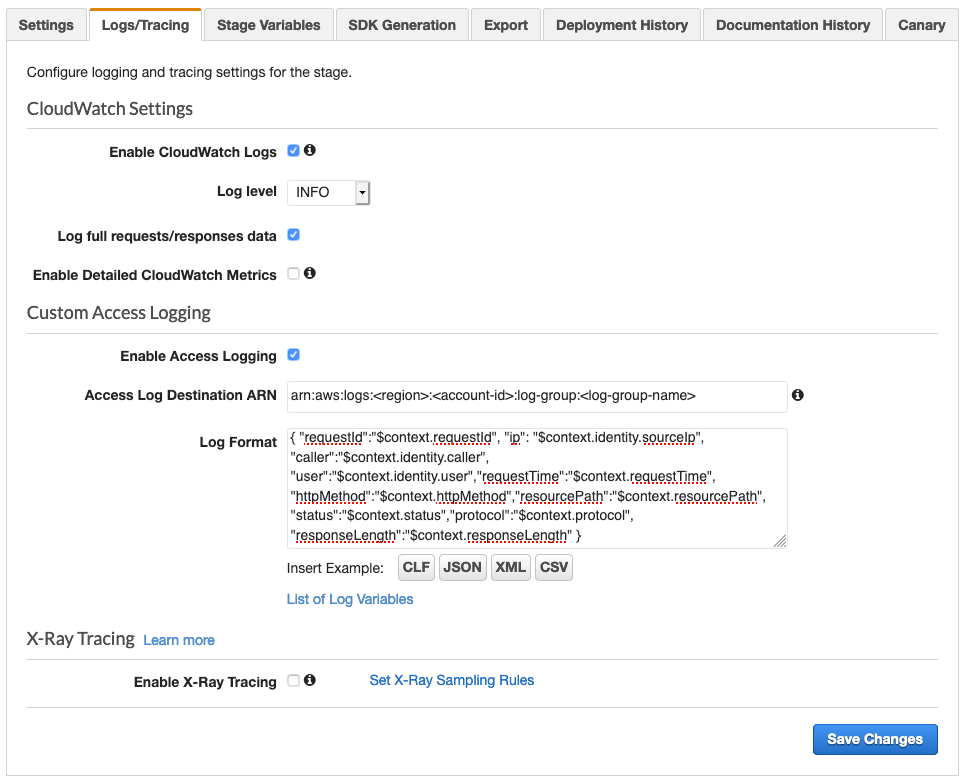
Figure 13: Enable access logs in the API Gateway console
ML-specific vulnerabilities, such as membership inference and model inversion, sometimes involve repeated API calls to derive information on the training dataset or the model. To limit who can use the model, we recommend protecting API Gateway with AWS WAF, which enables configuring rules to block requests from specified IP addresses or limit the number of web requests that are allowed by each client IP within a trailing time window.
7. Use version control on model artifacts
We recommend that you use version control to track your code or other model artifacts. If your model artifacts are modified or deleted, either accidentally or deliberately, version control allows you to roll back to a previous stable release. This can be used in the case where an unauthorized user gains access to your environment and makes changes to your model.
If your model artifacts are stored in Amazon S3, you should enable versioning on a new or an existing S3 bucket. We also recommend that you pair Amazon S3 versioning with multi-factor authentication (MFA) delete, to help ensure that only users authenticated with MFA can permanently delete an object version, or change the versioning state of the bucket.
Another way of enabling version control is to associate Git repositories with new or existing SageMaker notebook instances. SageMaker supports AWS CodeCommit, GitHub, and other Git-based repositories. Using CodeCommit, you can further secure your repository by rotating credentials and enabling MFA.
Conclusion
This post summarizes basic security controls that data scientists and security engineers can collaborate on to build more secure ML infrastructure.
For more information about securing your ML workflow on AWS, see the following resources:
- Machine learning best practices in financial services on the AWS Machine Learning Blog
- Secure deployment of Amazon SageMaker resources on the AWS Security Blog
- Build a secure ML environment with SageMaker in the Amazon SageMaker Workshop
- Provision a secure ML environment with SageMaker and run an end-to-end example in the Amazon SageMaker Workshop
- Amazon SageMaker with Guardrails on AWS Quick Start
If you have feedback about this post, submit comments in the Comments section below.
Want more AWS Security how-to content, news, and feature announcements? Follow us on Twitter.