AWS Security Blog
Configure fine-grained access to your resources shared using AWS Resource Access Manager
You can use AWS Resource Access Manager (AWS RAM) to securely, simply, and consistently share supported resource types within your organization or organizational units (OUs) and across AWS accounts. This means you can provision your resources once and use AWS RAM to share them with accounts. With AWS RAM, the accounts that receive the shared resources can list those resources alongside the resources they own.
When you share your resources by using AWS RAM, you can specify the actions that an account can perform and the access conditions on the shared resource. AWS RAM provides AWS managed permissions, which are created and maintained by AWS and which grant permissions for common customer scenarios. Now, you can further tailor resource access by authoring and applying fine-grained customer managed permissions in AWS RAM. A customer managed permission is a managed permission that you create to precisely specify who can do what under which conditions for the resource types included in your resource share.
This blog post walks you through how to use customer managed permissions to tailor your resource access to meet your business and security needs. Customer managed permissions help you follow the best practice of least privilege for your resources that are shared using AWS RAM.
Considerations
Before you start, review the considerations for using customer managed permissions for supported resource types in the AWS RAM User Guide.
Solution overview
Many AWS customers share infrastructure services to accounts in an organization from a centralized infrastructure OU. The networking account in the infrastructure OU follows the best practice of least privilege and grants only the permissions that accounts receiving these resources, such as development accounts, require to perform a specific task. The solution in this post demonstrates how you can share an Amazon Virtual Private Cloud (Amazon VPC) IP Address Manager (IPAM) pool with the accounts in a Development OU. IPAM makes it simpler for you to plan, track, and monitor IP addresses for your AWS workloads.
You’ll use a networking account that owns an IPAM pool to share the pool with the accounts in a Development OU. You’ll do this by creating a resource share and a customer managed permission through AWS RAM. In this example, shown in Figure 1, both the networking account and the Development OU are in the same organization. The accounts in the Development OU only need the permissions that are required to allocate a classless inter-domain routing (CIDR) range and not to view the IPAM pool details. You’ll further refine access to the shared IPAM pool so that only AWS Identity and Access Management (IAM) users or roles tagged with team = networking can perform actions on the IPAM pool that’s shared using AWS RAM.
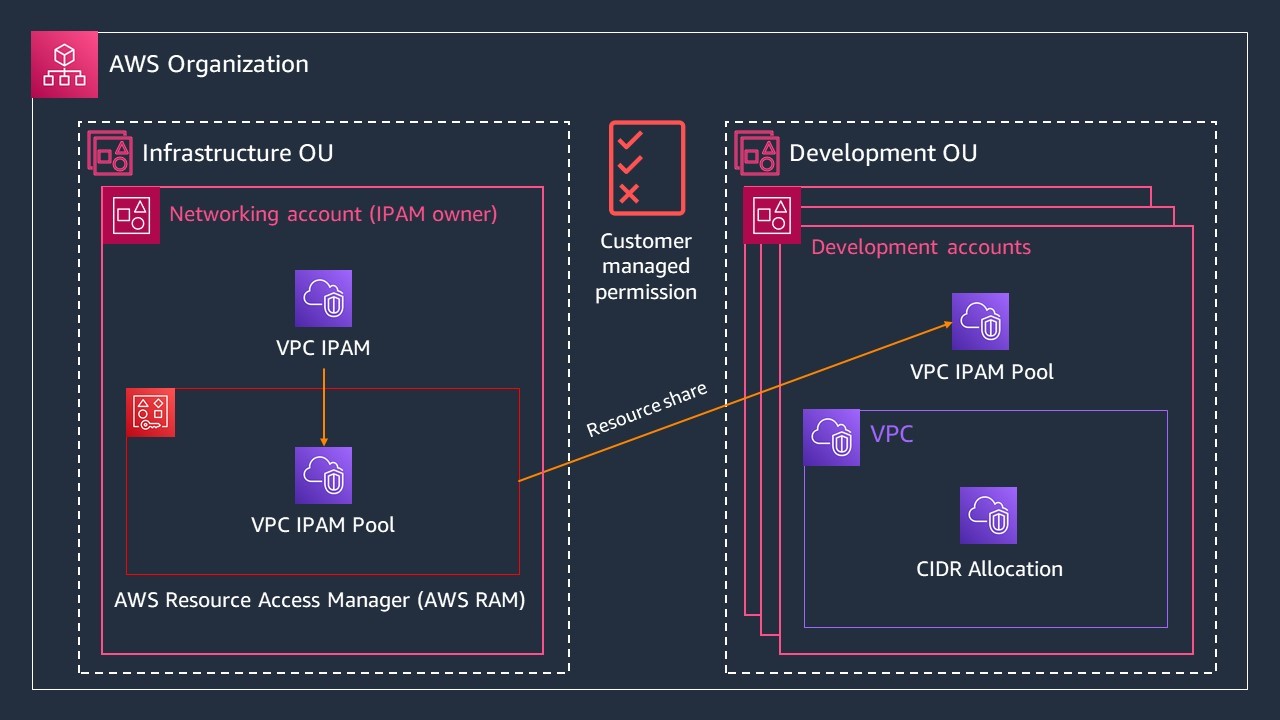
Figure 1: Multi-account diagram for sharing your IPAM pool from a networking account in the Infrastructure OU to accounts in the Development OU
Prerequisites
For this walkthrough, you must have the following prerequisites:
- An AWS account (the networking account) with an IPAM pool already provisioned. For this example, create an IPAM pool in a networking account named ipam-vpc-pool-use1-dev. Because you share resources across accounts in the same AWS Region using AWS RAM, provision the IPAM pool in the same Region where your development accounts will access the pool.
- An AWS OU with the associated development accounts to share the IPAM pool with. In this example, these accounts are in your Development OU.
- An IAM role or user with permissions to perform IPAM and AWS RAM operations in the networking account and the development accounts.
Share your IPAM pool with your Development OU with least privilege permissions
In this section, you share an IPAM pool from your networking account to the accounts in your Development OU and grant least-privilege permissions. To do that, you create a resource share that contains your IPAM pool, your customer managed permission for the IPAM pool, and the OU principal you want to share the IPAM pool with. A resource share contains resources you want to share, the principals you want to share the resources with, and the managed permissions that grant resource access to the account receiving the resources. You can add the IPAM pool to an existing resource share, or you can create a new resource share. Depending on your workflow, you can start creating a resource share either in the Amazon VPC IPAM or in the AWS RAM console.
To initiate a new resource share from the Amazon VPC IPAM console
- Sign in to the AWS Management Console as your networking account. For Features, select Amazon VPC IP Address Manager console.
- Select ipam-vpc-pool-use1-dev, which was provisioned as part of the prerequisites.
- On the IPAM pool detail page, choose the Resource sharing tab.
- Choose Create resource share.
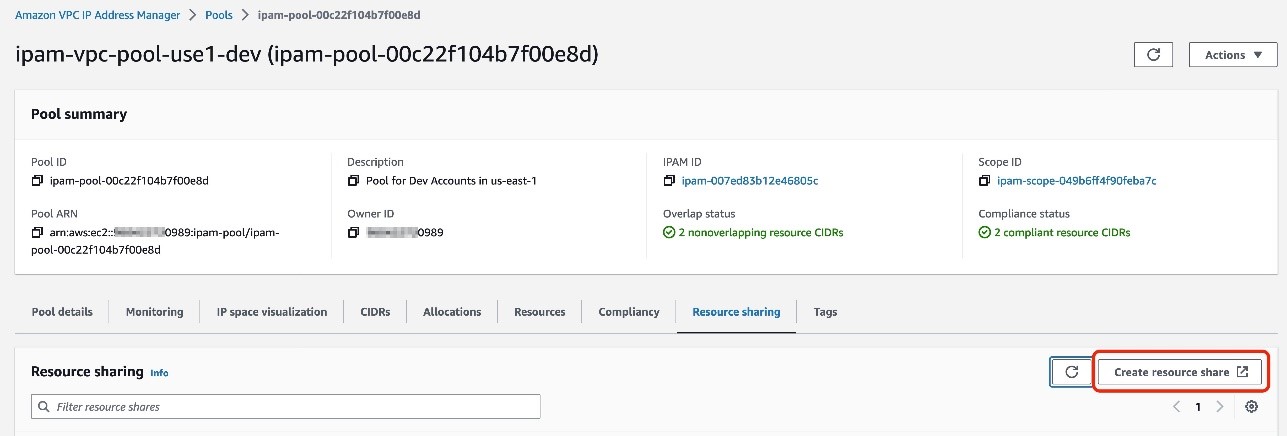
Figure 2: Create resource share to share your IPAM pool
Alternatively, you can initiate a new resource share from the AWS RAM console.
To initiate a new resource share from the AWS RAM console
- Sign in to the AWS Management Console as your networking account. For Services, select Resource Access Manager console.
- Choose Create resource share.
Next, specify the resource share details, including the name, the resource type, and the specific resource you want to share. Note that the steps of the resource share creation process are located on the left side of the AWS RAM console.
To specify the resource share details
- For Name, enter ipam-shared-dev-pool.
- For Select resource type, choose IPAM pools.
- For Resources, select the Amazon Resource Name (ARN) of the IPAM pool you want to share from a list of the IPAM pool ARNs you own.
- Choose Next.
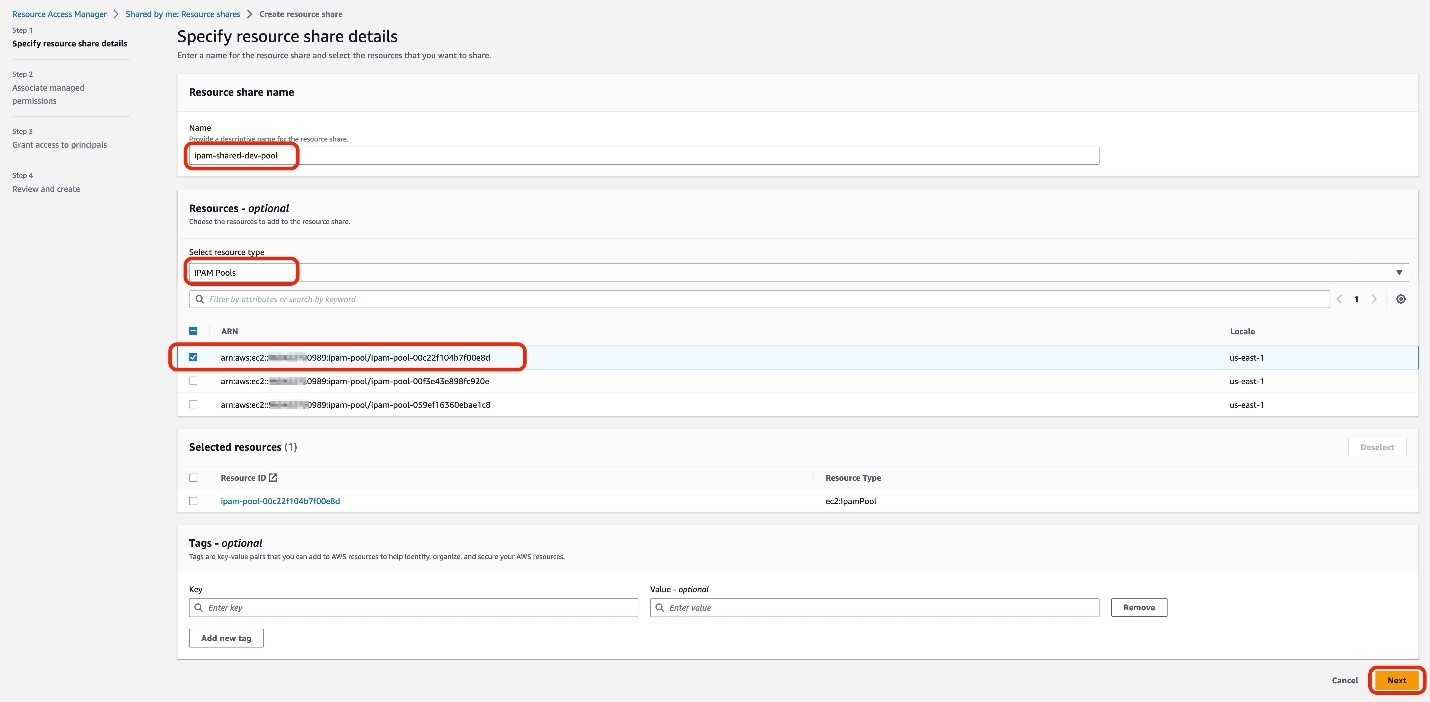
Figure 3: Specify the resources to share in your resource share
Configure customer managed permissions
In this example, the accounts in the Development OU need the permissions required to allocate a CIDR range, but not the permissions to view the IPAM pool details. The existing AWS managed permission grants both read and write permissions. Therefore, you need to create a customer managed permission to refine the resource access permissions for your accounts in the Development OU. With a customer managed permission, you can select and tailor the actions that the development accounts can perform on the IPAM pool, such as write-only actions.
In this section, you create a customer managed permission, configure the managed permission name, select the resource type, and choose the actions that are allowed with the shared resource.
To create and author a customer managed permission
- On the Associate managed permissions page, choose Create customer managed permission. This will bring up a new browser tab with a Create a customer managed permission page.
- On the Create a customer managed permission page, enter my-ipam-cmp for the Customer managed permission name.
- Confirm the Resource type as ec2:IpamPool.
- On the Visual editor tab of the Policy template section, select the Write checkbox only. This will automatically check all the available write actions.
- Choose Create customer managed permission.
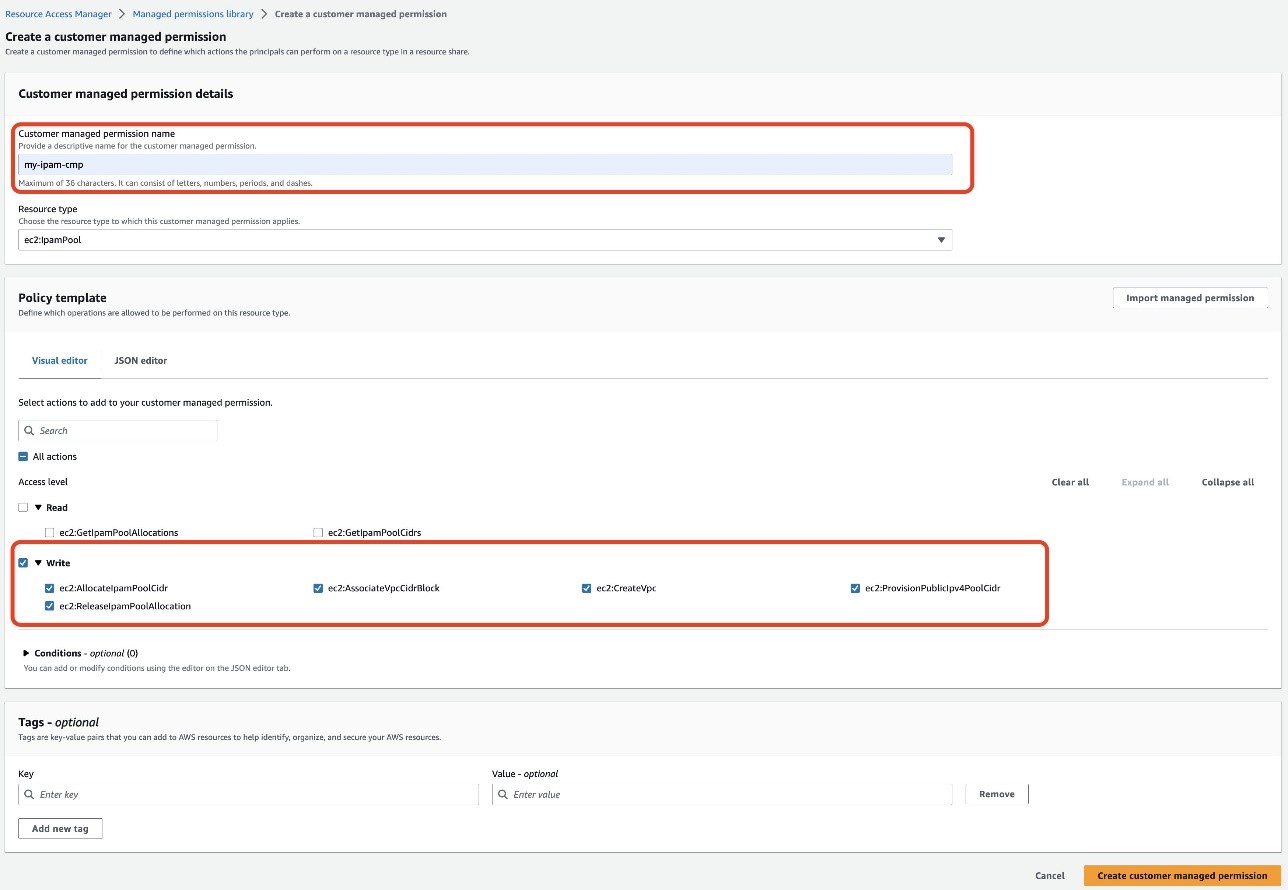
Figure 4: Create a customer managed permission with only write actions
Now that you’ve created your customer managed permission, you must associate it to your resource share.
To associate your customer managed permission
- Go back to the previous Associate managed permissions page. This is most likely located in a separate browser tab.
- Choose the refresh icon
 .
. - Select my-ipam-cmp from the dropdown menu.
- Review the policy template, and then choose Next.
Next, select the IAM roles, IAM users, AWS accounts, AWS OUs, or organization you want to share your IPAM pool with. In this example, you share the IPAM pool with an OU in your account.
To grant access to principals
- On the Grant access to principals page, select Allow sharing only with your organization.
- For Select principal type, choose Organizational unit (OU).
- Enter the Development OU’s ID.
- Select Add, and then choose Next.
- Choose Create resource share to complete creation of your resource share.
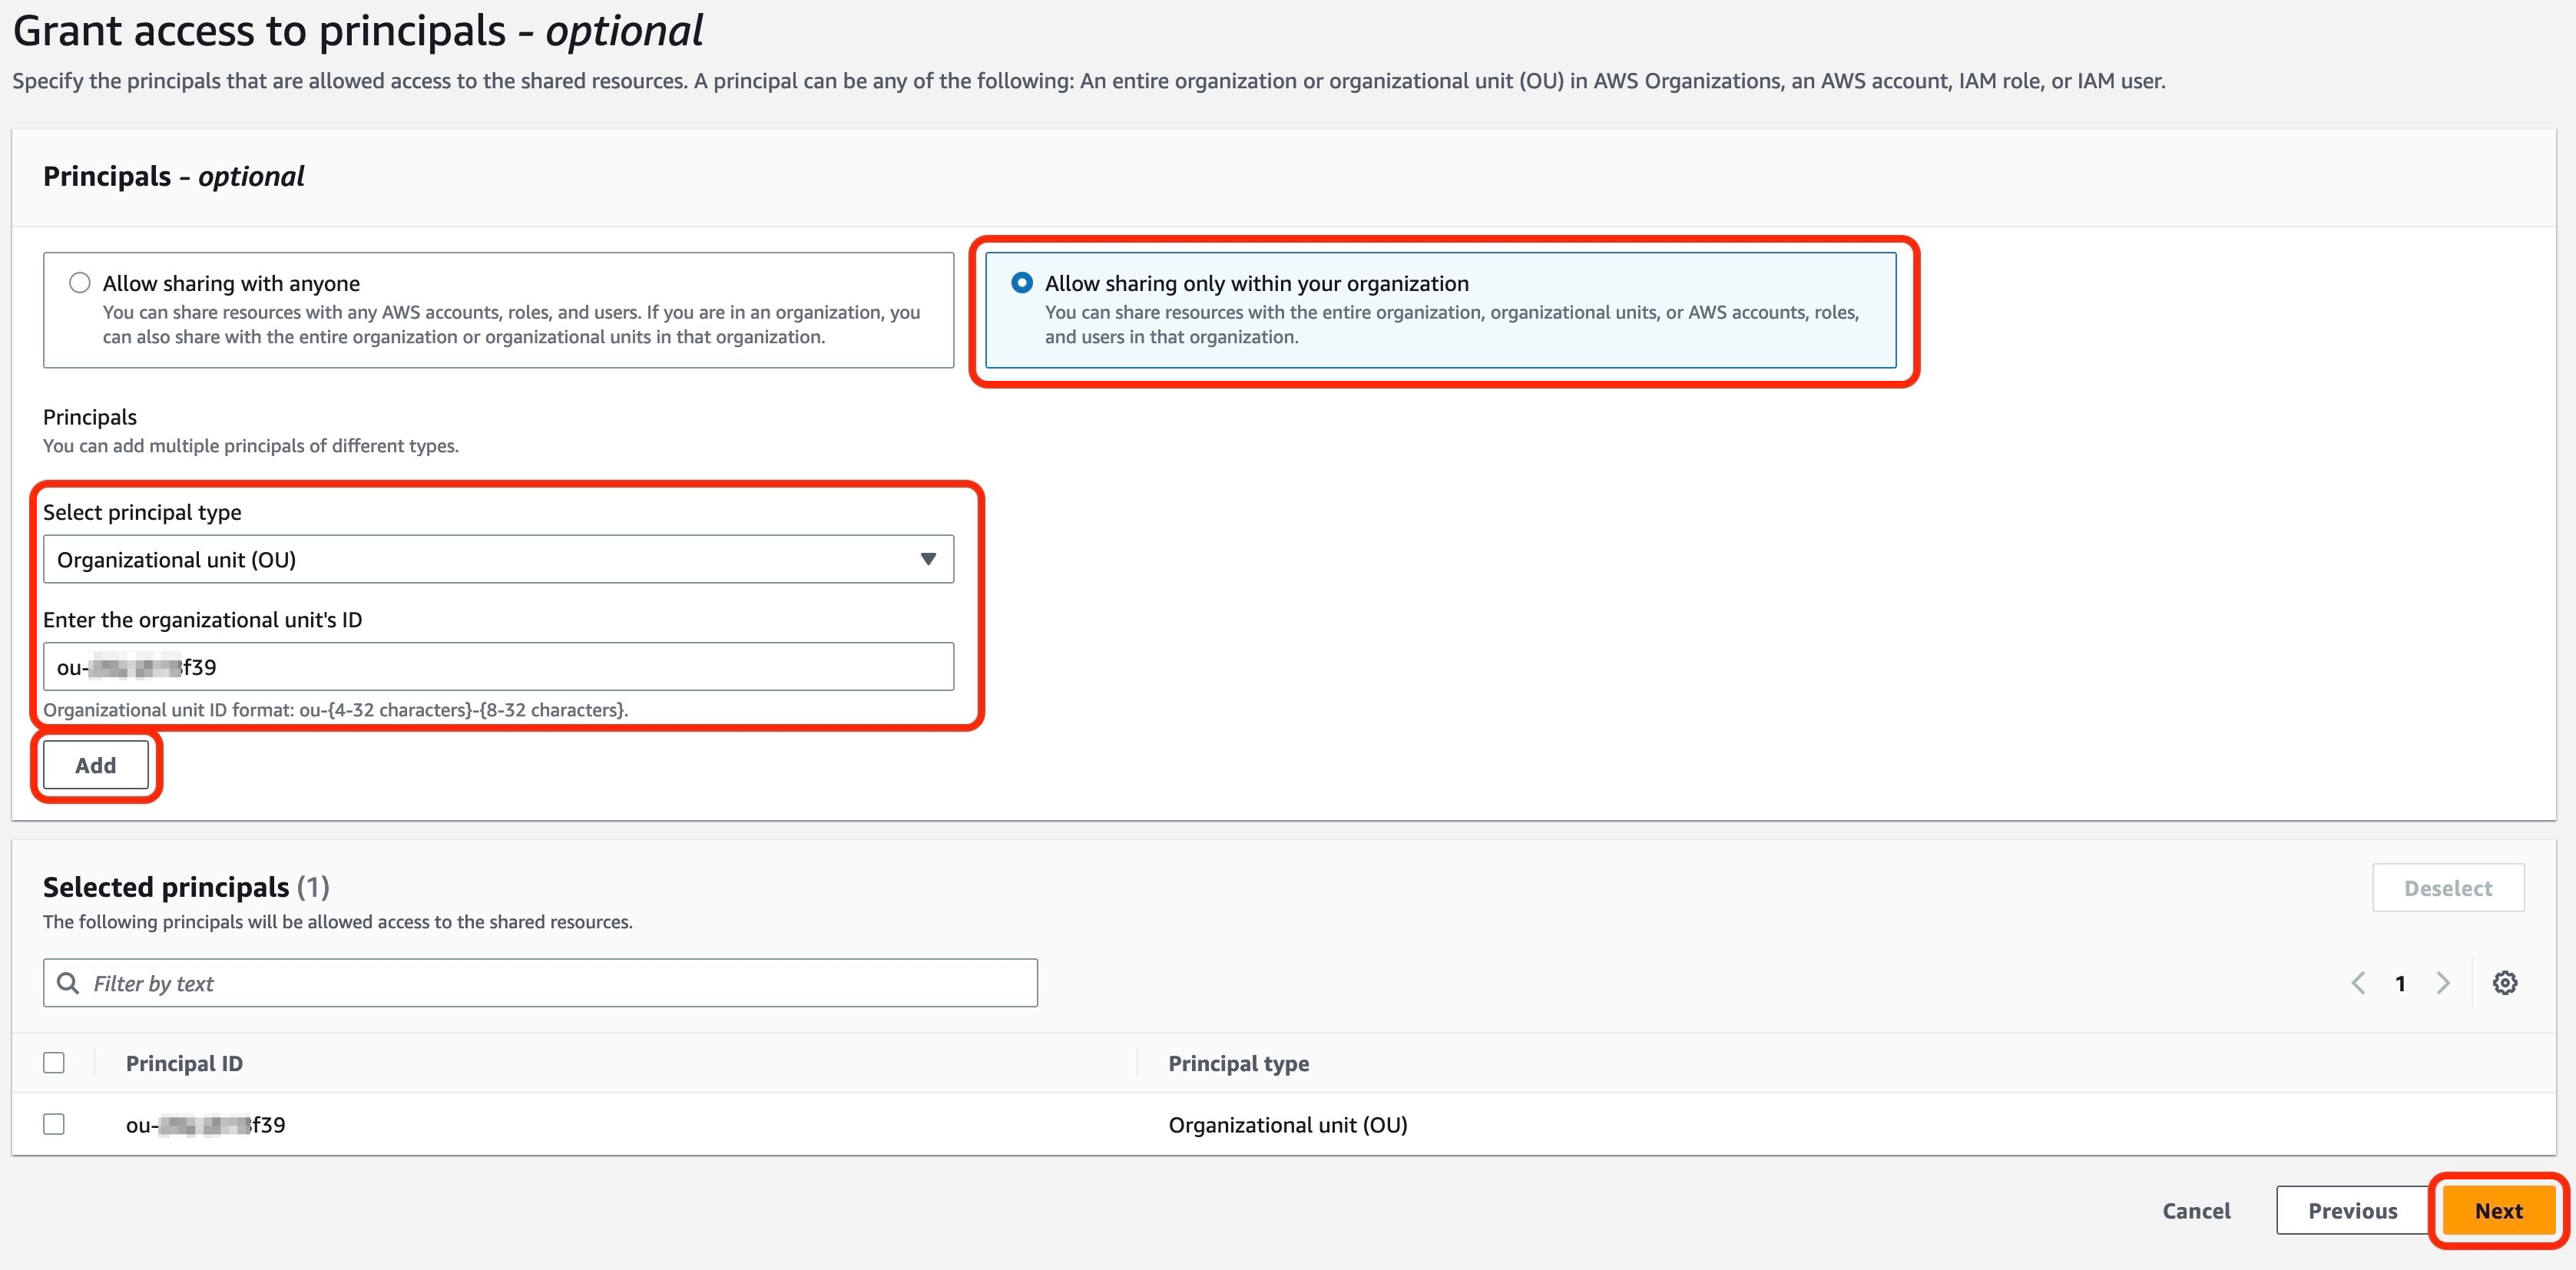
Figure 5: Grant access to principals in your resource share
Verify the customer managed permissions
Now let’s verify that the customer managed permission is working as expected. In this section, you verify that the development account cannot view the details of the IPAM pool and that you can use that same account to create a VPC with the IPAM pool.
To verify that an account in your Development OU can’t view the IPAM pool details
- Sign in to the AWS Management Console as an account in your Development OU. For Features, select Amazon VPC IP Address Manager console.
- In the left navigation pane, choose Pools.
- Select ipam-shared-dev-pool. You won’t be able to view the IPAM pool details.
To verify that an account in your Development OU can create a new VPC with the IPAM pool
- Sign in to the AWS Management Console as an account in your Development OU. For Services, select VPC console.
- On the VPC dashboard, choose Create VPC.
- On the Create VPC page, select VPC only.
- For name, enter my-dev-vpc.
- Select IPAM-allocated IPv4 CIDR block.
- Choose the ARN of the IPAM pool that’s shared with your development account.
- For Netmask, select /24 256 IPs.
- Choose Create VPC. You’ve successfully created a VPC with the IPAM pool shared with your account in your Development OU.
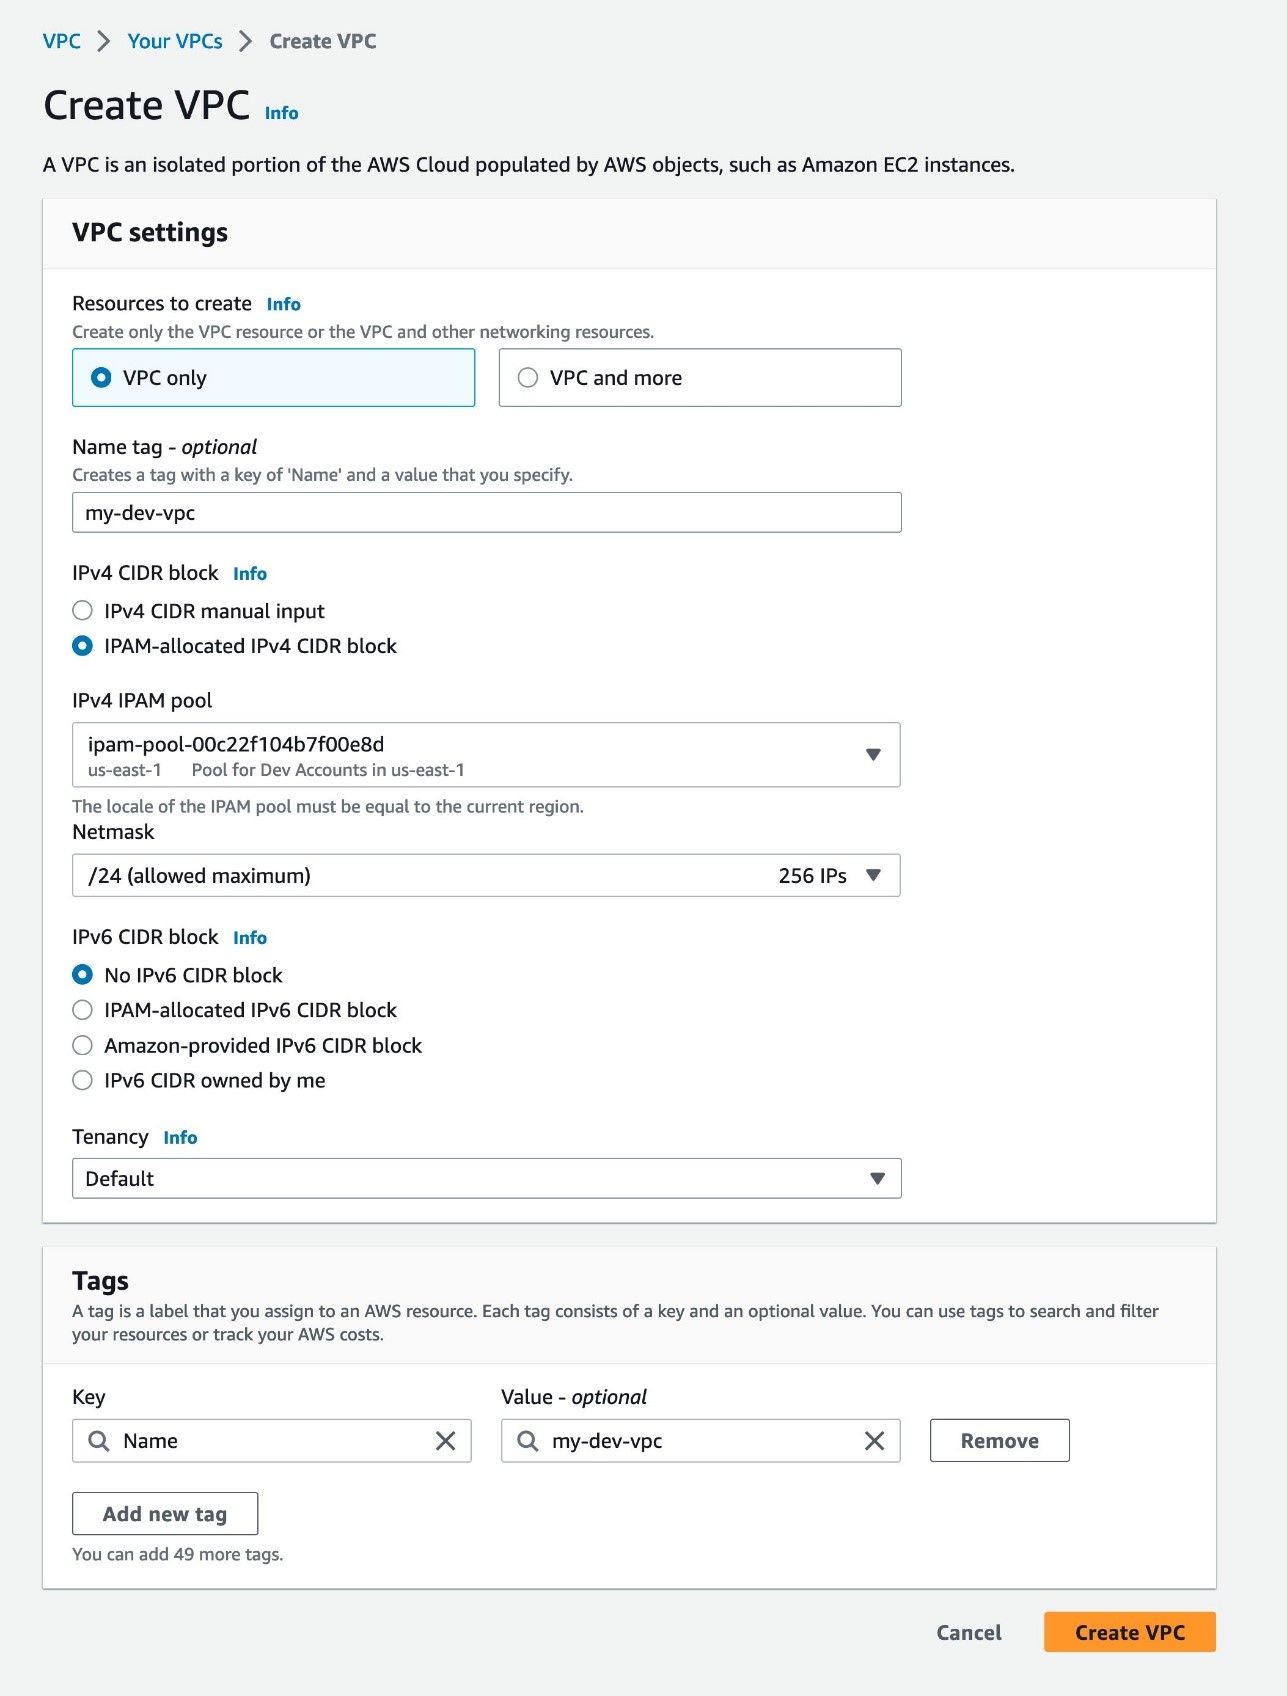
Figure 6: Create a VPC
Update customer managed permissions
You can create a new version of your customer managed permission to rescope and update the access granularity of your resources that are shared using AWS RAM. For example, you can add a condition in your customer managed permissions so that only IAM users or roles tagged with a particular principal tag can access and perform the actions allowed on resources shared using AWS RAM. If you need to update your customer managed permission — for example, after testing or as your business and security needs evolve — you can create and save a new version of the same customer managed permission rather than creating an entirely new customer management permission. For example, you might want to adjust your access configurations to read-only actions for your development accounts and to rescope to read-write actions for your testing accounts. The new version of the permission won’t apply automatically to your existing resource shares, and you must explicitly apply it to those shares for it to take effect.
To create a version of your customer managed permission
- Sign in to the AWS Management Console as your networking account. For Services, select Resource Access Manager console.
- In the left navigation pane, choose Managed permissions library.
- For Filter by text, enter my-ipam-cmp and select my-ipam-cmp. You can also select the Any type dropdown menu and then select Customer managed to narrow the list of managed permissions to only your customer managed permissions.
- On the my-ipam-cmp page, choose Create version.
- You can make the customer managed permission more fine-grained by adding a condition. On the Create a customer managed permission for my-ipam-cmp page, under the Policy template section, choose JSON editor.
- Add a condition with aws:PrincipalTag that allows only the users or roles tagged with team = networking to access the shared IPAM pool.
"Condition": { "StringEquals": { "aws:PrincipalTag/team": "networking" } } - Choose Create version. This new version will be automatically set as the default version of your customer managed permission. As a result, new resource shares that use the customer managed permission will use the new version.
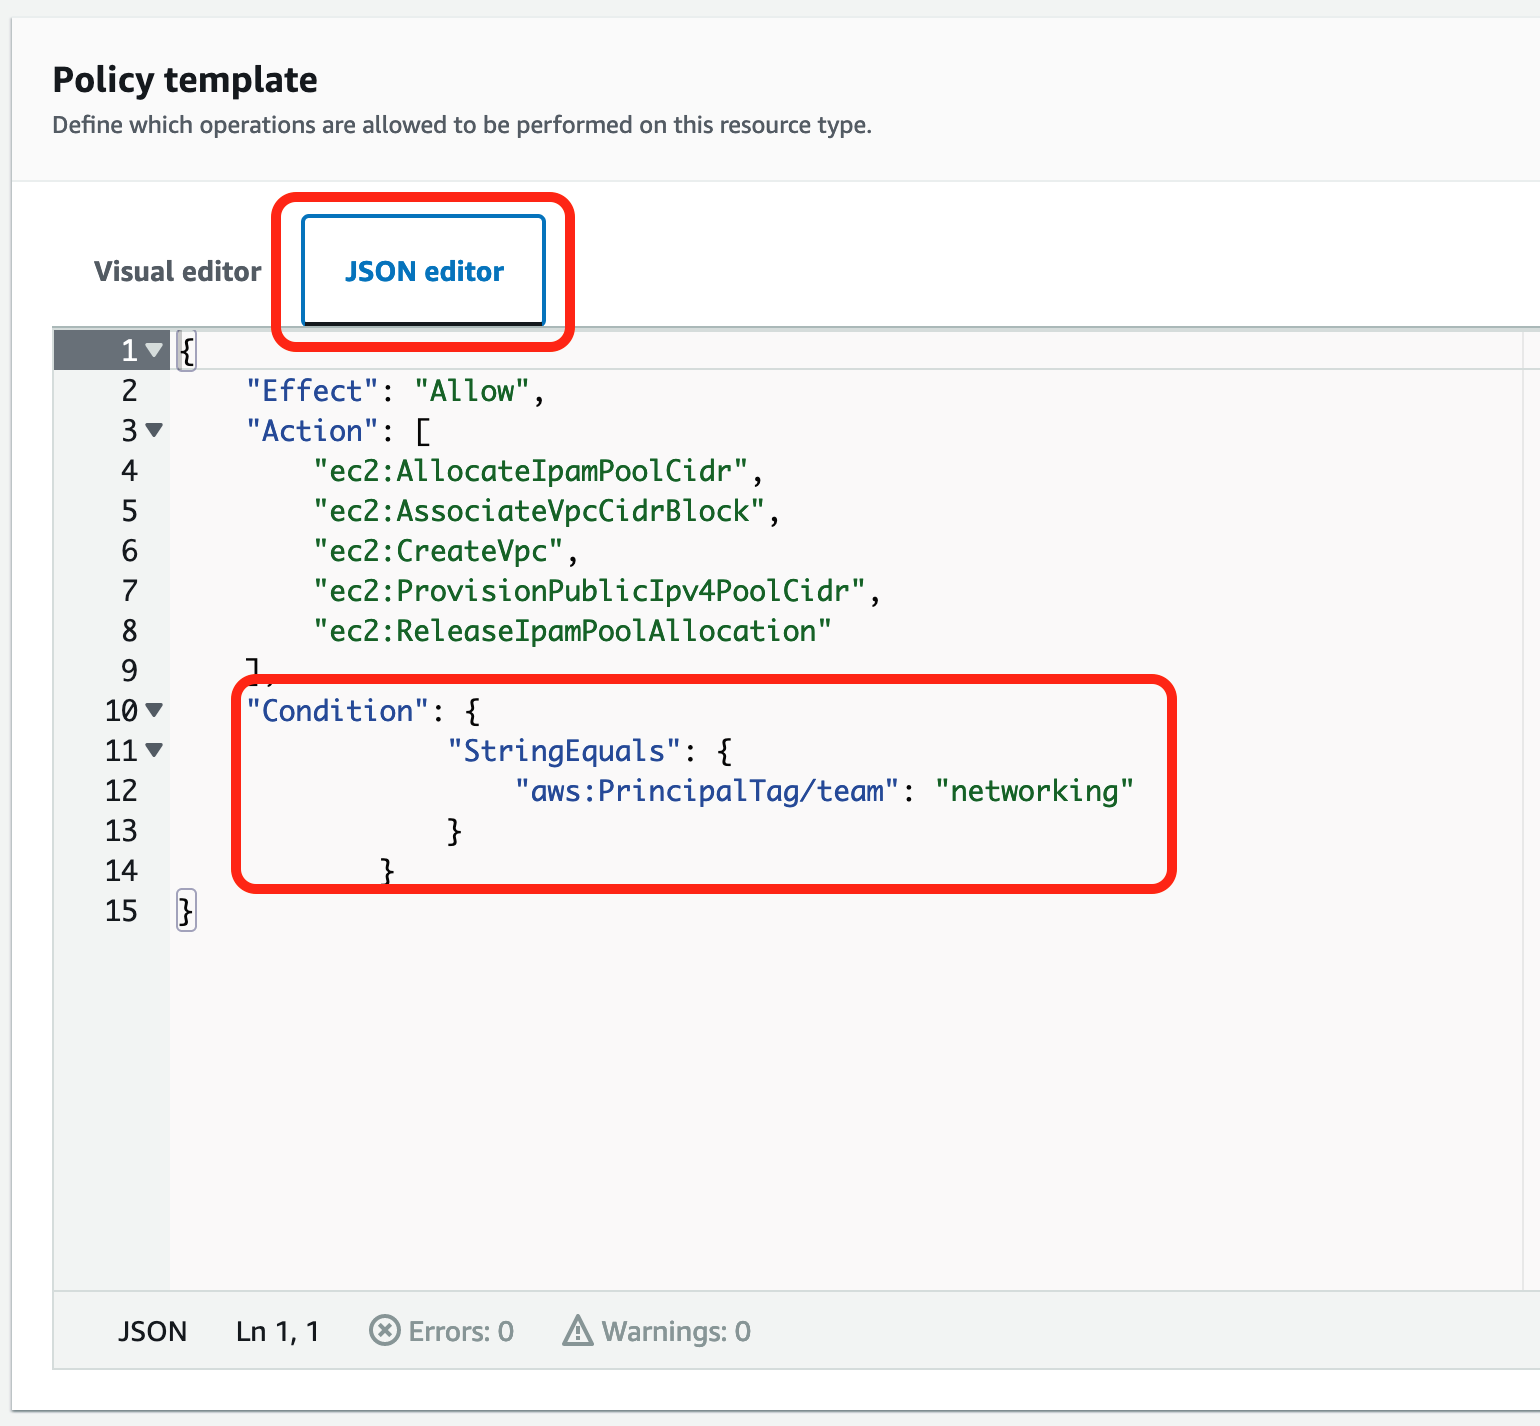
Figure 7: Update your customer managed permissions and add a condition statement with aws:PrincipalTag
Note: Now that you have the new version of your customer managed permission, you must explicitly apply it to your existing resource shares for it to take effect.
To apply the new version of the customer managed permission to existing resource shares
- On the my-ipam-cmp page, under the Managed permission versions, select Version 1.
- Choose the Associated resource shares tab.
- Find ipam-shared-dev-pool and next to the current version number, select Update to default version. This will update your ipam-shared-dev-pool resource share with the new version of your my-ipam-cmp customer managed permission.
To verify your updated customer managed permission, see the Verify the customer managed permissions section earlier in this post. Make sure that you sign in with an IAM role or user tagged with team = networking, and then repeat the steps of that section to verify your updated customer managed permission. If you use an IAM role or user that is not tagged with team = networking, you won’t be able to allocate a CIDR from the IPAM pool and you won’t be able to create the VPC.
Cleanup
To remove the resources created by the preceding example:
- Delete the resource share from the AWS RAM console.
- Deprovision the CIDR from the IPAM pool.
- Delete the IPAM pool you created.
Summary
This blog post presented an example of using customer managed permissions in AWS RAM. AWS RAM brings simplicity, consistency, and confidence when sharing your resources across accounts. In the example, you used AWS RAM to share an IPAM pool to accounts in a Development OU, configured fine-grained resource access controls, and followed the best practice of least privilege by granting only the permissions required for the accounts in the Development OU to perform a specific task with the shared IPAM pool. In the example, you also created a new version of your customer managed permission to rescope the access granularity of your resources that are shared using AWS RAM.
To learn more about AWS RAM and customer managed permissions, see the AWS RAM documentation and watch the AWS RAM Introduces Customer Managed Permissions demo.
If you have feedback about this post, submit comments in the Comments section below. If you have questions about this post, contact AWS Support.
Want more AWS Security news? Follow us on Twitter.