AWS Security Blog
Creating an opportunistic IPSec mesh between EC2 instances
August 31, 2021: AWS KMS is replacing the term customer master key (CMK) with AWS KMS key and KMS key. The concept has not changed. To prevent breaking changes, AWS KMS is keeping some variations of this term. More info.

IPSec (IP Security) is a protocol for in-transit data protection between hosts. Configuration of site-to-site IPSec between multiple hosts can be an error-prone and intensive task. If you need to protect N EC2 instances, then you need a full mesh of N*(N-1)IPSec tunnels. You must manually propagate every IP change to all instances, configure credentials and configuration changes, and integrate monitoring and metrics into the operation. The efforts to keep the full-mesh parameters in sync are enormous.
Full mesh IPSec, known as any-to-any, builds an underlying network layer that protects application communication. Common use cases are:
- You’re migrating legacy applications to AWS, and they don’t support encryption. Examples of protocols without encryption are File Transfer Protocol (FTP), Hypertext Transfer Protocol (HTTP) or Lightweight Directory Access Protocol (LDAP).
- You’re offloading protection to IPSec to take advantage of fast Linux kernel encryption and automated certificate management, the use case we focus on in this solution.
- You want to segregate duties between your application development and infrastructure security teams.
- You want to protect container or application communication that leaves an EC2 instance.
In this post, I’ll show you how to build an opportunistic IPSec mesh that sets up dynamic IPSec tunnels between your Amazon Elastic Compute Cloud (EC2) instances. IPSec is based on Libreswan, an open-source project implementing opportunistic IPSec encryption (IKEv2 and IPSec) on a large scale.
Solution benefits and deliverable
The solution delivers the following benefits (versus manual site-to-site IPSec setup):
- Automatic configuration of opportunistic IPSec upon EC2 launch.
- Generation of instance certificates and weekly re-enrollment.
- IPSec Monitoring metrics in Amazon CloudWatch for each EC2 instance.
- Alarms for failures via CloudWatch and Amazon Simple Notification Service (Amazon SNS).
- An initial generation of a CA root key if needed, including IAM Policies and two AWS KMS keys (KMS keys) that will protect the CA key and instance key.
Out of scope
This solution does not deliver IPSec protection between EC2 instances and hosts that are on-premises, or between EC2 instances and managed AWS components, like Elastic Load Balancing, Amazon Relational Database Service, or Amazon Kinesis. Your EC2 instances must have general IP connectivity that allows NACLs and Security Groups. This solution cannot deliver extra connectivity like VPC peering or Transit VPC can.
Prerequisites
You’ll need the following resources to deploy the solution:
- A trusted Unix/Linux/MacOS machine with AWS SDK for Python and OpenSSL
- AWS admin rights in your AWS account (including API access)
- AWS Systems Manager on EC2
- Linux RedHat, Amazon Linux 2, or CentOS installed on the EC2 instances you want to configure
- Internet access on the EC2 instances for downloading Linux packages and reaching AWS Systems Manager endpoint
- The AWS services used by the solution, which are AWS Lambda, AWS Key Management Service (AWS KMS), AWS Identity and Access Management (IAM), AWS Systems Manager, Amazon CloudWatch, Amazon Simple Storage Service (Amazon S3), and Amazon SNS
Solution and performance costs
My solution does not require any additional charges to standard AWS services, since it uses well-established open source software. Involved AWS services are as follows:
- AWS Lambda is used to issue the certificates. Per EC2 and per week, I estimate the use of two 30 second Lambda functions with 256 MB of allocated memory. For 100 EC2 instances, the cost will be several cents. See AWS Lambda Pricing for details.
- Certificates have no charge, since they’re issued by the Lambda function.
- CloudWatch Events and Amazon S3 Storage usage are within the free tier policy.
- AWS Systems Manager has no additional charge.
- AWS EC2 is a standard AWS service on which you deploy your workload. There are no charges for IPSec encryption.
- EC2 CPU performance decrease due to encryption is negligible since we use hardware encryption support of the Linux kernel. The IKE negotiation that is done by the OS in your CPU may add minimal CPU overhead depending on the number of EC2 instances involved.
Installation (one-time setup)
To get started, on a trusted Unix/Linux/MacOS machine that has admin access to your AWS account and AWS SDK for Python already installed, complete the following steps:
- Download the installation package from https://github.com/aws-quickstart/quickstart-ec2-ipsec-mesh.
- Edit the following files in the package to match your network setup:
- config/private should contain all networks with mandatory IPSec protection, such as EC2s that should only be communicated with via IPSec. All of these hosts must have IPSec installed.
- config/clear should contain any networks that do not need IPSec protection. For example, these might include Route 53 (DNS), Elastic Load Balancing, or Amazon Relational Database Service (Amazon RDS).
- config/clear-or-private should contain networks with optional IPSec protection. These networks will start clear and attempt to add IPSec.
- config/private-or-clear should also contain networks with optional IPSec protection. However, these networks will start with IPSec and fail back to clear.
- Execute ./aws_setup.py and carefully set and verify the parameters. Use -h to view help. If you don’t provide customized options, default values will be generated. The parameters are:
- Region to install the solution (default: your AWS Command Line Interface region)
- Buckets for configuration, sources, published host certificates and CA storage. (Default: random values that follow the pattern ipsec-{hostcerts|cacrypto|sources}-{stackname} will be generated.) If the buckets do not exist, they will be automatically created.
- Reuse of an existing CA? (default: no)
- Leave encrypted backup copy of the CA key? The password will be printed to stdout (default: no)
- Cloud formation stackname (default: ipsec-{random string}).
- Restrict provisioning to certain VPC (default: any)
Here is an example output:
Launching the EC2 Instance
Now that you’ve installed the solution, you can start launching EC2 instances. From the EC2 Launch Wizard, execute the following steps. The instructions assume that you’re using RedHat, Amazon Linux 2, or CentOS.
Note: Steps or details that I don’t explicitly mention can be set to default (or according to your needs).
- Select the IAM Role already configured by the solution with the pattern Ec2IPsec-{stackname}

Figure 1: Select the IAM Role
- (You can skip this step if you are using Amazon Linux 2.) Under Advanced Details, select User data as text and activate the AWS Systems Manager Agent (SSM Agent) by providing the following string (for RedHat and CentOS 64 Bits only):

Figure 2: Select User data as text and activate the AWS Systems Manager Agent
- Set the tag name to IPSec with the value todo. This is the identifier that triggers the installation and management of IPsec on the instance.

Figure 3: Set the tag name to “IPSec” with the value “todo”
- On the Configuration page for the security group, allow ESP (Protocol 50) and IKE (UDP 500) for your network, like 172.31.0.0/16. You need to enter these values as shown in following screen:

Figure 4: Enter values on the “Configuration” page
After 1-2 minutes, the value of the IPSec instance tag will change to enabled, meaning the instance is successfully set up.
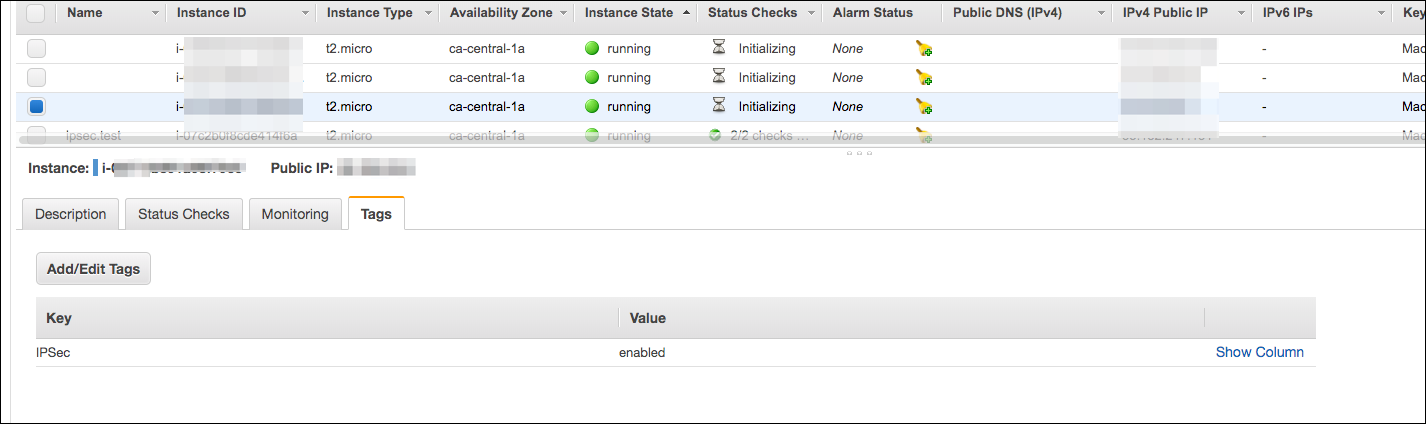
Figure 5: Look for the “enabled” value for the IPSec key
So what’s happening in the background?
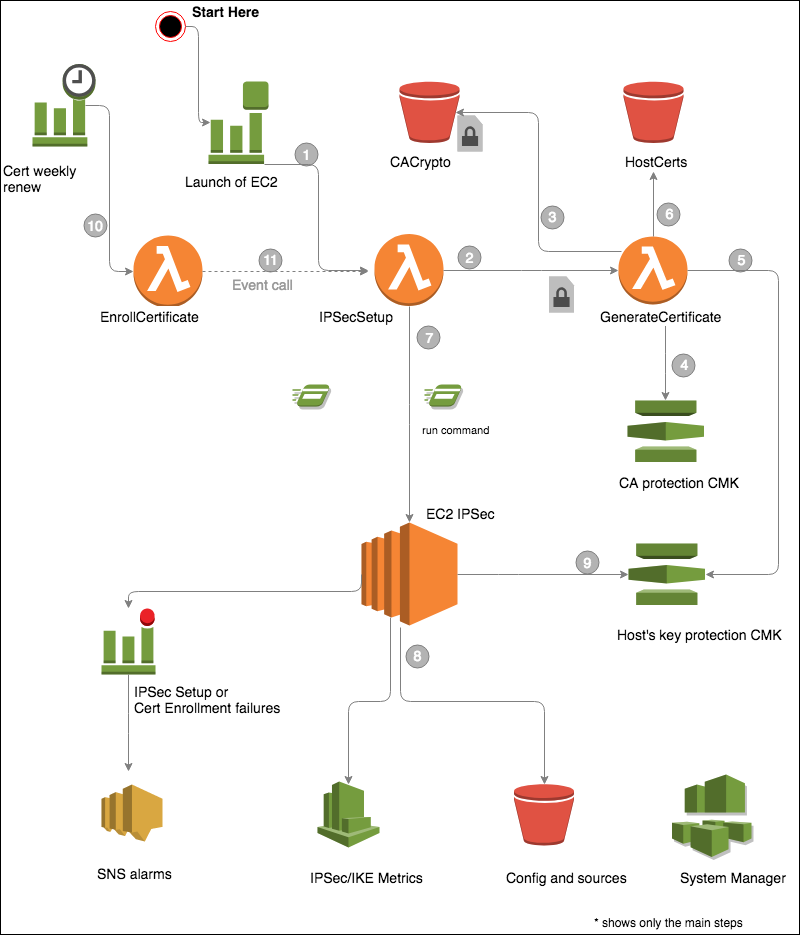
Figure 6: Architectural diagram
As illustrated in the solution architecture diagram, the following steps are executed automatically in the background by the solution:
- An EC2 launch triggers a CloudWatch event, which launches an IPSecSetup Lambda function.
- The IPSecSetup Lambda function checks whether the EC2 instance has the tag IPSec:todo. If the tag is present, the Lambda function issues a certificate calling a GenerateCertificate Lambda.
- The GenerateCertificate Lambda function downloads the encrypted CA certificate and key.
- The GenerateCertificate Lambda function decrypts the CA key with a KMS key.
- The GenerateCertificate Lambda function issues a host certificate to the EC2 instance. It encrypts the host certificate and key with a KMS generated random secret in PKCS12 structure. The secret is envelope-encrypted with a dedicated KMS key.
- The GenerateCertificate Lambda function publishes the issued certificates to your dedicated bucket for documentation.
- The IPSec Lambda function calls and runs the installation via SSM.
- The installation downloads the configuration and installs python, aws-sdk, libreswan, and curl if needed.
- The EC2 instance decrypts the host key with the dedicated KMS key and installs it in the IPSec database.
- A weekly scheduled event triggers reenrollment of the certificates via the Reenrollcertificates Lambda function.
- The Reenrollcertificates Lambda function triggers the IPSecSetup Lambda (call event type: execution). The IPSecSetup Lambda will renew the certificate only, leaving the rest of the configuration untouched.
Testing the connection on the EC2 instance
You can log in to the instance and ping one of the hosts in your network. This will trigger the IPSec connection and you should see successful answers.
To see a list of IPSec tunnels you can execute the following:
Here is an example of the execution:
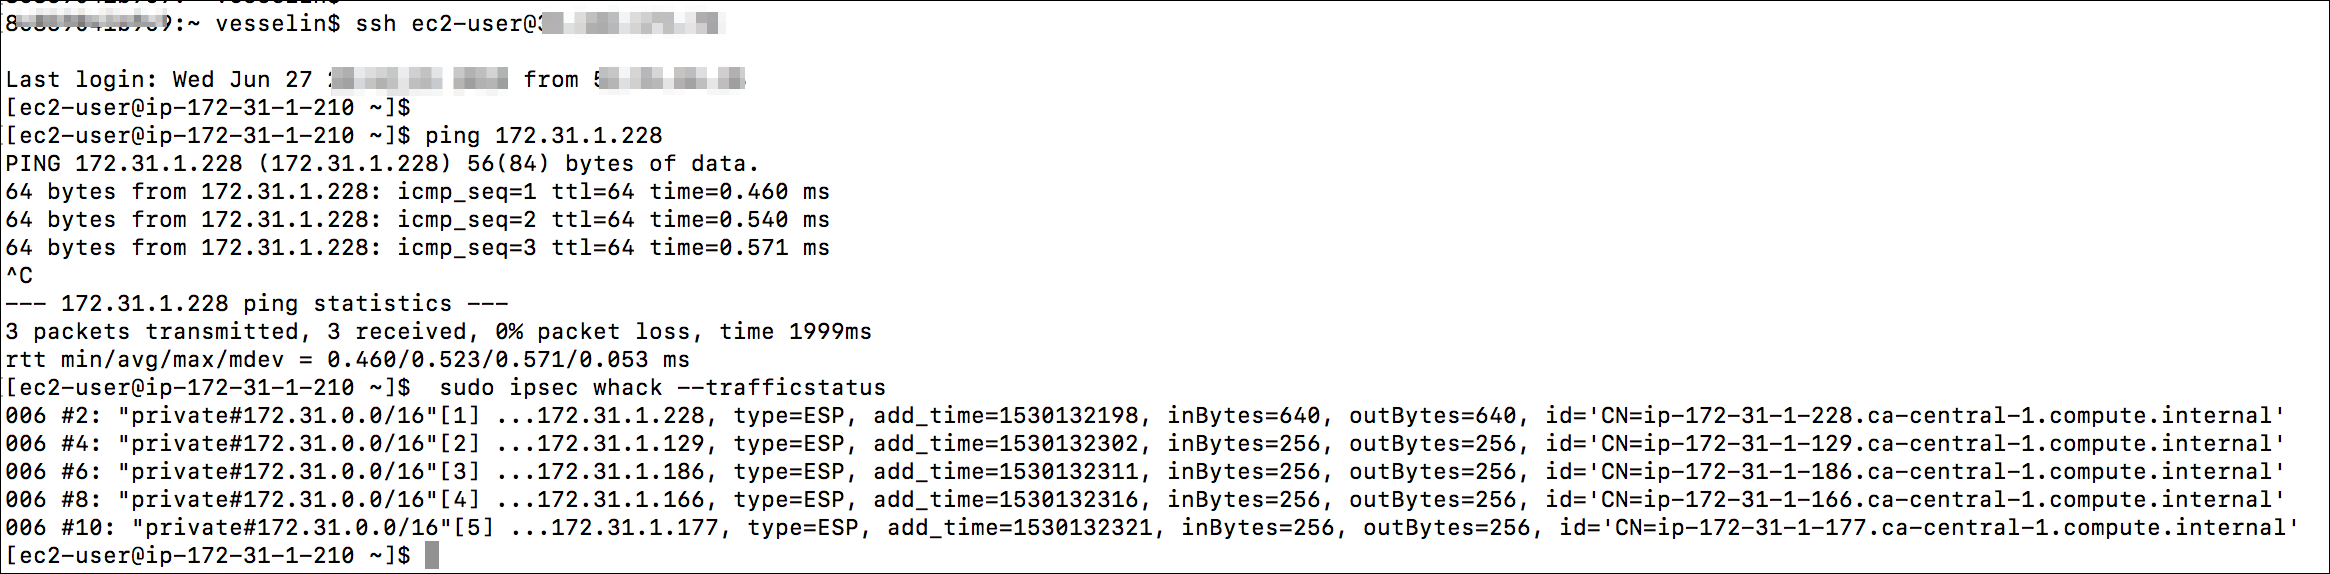
Figure 7: Example execution
Changing your configuration or installing it on already running instances
All configuration exists in the source bucket (default: ipsec-source prefix), in files for libreswan standard. If you need to change the configuration, follow the following instructions:
- Review and update the following files:
- oe-conf, which is the configuration for libreswan
- clear, private, private-to-clear and clear-to-ipsec, which should contain your network ranges.
- Change the tag for the IPSec instance to
IPSec:todo. - Stop and Start the instance (don’t restart). This will retrigger the setup of the instance.

Figure 8: Stop and start the instance
- As an alternative to step 3, if you prefer not to stop and start the instance, you can invoke the IPSecSetup Lambda function via Test Event with a test JSON event in the following format:
A sample of test event creation in the Lambda Design window is shown below:

Figure 9: Sample test event creation
- As an alternative to step 3, if you prefer not to stop and start the instance, you can invoke the IPSecSetup Lambda function via Test Event with a test JSON event in the following format:
Monitoring and alarms
The solution delivers and takes care of IPSec/IKE Metrics and SNS Alarms in the case of errors. To monitor your IPSec environment, you can use Amazon CloudWatch. You can see metrics for active IPSec sessions, IKE/ESP errors, and connection shunts.
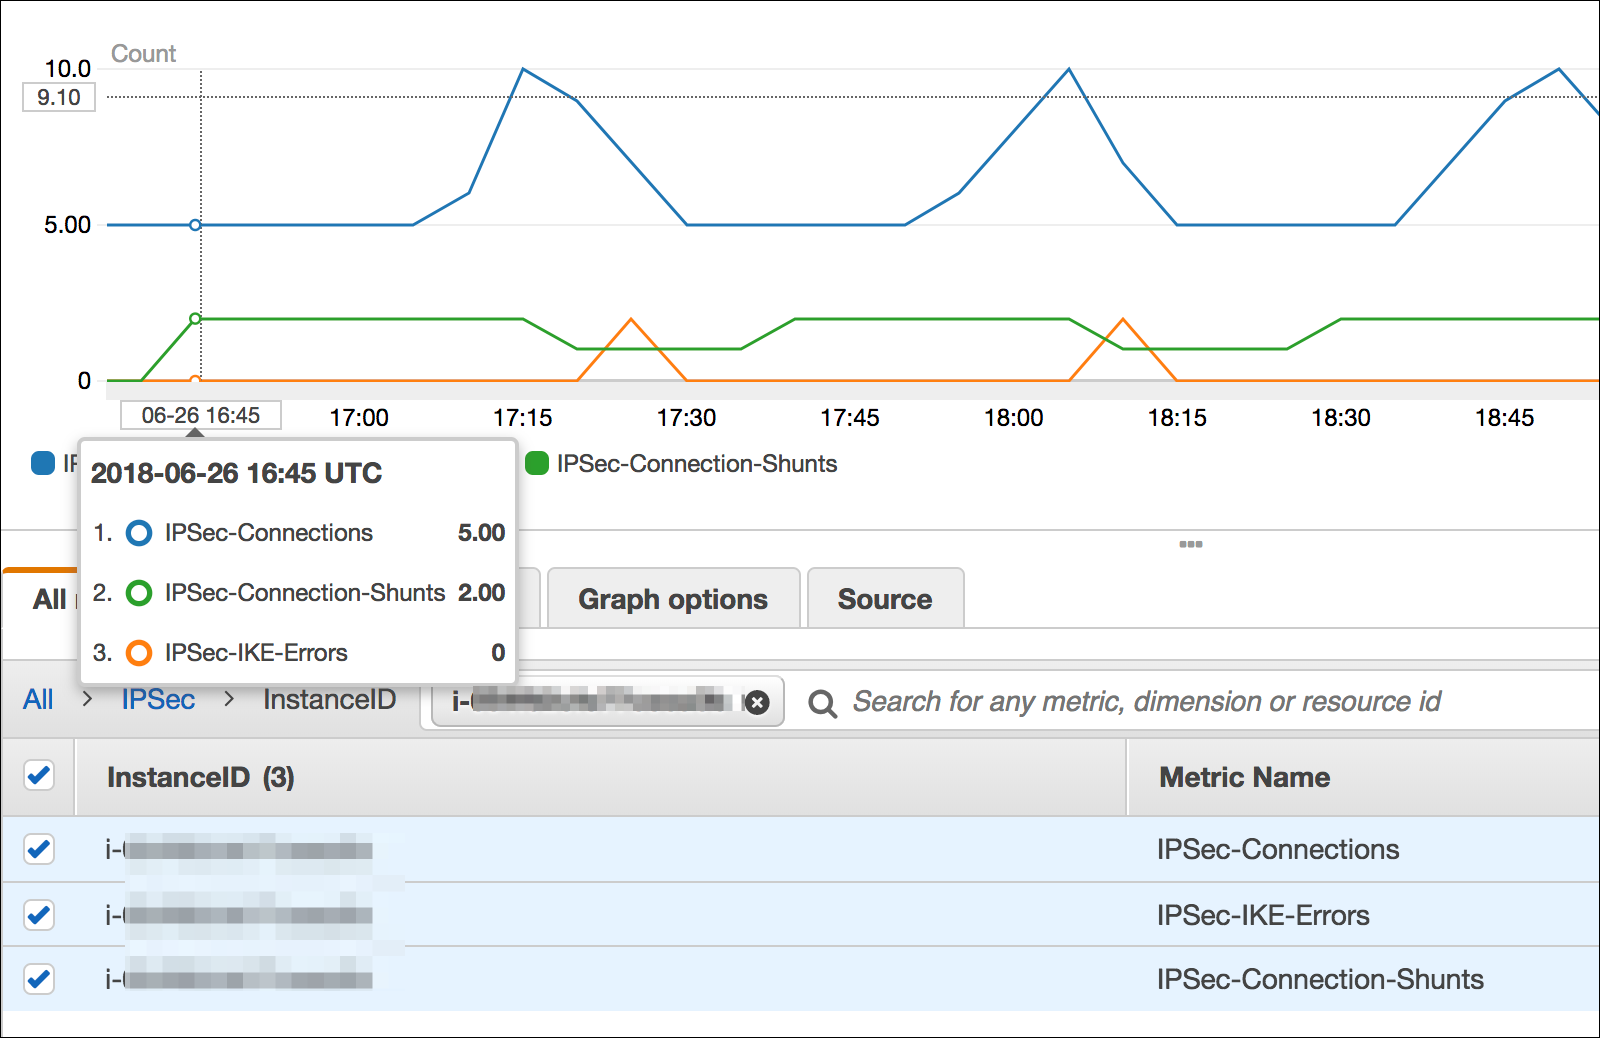
Figure 10: View metrics for active IPSec sessions, IKE/ESP errors, and connection shunts
There are two SNS topics and alarms configured for IPSec setup failure or certificate reenrollment failure. You will see an alarm and an SNS message. It’s very important that your administrator subscribes to notifications so that you can react quickly. If you receive an alarm, please use the information in the “Troubleshooting” section of this post, below.
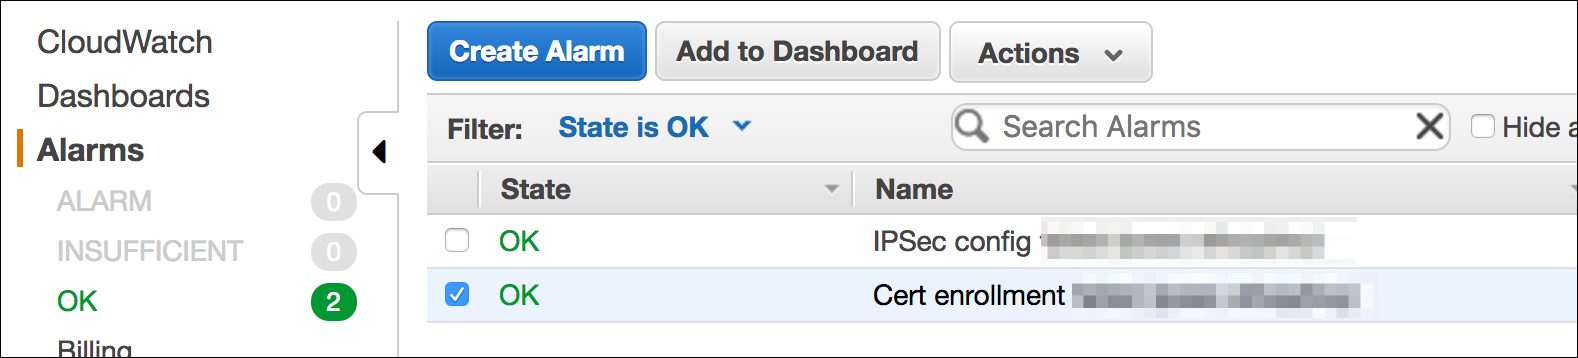
Figure 11: Alarms
Troubleshooting
Below, I’ve listed some common errors and how to troubleshoot them:
The IPSec Tag doesn’t change to IPSec:enabled upon EC2 launch.
- Wait 2 minutes after the EC2 instance launches, so that it becomes reachable for AWS SSM.
- Check that the EC2 Instance has the right role assigned for the SSM Agent. The role is provisioned by the solution named Ec2IPsec-{stackname}.
- Check that the SSM Agent is reachable via a NAT gateway, an Internet gateway, or a private SSM endpoint.
- For CenOS and RedHat, check that you’ve installed the SSM Agent. See “Launching the EC2 instance.”
- Check the output of the SSM Agent command execution in the EC2 service.
- Check the IPSecSetup Lambda logs in CloudWatch for details.
The IPSec connection is lost after a few hours and can only be established from one host (in one direction).
- Check that your Security Groups allow ESP Protocol and UDP 500. Security Groups are stateful. They may only allow a single direction for IPSec establishment.
- Check that your network ACL allows UDP 500 and ESP Protocol.
The SNS Alarm on IPSec reenrollment is trigged, but everything seems to work fine.
- Certificates are valid for 30 days and rotated every week. If the rotation fails, you have three weeks to fix the problem.
- Check that the EC2 instances are reachable over AWS SSM. If reachable, trigger the certificate rotation Lambda again.
- See the IPSecSetup Lambda logs in CloudWatch for details.
DNS Route 53, RDS, and other managed services are not reachable.
- DNS, RDS and other managed services do not support IPSec. You need to exclude them from encryption by listing them in the config/clear list. For more details see step 2 of Installation (one-time setup) in this blog.
Here are some additional general IPSec commands for troubleshooting:
Stopping IPSec can be done by executing the following unix command:
If you want to stop IPSec on all instances, you can execute this command via AWS Systems Manager on all instances with the tag IPSec:enabled. Stopping encryption means all traffic will be sent unencrypted.
If you want to have a fail-open case, meaning on IKE(IPSec) failure send the data unencrypted, then configure your network in config/private-or-clear as described in step 2 of Installation (one-time setup).
Debugging IPSec issues can be done using Libreswan commands . For example:
Security
The CA key is encrypted using an Advanced Encryption Standard (AES) 256 CBC 128-byte secret and stored in a bucket with server-side encryption (SSE). The secret is envelope-encrypted with a KMS key in AWS KMP pattern. Only the certificate-issuing Lambda function can decrypt the secret KMS resource policy. The encrypted secret for the CA key is set in an encrypted environment variable of the certificate-issuing Lambda function.
The IPSec host private key is generated by the certificate-issuing Lambda function. The private key and certificate are encrypted with AES 256 CBC (PKCS12) and protected with a 128-byte secret generated by KMS. The secret is envelope-encrypted with a user KMS key. Only the EC2 instances with attached IPSec IAM policy can decrypt the secret and private key.
The issuing of the certificate is a full synchronous call: One request and one corresponding response without any polling or similar sync/callbacks. The host private key is not stored in a database or an S3 bucket.
The issued certificates are valid for 30 days and are stored for auditing purposes in a certificates bucket without a private key.
Alternate subject names and multiple interfaces or secondary IPs
The certificate subject name and AltSubjectName attribute contains the private Domain Name System (DNS) of the EC2 and all private IPs assigned to the instance (interfaces, primary, and secondary IPs).
The provided default libreswan configuration covers a single interface. You can adjust the configuration according to libreswan documentation for multiple interfaces, for example, to cover Amazon Elastic Container Service for Kubernetes (Amazon EKS).
Conclusion
With the solution in this blog post, you can automate the process of building an encryption IPSec layer for your EC2 instances to protect your workloads. You don’t need to worry about configuring certificates, monitoring, and alerting. The solution uses a combination of AWS KMS, IAM, AWS Lambda, CloudWatch and the libreswan implementation. If you need libreswan support, use the mailing list or github. AWS forums can give you more information on KMS for IAM. If you require a special enterprise enhancement, contact AWS professional services.
Want more AWS Security how-to content, news, and feature announcements? Follow us on Twitter.