AWS Security Blog
How to prompt users to reset their AWS Managed Microsoft AD passwords proactively
If you’re an AWS Directory Service administrator, you can reset your directory users’ passwords from the AWS console or the CLI when their passwords expire. However, you can improve your efficiency by reducing the number of requests for password resets. You can also help improve the security of your organization by having your users proactively reset their directory passwords before they expire. In this post, I describe the steps you can take to set up a solution to send regular reminders to your AWS Directory Service for Microsoft Active Directory (AWS Managed Microsoft AD) users to prompt them to change their password before it expires. This will help prevent users from being locked out when their passwords expire and also reduce the number of reset requests sent to administrators.
Solution Overview
When users’ passwords expire, they typically contact their directory service administrator to help them reset their password. For security reasons, they then need to reset their password again on their computer so that the administrator has no knowledge of the new password. This process is time-consuming and impacts productivity. In this post, I present a solution to remind users automatically to reset AWS Managed Microsoft AD passwords. The following diagram and description explains how the solution works.
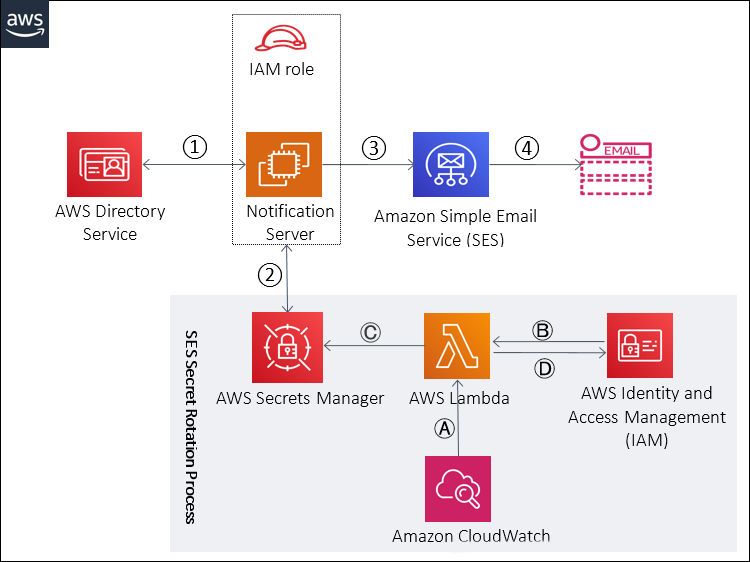
Figure 1: Solution architecture
- A script running on an AWS Managed Microsoft AD domain-joined Amazon Elastic Compute Cloud (Amazon EC2) instance (Notification Server) searches the AWS Managed Microsoft AD for all enabled user accounts and retrieves their names, email addresses, and password expiry dates.
- Using the permissions of the IAM role attached to the Notification Server, the script obtains the SES SMTP credentials stored in AWS Secrets Manager.
- With the SMTP credentials obtained in Step 2, the script then securely connects to Amazon Simple Email Service (Amazon SES.)
- Based on your preferences, Amazon SES sends domain password expiry notifications to the users’ mailboxes.
A separate process for updating the SES credentials stored in AWS Secrets Manager occurs as follows:
- A CloudWatch rule triggers a Lambda function.
- The Lambda function generates new SES SMTP credentials from the SES IAM Username.
- The Lambda function then updates AWS Secrets Manager with the new SES credentials.
- The Lambda function then deletes the previous IAM access key.
Prerequisites
The instructions in this post assume that you’re familiar with how to create Amazon EC2 for Windows Server instances, use Remote Desktop Protocol (RDP) to log in to the instances, and have completed the following tasks:
- Create an AWS Microsoft AD directory.
- Join an Amazon EC2 for Windows Server instance to the AWS Microsoft AD domain to use as your Notification Server.
- Sign up for Amazon Simple Email Service (Amazon SES).
- Remove Amazon EC2 throttling on port 25 for your EC2 instance.
- Remove your Amazon SES account from the Amazon SES sandbox so you can also send email to unverified recipients.
Note: You can use your AWS Microsoft Directory management instance as the Notification Server. For the steps below, use any account that is a member of the AWS delegated Administrators’ group.
Summary of the steps
- Verify an Amazon SES email address.
- Create Amazon SES SMTP credentials.
- Store the Amazon SES SMTP credentials in AWS Secrets Manager.
- Create an IAM role with read permissions to the secret in AWS Secrets Manager.
- Set up and test the notification script.
- Set up Windows Task Scheduler.
- Configure automatic rotation of the SES Credentials stored in Secrets Manager.
STEP 1: Verify an Amazon SES email address
To prevent unauthorized use, Amazon SES requires that you verify the email address that you use as a “From,” “Source,” “Sender,” or “Return-Path”.
To verify the email address you will use as the sending address, complete the following steps:
- Sign in to the Amazon SES console.
- In the navigation pane, under Identity Management, select Email Addresses.
- Select Verify a New Email Address, and then enter the email address.
- Select Verify This Email Address.
An email will be sent to the specified email address with a link to verify the email address. Once you verify the email, you’ll see the Verification Status as verified in the SES console.
In the image below, I have four verified email addresses:

Figure 2: Verified email addresses
STEP 2: Create Amazon SES SMTP credentials
You must create an Amazon SES SMTP user name and password to access the Amazon SES SMTP interface and send email using the service. To do this, complete the following steps:
- Sign in to the Amazon SES console.
- In the navigation bar, select SMTP Settings.
- In the content pane, make a note of the Server Name as you will use this when sending the email in Step 5. Select Create My SMTP Credentials.

Figure 3: Make a note of the SES SMTP Server Name
- Specify a value for the IAM User Name field. Make a note of this IAM User Name as you will need in Step 7 later. In this post, I use the placeholder, ses-smtp-user-eu-west-1, as the user name (as shown below):

Figure 4: Make a note of SES IAM User Name
- Select Create.
Make a note of the SMTP Username and SMTP Password you created because you’ll use these in later steps. This is as shown below in my example.
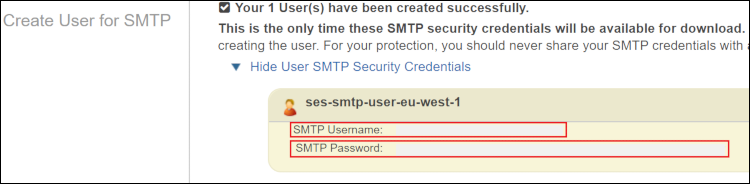
Figure 5: Make a note of the SES SMTP Username and SMTP Password
STEP 3: Store the Amazon SES SMTP credentials in AWS Secrets Manager
In this step, use AWS Secrets Manager to store the Amazon SES SMTP credentials created in Step 2. You will reference this credential when you execute the script in the Notification Server.
Complete the following steps to store the Amazon SES SMTP credentials in AWS Secrets Manager:
- Sign in to the AWS Secrets Manager Console.
- Select Store a new secret, and then select Other types of secrets.
- Under Secret Key/value, enter the Amazon SES SMTP Username in the left box and the Amazon SES SMTP Password in the right box, and then select Next.

Figure 6: Enter the Amazon SES SMTP user name and password
- In the next screen, enter the string AWS-SES as the name of the secret. Enter an optional description for the secret and add an optional tag and select Next.
Note: I recommend using AWS-SES as the name of your secret. If you choose to use some other name, you will have to update PowerShell script in Step 5. I also recommend creating the secret in the same region as the Notification Server. If you create your secret in a different region, you will also have to update PowerShell script in Step 5.

Figure 7: Enter “AWS-SES” as the secret name
- On next screen, leave the default setting as Disable automatic rotation and select Next. You will come back later in Step 7 where you will use a Lambda function to rotate the secret at specified intervals.
- To store the secret, in the last screen, select Store. Now select the secret and make a note of the ARN of the secret as shown in in Figure 8.

Figure 8: Make a note of the Secret ARN
Step 4: Create IAM role with permissions to read the secret
Create an IAM role that grants permissions to read the secret created in Step 3. Then, attach this role to the Notification Server to enable your script to read this secret. Complete the following steps:
- Log in to the IAM Console.
- In the navigation bar, select Policies.
- In the content pane, select Create Policy, and then select JSON.
- Replace the content with the following snippet while specifying the ARN of the secret you created earlier in step 3:
Here is how it looks in my example after I replace with the ARN of my Secrets Manager secret:

Figure 9: Example policy
- Select Review policy.
- On the next screen, specify a name for the policy. In my example, I have specified Access-Ses-Secret as the name of the policy. Also specify a description for the policy, and then select Create policy.
- In the navigation pane, select Roles.
- In the content pane, select Create role.
- On the next page, select EC2, and then select Next: Permissions.
- Select the policy you created, and then select Next: Tags.
- Select Next: Review, provide a name for the role. In my example, I have specified SecretsManagerReadAccessRole as the name. Select Create Role.
Now, complete the following steps to attach the role to the Notification Server:
- From the Amazon EC2 Console, select the Notification Server instance.
- Select Actions, select Instance Settings, and then select Attach/Replace IAM Role.

Figure 10: Select “Attach/Replace IAM Role”
- On the Attach/Replace IAM Role page, choose the role to attach from the drop-down list. For this post, I choose SecretsManagerReadAccessRole and select Apply.
Here is how it looks in my example:

Figure 11: Example “Attach/Replace IAM Role”
STEP 5: Setup and Test the Notification Script
In this section, you’re going to test the script by sending a sample notification email to an end user to remind the user to change their password. To test the script, log into your Notification Server using your AWS Microsoft Managed AD default Admin account. Then, complete the following steps:
- Install the PowerShell Module for Active Directory by opening PowerShell as Administrator and run the following command:
Install-WindowsFeature -Name RSAT-AD-PowerShell
- Download the script to the Notification Server. In my example, I downloaded the script and stored in the location
c:\scripts\PasswordExpiryNotify.ps1
- Create a new user in Active Directory and ensure you enter a valid email address for the new user.
Note: Make sure to clear the User must change password at next logon check box when creating the user; otherwise, you will get an invalid output from the command in the next step.
For this example, I created a test user named RandomUser in Active Directory.
- In the PowerShell Window, execute the following command to determine the number of days remaining before the password for the user expires. In this example, I run the following to determine the number of days remaining before the RandomUser account password expires:
(New-TimeSpan -Start ((Get-Date).ToLongDateString()) -End ((Get-ADUser -Identity ‘RandomUser’ -Properties “msDS-UserPasswordExpiryTimeComputed”|Select @{Name=”exp”;Expression={[datetime]::FromFileTime($_.”msDS-UserPasswordExpiryTimeComputed”).tolongdatestring()}}) | Select -ExpandProperty exp)).Days
In my example, I get “15” as the output.
- To test the script, navigate to the location of the script on your Notification Server and execute the following:
.\PasswordExpiryNotify.ps1 -smtpServer “<SES-SMTP-SERVER-NAME-NOTED-IN-STEP 2> ” -from “<SENDER LABEL> <SES VERIFIED EMAIL ADDRESS>” -NotifyDays <NUMBER OF DAYS>
In this example, I navigate to c:\scripts\ and execute:
.\PasswordExpiryNotify.ps1 -smtpServer “email-smtp.eu-west-1.amazonaws.com” -from “IT Servicedesk servicedesk@mydomain.com” -NotifyDays 15
A new email will be sent to user’s mailbox. Verify the user has received the email.
Note: I can update these instructions to send multiple email reminders to users. For example, if I want to notify users on three occasions (first notification 15 days before password expiration, then 7 days, and one more when there is only 1 day) I would execute the following:
.\PasswordExpiryNotify.ps1 -smtpServer “email-smtp.eu-west-1.amazonaws.com” -from “IT Servicedesk <servicedesk@mydomain.com>” -NotifyDays 1,7,15
Step 6: Set up a Windows Task Scheduler
Now that you have tested the script and confirmed that the solution is working as expected, you can set up a Windows Scheduled Task to execute the script daily. To do this:
- Open Task Scheduler.
- Right-click Task Scheduler Library, and then select Create Task.
- Specify a name for the task.
- On the Triggers tab, select New.
- Select Daily, and then select OK.
- On the Actions tab, select New.
- Inside Program/Script, type PowerShell.exe
- In the Add arguments (optional) box, type the following command, including the full path to the script.
“C:\Scripts\PasswordExpiryNotify.ps1 -smtpServer “<SES-SMTP-SERVER-NAME-NOTED-IN-STEP 2>” -from “<SENDER LABEL> <SES VERIFIED EMAIL ADDRESS>” -NotifyDays <DAY,DAY,DAY>“
In my example, I type the following:
“C:\Scripts\PasswordExpiryNotify.ps1 -smtpServer ’email-smtp.eu-west-1.amazonaws.com’ -from ‘IT Servicedesk Servicedesk@mydomain.com’ -NotifyDays 1,7,15”
- Select OK twice, and then enter your password when prompted to complete the steps.
The script will now run daily at the specified time and will send password expiration email notifications to your AWS Managed Microsoft AD users. In my example, a password expiration reminder email is sent to my AWS Managed Microsoft AD users 15 days before expiration, 7 days before expiration, and then 1 day before expiration.
Here is a sample email:
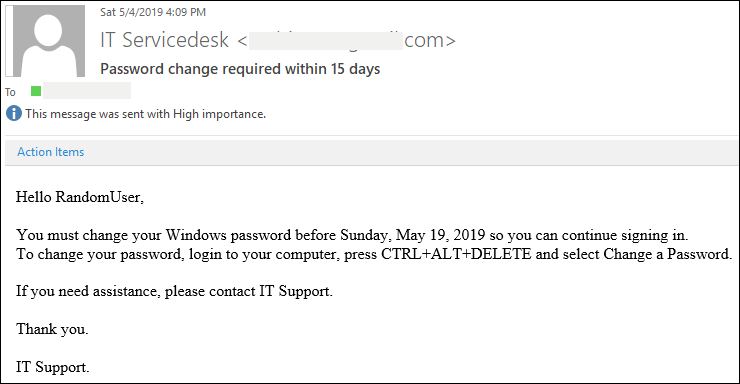
Figure 12: Sample password expiration email
Note: You can edit the script to change the notification message to suit your requirements.
Step 7: Configure automatic update of the SES credentials
In this final section, you’re going to setup the configuration to automatically update the secret (that is, the SES credentials stored in AWS Secrets Manager) at regular intervals. To achieve this, you will use an Amazon Lambda function that will do the following:
- Create a new access key using the IAM user you used to create the SES SMTP Credentials in Step 2 (ses-smtp-user-eu-west-1 in my example).
- Generate a new SES SMTP User password from the created IAM secret access key.
- Update the SES credentials stored in AWS Secrets Manager.
- Delete the old IAM access key.
Complete the following steps to enable automatic update of the SES credentials:
First you will create the IAM policy which you will attach to a role that will be assumed by the lambda function. This policy will provide the permissions to create new access keys for the SES IAM user and permissions to update the SES credentials stored in AWS Secrets Manager.
- Log in to the IAM Console, and in the navigation bar, select Policies.
- In the content pane, select Create Policy, and then select JSON.
- Replace the content with the following script while specifying the ARN of the IAM user we used to create the SES SMTP credentials in Step 2 and the ARN of the secret stored in Secrets Manager that you noted in Step 3.
Here is the JSON for the policy in my example:

Figure 13: Example policy
- Select Review Policy, and then specify a name and a description for the policy. In my example, I have specified the name of the policy as iam-secretsmanager-access-for-lambda.
Here is how it looks in my example:

Figure 14: Specify a name and description for the policy
- Select Create Policy
Now, create an IAM role and attach this policy.
- In the navigation bar, select Roles and select Create Role.
- Under the Choose the service that will use this role, select Lambda, and then select Next: Permissions.
- On the next page, select the policy you just created and select Next: Tags. Add an optional tag and select Next: Review.
- Specify a name for the role and description, and then select Create role. In my example, I have named the role: LambdaRoleRotatateSesSecret.
Now, you will create a Lambda function that will assume the created role:
- Log on to the AWS Lambda console and select Create Function
- Specify a name for the function, and then, under Runtime, select Python 3.7.
- Under execution role, select User an existing role, and then select the role you created earlier.
Here are the settings I used in my example:

Figure 15: Settings on the “Create function” page
- Select Create function, copy the following Python code, and then paste it in the Function Code section.
Here is what it will look like:

Figure 16: The Python code pasted in the “Function Code” section
- In the Environment variables section, specify the two environment variables required by the Lambda Python code as follows:
Here is how my environment variables look:

Figure 17: The Python code pasted in the “Function Code” section
- Select Save.
You have now created a Lambda function that can update the SES credentials stored in AWS Secrets Manager.
You will now set up CloudWatch to trigger the Lambda function at scheduled intervals.
- Open the Amazon CloudWatch Console.
- In the navigation pane, select Rules and, in the content pane, select Create Rule.
- Under Event Source, select Schedule, and then select Fixed rate of. Specify how often you would like CloudWatch to trigger the Lambda function. In my example, I have chosen to update the SES credentials every 30 days.
- Under Targets, select Add Target, and then select Lambda Function.
- In Function, select the Lambda function you just created, and then select Configure details.

Figure 18: Create new CloudWatch rule
- Specify a name for the rule, enter a description, make sure the State check box is selected, and then select Create rule.
The SES credentials stored in AWS Secrets Manager will now be updated based on the scheduled intervals you specified in CloudWatch.
Conclusion
In this post, I showed how you can set up a solution to remind your AWS Directory Service for Microsoft Active Directory users to change their passwords before expiration. I demonstrated how you can achieve this using a combination of a script and Amazon SES. I also showed you how you can configure rotation of the Amazon SES credentials on your preferred schedule.
If you have comments about this post, submit them in the “Comments” section below. If you have questions or suggestions, please start a new thread on the Amazon SES forum.
Want more AWS Security how-to content, news, and feature announcements? Follow us on Twitter.