AWS Security Blog
How to use resource-based policies in the AWS Secrets Manager console to securely access secrets across AWS accounts
AWS Secrets Manager now enables you to create and manage your resource-based policies using the Secrets Manager console. With this launch, we are also improving your security posture by both identifying and preventing creation of resource policies that grant overly broad access to your secrets across your Amazon Web Services (AWS) accounts. To achieve this, we use the Zelkova engine to mathematically analyze access granted by your resource policy and alert you if such permissions are found. The analysis verifies access across all resource-policy statements, actions, and the set of condition keys used in your policies. To be considered non-public, the resource policy must grant access only to fixed values (values that don’t contain a wildcard) of one or more of the following: aws:SourceArn, aws:SourceVpc, aws:SourceVpce, aws:SourceAccount, aws:SourceIP, and ensure the Principal does not include a “*” entry.
If the policy grants Public or overly broad access to your secrets across AWS accounts, Secrets Manager will block you from applying the policy in the console and alert you with a dashboard message. This prevents your policy from accidentally granting broader access to your secrets, instead ensuring you are restricting it to the intended AWS accounts, AWS services, and AWS Identity and Access Management (IAM) entities. Access to AWS Secrets Manager requires AWS credentials. Those credentials must contain permission to access the AWS resources you want to access, such as your Secrets Manager secrets. In this blog post, we use Public or broad access to refer to values (or a combination of values) in the resource policy that result in a wide access across AWS accounts and principals.
With AWS Secrets Manager, you have the option to store, rotate, manage, and retrieve many types of secrets. These can be database usernames and passwords, API keys, string values, and binary data. AWS supports the ability to share these secrets cross-account by applying resource policies via the AWS Command Line Interface (AWS CLI) and now via the Secrets Manager console.
Why would you need to share a secret? There are many reasons. Perhaps you have database credentials managed in a central account that are needed by applications in your production account. Maybe you have the binary stored for an encryption key that other accounts will use to create AWS Key Management Service (AWS KMS) keys in their accounts. To achieve this goal while ensuring a secure transfer of information and least privilege permissions, you will need a resource-based policy on your secret, a resource-based policy on your AWS KMS Customer Managed Key (CMK) used for encrypting the secret, and a user-based policy on your IAM principal.
You can still create a policy using AWS CLI or AWS SDK permitting access to a broader scope of entities if your business needs dictate. If you do permit this type of broader access, AWS Secrets Manager will show a notification in your dashboard, as shown in Figure 2, below.
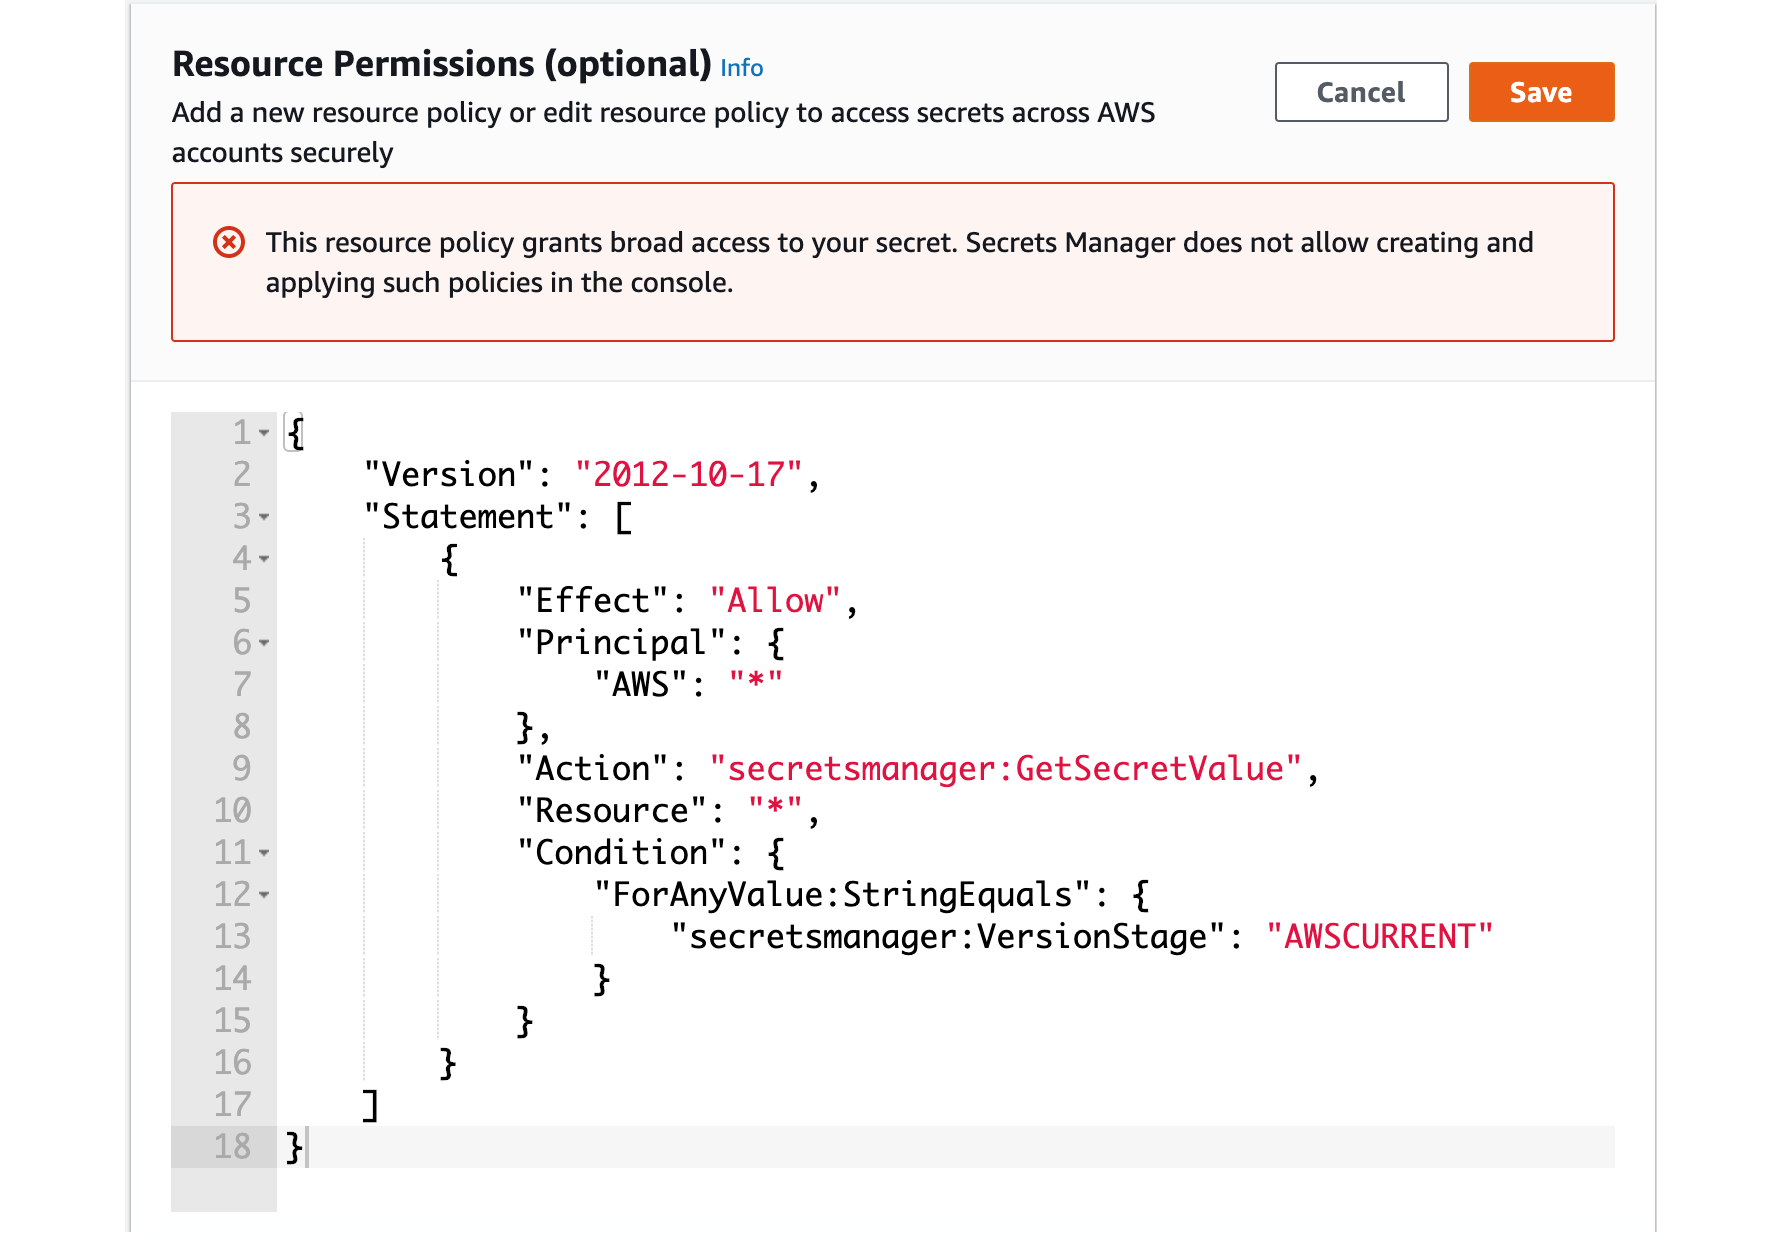
Figure 1. This shows the warning when you try to create a resource policy that grants broad access to your secrets via the AWS Secrets Manager console.

Figure 2. This alert pops up when you click on a secret that has a resource policy attached via the CLI that grants broad access to the secret.
In the example below, you’ll see how to use the AWS Secrets Manager console to attach a resource-based policy and allow access to your secret from a secondary account. A secret in the CENTRAL_SECURITY_ACCOUNT will be set to allow it to be accessed by an IAM role in the PRODUCTION_ACCOUNT.
In this example:
- SECURITY_SECRET = The secret created in the CENTRAL_SECURITY_ACCOUNT.
- SECURITY_CMK = The AWS KMS CMK used to encrypt the SECURITY_SECRET.
- PRODUCTION_ROLE = The AWS IAM role used to access the SECURITY_SECRET.
- PRODUCTION_ACCOUNT = The AWS account that owns the AWS IAM role used for cross-account access.
Overview of solution
The architecture of the solution can be broken down into four steps, which are outlined in Figure 3. The four main steps are:
- Create the resource-based policy via the AWS Secrets Manager console on the SECURITY_SECRET in the CENTRAL_SECURITY_ACCOUNT.
- Update the SECURITY_CMK policy in the CENTRAL_SECURITY_ACCOUNT to allow the role from the PRODUCTION account access.
- Grant the AWS IAM role in the PRODUCTION_ACCOUNT permissions to access the secret.
- Test and verify access from the PRODUCTION_ACCOUNT.
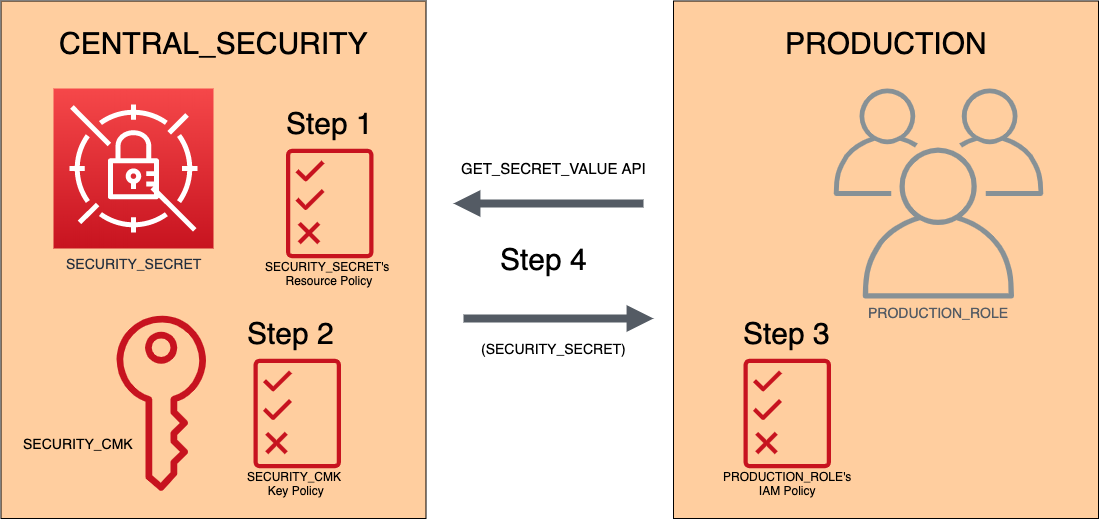
Figure 3. A visual overview of the four steps to use the AWS Secrets Manager console to attach a resource-based policy, allow access to your secret from a secondary account, and test and verify the process.
Prerequisites
To use the example in this post, you need:
- An AWS account.
- An IAM Role with permissions to make modifications in both the CENTRAL_SECURITY_ACCOUNT and the PRODUCTION_ACCOUNT.
- An IAM role in the PRODUCTION_ACCOUNT you wish to grant permissions to access the SECURITY_SECRET.
Deploying the solution
Step 1: Create a resource-based policy in your CENTRAL_SECURITY account on the SECURITY_SECRET secret
- Log in to the AWS Secrets Manager console in the CENTRAL_SECURITY_ACCOUNT.
- Choose SECURITY_SECRET.
- Choose Edit Permissions next to Resource Permissions (optional).

Figure 4. The dashboard view where you edit permissions.
- This will bring you to the page to add the resource policy. It will give you a basic template as shown in Figure 5, below.

Figure 5. The basic template to add the resource policy.
- Since the full policy is provided for you in this example, delete the template from the text box.
- Copy the policy below and paste it in the text box. Make sure to replace PRODUCTION with your AWS account ID. You can also adjust the permissions you grant if needed. This policy allows a specific role in the PRODUCTION_ACCOUNT account to retrieve the current version of your secret. In the example, my IAM Role is called PRODUCTION_ROLE. Note you do not need to replace AWSCURRENT with any other value.
As shown in Figure 6, below, you’ll see this in the resource policy text area (with your AWS account ID in place of PRODUCTION).

Figure 6. The example resource policy shown in the console.
- Choose Save.
Step 2: Update the resource-based policy in your CENTRAL_SECURITY account on the SECURITY_CMK
Note: Secrets in AWS Secrets Manager are encrypted by default. However, it is important for you to provide authorization for IAM Principals that need to access your secrets. Complete authorization requires access to the secret and the KMS CMK used to encrypt it, which prevents accidental public permissions on the secret. It is important to maintain both sets of authorization to provide appropriate access to secrets.
- Log in to the AWS KMS console in the CENTRAL_SECURITY_ACCOUNT.
- Choose SECURITY_CMK.
- Next to Key policy choose the Edit button.
- Paste the below code snippet into your key policy to allow the PRODUCTION_ACCOUNT access:
You will need to replace PRODUCTION with your production account ID, PRODUCTION_ROLE with your production Role name, CENTRAL_SECURITY with your security account ID, and SECURITY_CMK with the CMK key ID of your security CMK. If you forget to swap out the account IDs in the policy with your own, you’ll see an error message similar to the one shown in Figure 7, below.

Figure 7. Error message that appears if you don’t swap out your account number correctly.
- Choose Save changes.
Step 3: Add permissions to the PRODUCTION_ROLE in the PRODUCTION account
- Log in to the AWS IAM console in the PRODUCTION_ACCOUNT account.
- In the left navigation pane, choose Roles.
- Select PRODUCTION_ROLE.
- Under the Permissions tab, choose Add inline policy.
- Choose the JSON tab and paste the below policy:
You will need to replace CENTRAL_SECURITY with your security account id, SECURITY_SECRET with the secret id, and SECURITY_CMK with the CMK key id of your security CMK.
- Choose Review policy.
- Name the policy Central_Security_Account_Security-Secret-Access, and choose Create policy.
Step 4: Test access to the SECURITY_SECRET from the PRODUCTION account
Verification of access via AWS CLI
- From the AWS CLI, use the PRODUCTION_ROLE credentials to run the get-secret-value command.
- Returned output should look like the example, below, in Figure 8.
You can also verify the policy was attached from the CENTRAL_SECURITY_ACCOUNT by following the steps below.
Verification of policy via console
- Log into the AWS Secrets Manager console in the CENTRAL_SECURITY_ACCOUNT.
- Choose SECURITY_SECRET.
- Scroll down to where it shows Resource Permissions (optional), and you’ll see your resource policy stored in the console, as shown in Figure 8, below.

Figure 8. What the example resource policy looks like in the console.
Conclusion
In this post, you saw how to add a resource-based policy on a secret in AWS Secrets Manager using the console, and how to update your AWS KMS CMK resource-based policy to enable access. The example showed setting up cross-account access, and allowing a role from the PRODUCTION_ACCOUNT to use the secret in the CENTRAL_SECURITY_ACCOUNT. By using the AWS Secrets Manager console to set up the resource-based policy, you now have a straight-forward, visual way to add and manage resource-based policies for your secrets and receive notifications if that policy is too broad.
If you have feedback about this post, submit comments in the Comments section below. If you have questions about this post, start a new thread on the AWS Secrets Manager forum or contact AWS Support.
Want more AWS Security how-to content, news, and feature announcements? Follow us on Twitter.