AWS Security Blog
How to migrate symmetric exportable keys from AWS CloudHSM Classic to AWS CloudHSM
Feb 17, 2025: This blog post references AWS CloudHSM Client SDK 3, which is no longer the recommended version. AWS recommends that you use the latest version, AWS CloudHSM Client SDK 5, which provides updated functionality and commands. We are currently working on an updated blog post for CloudHSM Client SDK 5. See the AWS CloudHSM documentation for guidance on using the latest version of the SDK.
In August 2017, we announced the “new” AWS CloudHSM service, which had a lot of improvements over AWS CloudHSM Classic (for clarity in this post I will refer to the services as New CloudHSM and CloudHSM Classic). These advantages in security, scalability, usability, and economy, included FIPS 140-2 Level 3 certification, fully managed high availability and backup, a management console, and lower costs.
Now, we turn another page. The Luna 5 HSMs used for CloudHSM Classic are reaching end of life, and the CloudHSM Classic service is being subsequently decommissioned, so CloudHSM Classic users must migrate cryptographic key material to the New CloudHSM.
In this post, I’ll show you how to use the RSA OAEP (optimal asymmetric encryption padding) wrapping mechanism, which was introduced in the CloudHSM client version 2.0.0, to move key material from CloudHSM Classic to New CloudHSM without exposing the plain text of the key material outside the HSM boundaries. You’ll use an RSA public key to wrap the key material (export it in encrypted form) on CloudHSM Classic, then use the corresponding RSA Private Key to unwrap it on New CloudHSM.
NOTE: This solution only works for symmetric exportable keys. Asymmetric keys on CloudHSM Classic can’t be exported. To replace non-exportable and asymmetric keys, you must generate new keys on New CloudHSM, then use the old keys to decrypt and the new keys to re-encrypt your data.
Solution overview
My solution shows you how to use the CKDemo utility on CloudHSM Classic, and key_mgmt_util on New CloudHSM, to: generate an RSA wrapping key pair; use it to wrap keys on CloudHSM Classic; and then unwrap the keys on New CloudHSM. These are all done via the RSA OAEP mechanism.
The following diagram provides a summary of the steps involved in the solution:
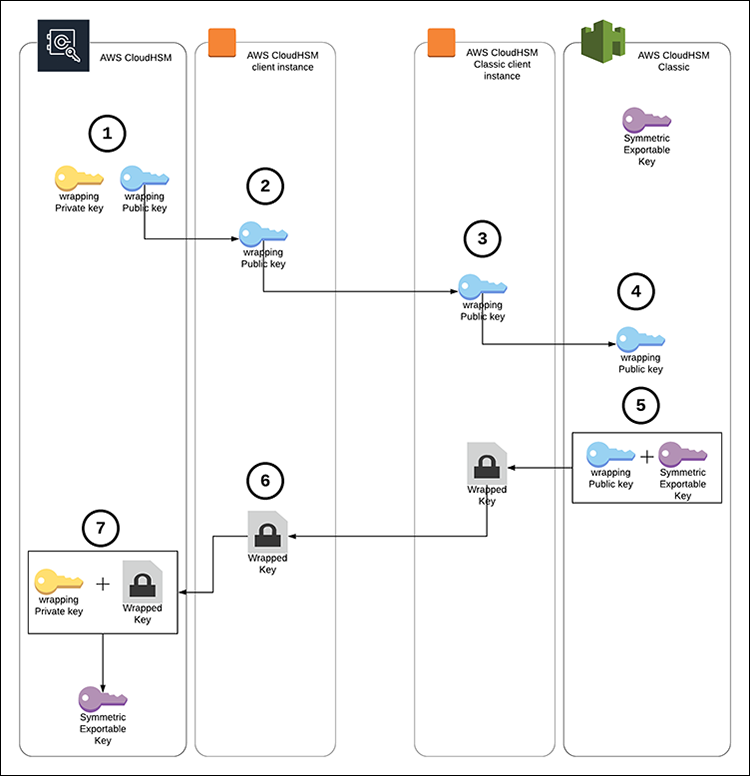
Figure 1: Solution overview
- Generate the RSA wrapping key pair on New CloudHSM.
- Export the RSA Public Key to the New CloudHSM client instance.
- Move the RSA public key to the CloudHSM Classic client instance.
- Import the RSA public key to CloudHSM Classic.
- Wrap the key using the imported RSA public key.
- Move the wrapped key to the New CloudHSM client instance.
- Unwrap the key on New CloudHSM with the RSA Private Key.
NOTE: You can perform the same procedure using supported libraries, such as JCE (Java Cryptography Extension) and PKCS#11. For example, you can use the wrap_with_imported_rsa_key sample to import an RSA public key into CloudHSM Classic, use that key to wrap your CloudHSM Classic keys, and then use the rsa_wrapping sample (specifically the rsa_oaep_unwrap_key function) to unwrap the keys into New CloudHSM using the RSA OAEP mechanism.
Prerequisites
- An active New CloudHSM cluster with at least one active hardware security module (HSM). Follow the Getting Started Guide to create and initialize a New CloudHSM cluster.
- An Amazon Elastic Compute Cloud (Amazon EC2) instance with the New CloudHSM client installed and configured to connect to the New CloudHSM cluster. You can refer to the Getting Started Guide to configure and connect the client instance.
- New CloudHSM CU (crypto user) credentials.
- An EC2 instance with the CloudHSM Classic client installed and configured to connect to the CloudHSM Classic partition or the high-availability (HA) partition group that contains the keys you want to migrate. You can refer to this guide to install and configure a CloudHSM Classic Client.
- The Password of the CloudHSM Classic partition or HA partition group that contains the keys you want to migrate.
- The handle of the symmetric key on CloudHSM Classic you want to migrate.
Step 1: Generate the RSA wrapping key pair on CloudHSM
1.1. On the New CloudHSM client instance, run the key_mgmt_util command line tool, and log in as the CU, as described in Getting Started with key_mgmt_util.
1.2. Run the following
genRSAKeyPair command to generate an RSA key pair with the label
classic_wrap. Take note of the private and public key handles, as they’ll be used in the coming steps.
Step 2: Export the RSA public key to the New CloudHSM client instance
2.1. Run the following exportPubKey command to export the RSA public key to the New CloudHSM client instance using the public key handle you received in step 1.2 (407, in my example). This will export the public key to a file named wrapping_public.pem.
Step 3: Move the RSA public key to the CloudHSM Classic client instance
Move the RSA Public Key to the CloudHSM Classic client instance using scp (or any other tool you prefer).
Step 4: Import the RSA public key to CloudHSM Classic
4.1. On the CloudHSM Classic instance, use the cmu command as shown below to import the RSA public key with the label classic_wrap. You’ll need the partition or HA partition group password for this command, plus the slot number of the partition or HA partition group (you can get the slot number of your partition or HA partition group using the vtl listSlots command).
4.2. Run the below command to get the handle (highlighted below) of the imported key.
4.3. Run the CKDemo utility.
4.4. Open a session to the partition or HA partition group slot.
4.5. Log in using the partition or HA partition group pin.
4.6. Change the CKA_WRAP attribute of the imported RSA public key to be able to use it for wrapping using the imported public key handle you received in step 4.2 above (149, in my example).
Step 5: Wrap the key using the imported RSA public key
5.1. Check whether the symmetric key you want to migrate is exportable. This can be done by following the below command using the handle of the key you want to migrate, and confirming the value of the CKA_EXTRACTABLE attribute (highlighted below) is equal to 1. Otherwise, the key can’t be exported.
5.2. Wrap the key using the imported RSA public key. This will create a file called wrapped.key that contains the wrapped key. Make sure to use handles of public key handle you received in step 4.2 above (149, in my example), and the handle of the key you want to migrate.
Step 6: Move the wrapped key to the New CloudHSM client instance
Move the wrapped key to the New CloudHSM client instance using scp (or any other tool you prefer).
Step 7: Unwrap the key on New CloudHSM with the RSA Private Key
7.1. On the New CloudHSM client instance, run the key_mgmt_util and login as the CU.
7.2. Run the following unWrapKey command to unwrap the key using the RSA private key handle you received in step 1.2 (408, in my example). The output of the command should show the handle of the wrapped key (highlighted below).
Conclusion
Using RSA OAEP for key migration ensures that your key material doesn’t leave the HSM boundary in plain text, as it’s encrypted using an RSA public key before being exported from CloudHSM Classic, and it can only be decrypted by New CloudHSM through the RSA private key that is generated and kept on New CloudHSM.
My post provides an example of how to use the ckdemo and key_mgmt_util utilities for the migration, but the same procedure can also be performed using the supported software libraries, such as the Java JCE library or the PKCS#11 library,a to migrate larger volumes of keys in an automated manner.
Want more AWS Security how-to content, news, and feature announcements? Follow us on Twitter.