AWS Security Blog
Simplify fine-grained authorization with Amazon Verified Permissions and Amazon Cognito
July 20, 2023: This post had been updated on the code samples to match the most recent documentation for the JavaScript SDK and the Verified Permissions API.
June 28, 2023: The article has been updated to make the console example and documentation consistent.
AWS customers already use Amazon Cognito for simple, fast authentication. With the launch of Amazon Verified Permissions, many will also want to add simple, fast authorization to their applications by using the user attributes that they have in Amazon Cognito. In this post, I will show you how to use Amazon Cognito and Verified Permissions together to add fine-grained authorization to your applications.
Fine-grained authorization
With Verified Permissions, you can write policies to use fine-grained authorization in your applications. Policy-based access control helps you secure your applications without embedding complicated access control code in the application logic. Instead, you write policies that say who can take what actions on which resources, and you evaluate the policies by using the Verified Permissions API. The API evaluates access control policies in the context of an access request: Who’s making the request? What do they want to do? What do they want to access? Under what conditions are they making the request?
AWS has removed the work needed to create context about who is making the request by using data from Amazon Cognito. By using Amazon Cognito as your identity store and integrating Verified Permissions with Amazon Cognito, you can use the ID and access tokens that Amazon Cognito returns in the authorization decisions in your applications. You provide Amazon Cognito tokens to Verified Permissions, which uses the attributes that the tokens contain to represent the principal and identify the principal’s entitlements.
Make access requests
To write policies for Verified Permissions, you use a policy language called Cedar. The examples in this post are modified from those in the Cedar language tutorial; I recommend that you review this tutorial for a comprehensive introduction on how to build and use Cedar policies. The following is an example of what a Cedar policy in a photo-sharing application might look like:
permit(
  principal == User::"alice",
  action    == Action::"update",
  resource  == Photo::"VacationPhoto94.jpg"
);
This policy states that Alice—the principal—is permitted to update the resource named VacationPhoto94.jpg. You place the policies for your application in a dedicated policy store. To ask Verified Permissions for an authorization decision, use the isAuthorized operation from the API. For example, the following request asks if user alice is permitted to update VacationPhoto94.jpg. Note that I’ve left out details like the policy store identifier for clarity.
This request returns a decision of allow because the principal, action, and resource all match those in the policy. If a user named bob tries to update the photo, the request returns a decision of deny because the policy only allows user alice. For requests that only need values for the principal, action, and resource, you can generally use values from the data in the application.
Things get more interesting when you build policies that use attributes of the principal to make the decision. In these cases, it can be challenging to assemble a complete and accurate authorization context. Policies might refer to attributes of the principal, such as their geographic location or whether they are paid subscribers. Fine-grained access control requires that you write good policies, properly format the access request, and provide the needed attributes for the policies to be evaluated. To get needed attributes, you must often make inline requests to other systems and then transform the results to meet the policy requirements.
The following policy uses an attribute requirement to allow any principal to view any resource as long as they are located in the United States.
permit(
  principal,
  action == Action::"view",
  resource
)
when {principal.location == "USA"};
To make an authorization request, you must supply the needed attributes for the principal. The following code shows how to do that by using the isAuthorized operation:
The authorization request now includes the context that Alice is located in the USA. According to the preceding policy, she should be allowed to view VacationPhoto94.jpg. To make this request, you must gather this information so that you can include it in the request.
Use Amazon Cognito
If the photo-sharing application uses Amazon Cognito for user authentication, then Amazon Cognito will pass an ID token to it when the authentication is successful. For more information about the format and encoding of ID tokens, see the OpenID Connect Core specification. For our purposes, it’s enough to know that after the ID token is verified and decoded, it contains a JSON structure with named attributes.
When you configure Amazon Cognito, you can specify the fields that are contained in the ID token. These might be user editable, but they can also be programmatically generated from other sources. Suppose that you have configured your Amazon Cognito user pool to also include a custom location attribute, custom:location. When Alice logs in to the photo-sharing application, the ID token that Amazon Cognito provides for her contains the following fields. Note that I’ve made the sub (subject) field human readable, but it would actually be a Amazon Cognito entity identifier.
If the needed attributes are in Amazon Cognito, you can use them to create the attributes that isAuthorized needs to render an access decision.
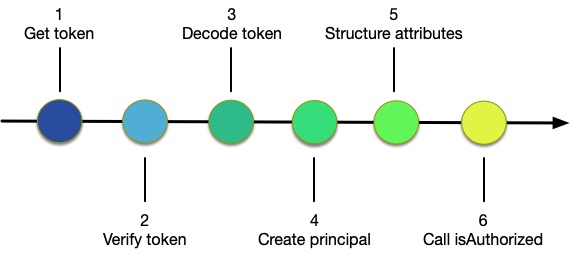
Figure 1: Steps to use Amazon Cognito with isAuthorized
As shown in Figure 1, you need to complete the following six steps to use isAuthorized with Amazon Cognito:
- Get the token from Amazon Cognito when the user authenticates
- Verify the token to authenticate the user
- Decode the token to retrieve attribute information
- Create the policy principal from information in the token or from other sources
- Create the
entitiesstructure by using information in the token or from other sources - Call Amazon Verified Permissions by using
isAuthorized
Now that you understand how to make a request by manually creating the context using data provided by an identity provider, I’ll share how the AWS integration of Amazon Cognito and Verified Permissions can help reduce your workload.
Use isAuthorizedWithToken
In addition to isAuthorized, the Verified Permissions API provides the isAuthorizedWithToken operation that accepts Amazon Cognito tokens. If your application uses Amazon Cognito for authentication, then Amazon Cognito provides the ID token after the user logs in. Let’s assume that you have stored this token in a variable named cognito_id_token. Because you are using an attribute from Amazon Cognito, you modify the previous policy to accommodate the namespace that the Amazon Cognito attributes are in, as shown in the following:
permit(
  principal,
  action == Action::"view",
  resource
)
when {principal.custom.location == "USA"};
With this policy, the photo-sharing application can use the ID token to make an authorization request using isAuthorizedWithToken:
Using this call, you don’t have to supply the principal or construct the entities argument for the principal. Instead, you just pass in the ID token that Amazon Cognito provides. When you call isAuthorizedWithToken, it constructs the principal by using information in the token and creates an entity context that includes Alice’s location from the attributes in the ID token.
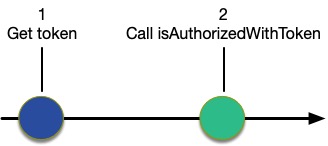
Figure 2: Use isAuthorizedWithToken
As shown in Figure 2, when you use isAuthorizedWithToken, you only need to complete two steps:
- Get the token from Amazon Cognito when the user authenticates
- Call Verified Permissions using
isAuthorizedWithToken, passing in the token
Optionally, your application might need to verify the token to authenticate the user and avoid unnecessary work, or it can rely on isAuthorizedWithToken to do that. Similarly, you might also decode the token if you need its values for the application logic.
Configure isAuthorizedWithToken
You can use the Verified Permissions console to tell the API which Amazon Cognito user pool you’re using for your application. This is called an identity source. Identity sources are associated with policy stores, so you must first create a policy store before configuring the identity source.
To create an identity source for use with Verified Permissions (console):
- Open the Verified Permissions console at https://console.aws.amazon.com/verifiedpermissions/
- Choose Identity source. You will see a list showing the sources that you have already configured. You must have a policy store defined before the Identity source tab is available.
- To create a new identity source, choose Create identity source.
- Enter the region and User pool ID.
- Enter the Principal type.
- Select whether or not to validate Client application IDs for this source.
- (Optional) Enter Tags.
- Choose Create identity source to add a new identity source to Verified Permissions with the given client ID.
The isAuthorizedWithToken operation uses the configuration information to get the public keys from Amazon Cognito to validate and decode the token. It also uses the configuration information to validate that the user pool for the token is associated with the policy store that the API is using.
Add resource entity attributes
ID tokens provide attributes about the principal, but they don’t provide information about the resource. Policies will often reference resource attributes, as shown in the following policy:
permit(
  principal,
  action == Action::"view",
  resource
)
when {resource.accessLevel == "public" &&
      principal.custom.location == "USA"};
Like the previous example, this policy requires that photo viewers are located in the US, but it also requires that the resource has a public attribute. The isAuthorizedWithToken operation can augment the entity information in the token by using the same entities argument that isAuthorized uses. You can add the resource entity information to the call, as shown in the following call to isAuthorizedWithToken:
The isAuthorizedWithToken operation combines the entity information that it gleans from the ID token with the explicit entities information provided in the call to construct the context needed for the authorization request.
Conclusion
Discussions about access control tend to focus on the policies: how you can use them to make the code cleaner, and the value of moving the authorization logic out of the code. But that often ignores the work needed to create meaningful authorization requests. Assembling the information about the entities is a big part of making the request. If you use both Amazon Cognito and Verified Permissions, the integration discussed in this blog post can help relieve you of the work needed to build entity information about principals and help provide you with assurance that the assembly is happening consistently and securely.
If you have feedback about this post, submit comments in the Comments section below. If you have questions about this post, contact AWS Support.
Want more AWS Security news? Follow us on Twitter.