BUILD, DELIVER, MANAGE BLOG SERIES: DELIVER
Imagine putting on your Virtual Reality (VR) headset and communicating with people from around the world, who natively speak French, Japanese and Thai, without a human translator. What if a fledgling start-up could now easily expand their product across borders and into new geographical markets by offering fluid, accurate, live translations in the metaverse across multiple domains like customer support and sales? What happens to your business when you are no longer bound by distance and language?
It’s common today to have virtual meetings with international teams and customers that speak languages ranging from Thai to Hindi to German. Whether they are internal or external meetings, frequently meaning gets lost in complex discussions. Global language barriers pose challenges for communication between individuals in the Metaverse, where human sight and hearing can be augmented beyond biological constraints.
In this blog post, you will build an application stitching together three fully managed Amazon services, Amazon Transcribe, Amazon Translate, and Amazon Polly. This application will produce a near real-time translation solution. This speech-to-speech translator solution quickly translates a speaker’s live voice into a spoken, accurate, translated target language, even if you don’t have any Machine Learning expertise.
Solution Overview
The translator solution comprises a simple Unity project that leverages the power of three fully managed Amazon Web Services (AWS) machine learning services. The solution uses the AWS SDK for .NET, as well as the Unity API for asynchronous audio streaming. This project was developed as VR application for the Meta Quest 2 headset.
The following diagram depicts an overview of this solution.
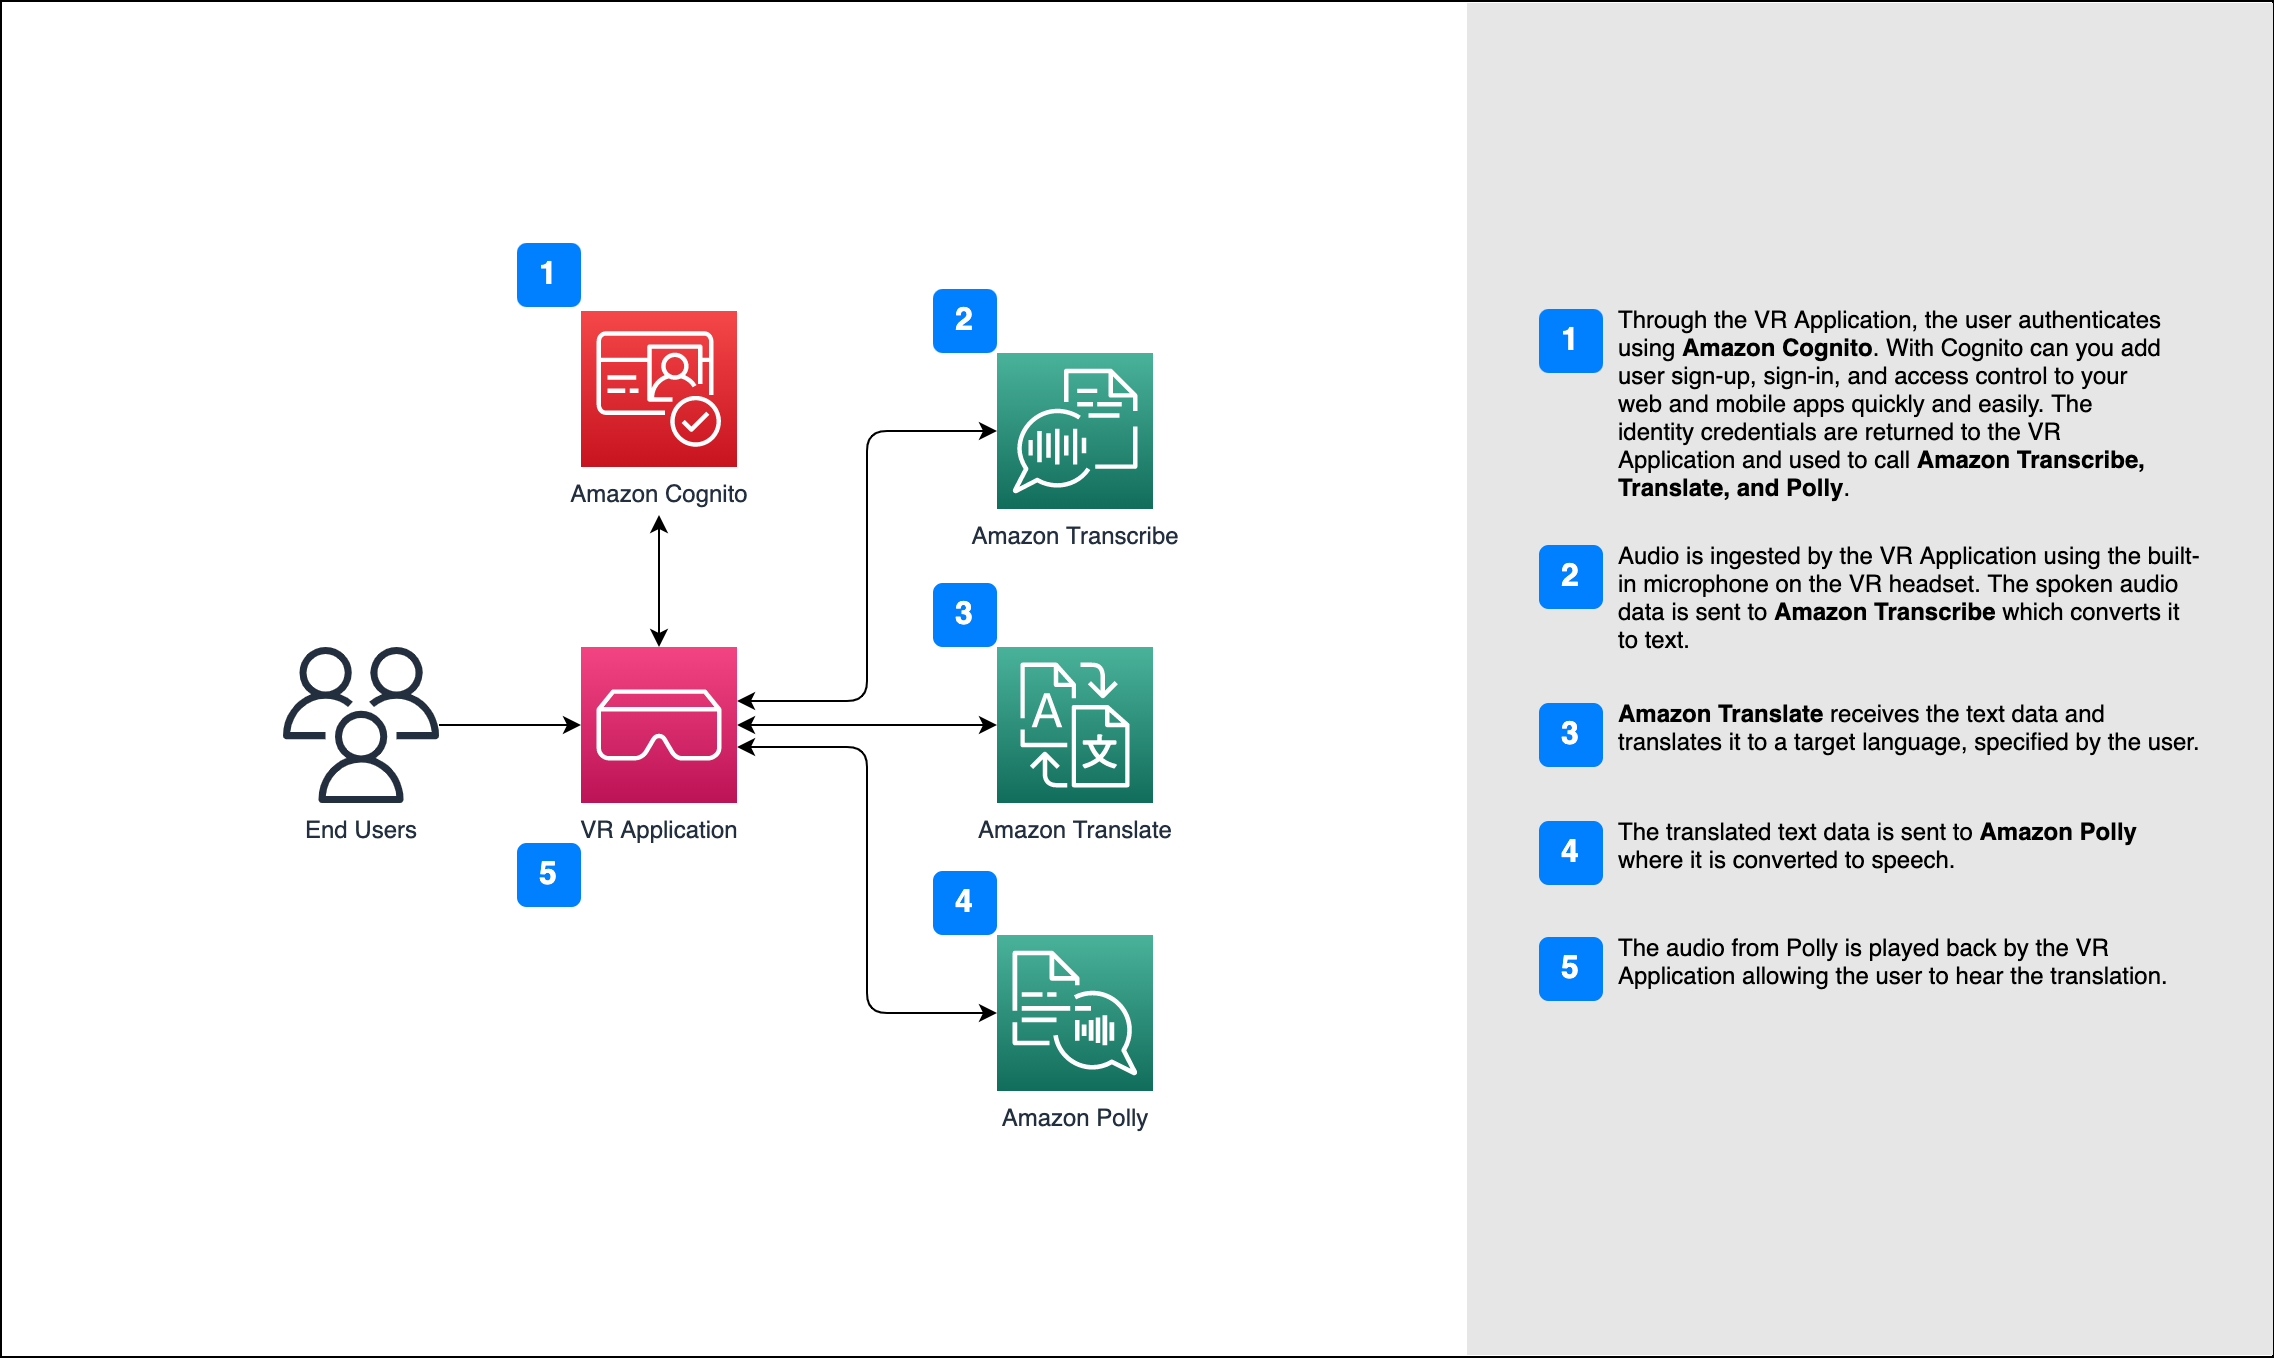
Here is how the solution works:
- Through the VR Application, the user authenticates using Amazon Cognito. Amazon Cognito lets you add user sign-up, sign-in, and access control to your web and mobile apps quickly and easily. The identity credentials are returned to the VR Application and used to call Amazon Transcribe, Amazon Translate, and Amazon Polly.
- Audio is ingested by the VR Application using the built-in microphone on the VR headset. The spoken audio data is sent to Amazon Transcribe, which converts it to text.
- Amazon Translate receives the text data and translates it to a target language specified by the user.
- The translated text data is sent to Amazon Polly, where it is converted to speech.
- The audio from Amazon Polly is played back by the VR Application allowing the user to hear the translation.
Let’s dive deeper into this solution.
Amazon Transcribe – Streaming Speech to Text
The first service you will use in the stack is Amazon Transcribe, a fully managed speech-to-text service that takes speech and transcribes it to text. Amazon Transcribe has flexible ingestion methods, batch or streaming, because it accepts either stored audio files or streaming audio data. In this post, you will use Transcribing streaming audio, which uses the WebSockets protocol to stream live audio and receive live transcriptions. Currently, these are the supported languages and language-specific features, but since you will be working with real-time streaming audio, your application will be able leverage 12 different languages to stream in and out audio.
Amazon Transcribe streaming works with Signing AWS API requests to Amazon Transcribe, which accepts audio data and returns text transcriptions. This text can be visually displayed using rendered UI in the VR application and passed as input to Amazon Translate.
Amazon Translate: State-of-the-art, fully managed translation API
Next in the stack is Amazon Translate, a translation service that delivers fast, high-quality, affordable, and customizable language translation. As of June 2022, Amazon Translate supports translation across 75 languages, with new language pairs and improvements being made constantly. Amazon Translate uses deep learning models hosted on a highly scalable and resilient AWS Cloud architecture to deliver accurate translations either in real time or batched, depending on your use case.
Using Amazon Translate requires no management of underlying architecture or ML skills. Amazon Translate has several features, like creating and using a customizing your translations with custom terminology to improve the recognition of industry-specific terms. For more information on Amazon Translate service limits, refer to Guidelines and limits.
After the application receives the translated text in the target language, it sends the translated text to Amazon Polly for immediate translated audio playback.
Amazon Polly: Fully managed text-to-speech API
Finally, you send the translated text to Amazon Polly, a fully managed text-to-speech service that can either send back lifelike audio stream responses for immediate streaming playback or batched and saved in Amazon Simple Storage Service (Amazon S3) for later use. You can control various aspects of speech, such as pronunciation, volume, pitch, speech rate, and more using standardized Speech Synthesis Markup Language (SSML).
You can synthesize speech for certain Amazon Polly Neural voices, for example using the Newscaster style to make them sound like a TV or radio newscaster. You can also detect when specific words or sentences in the text are being spoken based on the metadata included in the audio stream. This allows the developer to synchronize graphical highlighting and animations, such as the lip movements of an avatar, with the synthesized speech.
You can change the pronunciation of particular words, such as company names, acronyms, or neologisms, for example “P!nk,” “ROTFL,” or “C’est la vie” (when spoken in a non-French voice), using custom lexicons.
Project Setup
Prerequisites
- An AWS account with permissions to use Amazon Transcribe, Amazon Translate, Amazon Polly, and Cognito.
- A local machine with Unity 2021+ with Android build modules installed.
- Intermediate level knowledge of C# and Unity development.
- Optionally, a VR headset that is configured for development. In this blog, it will be assumed that you will use a Meta Quest 2.
You will need a Unity supported device with a microphone, speaker and reliable internet connection. A modern laptop will work for development and testing if you do not have a VR headset available.
For reference, this project was built with Unity 2021.3.2f1 using the Universal Render Pipeline (URP) and the Unity XR Interaction Toolkit package for VR locomotion and interaction. To learn more about VR development with Unity, please reference the Unity documentation: Getting started with VR development in Unity.
AWS Back-End
For authorization and authentication of service calls, the application uses Amazon Cognito User Pool and Identity Pool. The Cognito User Pool is used as a directory that provides sign-up and sign-in options for the application. An Identity Pool grants temporary access to these services. This ensures that services are being called by an authorized identity. As always, follow the principle of least privilege when assigning IAM policies to creating an IAM user or role.
- Set up a Cognito User Pool. This will allow for users to sign up and sign into their account, using email or username. It is recommended to toggle on the “strong passwords only” settings.
- Along with the User Pool, add an App Client that allows for Use SRP password verification in custom authentication flow.
- Create a Cognito Identity Pool that points to the User Pool as an identity provider.
- For users to access Amazon Transcribe, Amazon Translate, Amazon Polly, authorized users in the Identity Pool should assume an IAM role that includes the following IAM Policy document.
// Translation Policy
{
    "Version": "2012-10-17",
    "Statement": [
        {
            "Action": [
                "transcribe:StartStreamTranscriptionWebSocket",
                "translate:TranslateText",
                "translate:ListTerminologies",
                "translate:ImportTerminology",
                "polly:DescribeVoices",
                "polly:SpeechSynthesis"
            ],
            "Resource": "*",
            "Effect": "Allow"
        }
    ]
}
Note, the Cognito User Pool ID, User Pool App Client ID, and Identity Pool ID will be required in the Unity application.
Unity Application
Moving onto the Unity side, you will need to create a new Unity project. For this project, you will use Unity 2021.3.2f1 using the Universal Render Pipeline (URP). Once your Unity project is open, follow these steps to prepare and build the application.
- Add in the proper AWS SDKs for .NET/ C# by downloading the SDK DLLs from the AWS documentation link. API Compatibility for .NET Framework (.NET 4.x) is required. Follow this Developer Guide for detailed instructions on downloading the DLLs: Special considerations for Unity support
- Copy these DLLs to the Assets/Plugins folder in the Unity project.
AWSSDK.Core
AWSSDK.CognitoIdentity
AWSSDK.CognitoIdentityProvider
Amazon.Extensions.CognitoAuthentication
AWSSDK.SecurityToken
AWSSDK.Polly
AWSSDK.Translate
AWSSDK.TranscribeService
- Copy the following DLLs alongside the AWS SDK files. Find the download links on the page, Special considerations for Unity support.
Microsoft.Bcl.AsyncInterfaces.dll
System.Runtime.CompilerServices.Unsafe.dll
System.Threading.Tasks.Extensions.dll
- In your Assets directory, make a file called link.xml copy the following, verifying the list of SDKs matches the DLLs you copied in the previous steps.
<linker>
    <assembly fullname="AWSSDK.Core" preserve="all"/>
    <assembly fullname="AWSSDK.CognitoIdentity" preserve="all"/>
    <assembly fullname="AWSSDK.AWSSDK.CognitoIdentityProvider" preserve="all"/>
    <assembly fullname="Amazon.Extensions.CognitoAuthentication" preserve="all"/>
    <assembly fullname="AWSSDK.SecurityToken" preserve="all"/>
    <assembly fullname="AWSSDK.Polly" preserve="all"/>
    <assembly fullname="AWSSDK.Translate" preserve="all"/>
    <assembly fullname="AWSSDK.TranscribeService" preserve="all"/>
</linker>
Amazon Cognito
In this project, you will use the Amazon CognitoAuthentication extension library and the Unity UI to build the client-side user authorization process. Since the Cognito User Pool was set up to allow SRP based authentication make sure your client-side authorization flow initiates an SRP request. To make calls to Amazon Transcribe, Amazon Translate, and Amazon Polly you will need to store references to the user’s identity credentials once the user has successfully signed in.
For a more in-depth understanding of working with the Amazon CognitoAuthentication extension library, please reference the documentation for .NET to connect the user to the AWS backend: Amazon CognitoAuthentication extension library examples
Amazon Transcribe
To produce real-time transcriptions, Amazon Transcribe streaming requires manual setup to generate a signed message, using AWS Signature Version 4, in event stream encoding. The following steps summarize the required process for creating an Amazon Transcribe streaming request, reference the documentation for a more in-depth understanding of additional requirements: Setting up a WebSocket stream.
- To start the streaming session, create a pre-signed URL including operations and parameters, as canonical request.
/// <summary>
/// Creates and formats Amazon Transcribe URL Parameters
/// </summary>
/// <param name="dateTimeString">transcribe formatted DateTime.Now string</param>
/// <param name="credentialScope">scope for aws region, service, and terminator</param>
/// <param name="languageCode">transcribe language id (default en-US)</param>
/// <param name="mediaEncoding">audio format</param>
/// <param name="sampleRate">audio rate</param>
private string GenerateQueryParams(string dateTimeString, string credentialScope, string languageCode = "en-US", string mediaEncoding = "pcm", string sampleRate = "16000")
{
    var credentials = $"{accessKeyId}/{credentialScope}";
    var result = new Dictionary<string, string>
    {
        {"X-Amz-Algorithm", "AWS4-HMAC-SHA256"},
        {"X-Amz-Credential", credentials},
        {"X-Amz-Date", dateTimeString},
        {"X-Amz-Expires", "300"},
        {"X-Amz-Security-Token", <SESSION_TOKEN>},
        {"X-Amz-SignedHeaders", "host"},
        {"language-code", languageCode},
        {"media-encoding", mediaEncoding},
        {"sample-rate", sampleRate},
        {"transfer-encoding", "chunked"}
    };
    return string.Join("&", result.Select(x => $"{x.Key}={Uri.EscapeDataString(x.Value)}"));
}
- Include parameters for the Amazon Transcribe session and the required parameters common to all API operations. To learn more about the available parameters, please reference the Amazon Transcribe documentation: Common Parameters
/// <summary>
/// Creates and formats Amazon Transcribe URL Parameters
/// </summary>
/// <param name="dateTimeString">transcribe formatted DateTime.Now string</param>
/// <param name="credentialScope">scope for aws region, service, and terminator</param>
/// <param name="languageCode">transcribe language id (default en-US)</param>
/// <param name="mediaEncoding">audio format</param>
/// <param name="sampleRate">audio rate</param>
private string GenerateQueryParams(string dateTimeString, string credentialScope, string languageCode = "en-US", string mediaEncoding = "pcm", string sampleRate = "16000")
{
    var credentials = $"{accessKeyId}/{credentialScope}";
    var result = new Dictionary<string, string>
    {
        {"X-Amz-Algorithm", "AWS4-HMAC-SHA256"},
        {"X-Amz-Credential", credentials},
        {"X-Amz-Date", dateTimeString},
        {"X-Amz-Expires", "300"},
        {"X-Amz-Security-Token", <SESSION_TOKEN>},
        {"X-Amz-SignedHeaders", "host"},
        {"language-code", languageCode},
        {"media-encoding", mediaEncoding},
        {"sample-rate", sampleRate},
        {"transfer-encoding", "chunked"}
    };
    return string.Join("&", result.Select(x => $"{x.Key}={Uri.EscapeDataString(x.Value)}"));
}
- In the following snippet, the canonical request is created containing information about the request. Then, a signing key is derived using the date, service (Amazon Transcribe), and the AWS Region the application is deployed in. Finally, the signature is generated using the HMAC keyed hash algorithm. For more information about calculating signatures for AWS Signature Version 4, reference the documentation: Calculate the signature for AWS Signature Version 4
/// <summary>
/// Creates the request and signatures follow AWS Signature Version 4
/// </summary>
/// <param name="host"></param>
/// <param name="dateString"></param>
/// <param name="dateTimeString"></param>
/// <param name="credentialScope"></param>
/// <returns></returns>
private string GenerateSignature(string host, string dateString, string dateTimeString, string credentialScope)
{
    var canonicalRequest = CanonicalizeRequest("/stream-transcription-websocket", host, dateTimeString, credentialScope);
    var canonicalRequestHashBytes = GetHash(canonicalRequest);

    // construct the string to be signed
    var stringToSign = new StringBuilder();
    stringToSign.AppendFormat(
"{0}-{1}\n{2}\n{3}\n",
“AWS4”,
"HMAC-SHA256",
dateTimeString,
credentialScope
);
    stringToSign.Append(ToHex(canonicalRequestHashBytes, true));

    var kha = KeyedHashAlgorithm.Create("HMACSHA256");
    kha.Key = GetSigningKey(
"HMACSHA256",
<SECRET_KEY>,
dateString,
"transcribe"
    );

    // generate the final signature for the request, place into the result
    var signature = kha.ComputeHash(Encoding.UTF8.GetBytes(stringToSign.ToString()));
    var signatureString = ToHex(signature, true);
    return signatureString;
}
Note, the previous steps provide an overview of the process required to create a signed URL request for Amazon Transcribe streaming. For more information, the Amazon Transcribe WebSocket streaming documentation provides an in-depth walk-through of the required steps: Setting up a WebSocket stream
WebSocket Streaming
To simplify the sending of the audio event data from the VR application to Amazon Transcribe, this project uses the open-source Unity package, NativeWebSockets. Find out more about this package on Github: NativeWebSockets Version 1.1.4
- The first step is to create a new WebSocket, adding listeners, and connecting the socket.
// cache websocket for use throughout functions
private WebSocket websocket;

/// <summary>
/// Initialize and Connect WebSocket before sending any audio events
/// </summary>
/// <param name="url">websocket url to Amazon Transcribe</param>
private async void Connect(string url)
{
    websocket = new WebSocket(url);

    websocket.OnOpen += () =>
    {
        Debug.Log("WebSocket Connection Open");
    };

    websocket.OnError += (e) =>
    {
        Debug.LogError($"WebSocket Error: {e}");
    };

    websocket.OnClose += (e) =>
    {
        Debug.Log($"WebSocket Connection Closed: {e}");
    };

   // listens for received messages
    websocket.OnMessage += HandleMessage;

    // waiting for messages
    await websocket.Connect();
}
- Once a message is received from the WebSocket, it is passed to the following function which parses the encoded response to get the data payload that holds the text. Amazon Transcribe uses a format called event stream encoding for streaming transcriptions, which provides bidirectional communication between a client and a server. To learn more about this encoding, reference the Amazon Transcribe streaming documentation: Setting up a streaming transcription.
// <summary>
/// Parses the payload response from Amazon Transcribe
/// </summary>
/// <param name="bytes">byte array payload</param>
private void HandleMessage(byte[] bytes)
{
    Debug.Log($"WebSocket Message Received");

    //First 8 bytes are the prelude with info about header lengths and total length.
    byte[] totalByteLengthBytes = new byte[4];
    Array.Copy(bytes, totalByteLengthBytes, 4);
    if (BitConverter.IsLittleEndian)
    {
        Array.Reverse(totalByteLengthBytes);
    }

    //an int32 is 4 bytes
    int totalByteLength = BitConverter.ToInt32(totalByteLengthBytes, 0);

    byte[] headersByteLengthBytes = new byte[4];
    Array.Copy(bytes, 4, headersByteLengthBytes, 0, 4);
    if (BitConverter.IsLittleEndian)
    {
        Array.Reverse(headersByteLengthBytes);
    }

    int headersByteLength = BitConverter.ToInt32(headersByteLengthBytes, 0);

    //Use the prelude to get the offset of the message.
    int offset = headersByteLength + 12;

    //Message length is everything but the headers, CRCs, and prelude.
    int payloadLength = totalByteLength - (headersByteLength + 16);
    byte[] payload = new byte[payloadLength];
    Array.Copy(bytes, offset, payload, 0, payloadLength);

   // convert byte payload to readable string
    string message = ParseWebsocketPayload(payload);
    if (!string.IsNullOrEmpty(message))
    {
        // invoke Amazon Translate to send message to other resources
        Translate(message, sourceLanguage, targetLanguage);
    }
}
- The last step of the Amazon Transcribe process is to convert the byte payload to a readable string. The payload will include a transcript of the audio in JSON format. This JSON document will contain Stable flags to show incomplete segment and “IsPartial”: true to indicate, if segments have been completed. This will filter this JSON result to call the Amazon Translate service only when you receive complete segments.
/// <summary>
/// Parses payload to readable string
/// </summary>
/// <param name="payload">byte payload from websocket response</param>
/// <returns>string message</returns>
private string ParseWebsocketPayload(byte[] payload)
{
    // convert byte payload to utf8 string
    string stringPayload = System.Text.Encoding.UTF8.GetString(payload);
    if (string.IsNullOrEmpty(stringPayload))
    {
        return null;
    }

    // get transcribed message
    TranslateWebsocketMessage jsonMessage = JsonUtility.FromJson<TranslateWebsocketMessage>(stringPayload);
    if (jsonMessage != null)
    {
        var results = jsonMessage.Transcript.Results;
        if (results != null && results.Count > 0)
        {
            // only return Transcript if it is a full response and not partial
            if (!results[0].IsPartial)
            {
                return results[0].Alternatives[0].Transcript;
            }
        }
    }
    return null;
}
Audio Capture
Before Amazon Transcribe can be tested, you will need to set up the audio capture process. To capture the user’s audio from the input device, you will use the Unity Microphone class and the Unity AudioSource component.
- In your Unity scene, add an AudioSource component to your Main Camera and disable Play On Awake. This AudioSource will be used to capture the user’s spoken word.
- Create an empty GameObject and add an AudioSource component to it. Again, verify Play On Awake is not enabled. This AudioSource will be used to playback the translated audio returned from Amazon Polly.
- In your script that is controlling the audio translation, start by verifying the user has authorized application access to the microphone. Please reference the Unity documentation for Requesting runtime permissions.
- Once access to the microphone is authorized, the application can start listening using the microphone. In the following code block microphoneAudioSource is a reference to the AudioSource component that was added to the Main Camera. Also, sampleRate is an int set to a valid media sample rate (16,000 Hz) supported by Amazon Transcribe. Note, it is best practice to start the microphone with the user’s knowledge based on user input. For a deeper dive into the Unity Microphone class, reference the Unity documentation here: Microphone.Start
microphoneAudioSource.clip = Microphone.Start(null, false, 300, sampleRate);
- The last step is to create an audio payload to send using the WebSocket. The IESendAudioEvent coroutine runs while the WebSocket connection is open and waits an incremental amount of time, delayTime, for audio to be captured by the microphone. Creating a new Unity AudioClip from the captured audio, the application utilized two utility functions to convert the clip to the 16-bit PCM encoded payload and format the data payload. To learn more about this process, please reference the Amazon Transcribe documentation: Setting up a streaming transcription.
/// <summary>
/// Captures Microphone Audi and converts to Websocket Payload for Amazon Transcribe
/// </summary>
/// <param name="microphoneSource">Microphone Audio Source component</param>
/// <param name="websocket">Websocket reference</param>
/// <param name="delayTime">Incremental wait time</param>
private IEnumerator IESendAudioEvent(AudioSource microphoneSource, WebSocket websocket, float delayTime = 0.2f)
{
    int offset = 0;
    while (websocket != null && websocket.State == WebSocketState.Open)
    {
       // delay to capture new audio
        yield return new WaitForSeconds(delayTime);
        int position = Microphone.GetPosition(null);
        int diff = position - offset;

        if (diff > 0)
        {
           // get audio sample data
            float[] currentSample = new float[diff * microphoneSource.clip.channels];
            _microphoneAudioSource.clip.GetData(currentSample, offset);

           // create audio clip and set data
            AudioClip newClip = AudioClip.Create("", currentSample.Length, microphoneSource.clip.channels, microphoneSource.clip.frequency, false);
            newClip.SetData(currentSample, 0);

           // convert clip to 16-bit pcm encoded byte payload & send via websocket
            byte[] payload = AudioUtils.CreateAudioEvent(AudioUtils.To16BitPCM(newClip));
            websocket.Send(payload);
        }
        offset = position;
    }
}
With the microphone setup and capturing audio, you can begin testing Amazon Transcribe by printing out the returned transcription of your spoken word.
Amazon Translate
The Amazon Transcribe SDK provides functionality to translate text from a source language to a target language. Passing in the message result from the Amazon Transcribe steps, as well as source and target language codes, you can translate the result message.
- The following snippet is an example of using the Amazon Translate SDK for .NET. This function is called at the end of the Amazon Transcribe steps and, upon successful return, starts the Amazon Polly process to convert the translated text to speech.
/// <summary>
/// Calls Amazon Translate to translate provided text
/// </summary>
/// <param name="message">text to translate</param>
/// <param name="sourceLanguage">speakers language</param>
/// <param name="targetLanguage">foreign language</param>
private async void Translate(string message, string sourceLanguage, string targetLanguage)
{
    try
    {
        using (var client = new AmazonTranslateClient(<ACCESS_KEY_ID>, <SECRET_KEY>, <SESSION_TOKEN>, <REGION>))
        {
           // call translate text passing in the translate request object
            var response = await client.TranslateTextAsync(
                new TranslateTextRequest()
                {
                    Text = message,
                    SourceLanguageCode = sourceLanguage,
                    TargetLanguageCode = targetLanguage
                }
            );

            if (response.HttpStatusCode != System.Net.HttpStatusCode.OK)
            {
                Debug.LogError($"Failed to translate text. Status Code: {response.HttpStatusCode}");
            }

           // passes the translated text string to Amazon Polly for speech synthesis
           SynthesizeSpeech(response.TranslatedText);
        }
    }
    catch (Exception e)
    {
        throw new Exception($"Translation Failed. {e}");
    }
}
With Amazon Transcribe setup, you can print the transcription result and translated result to compare the quality of the translation.
Amazon Polly
The final part of this solution will turn the translated text into lifelike speech using Amazon Polly. Similar to Amazon Transcribe, converting the translated text to audio that is playable by Unity requires four steps.
- Calling the Amazon Polly function, SynthesizeSpeechAsync, sends the translated text message to Amazon Polly and returns a System.IO.Stream audio stream.
/// <summary>
/// Calls Amazon Polly to convert text to speech
/// </summary>
/// <param name="message">text to convert</param>
/// <param name="targetVoice">Polly Voice ID</param>
/// <param name="sampleRate">desired rate for generated audio stream</param>
private async void SynthesizeSpeech(string message, string targetVoice = "Emma", int sampleRate = 16000)
{
    try
    {
        using (var client = new AmazonPollyClient(<ACCESS_KEY_ID>, <SECRET_KEY>, <SESSION_TOKEN>, <REGION>))
        {
            // convert targetVoice string to Amazon.Polly.VoiceId
            VoiceId voiceId = VoiceId.FindValue(targetVoice);

            // call Polly passing in the translated text message
            var response = await client.SynthesizeSpeechAsync(
                new SynthesizeSpeechRequest()
                {
                    Text = message,
                    VoiceId = voiceId,
                    OutputFormat = OutputFormat.Mp3,
                    SampleRate = sampleRate.ToString()
                }
            );

            if (response.HttpStatusCode != System.Net.HttpStatusCode.OK)
            {
                throw new Exception($"Failed to get audio clip. Status code: {response.HttpStatusCode}");
            }

            // save response audio stream to a local file, overwrite existing
            if (response.AudioStream != null)
            {
                CreateAudioFile(response.AudioStream);
            }
        }
    }
    catch (Exception e)
    {
        throw new Exception($"Speech Synthesis Failed. {e}");
    }
}
- For the audio stream, returned from Amazon Polly, to be played as a Unity AudioClip it must first be written to an audio file on the local device. In this case, you overwrite the audio file each time and remove it from the device when the application quits, and it deleting any recorded data.
/// <summary>
/// Writes Audio Stream to local file
/// </summary>
/// <param name="audioStream">stream to write to file</param>
private void CreateAudioFile(Stream audioStream)
{
    string path = $"{Application.persistentDataPath}/polly-audio.mp3";
    using (FileStream fs = File.Create(path))
    {
        await response.AudioStream.CopyToAsync(fs);
    }
    // call request coroutine to read in unity audio clip content data
    StartCoroutine(IERequestAudioClip($"file://{path}"));
}
- With the stream stored as a local audio file, you can use the Unity API to request the file from the local device, and convert it to a Unity AudioClip. To learn more about this step, please reference the Unity documentation: UnityWebRequestMultimedia.GetAudioClip
/// <summary>
/// Request Coroutine reads in Unity AudioClip content data so audio can be played
/// </summary>
/// <param name="path">path to audio file</param>
/// <param name="audioType">unity audio type (default MPEG)</param>
private IEnumerator IERequestAudioClip(string path, AudioType audioType = AudioType.MPEG)
{
    // unity web request multimedia loads local audio file as unity audio clip
    using (UnityWebRequest request = UnityWebRequestMultimedia.GetAudioClip(path, audioType))
    {
        yield return request.SendWebRequest();
        switch (request.result)
        {
            case UnityWebRequest.Result.ConnectionError:
            case UnityWebRequest.Result.DataProcessingError:
            case UnityWebRequest.Result.ProtocolError:
                Debug.LogError($"{request.result}: {request.error}");
                break;
            case UnityWebRequest.Result.Success:
                // call PlayAudio passing downloadHandler payload
                PlayAudio(DownloadHandlerAudioClip.GetContent(request));
                break;
        }
    }
}
- The spoken audio has been transcribed, translated, converted to speech, and loaded as a Unity AudioClip. The last step is to pass this AudioClip to the Unity AudioSource that was previously created, so the audio can be played out loud in the scene.
/// <summary>
/// Plays loaded AudioClip
/// </summary>
/// <param name="clip">unity audio clip to play</param>
private void PlayAudio(AudioClip clip)
{
    if (clip != null)
    {
        pollyAudioSource.PlayOneShot(clip);
    }
}
Cleanup
Amazon Cognito Pools
- Go to the Amazon Cognito console. If prompted, enter your AWS credentials.
- From the navigation pane, choose User Pools.
- If you have not created a domain for your user pool, select the radio button next to a user pool and select Delete. Enter the name of the user pool to confirm, and stop here.
- If you have created a domain for your user pool, select the user pool.
- Navigate to the App integration tab for your user pool.
- Next to Domain, choose Actions and select Delete Cognito domain or Delete custom domain.
- Enter the domain name to confirm deletion.
- Return to the User pools list and select the radio button next to your user pool. Select Delete and enter the name of the user pool to confirm.
Unity Project
Since all of these services are event driven and pay-as- you go, you can clean up your Unity project according to your organization’s best practices.
Source Code
See our Github here: https://github.com/aws-samples/spatial-real-time-translation
Conclusion
With this solution, you will be able to speak into the microphone and quickly hear your voice translated to a language of your choice. By using the automatic language detection feature for Amazon Transcribe and Amazon Translate, users can toggle their desired input and output languages, and they enable scalability right out of the box. A user can narrate the entire series of The Canterbury Tales and have their speech translated and then spoken out for their entire audience to hear. AWS’s scalability allows for the live language translation, which I believe is a key aspect of collaborating in the Metaverse.
This post showed how three fully managed Amazon services, Amazon Transcribe, Amazon Translate, and Amazon Polly, can function together to bring real-time translations to VR applications. I encourage you to think about how you can integrate this application into your current application to enable multilingual communication across the future of the Metaverse.
References
AWS Services
Unity
Meta