AWS Storage Blog
VMware vCenter Disaster Recovery using CloudEndure Disaster Recovery
IT disasters such as data center failures, data corruption, or cyber-attacks can not only disrupt your business, but also cause data loss, impact your revenue, and damage your reputation.
Organizations using infrastructure on-premises can significantly reduce disaster recovery (DR) TCO by shifting their secondary data center to the public cloud. CloudEndure Disaster Recovery can replicate any physical, virtual, or cloud-based workload with RPOs of seconds and RTOs of minutes.
There are multiple ways customers can use CloudEndure Disaster Recovery to perform a DR failover and failback. Customers with VMware vCenter in their source data center can use the vCenter integration features of CloudEndure Disaster Recovery. This enables them to perform a failback of several virtual machines in an automated way. In this blog post, I discuss the architecture of CloudEndure Disaster Recovery and provide recommended steps to perform disaster recovery and failback of a VMware vCenter environment.
Overview of solution: Disaster recovery failovers and failbacks
The DR failover process to AWS is the same regardless of the source infrastructure. In order to establish a disaster recovery setup, replication of virtual machines is performed by installing a CloudEndure agent on the source virtual machines (VMs). Then you establish continuous, asynchronous replication over a secure connection to the target AWS staging area. At the time of DR failover, CloudEndure Disaster Recovery converts those replicated source volumes into their respective Amazon Elastic Compute Cloud (Amazon EC2) instances and launch them in the preconfigured Amazon Virtual Private Cloud (Amazon VPC) subnet.
The following diagram explains this architecture for a DR failover:

The DR failback process varies based on the source infrastructure setup. In a classic scenario, the source is a standalone host, which could be a VM, bare metal system, or a VM from another cloud provider. To initiate a failback, CloudEndure Disaster Recovery boots the host and performs continuous reverse replication from the DR EC2 instance to the new host. It also launches the new machine.
However, when there is a vCenter environment, a CloudEndure vCenter appliance is installed at the source vCenter cluster. Once the DR failback is initiated, the vCenter appliance will coordinate a “Reverse replication” of failed over EC2 instances back into the vCenter cluster’s staging area. At the “failback launch” stage, replicated instances are converted back as virtual machines and brought online on the source vCenter cluster. By using CloudEndure vCenter, you can orchestrate failback of several virtual machines automatically without having to install failback agents on individual hosts. This is a major advantage of using vCenter based DR. This DR operation is also described as “vCenter to AWS” in the CloudEndure documentation.
The following diagram explains this architecture for a DR failback in a vCenter environment:

Prerequisites:
In order to perform this exercise, your setup must include the following:
- VMware vCenter 6.5 or 6.7 cluster
- A Linux or Windows virtual machine
- VLAN for vCenter staging area must provide DHCP
- Access to internet to connect to AWS Cloud
- Firewall rules to allow outbound traffic at TCP port 443 to console.cloudendure.com
- Firewall rules to allow TCP port 1500 inbound traffic from AWS Cloud
- Access to Amazon S3 from vCenter cluster
Steps:
Now you understand the architecture of DR failover and failback. This section covers how to build this environment in your lab. The complete process is divided into four sections as follows:
- Set up replication into AWS.
- Perform a failover into AWS.
- Perform a failback to original environment.
- Back to normal operation.
Step 1: Set up replication into AWS
In this section, set up a sample Windows VM in a data center to replicate into the AWS DR site. First, register in the CloudEndure console by following the on-screen instructions on how to give CloudEndure Disaster Recovery access to my AWS environment. Also, create an AWS Identity and Access Management (IAM) user in your AWS account that has the necessary permissions to perform CloudEndure-related API operations. Input the IAM user credentials (Access key and secret access key) into your CloudEndure console.
Next, launch a DR project into the CloudEndure console.

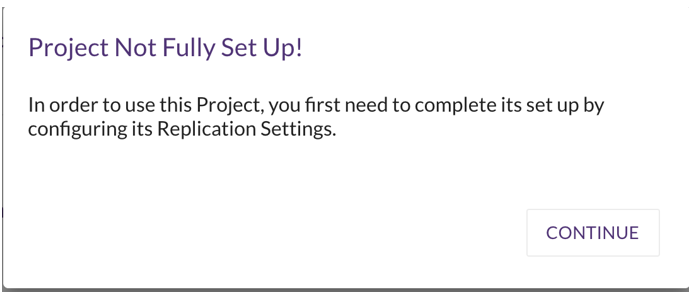
You’ll see in the following screen at the Project Not Fully Set Up! point. Leave it at this stage.
Vcenter access
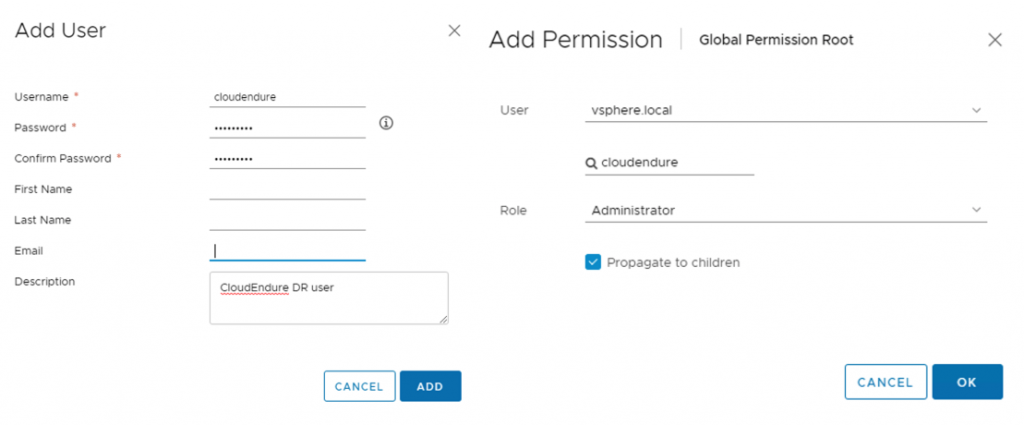
I already have a prebuilt vSphere 6.7 cluster with a Windows 2016 virtual machine as my base setup. I created a vCenter user “CloudEndure” (any user name) with administrator access and made note of the password for future use. Here is the link to the official documentation to determine minimum vCenter permissions needed for this step.
Download and install the “CloudEndure Appliance” for vCenter based on your preferred vCenter cluster configuration. Once you boot this appliance VM, you will see a replicator instance being downloaded and installed, and requesting a token. Grab the Install token from the CloudEndure console. Be sure to grab the install token and not the API token for this purpose. Input the token to complete the vCenter appliance install as follows. You must input the username@domain and password for vCenter access. This will connect the vCenter appliance to your vCenter connector with the necessary permissions.
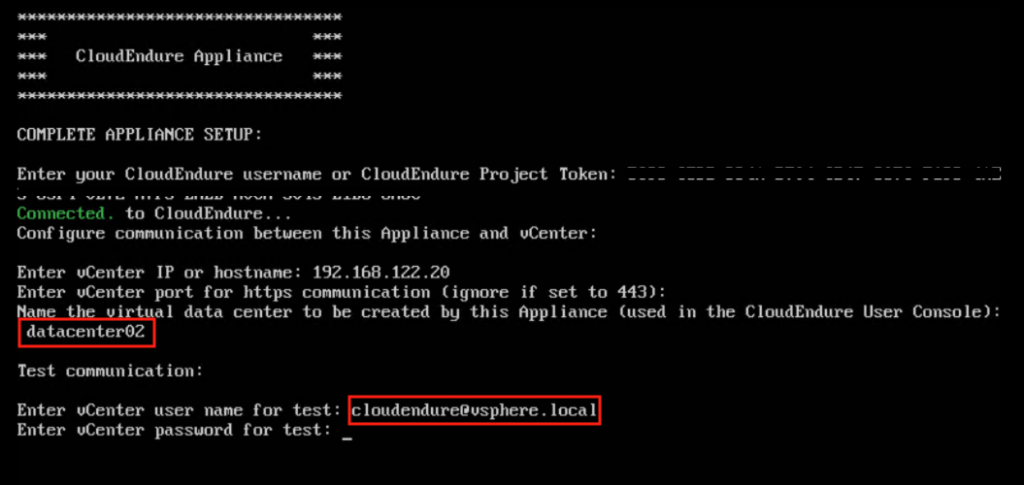
Once you notice the message stating that the appliance was set up successfully, you must input the token and vCenter credentials once again. You should see this message when the setup is successful.

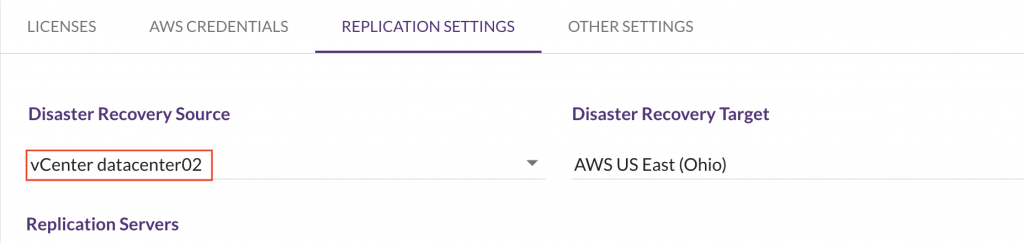
Go back to the CloudEndure Disaster Recovery console and refresh the browser. On the Replication Settings screen, you should be able to see your data center as the Disaster Recovery Source. Select the correct Disaster Recovery Target in AWS. Make sure you have populated the right subnet and other settings and save it.
Installing agent on virtual machines
Go to the CloudEndure console and follow the Machines > add machines steps to install the agent on the VMs.

After successfully installing the agent, I can see replication happening in the AWS staging area based on the specified Replication Settings.

Step 2: Perform a failover from vCenter to AWS
To validate the DR readiness, perform a launch of the replicated VM into AWS. In the CloudEndure console, select the replicated machine and go to the blueprint settings. Here you have an opportunity to customize the EC2 instance by providing details like EC2 instance type, subnet, security group, IP address, tags etc.
My setup is ready to perform a failover after successfully completing the replication in the previous step. Before performing an actual failover, launch your target server in Test Mode and validate it. This is done by selecting the machine, and selecting Launch Target Machine, then Test Mode. Select the recovery point you would like to recover from and choose Recover. After the Test machine has been created successfully, the Disaster Recovery Lifecycle column will show Tested Recently with a green bar to the left of the machine name. This means that the machine is now ready to be failed over.
To initiate a DR failover, select Launch Target Machine, then Recovery Mode. Select the recovery point you would like to recover from and choose Recover. In few minutes, you will see a new EC2 instance launched as a replica of your vCenter VM.
Step 3: Perform a failback AWS to vCenter
Failback is the process of restoring the operations of the primary VM after it was shifted to AWS due to disaster. This is done in two steps. First, initiate a reverse replication from the failed over EC2 instance in AWS to the vCenter staging area. This is followed by the step to actually launch the original virtual machine into the vCenter.
Configuring failback replication
Before initiating failback, confirm that the EC2 instance subnet, routing, any IAM policies, and security group allow TCP 1500 inbound traffic for replicating to vCenter replication servers. This is critical for the communication to flow properly between the EC2 instance and the vCenter cluster.
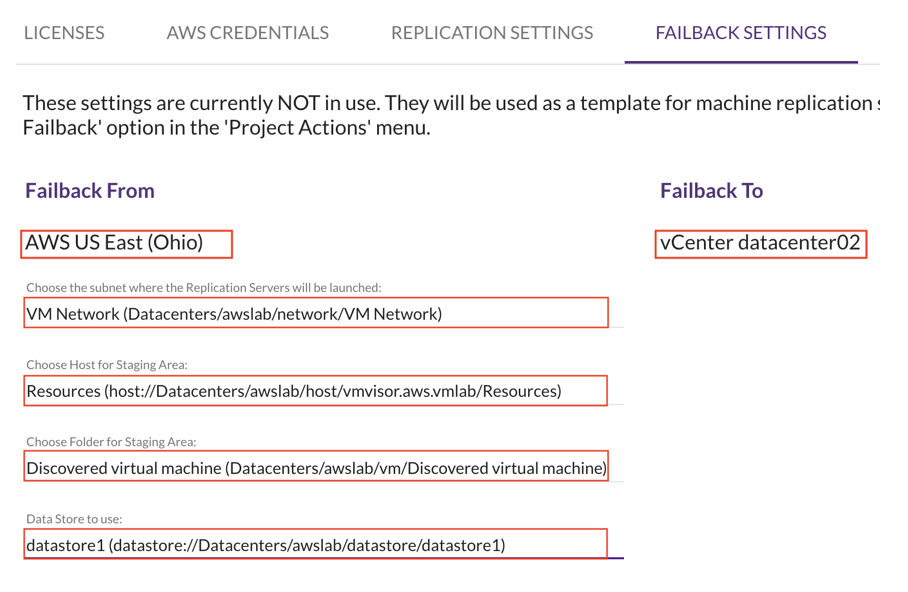
In the CloudEndure console, go to Project, then Failback settings and configure the correct subnets, staging area folder, and datastore based on the desired vCenter staging environment. Based on these settings, the replication back to staging area will be established. One important point to note is that, when failing back, CloudEndure Disaster Recovery maintains the machine configuration from AWS (including the networking). The failed back machine will be configured for DHCP and must be reconfigured for its original static IP manually post failback
Initiating failback
Go to CloudEndure console, select Project Actions, then Prepare for Failback.

The console reports Initiating Data Replication then Continuous Data Protection states, exactly similar to what we observed during DR replication. There are multiple activities in the vCenter task manager to show progress. Wait for the replication to complete and enter Continuous Data Protection state on the CloudEndure console. This indicates that the replication direction has been reversed successfully.

Launching failback VM
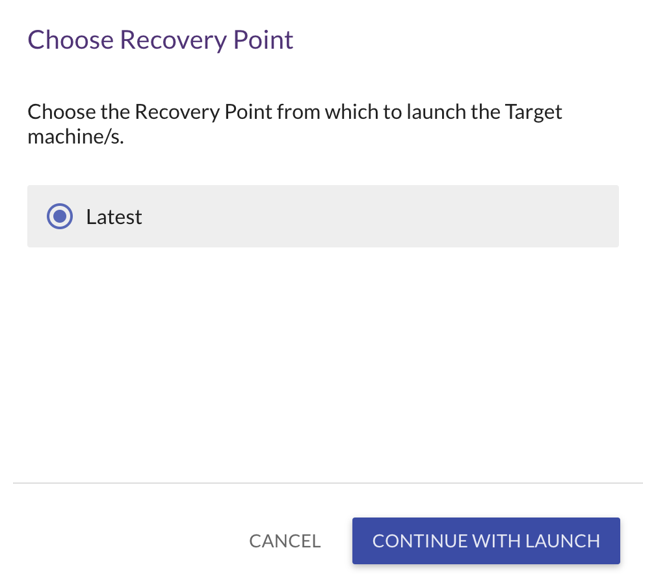
Now I have an opportunity to customize the configuration of the new failed back VM. I can go to the FAILBACK SETTINGS once again for every VM I have replicated and customize those settings to match my final VM launch. Pay attention to the SCSI adapter type to match the original one supported by your vCenter environment. You can also provide a different VM name for failback launch. Launch the target machine in recovery mode and choose the appropriate recovery point.
Monitor the job progress and also any activity in your vCenter console to see the original VM come back to life.

Step 4: Return to normal operations
Once the original source VM has been launched, switch back to normal DR replication. To achieve this, go to the CloudEndure Disaster Recovery console, select Project Actions, then Return to Normal Operation. When you return to normal, the Data Replication direction is reversed. The currently launched Target machines are treated as Source machines and data flows from vCenter VMs back to your original AWS DR location. There is no need to install a CloudEndure agent this time, as it is already embedded in the recovered VM.

This finishes the demonstration of the complete lifecycle of vCenter DR using CloudEndure Disaster Recovery.
Cleaning up
By the end of this exercise, make sure you delete the resources you created on both the AWS and vCenter sides. After the new machines have been launched, the original source machines must be cleaned up manually, as CloudEndure does not delete source machines.
Conclusion
This blog post reviewed the architecture and functional details of how CloudEndure Disaster Recovery handles disaster recovery for a VMware vCenter environment. It provided instructions to build a lab environment to demonstrate replication, failover, and failback aspects of a complete disaster recovery cycle. Finally, you were able to restore the complete environment back to normal after recovering from disaster. More details on this functionality can be found on the CloudEndure Disaster Recovery service page.
If you have questions, feel free to ask in the comments. I look forward to hearing from you.