AWS Compute Blog
Taking Advantage of Amazon EC2 Spot Instance Interruption Notices
Amazon EC2 Spot Instances are spare compute capacity in the AWS Cloud available to you at steep discounts compared to On-Demand prices. The only difference between On-Demand Instances and Spot Instances is that Spot Instances can be interrupted by Amazon EC2 with two minutes of notification when EC2 needs the capacity back.
Customers have been taking advantage of Spot Instance interruption notices available via the instance metadata service since January 2015 to orchestrate their workloads seamlessly around any potential interruptions. Examples include saving the state of a job, detaching from a load balancer, or draining containers. Needless to say, the two-minute Spot Instance interruption notice is a powerful tool when using Spot Instances.
In January 2018, the Spot Instance interruption notice also became available as an event in Amazon CloudWatch Events. This allows targets such as AWS Lambda functions or Amazon SNS topics to process Spot Instance interruption notices by creating a CloudWatch Events rule to monitor for the notice.
In this post, I walk through an example use case for taking advantage of Spot Instance interruption notices in CloudWatch Events to automatically deregister Spot Instances from an Elastic Load Balancing Application Load Balancer.
Architecture
In this reference architecture, you use an AWS CloudFormation template to deploy the following:
- An Amazon Virtual Private Cloud (Amazon VPC) with subnets in two Availability Zones
- An Application Load Balancer with a listener and target group
- An Amazon CloudWatch Events rule
- An AWS Lambda function
- An Amazon Simple Notification Service (SNS) topic
- Associated IAM policies and roles for all of the above
After the AWS CloudFormation stack deployment is complete, you then create an Amazon EC2 Spot Fleet request diversified across both Availability Zones and use a couple of recent Spot Fleet features: Elastic Load Balancing integration and Tagging Spot Fleet Instances.
When any of the Spot Instances receives an interruption notice, Spot Fleet sends the event to CloudWatch Events. The CloudWatch Events rule then notifies both targets, the Lambda function and SNS topic. The Lambda function detaches the Spot Instance from the Application Load Balancer target group, taking advantage of nearly a full two minutes of connection draining before the instance is interrupted. The SNS topic also receives a message, and is provided as an example for the reader to use as an exercise.
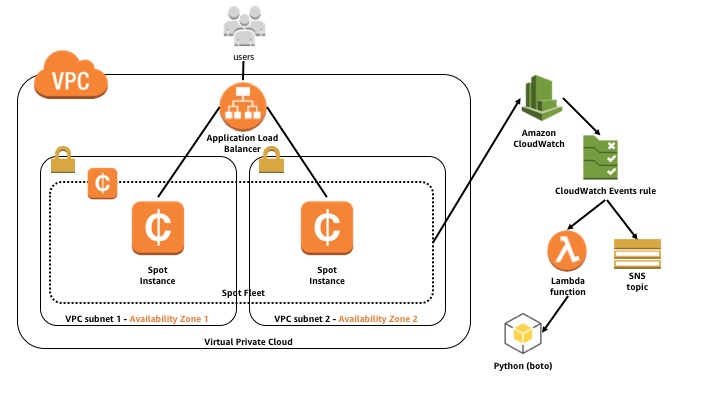
EC2 Spot Instance Interruption Notices Reference Architecture Diagram
Walkthrough
To complete this walkthrough, have the AWS CLI installed and configured, as well as the ability to launch CloudFormation stacks.
Launch the stack
Go ahead and launch the CloudFormation stack. You can check it out from GitHub, or grab the template directly. In this post, I use the stack name “spot-spin-cwe“, but feel free to use any name you like. Just remember to change it in the instructions.
$ git clone https://github.com/awslabs/ec2-spot-labs.git

$ aws cloudformation create-stack --stack-name spot-spin-cwe \
  --template-body file://ec2-spot-labs/ec2-spot-interruption-notice-cloudwatch-events/ec2-spot-interruption-notice-cloudwatch-events.yaml \
  --capabilities CAPABILITY_IAM
You should receive a StackId value in return, confirming the stack is launching.
{
  "StackId": "arn:aws:cloudformation:us-east-1:123456789012:stack/spot-spin-cwe/083e7ad0-0ade-11e8-9e36-500c219ab02a"
}
Review the details
Here are the details of the architecture being launched by the stack.
IAM permissions
Give permissions to a few components in the architecture:
- The Lambda function
- The CloudWatch Events rule
- The Spot Fleet
The Lambda function needs basic Lambda function execution permissions so that it can write logs to CloudWatch Logs. You can use the AWS managed policy for this. It also needs to describe EC2 tags as well as deregister targets within Elastic Load Balancing. You can create a custom policy for these.
lambdaFunctionRole:
    Properties:
      AssumeRolePolicyDocument:
        Statement:
        - Action:
          - sts:AssumeRole
          Effect: Allow
          Principal:
            Service:
            - lambda.amazonaws.com
        Version: 2012-10-17
      ManagedPolicyArns:
      - arn:aws:iam::aws:policy/service-role/AWSLambdaBasicExecutionRole
      Path: /
      Policies:
      - PolicyDocument:
          Statement:
          - Action: elasticloadbalancing:DeregisterTargets
            Effect: Allow
            Resource: '*'
          - Action: ec2:DescribeTags
            Effect: Allow
            Resource: '*'
          Version: '2012-10-17'
        PolicyName:
          Fn::Join:
          - '-'
          - - Ref: AWS::StackName
            - lambdaFunctionRole
    Type: AWS::IAM::Role
Allow CloudWatch Events to call the Lambda function and publish to the SNS topic.
lambdaFunctionPermission:
    Properties:
      Action: lambda:InvokeFunction
      FunctionName:
        Fn::GetAtt:
        - lambdaFunction
        - Arn
      Principal: events.amazonaws.com
      SourceArn:
        Fn::GetAtt:
        - eventRule
        - Arn
    Type: AWS::Lambda::Permission
snsTopicPolicy:
DependsOn:
- snsTopic
Properties:
PolicyDocument:
Id:
Fn::GetAtt:
- snsTopic
- TopicName
Statement:
- Action: sns:Publish
Effect: Allow
Principal:
Service:
- events.amazonaws.com
Resource:
Ref: snsTopic
Version: '2012-10-17'
Topics:
- Ref: snsTopic
Type: AWS::SNS::TopicPolicyFinally, Spot Fleet needs permissions to request Spot Instances, tag, and register targets in Elastic Load Balancing. You can tap into an AWS managed policy for this.
spotFleetRole:
    Properties:
      AssumeRolePolicyDocument:
        Statement:
        - Action:
          - sts:AssumeRole
          Effect: Allow
          Principal:
            Service:
            - spotfleet.amazonaws.com
        Version: 2012-10-17
      ManagedPolicyArns:
      - arn:aws:iam::aws:policy/service-role/AmazonEC2SpotFleetTaggingRole
      Path: /
    Type: AWS::IAM::Role
Elastic Load Balancing timeout delay
Because you are taking advantage of the two-minute Spot Instance notice, you can tune the Elastic Load Balancing target group deregistration timeout delay to match. When a target is deregistered from the target group, it is put into connection draining mode for the length of the timeout delay: 120 seconds to equal the two-minute notice.
loadBalancerTargetGroup:
    DependsOn:
    - vpc
    Properties:
      HealthCheckIntervalSeconds: 5
      HealthCheckPath: /
      HealthCheckTimeoutSeconds: 2
      Port: 80
      Protocol: HTTP
      TargetGroupAttributes:
      - Key: deregistration_delay.timeout_seconds
        Value: 120
      UnhealthyThresholdCount: 2
      VpcId:
        Ref: vpc
    Type: AWS::ElasticLoadBalancingV2::TargetGroup
CloudWatch Events rule
To capture the Spot Instance interruption notice being published to CloudWatch Events, create a rule with two targets: the Lambda function and the SNS topic.
eventRule:
    DependsOn:
    - snsTopic
    Properties:
      Description: Events rule for Spot Instance Interruption Notices
      EventPattern:
        detail-type:
        - EC2 Spot Instance Interruption Warning
        source:
        - aws.ec2
      State: ENABLED
      Targets:
      - Arn:
          Ref: snsTopic
        Id:
          Fn::GetAtt:
          - snsTopic
          - TopicName
      - Arn:
          Fn::GetAtt:
          - lambdaFunction
          - Arn
        Id:
          Ref: lambdaFunction
    Type: AWS::Events::Rule
Lambda function
The Lambda function does the heavy lifting for you. The details of the CloudWatch event are published to the Lambda function, which then uses boto3 to make a couple of AWS API calls. The first call is to describe the EC2 tags for the Spot Instance, filtering on a key of “TargetGroupArn”. If this tag is found, the instance is then deregistered from the target group ARN stored as the value of the tag.
import boto3
def handler(event, context):
  instanceId = event['detail']['instance-id']
  instanceAction = event['detail']['instance-action']
  try:
    ec2client = boto3.client('ec2')
    describeTags = ec2client.describe_tags(Filters=[{'Name': 'resource-id','Values':[instanceId],'Name':'key','Values':['loadBalancerTargetGroup']}])
  except:
    print("No action being taken. Unable to describe tags for instance id:", instanceId)
    return
  try:
    elbv2client = boto3.client('elbv2')
    deregisterTargets = elbv2client.deregister_targets(TargetGroupArn=describeTags['Tags'][0]['Value'],Targets=[{'Id':instanceId}])
  except:
    print("No action being taken. Unable to deregister targets for instance id:", instanceId)
    return
  print("Detaching instance from target:")
  print(instanceId, describeTags['Tags'][0]['Value'], deregisterTargets, sep=",")
  return
SNS topic
Finally, you’ve created an SNS topic as an example target. For example, you could subscribe an email address to the SNS topic in order to receive email notifications when a Spot Instance interruption notice is received.
snsTopic:
    Properties:
      DisplayName: SNS Topic for EC2 Spot Instance Interruption Notices
    Type: AWS::SNS::Topic
Create a Spot Fleet request
To proceed to creating your Spot Fleet request, use some of the resources that the CloudFormation stack created, to populate the Spot Fleet request launch configuration. You can find the values in the outputs values of the CloudFormation stack:
$ aws cloudformation describe-stacks --stack-name spot-spin-cweUsing the output values of the CloudFormation stack, update the following values in the Spot Fleet request configuration:
- %spotFleetRole%
- %publicSubnet1%
- %publicSubnet2%
- %loadBalancerTargetGroup% (in two places)
Be sure to also replace %amiId% with the latest Amazon Linux AMI for your region and %keyName% with your environment.
{
  "AllocationStrategy": "diversified",
  "IamFleetRole": "%spotFleetRole%",
  "LaunchSpecifications": [
    {
      "ImageId": "%amiId%",
      "InstanceType": "c4.large",
      "Monitoring": {
        "Enabled": true
      },
      "KeyName": "%keyName%",
      "SubnetId": "%publicSubnet1%,%publicSubnet2%",
      "UserData": "IyEvYmluL2Jhc2gKeXVtIC15IHVwZGF0ZQp5dW0gLXkgaW5zdGFsbCBodHRwZApjaGtjb25maWcgaHR0cGQgb24KaW5zdGFuY2VpZD0kKGN1cmwgaHR0cDovLzE2OS4yNTQuMTY5LjI1NC9sYXRlc3QvbWV0YS1kYXRhL2luc3RhbmNlLWlkKQplY2hvICJoZWxsbyBmcm9tICRpbnN0YW5jZWlkIiA+IC92YXIvd3d3L2h0bWwvaW5kZXguaHRtbApzZXJ2aWNlIGh0dHBkIHN0YXJ0Cg==",
      "TagSpecifications": [
        {
          "ResourceType": "instance",
          "Tags": [
            {
              "Key": "loadBalancerTargetGroup",
              "Value": "%loadBalancerTargetGroup%"
            }
          ]
        }
      ]
    }
  ],
  "TargetCapacity": 2,
  "TerminateInstancesWithExpiration": true,
  "Type": "maintain",
  "ReplaceUnhealthyInstances": true,
  "InstanceInterruptionBehavior": "terminate",
  "LoadBalancersConfig": {
    "TargetGroupsConfig": {
      "TargetGroups": [
        {
          "Arn": "%loadBalancerTargetGroup%"
        }
      ]
    }
  }
}
Save the configuration and place the Spot Fleet request:
$ aws ec2 request-spot-fleet --spot-fleet-request-config file://sfr.jsonYou should receive a SpotFleetRequestId in return, confirming the request:
{
    "SpotFleetRequestId": "sfr-3cec4927-9d86-4cc5-a4f0-faa996c841b7"
}
You can confirm that the Spot Fleet request was fulfilled by checking that ActivityStatus is “fulfilled”, or by checking that FulfilledCapacity is greater than or equal to TargetCapacity, while describing the request:
$ aws ec2 describe-spot-fleet-requests --spot-fleet-request-id sfr-3cec4927-9d86-4cc5-a4f0-faa996c841b7{
"SpotFleetRequestConfigs": [
{
"ActivityStatus": "fulfilled",
"CreateTime": "2018-02-08T01:23:16.029Z",
"SpotFleetRequestConfig": {
"AllocationStrategy": "diversified",
"ExcessCapacityTerminationPolicy": "Default",
"FulfilledCapacity": 2.0,
…
"TargetCapacity": 2,
…
}
]
}Next, you can confirm that the Spot Instances have been registered with the Elastic Load Balancing target group and are in a healthy state:
$ aws elbv2 describe-target-health --target-group-arn arn:aws:elasticloadbalancing:us-east-1:123456789012:targetgroup/spot-loadB-1DZUVWL720VS6/26456d12cddbf23a{
"TargetHealthDescriptions": [
{
"Target": {
"Id": "i-056c95d9dd6fde892",
"Port": 80
},
"HealthCheckPort": "80",
"TargetHealth": {
"State": "healthy"
}
},
{
"Target": {
"Id": "i-06c4c47228fd999b8",
"Port": 80
},
"HealthCheckPort": "80",
"TargetHealth": {
"State": "healthy"
}
}
]
}Test
In order to test, you can take advantage of the fact that any interruption action that Spot Fleet takes on a Spot Instance results in a Spot Instance interruption notice being provided. Therefore, you can simply decrease the target size of your Spot Fleet from 2 to 1. The instance that is interrupted receives the interruption notice:
$ aws ec2 modify-spot-fleet-request --spot-fleet-request-id sfr-3cec4927-9d86-4cc5-a4f0-faa996c841b7 --target-capacity 1{
"Return": true
}As soon as the interruption notice is published to CloudWatch Events, the Lambda function triggers and detaches the instance from the target group, effectively putting the instance in a draining state.
$ aws elbv2 describe-target-health --target-group-arn arn:aws:elasticloadbalancing:us-east-1:123456789012:targetgroup/spot-loadB-1DZUVWL720VS6/26456d12cddbf23a{
"TargetHealthDescriptions": [
{
"Target": {
"Id": "i-0c3dcd78efb9b7e53",
"Port": 80
},
"HealthCheckPort": "80",
"TargetHealth": {
"State": "draining",
"Reason": "Target.DeregistrationInProgress",
"Description": "Target deregistration is in progress"
}
},
{
"Target": {
"Id": "i-088c91a66078b4299",
"Port": 80
},
"HealthCheckPort": "80",
"TargetHealth": {
"State": "healthy"
}
}
]
}Conclusion
In conclusion, Amazon EC2 Spot Instance interruption notices are an extremely powerful tool when taking advantage of Amazon EC2 Spot Instances in your workloads, for tasks such as saving state, draining connections, and much more. I’d love to hear how you are using them in your own environment!

Chad Schmutzer
|
Chad Schmutzer is a Solutions Architect at Amazon Web Services based in Pasadena, CA. As an extension of the Amazon EC2 Spot Instances team, Chad helps customers significantly reduce the cost of running their applications, growing their compute capacity and throughput without increasing budget, and enabling new types of cloud computing applications. |