AWS for SAP
AWS DevOps tools for SAP, Part 2: SAP Fiori Apps
In Part 1 of this blog series, we demonstrated how AWS Developer Tools can be used to store and version your SCP Cloud Foundry application. You can automatically build, test, and deploy your application without setting up or managing any Jenkins instances or other infrastructure. This serverless approach allows you to focus on your software delivery process, deploying changes at scale and at a high quality.
This post shows you how to use AWS DevOps Tools to set up a simplified continuous integration and continuous delivery (CI/CD) pipeline for SAP Fiori applications running on-premises or in the cloud (front-end components only). For the solution in this blog, we use a sample app provided by SAP.
For an integrated development environment (IDE), we use AWS Cloud9, to perform changes to the sample app. The project artifacts are stored in AWS CodeCommit for source control repository. Finally, the deployment is executed through the AWS CodeDeploy agent, allowing seamless integration into the SAP Transport Management by specifying SAP transport number or development package.

Prerequisites
Before you set up the pipeline, validate and complete the following requirements.
- You’re running NetWeaver ABAP version 7.40 or greater.
- You are an SAP user with common developer authorizations.
- You have enabled ABAP developer tools (ADT) by activating SICF path /sap/bc/adt. See SAP troubleshooting guide for configuration issues.
- You have a server with outbound internet access and connectivity to the target SAP system to allow the AWS CodeDeploy agent to operate.
- A new AWS CodeCommit repository has been created with a unique name (example: my-sap-fiori-app) for your SAP Fiori application. See AWS DevOps tools for SAP, Part 1: Cloud Foundry Apps for instructions on how to set up.
- You have AWS Cloud9 development environment configured. See AWS DevOps tools for SAP, Part 1: Cloud Foundry Apps for instructions on how to set up.
Creating an SAP Fiori sample application
1. Launch your AWS Cloud9 environment.
2. Clone the CodeCommit empty repository created for your SAP Fiori application and navigate to the directory.
$ git clone <CodeCommit repo-url>
$ cd <repo-url>
3. Create a new sample application for SAP Fiori by cloning the following repository.
$ git clone https://github.com/SAP/openui5-sample-app.git4. Execute the bash commands to modify the repository structure in AWS Cloud9.
$ rm -Rf openui5-sample-app/.git
$ cp -Ra openui5-sample-app/. .
$ rm -Rf openui5-sample-app/
$ npm install --global @ui5/cli
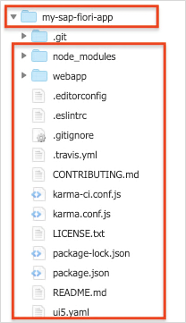
$ npm install5. Validate the structure of the modified repository in AWS Cloud9. You should see this structure.
Storing Your SAP secrets with AWS Secrets Manager
You use AWS Secrets Manager to store SAP NetWeaver ABAP environment user name, password, and hostname as secrets for AWS service to access your SAP environment.
1. Add the secret as following plaintext values. Pass your SAP environment credentials and host info matching SICF services. See AWS Secrets Manager documentation to setup the credentials.
{
“USER”: “”,
“PASSWORD”: “”,
“URL”: “http://host:port”
}
2. Name your secret as SAP_DEPLOY and store your secrets by choosing Next.
Configure Build and Deploy files in AWS Cloud9
Select the “create new file” option from the AWS Cloud9 menu to create the following files inside the GitHub repository folder required for your CI/CD pipeline execution.
1. Create a new file with the following code snippet and save as ‘buildspec.yml’ file.
version: 0.2

phases:
  install:
    runtime-versions:
      nodejs: 10

  build:
    commands:
       - npm install --global @ui5/cli
       - npm install
       - ui5 build -a
       - npm test

reports: #New
  FioriReports: # CodeBuild will create a report group called "FioriReports".
    files: #Store all of the files
      - '**/*.xml'
    base-directory: 'junit' # Location of the reports
    #file-format: CucumberJson #Type of the report, defaults to JunitXml

artifacts:
  files:
    - dist/*
    - appspec.yml
    - appspec_deploy.sh
    - appspec_cleanup.sh
    - Gruntfile.js
    - package.json
2. Create a new file with the following code snippet and save as ‘appspec.yml’ file. This file determines the deployment steps of the agent and the working directory where the deployment artifacts are downloaded and stored.
version: 0.0
os: linux
files:
  - source: /
    destination: /codedeploy/sapfioriapp
hooks:
  BeforeInstall:
    - location: appspec_cleanup.sh
  AfterInstall:
    - location: appspec_deploy.sh
      timeout: 180
3. Create a new file with the following code snippet and save as ‘appspec_cleanup.sh’ file. This file cleans up the working directory during the deployment process to ensure that the latest application artifacts are being deployed.
echo "Cleanup"
rm /codedeploy/sapfioriapp -R -f
4. Create a new file with the following code snippet and save as ‘appspec_deploy.sh’ file. This file is executed by the CodeDeploy agent to start the deployment task to upload the application artifacts to the specified SAP NetWeaver ABAP – Business Server Pages (BSP) repository by using the grunt-nwabap-ui5uploader (an open source plugin for Node.js and grunt – a Node.js task runner).
echo "Starting Deployment Task"
cd /codedeploy/sapfioriapp
echo "Installing grunt & dependencies"
npm install grunt
npm install grunt-nwabap-ui5uploader
echo "Deploy to"
# AWS CLI SECRETSMANAGER - Get SAP access from AWS Secrets Manager
duser=$(aws secretsmanager get-secret-value --secret-id SAP_DEPLOY --region us-east-1 --query SecretString --output text | grep -oP '(?<="USER":")[^"]*')
dpw=$(aws secretsmanager get-secret-value --secret-id SAP_DEPLOY --region us-east-1 --query SecretString --output text | grep -oP '(?<="PASSWORD":")[^"]*')
durl=$(aws secretsmanager get-secret-value --secret-id SAP_DEPLOY --region us-east-1 --query SecretString --output text | grep -oP '(?<="URL":")[^"]*')
echo $durl
echo "as"
echo $duser
grunt deploy --server=$durl --user=$duser --pwd=$dpw
5. Create a new file with the following code snippet and save as ‘Gruntfile.js’ file. This file configures the deployment for SAP NetWeaver ABAP. SAP Business Server Page (BSP) name, package, and transports are maintained in this file.
module.exports = function (grunt) {

    //DOC: https://www.npmjs.com/package/grunt-nwabap-ui5uploader

    var sUser = grunt.option('user');
    var sPwd = grunt.option('pwd');
    var sServer = grunt.option('server');

    grunt.initConfig({
        nwabap_ui5uploader: {
            options: {
                conn: {
                    server: sServer,
                    useStrictSSL: false
                },
                auth: {
                    user: sUser,
                    pwd: sPwd
                }
            },
            upload_build: {
                options: {
                    ui5: {
                        package: '$TMP',
                        bspcontainer: 'z_sap_fiori_app',
                        bspcontainer_text: 'test App',
                    },
                    resources: {
                        cwd: 'dist',
                        src: '**/*.*'
                    }
                }
            }
        }
    });
    grunt.loadNpmTasks('grunt-nwabap-ui5uploader');
    grunt.registerTask('deploy', ['nwabap_ui5uploader']);
};
Note: See the npm plugin documentation to use an existing transport request or upload to different server.
6. Validate if the new files created are available in the sample application repository in your AWS Cloud9 environment.

7. Enable junit outputs inside the ‘karma-ci.conf.js’ to activate AWS CodeBuild test reports. From your sample application repository, edit the ‘karma-ci.conf.js’ by adding the following code snippet. See aws-samples repository to understand the ‘karma-ci.conf.js’ file structure.
...
  //NEW
  junitReporter: {
      outputDir: 'junit', // results will be saved as $outputDir/$browserName.xml
      outputFile: undefined, // if included, results will be saved as $outputDir/$browserName/$outputFile
      suite: '', // suite will become the package name attribute in xml testsuite element
      useBrowserName: true, // add browser name to report and classes names
      nameFormatter: undefined, // function (browser, result) to customize the name attribute in xml testcase element
      classNameFormatter: undefined, // function (browser, result) to customize the classname attribute in xml testcase element
      properties: {}, // key value pair of properties to add to the  section of the report
      xmlVersion: null // use '1' if reporting to be per SonarQube 6.2 XML format
  },

  reporters: ["progress", "coverage", "junit"], //NEW
  //reporters: ["progress", "coverage"], OLD
...
8. Execute ‘npm install karma-junit-reporter’ to install the runtime dependencies.
Add the project code to the CodeCommit repository
1. From your AWS Cloud9 environment project folder path, push the code to your repository. Make sure to also add the .eslintrc file (defining guidelines on static code checks)
$ git add *
$ git add .eslintrc
$ git commit -m 'initial setup'
$ git push
2. Validate the result inside the CodeCommit repository.

Deploying the AWS CodeDeploy agent
The CodeDeploy agent can be deployed to work on any supported environment, as long as outbound internet access is available.
1. Create an IAM user and generate CLI credentials with the respective permissions for CodeDeploy, S3 & IAM, as shown here.
2. Add an IAM policy for AWS Secrets Manager to allow the IAM user to access to your “SAP_DEPLOY” secret.
{

"Effect":"Allow",
"Action":[
   "secretsmanager:GetSecretValue"
 ],
   "Resource": "<Secret ARN>"
}
3. Use an SSH client to connect to your instance of choice to start deploying the CodeDeploy agent.
4. Install Node.js in your instance. See Node.js package manager documentation for OS-specific installation steps.
5. Install the AWS CLI to in your instance. See AWS CLI documentation for configuration steps.
6. Execute “aws configure” command to set up AWS CLI in your instance and pass the previously generated IAM credentials.
7. Create a new folder in your instance for the deployment artifacts.
$ mkdir /codedeploy
$ mkdir /codedeploy/sapfioriapp
8. Install CodeDeploy agent. See AWS documentation for installation steps.
9. Execute the following command to register the agent
$ aws deploy register --instance-name <NAME> --tags Key=Name,Value=CodeDeployDemo-OnPrem --region <AWS REGION>
10. Execute the following command to copy the config file to the agent directory.
$ cp codedeploy.onpremises.yml /etc/codedeploy-agent/conf/codedeploy.onpremises.yml
11. Execute the following commands to restart CodeDeploy agent.
$ sudo service codedeploy-agent stop
$ sudo service codedeploy-agent start
$ sudo service codedeploy-agent status
12. Validate your CodeDeploy agent registration in AWS Management Console. You should see your registered instance in the AWS CodeDeploy on-premises instance list.
Configuring AWS CodePipeline for the build process
1. Create a new SNS topic and enter a name. To create SNS topic, see AWS DevOps tools for SAP, Part 1: Cloud Foundry Apps.
2. Initially configure AWS CodePipeline for the build process using the CodeCommit repository for your Fiori application. To create pipeline for SAP Fiori application, see AWS DevOps tools for SAP, Part 1: Cloud Foundry Apps. Choose again Ubuntu as build image.
3. Once the pipeline has been successfully created, it is automatically triggered based on your last commit. Validate the build output by clicking the Details link inside the build stage.
Creating a new AWS CodeDeploy application configuration
1. Create application from CodeDeploy menu to create a new application. See AWS documentation to create an application and deployment group.
2. Enter a unique name as an application name and choose EC2/On-premises as compute platform.
3. Create a new deployment group with a unique name and choose in place as deployment type.

4. Choose ‘On-premises instances’ from your environment configuration and fill the Tag group based on the CodeDeploy registration information.
Key: Name
Value: CodeDeployDemo-OnPrem
5. Make sure to disable ‘Load Balancing’ and also choose ‘Disable Rollbacks’ in section Advanced.
6. Finish the wizard.
Configuring AWS CodePipeline for the deployment process
1. In your pipeline go to edit mode. Create a new Action Group and Action “Approve”, see AWS DevOps tools for SAP, Part 1: Cloud Foundry Apps.
2. Create an additional action called Deploy and select AWS CodeDeploy as Action provider.
3. Choose BuildArtifact as input provider and select your Fiori application and Deployment Group.
4. Complete the wizard, click save and release the change to trigger the pipeline.

5. Validate the pipeline execution using the Build logs from the Deployment menu.
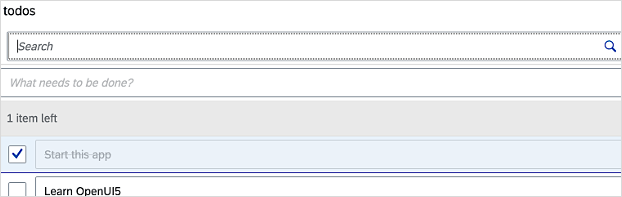
6. Test your Fiori application using SAP transaction SE80 or using a browser.
SAP BSP Application ‘z_sap_fiori_app’
https://:/sap/bc/ui5_ui5/sap/z_sap_fiori_app/index.html
Conclusion
In this blog series, we’ve shown how to leverage the AWS DevOps Tooling such as AWS CodePipeline, AWS CodeCommit, AWS CodeBuild and AWS CodeDeploy as serverless CI/CD toolset to orchestrate, build, validate, approve, and deploy SAP Fiori based applications. With this fully managed AWS solution, our customers can focus on innovating and transforming their business rather than worrying about managing and maintaining servers for mission critical SAP applications.