AWS Security Blog
Use AWS WAF CAPTCHA to protect your application against common bot traffic
June 1, 2023: In April 2023, AWS WAF Captcha launched JavaScript API support which gives developers the ability to embed CAPTCHA within client-rendered web applications. The update to this blog introduces the new functionality and how to get started with it.
In this blog post, you’ll learn how you can use a Completely Automated Public Turing test to tell Computers and Humans Apart (CAPTCHA) with other AWS WAF controls as part of a layered approach to provide comprehensive protection against bot traffic. We’ll describe a workflow that tracks the number of incoming requests to a site’s store page. The workflow then limits those requests if they exceed a certain threshold. Requests from IP addresses that exceed the threshold will be presented a CAPTCHA challenge to prove that the requests are being made by a human.
Amazon Web Services (AWS) offers many tools and recommendations that companies can use as they face challenges with bot traffic on their websites. Web applications can be compromised through a variety of vectors, including cross-site scripting, SQL injection, path traversal, local file inclusion, and distributed denial-of-service (DDoS) attacks. AWS WAF offers managed rules that are designed to provide protection against common application vulnerabilities or other unwanted web traffic, without requiring you to write your own rules.
There are some web attacks like web scraping, credential stuffing, and layer 7 DDoS attempts conducted by bots (as well as by humans) that target sensitive areas of your website, such as your store page. A CAPTCHA mitigates undesirable traffic by requiring the visitor to complete challenges before they are allowed to access protected resources. You can implement CAPTCHA to help prevent unwanted activities.
Last year, AWS introduced the AWS WAF CAPTCHA rule action, which allows customers to set up AWS WAF rules that require challenges to be completed for common targets. In this post, we will present two common scenarios where you might want to use this recently released feature. The first scenario will walk you through how to use the CAPTCHA JS API to customize your end users’ experience with the CAPTCHA puzzle each time they try to sign in. The second scenario walks through using a rate-based rule to invoke CAPTCHA as a rule action after a bot has sent an excessive number of requests to a page (such as a /store page).
Scenario 1: Using the CAPTCHA JS API
In April 2023, we introduced the CAPTCHA JS API to give developers the ability to embed CAPTCHA within client-rendered web applications (like those written in React). This benefits customers who previously were unable to use the AWS WAF CAPTCHA rule action for their non–server-side rendered web applications. This API also allows developers to choose where in a page the CAPTCHA puzzle is presented, to improve the end-user experience.
To get started with using the CAPTCHA JS API functionality
- Open the AWS WAF console, and in the left navigation pane, choose Application integration.
- On the CAPTCHA integration tab, copy the JavaScript tag that includes the integration URL to use in your code.
- Under API keys, choose Generate API key to generate keys for up to five domains.
- In your code, paste the JavaScript tag and the API key data.
To help you get started, see the example implementation of how to render CAPTCHA in the AWS documentation. Additionally, we’ve provided the following sample code that you can use to test the feature. Make sure to replace INTEGRATION URL and YOUR API KEY with your own data.
<!DOCTYPE html>
<html>

<head>
    <title>Captcha JS API</title>
    <script src="INTEGRATION URL"></script>
</head>

<body>
    <button id="render-captcha-btn" onClick="onClickRenderCaptcha()">Render Captcha</button>
    <div id="captcha-container"></div>
    <button id="fetch-data-btn" style="display: none" onClick="fetchProtectedData()">Fetch data</button>
    <div id="pets-container"></div>
    <div id="error-container"></div>

    <script>
        function setError(error) {
            document.getElementById("error-container").innerHTML = error.message;
        }

        function onClickRenderCaptcha() {
            const container = document.getElementById('captcha-container');
            AwsWafCaptcha.renderCaptcha(container, {
                apiKey: "YOUR API KEY",
                onSuccess: () => {
                    document.getElementById("fetch-data-btn").style.display = 'block';
                },
                onError: setError,
            });
        }

        function fetchProtectedData() {
            AwsWafIntegration.fetch('./pets', {
                method: 'GET'
            })
                .then((response) => response.json())
                .then((data) => {
                    document.getElementById('pets-container').textContent = JSON.stringify(data);
                })
                .catch(setError);
        }
    </script>
</body>

</html>
This code sample demonstrates how to render a CAPTCHA by using the CAPTCHA JS API, and then it uses the AwsWafIntegration fetch wrapper to fetch some JSON data from an AWS WAF protected endpoint (a /pets endpoint, in this example) and displays the data on screen.
When a user solves a CAPTCHA challenge, AWS automatically generates and encrypts a token and sends it to the client as a cookie. The client requests aren’t challenged again until the token has expired. AWS WAF calculates token expiration by using the immunity time configuration. You can configure the immunity time in a web access control list (web ACL) CAPTCHA configuration and in the configuration for a rule’s action setting.
Upon a successful CAPTCHA attempt, the generated AWS WAF token will last as long as the immunity time that was configured in the web ACL.
Suppose that a user is presented a challenge and solves it, but then later their AWS WAF token expires because the immunity time ran out. As a response, AWS WAF will return an HTTP 405 error response that includes an x-amzn-waf-action header with the value of captcha, which your code can interpret and use to render another CAPTCHA to the user so that they can refresh their AWS WAF token.
For endpoints such as /signin that you want to protect with CAPTCHA, a CAPTCHA action is required to validate that a puzzle has been solved. Thus, it is important to have a rule in your web ACL with the action set to CAPTCHA that is targeting the endpoint or endpoints you wish to protect. In the following procedure, you can see how to use a custom rule to complement the JavaScript code from the example earlier in this post.
To create a custom rule
- Open the AWS WAF console and in the left navigation pane, choose Web ACLs.
- Choose an existing web ACL, or choose Create web ACL at the top right to create a new web ACL.
- Under Rules, choose Add rules, and then in the drop-down list, choose Add my own rules and rule groups.
- For Rule type, choose Rule builder.
- In the Rule builder section, for Name, enter your rule name. For Type, choose Regular rule.
- In the request criteria, for If a request, choose statement operator.
Note: In this example, we chose Matches all the statements (AND) to use for the two conditions we have.
- For statement 1, for Inspect, choose URI path. For Match type, choose Contains string, and for the string to match, enter /pets.
- For statement 2, for Inspect, choose Originates from a country in, and for Country code, choose US.
- In the Action section, choose CAPTCHA.
When you make a request to the sign-in page on your website, you will be presented with a puzzle directly on the page without redirecting through an intermediary page. Figure 1 shows the workflow for this process, in which a user sends a request for the login.php page, which is routed by Amazon Route 53 and accelerated by Amazon CloudFront.
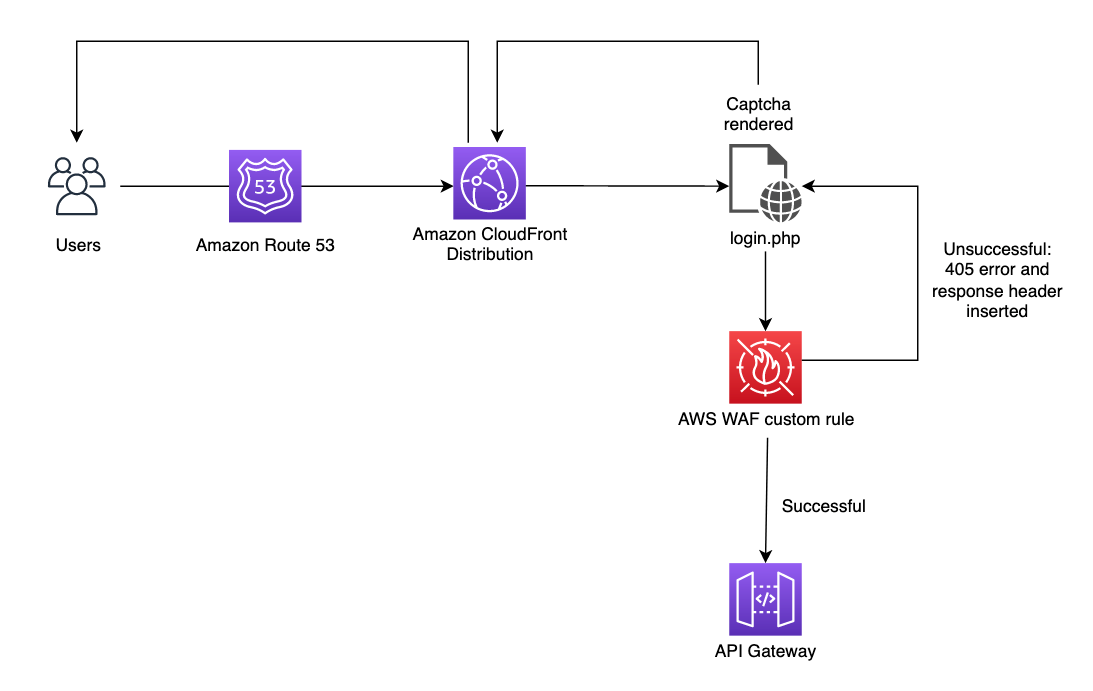
Figure 1: User visits sign-in page, is presented with a puzzle that is embedded within the page, and the response is evaluated by an AWS WAF custom rule
Using the sample code provided in this post, when the user visits the login.php page, they will be shown a puzzle after choosing the Render Captcha button. Figure 2 shows how this should appear to the user.
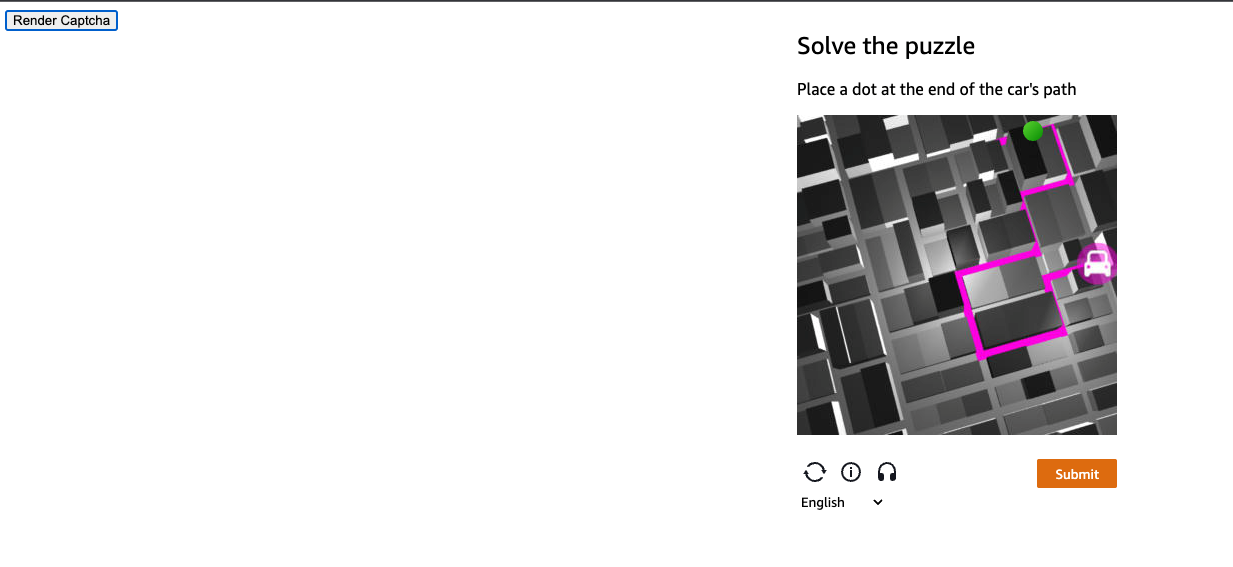
Figure 2: User chooses Render Captcha button and a puzzle is rendered on the same page
Scenario 2: Using a rate-based rule to present CAPTCHA
Consider an attack where the unauthorized user is attempting to overwhelm a site’s store page by repeatedly sending search requests for different items.
Assume that traffic visits a website that is hosted through Amazon CloudFront and attempts the above behavior on the /store URL. In this scenario, there is a rate-based rule in place that will track the number of requests coming in from each IP. This rate-based rule tracks the rate of requests for each originating IP address and invokes the rule action on IPs with rates that go over the limit. With CAPTCHA implemented as the rule action, excessive attempts to search within a 5-minute window will result in a CAPTCHA challenge being presented to the user. This workflow is shown in Figure 3.
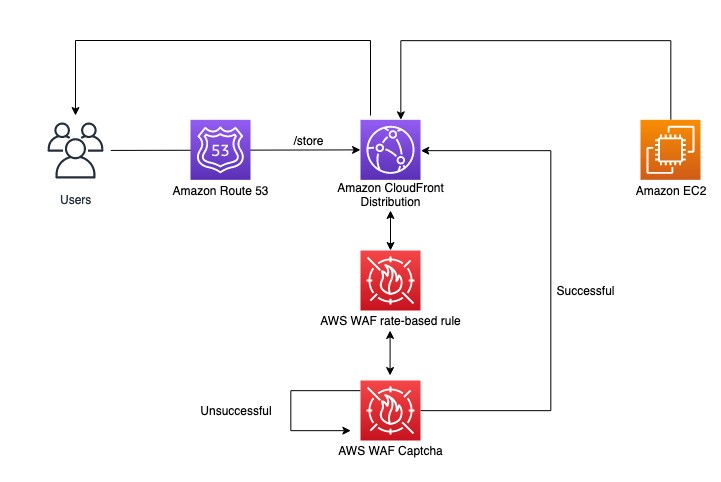
Figure 3: User visits a store page and is evaluated by a rate-based rule
When a user provides an incorrect answer to a CAPTCHA challenge, the challenge informs the user and loads a new puzzle. When the user solves the challenge, the challenge automatically submits the original web request, updated with the CAPTCHA token from the successful puzzle completion.
Walkthrough for scenario 2
This workflow will require an AWS WAF rule within a new or existing rule group or web ACL. The rule will define how web requests are inspected and the action to take.
To create an AWS WAF rate-based rule
- Open the AWS WAF console and in the left navigation pane, choose Web ACLs.
- Choose an existing web ACL, or choose Create web ACL at the top right to create a new web ACL.
- Under Rules, choose Add rules, and then in the drop-down list, choose Add my own rules and rule groups.
- For Rule type, choose Rule builder.
- In the Rule builder section, for Name, enter your rule name. For Type, choose Rate-based rule.
- In the Request rate details section, enter your rate limit (for example, 100). For IP address to use for rate limiting, choose Source IP address, and for Criteria to count requests toward rate limit, choose Only consider requests that match criteria in a rule statement.
- For Count only the requests that match the following statement, choose Matches the statement from the drop-down list.
- In the Statement section, for Inspect, choose URI path. For Match type, choose Contains string.
- For String to match, enter the URI path of your web page (for example, /store).
- In the Action section, choose CAPTCHA.
- (Optional) For Immunity time, choose Set a custom immunity time for this rule, or keep the default value (300 seconds).
- To finish, choose Add rule, and then choose Save to add the rule to your web ACL.
After you add the rule, go to the Rules tab of your web ACL and navigate to your rule. Confirm that the output resembles what is shown in Figure 4. You should have a rate-based rule with a scope-down statement that matches the store URI path you entered earlier, and the action should be set to CAPTCHA.
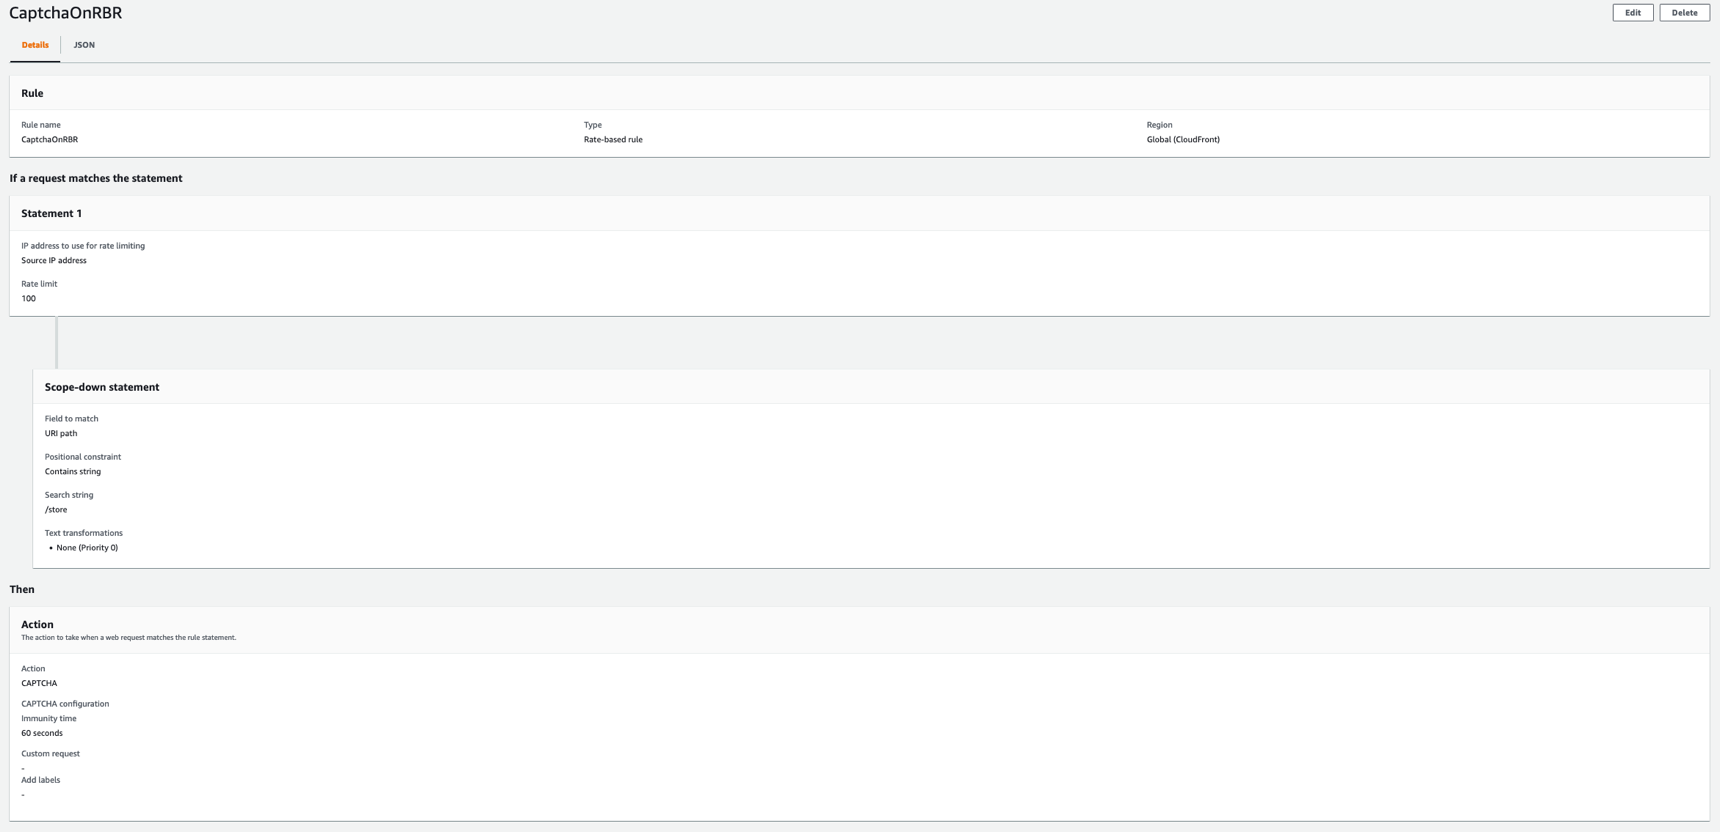
Figure 4: Finished rate-based rule with CAPTCHA action
The following is the JSON for the CAPTCHA rule that you just created. You can use this to validate your configuration. You can also use this JSON in the rule builder while creating the rule.
{
  "Name": "CaptchaOnRBR",
  "Priority": 0,
  "Statement": {
    "RateBasedStatement": {
      "Limit": 100,
      "AggregateKeyType": "IP",
      "ScopeDownStatement": {
        "ByteMatchStatement": {
          "SearchString": "/store",
          "FieldToMatch": {
            "UriPath": {}
          },
          "TextTransformations": [
            {
              "Priority": 0,
              "Type": "NONE"
            }
          ],
          "PositionalConstraint": "CONTAINS"
        }
      }
    }
  },
  "Action": {
    "Captcha": {}
  },
  "VisibilityConfig": {
    "SampledRequestsEnabled": true,
    "CloudWatchMetricsEnabled": true,
    "MetricName": "CaptchaOnRBR"
  },
  "CaptchaConfig": {
    "ImmunityTimeProperty": {
      "ImmunityTime": 60
    }
  }
}
After you complete this configuration, the rule will be invoked when an IP address unsuccessfully attempts to search the store at a rate that exceeds the threshold. This user will be presented with a CAPTCHA challenge, as shown in Figure 5. If the user is successful, they will be routed back to the store page. Otherwise, they will be served a new puzzle until it is solved.
Figure 5: CAPTCHA challenge presented to a request that exceeded the threshold
Implementing rate-based rules and CAPTCHA also allows you to track IP addresses, limit the number of invalid search attempts, and use the specific IP information available to you within sampled requests and AWS WAF logs to work to prevent that traffic from affecting your resources. Additionally, you have visibility into IPs addresses blocked by rate-based rules so that you can later add these addresses to a block list or create custom logic as needed to mitigate false positives.
Conclusion
In this blog post, you learned how to configure and deploy a CAPTCHA challenge with AWS WAF in two different scenarios that demonstrate the use of the recently released CAPTCHA JS API and how to handle web requests that exceed a certain rate threshold by requiring the client who is sending such requests to solve a challenge. Note that there is an additional charge for enabling CAPTCHA on your web ACL (for pricing details, see AWS WAF Pricing). Although CAPTCHA challenges are simple for humans to complete, they should be harder for common bots to complete with any meaningful rate of success. You can use a CAPTCHA challenge when a block action would stop too many legitimate requests, but letting all traffic through would result in unacceptably high levels of unwanted requests, such as from bots.
For more information and guidance on AWS WAF rate-based rules, see the blog post The three most important AWS WAF rate-based rules and the AWS whitepaper AWS Best Practices for DDoS Resiliency. You can also check out these additional resources:
- Using AWS WAF with CAPTCHA (YouTube video)
- Best practices for using the CAPTCHA and Challenge actions (AWS WAF Developer Guide)
- Reduce Unwanted Traffic on Your Website with New AWS WAF Bot Control (AWS Blog post)
- Fine-tune and optimize AWS WAF Bot Control mitigation capability (AWS Blog post)
- Detect and block advanced bot traffic (AWS Blog post)
If you have feedback about this blog post, submit comments in the Comments section below. You can also start a new thread on AWS WAF re:Post to get answers from the community.
Want more AWS Security news? Follow us on Twitter.