AWS Compute Blog
Cost Optimize your Jenkins CI/CD pipelines using EC2 Spot Instances
Author: Rajesh Kesaraju, Sr. Specialist Solution Architect, EC2 Spot Instances
In this blog post, I go over using Amazon EC2 Spot Instances on continuous integration and continuous deployment (CI/CD) workloads, via the popular open-source automation server Jenkins. I also break down the steps required to adopt Spot Instances into your CI/CD pipelines for cost optimization purposes. In this blog, I explain how to configure your Jenkins environment to achieve significant cost savings by using Spot Instances with the EC2 Fleet Jenkins plugin.
Overview of EC2 Spot, CI/CD, and Jenkins
AWS offers multiple purchasing models for its EC2 instances. This particular blog post focuses on Amazon EC2 Spot Instances, which lets you take advantage of unused EC2 capacity in the AWS Cloud at a steep discount.
You can use Spot Instances for various stateless, fault-tolerant, or flexible applications such as big data, containerized workloads, CI/CD, web servers, high performance computing (HPC), and other test and development workloads.
CI/CD pipelines are familiar to many readers via a popular piece of open-source software called Jenkins. Jenkins’ automation of development, testing and deployment scenarios, courtesy of more than 2000 plugins, plays a key role in many organizations’ software development and delivery ecosystems. Jenkins accelerates software development through multiple stages, including building and documenting, packaging and analytics, staging and deploying, etc.
Lyft began using EC2 Spot Instances for their Jenkins CI pipelines, and discovered they could save up to 90 percent compared to their previous non-Spot EC2 implementations. They moved their entire CI/CD pipeline to EC2 Spot Instances by modifying just four lines of their deployment code.
In this blog, I walk through how to configure your Jenkins environment to achieve significant cost savings by using Spot Instances with the EC2 Fleet Jenkins plugin.
Solution Overview
For the following tutorial, you need both an AWS account and Jenkins downloaded and installed on your system.
This blog post uses Spot Instances. If your Jenkins server runs on On-Demand Instances, you can easily switch to Spot Instances with EC2-Fleet Plugin. Now, let’s look at how this plugin can be configured to make your Jenkins elastically scale up/down depending on pending jobs, and save significantly on compute costs.
Note: In this blog we are provisioning the Jenkins master server node on Spot Instances. This means if the Spot Instance running on your master server node is reclaimed, your workload will stop running temporarily until a new Spot Instance is allocated to your master server node.
Solution
Create a new EC2 key pair
To access the SSH interfaces of your Jenkins instances, you must have an EC2 key pair. Please follow below steps to create a new EC2 key pair.
1. Log in to your AWS Account;
2. Switch to your preferred Region;
3. Provision a new EC2 key pair:
-
- Go to the EC2 console and click on the key pairs option from the left frame.
- Click on the Create key pair button;
- Provide key pair name and click on the Create button;
- Your web browser should download a .pem file – keep this file as it will be required to access the EC2 instances that you create in this workshop. If you’re using a Windows system, convert the .pem file to a PuTTY .ppk file. If you’re not sure how to do this, instructions are available here.
Create an AWS IAM User for EC2-Fleet Plugin
To control Spot Instances from the EC2-Fleet plugin, you first create an IAM user (with programmatic access) in your AWS account. Then configure an IAM policy for AWS permissions. Use the following code to achieve this step.
{
    "Version": "2012-10-17",
    "Statement": [
        {
            "Action": [
                "ec2:*",
                "autoscaling:*",
                "iam:ListInstanceProfiles",
                "iam:ListRoles",
                "iam:PassRole"
            ],
            "Resource": "*",
            "Effect": "Allow"
        }
    ]
}
These permissions allow you to configure the plugin, allow programmatic access to AWS resources to create and terminate Spot Instances, and control Auto Scaling Group (ASG) parameters.
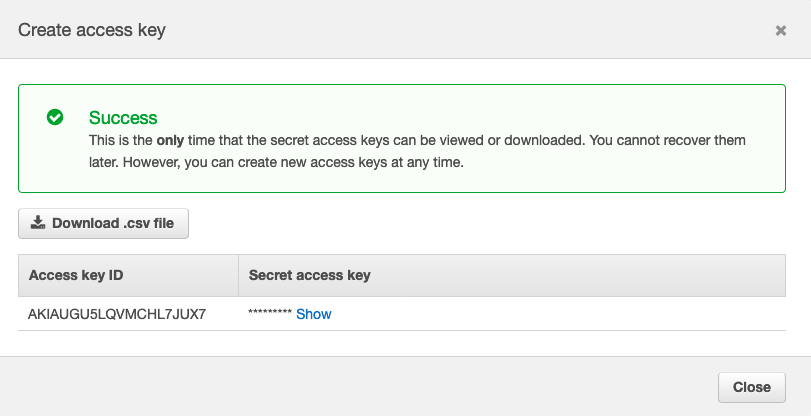
In the IAM dashboard, click User and select the Jenkins User you created. Next, click Create access key, and save the Access key ID and Secret access key for use in next steps.
IAM > Users > Jenkins User > Security Credentials > Create Access Key

Create an Auto Scaling Group
Auto Scaling groups help you configure your Jenkins EC2-Fleet plugin to control Jenkins build agents and scale up or down depending on the job queue. It also replaces instances that were terminated due to demand spike in specific Spot Instance pools.
Documentation on how to create Auto Scaling Group is here.
Set your ASG to diversify your Spot Fleet across multiple Spot pools to increase your chances of getting a Spot Instance for your Jenkins jobs, and set an allocation strategy. I used “capacity-optimized” as the allocation strategy in the following example.
The “capacity-optimized” option allocates Spot Instances from the deepest pools of available spare capacity, which lowers the chance of interruptions. Alternatively, you may choose the “lowest-price” allocation strategy if you have builds that finish quicker, and the cost of re-processing of failed jobs due to interruption isn’t that significant. Learn more about allocation strategies in this blog.
The Jenkins EC2-Fleet plugin overrides and controls ASG’s capacity configuration. So, start with one instance for now. I also cover a scenario that starts with 0 instances to further minimize costs.
A sample ASG configuration looks like the following image. Notice there are 6 instance types across 3 Availability Zones, this means EC2 Spot capacity is provided from 18 (6×3) Spot Instance pools! This configuration increases the likelihood of getting Spot Instances from the deepest Spot pools at a steep discount.

Install and Configure an EC2-Fleet plugin in Jenkins
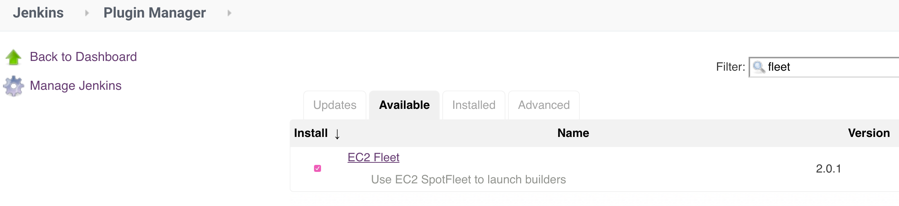
Install the latest version of EC2-Fleet plugin in Jenkins. This plugin launches Spot Instances using ASG or EC2 Spot Fleet where you can run your build jobs. In this blog, I launch EC2 Spot Instances using ASG.
After installing you see it in the plugin manager. This blog uses current version 2.0.0.
Go to Manage Jenkins > Plugin Manager then install EC2 Fleet Jenkins Plugin
Configure a Jenkins User in
Jenkins Server EC2-Fleet Plugin
In the first part of this solution, you created an AWS user. Now, configure this user in your Jenkins Amazon EC2 Fleet configuration section.
Navigate to Manage Jenkins -> Configure Clouds -> Add a New Cloud -> Amazon EC2 Fleet.

Create a name for your EC2-Fleet plugin configuration. I use Amazon EC2 Spot Fleet. Then configure your AWS Credentials.
Configure ASG in Jenkins EC2-fleet plugin
1. Change the Kind to AWS Credentials;
2. Change the Scope to System (Jenkins and nodes only) – you don’t want your builds to have access to these credentials!
3. At the ID (optional) field. Enter this if need to access this using scripts
4. Provide Access key ID and Secret access key fields, saved when you created Jenkins user before, then click Add.
5. Once you are done adding credentials, select the corresponding AWS Region to your ASG.
6. EC2 Fleet dropdown automatically populates the ASG that you created earlier.
7. Once the ASG is selected, check your configuration. The following image shows this test:
Configure Launcher
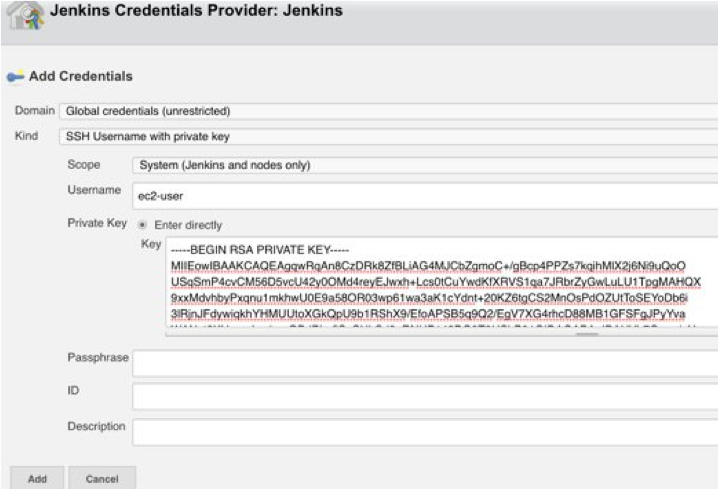
1. Change the Kind to SSH Username with private key;
2. Change the Scope to System (Jenkins and nodes only) – you also don’t want your builds to have access to these credentials;
3. Enter ec2-user as the Username.
4. Select the Enter directly button for the Private Key. Open the .pem file that you downloaded previously, and copy the contents of the file to the Key field including the BEGIN RSA PRIVATE KEY and END RSA PRIVATE KEY fields.
5. Verify your launcher looks like as below, and click on the Add button
Once your credentials are added, you move on to complete rest of the Launcher configuration.
1. Select the ec2-user option from the Credentials drop-down.
2. Select the “Non verifying Verification Strategy” option from the Host Key Verification Strategy drop-down. Select this option because Spot Instances have a random SSH host fingerprint.

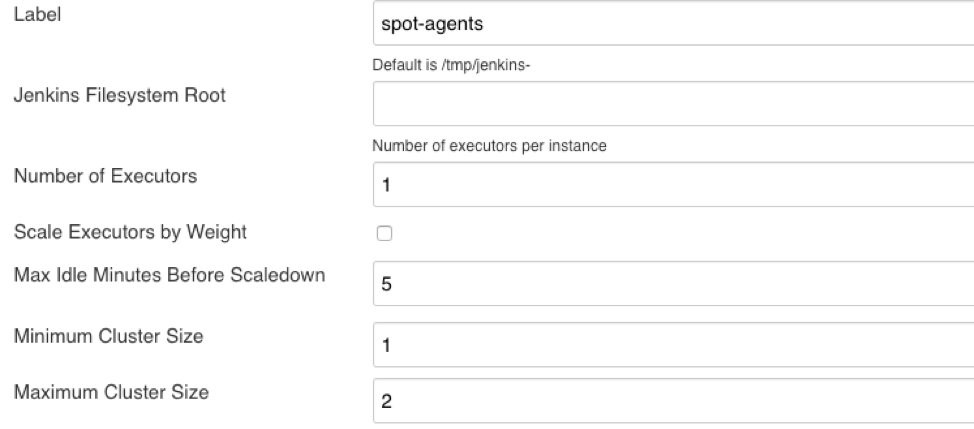
3. Mark the Connect Private check box to ensure that your Jenkins Master always communicates with the Agents via their internal VPC IP addresses (in real-world scenarios, your build agents would likely not be publicly addressable).
4. Change the Label field to spot-agents.
5. Set the Max Idle Minutes Before Scaledown. In this example, I used AWS launched per-second billing in 2017, so there’s no need to keep a build agent running for too much longer than it’s required.
6. Change the Maximum Cluster Size depending on your need. For example, I set the Maximum Cluster Size to 2.
After saving these configurations, your screen should look similar to the following image.
Configure Number of Executors
Determine the number of executors based on your build requirements, such as how many builds on average can be executed concurrently on each machine based on machine’s vCPU and RAM allocations.
If you cram many executors into one machine, each build average execution may increase, which slows down the pipeline.
Once you determine optimum executors per machine, any additional pending jobs get executed on scaled out machines by auto scaling.
Some Important aspects about Cluster size settings
Jenkins EC2-Fleet agent settings override ASG settings. So, “Minimum Cluster Size” and “Maximum Cluster Size” values mentioned here override ASG’s settings dynamically.
If you set minimum cluster size as 0, then when there are no pending jobs there won’t be any idle servers after Max Idle Minutes before shut down minutes are met. In this scenario, when there is a new build request, it takes roughly two to five minutes for new EC2 Spot Instances to start processing after boot strapping and installing necessary Jenkins agents.
If your jobs are time-insensitive, this strategy maximizes savings, as you eliminate spending money on idle instances.
Alternatively, you may set “Minimum Cluster Size” as 1 or 2 so you have running instances all the time if you have a need to process several builds/tests a day and/or builds taking very long time and occur on a daily basis.
In this blog the idea is to cost optimize CI/CD pipelines, to avoid idle instances.
Configure Jenkins build Jobs to utilize EC2 Spot Instances
Finally, configure your build job to check “Restrict where this project can be run” and enter “spot-agents” as the label expression. When builds are initiated, they are executed against Spot Instance.

At this point, you are ready to run your builds on Spot Instances and save significantly!
Configuring Jenkins server to run on EC2 Spot Instances
Now you started saving on your build agents, is it possible to save on Jenkins server also using Spot Instances? Yes! Let’s see how this can be done with a few simple techniques.
By running your Jenkins server on Spot, you optimize the compute costs associated with the whole Jenkins CI/CD environment. With Spot Instance diversification strategy and making use of ASG features, you can move your Jenkins server also to EC2 Spot Instance.
There is one slight wrinkle in the above process. Jenkins requires persistent data on a local file system, whereas a Spot Instance cannot be guaranteed to be persistent due to the chance of interruptions. Therefore, to switch your Jenkins server over to Spot, you must first move your Jenkins data to an Amazon Elastic File System (EFS) volume — which your Spot Instance can then access.
Amazon Elastic File System provides a simple, scalable, fully managed elastic NFS file system for use with AWS Cloud services and on-premises resources. More here
Here are the steps to mount EFS volume to an existing Jenkins server, and move its content to Amazon EFS managed store. Then, you can point the Jenkins server to use EFS mount point for its operations and maintain server state. This way when a Spot Instance gets interrupted, server state is not lost, and another Spot Instance can pick up from where the previous server left off.
Here are the steps move data from JENKINS_HOME to Amazon EFS
1. Mount EFS volume:
sudo mount -t nfs -o nfsvers=4.1,rsize=1048576,wsize=1048576,hard,timeo=600,retrans=2 \
$(curl -s http://169.254.169.254/latest/meta-data/placement/availability-zone)\
.%FILE-SYSTEM-ID%.efs.<AWS Region>.amazonaws.com:/ (http://efs.<AWS Region>.amazonaws.com/) /mnt
2. Copy existing JENKINS_HOME (/var/lib/Jenkins) content to EFS after shutting down Jenkins server
3. >> sudo chown jenkins:jenkins /mnt
>> sudo cp -rpv /var/lib/jenkins/* /mnt
Once you’ve moved the contents of JENKINS_HOME to Amazon EFS, now it’s safe to run Jenkins Server to EC2 Spot Instance.
Spot Instances can be interrupted by AWS, so you may lose your Jenkins server access momentarily when an interruption occurs.
Since you already externalized the state to Amazon EFS, you don’t lose any previous state. So, when the instance running your Jenkins server gets interrupted, in a matter of a few minutes, ASG replenishes new EC2 Spot Instance to run your Jenkins Server.
To get this into service automatically complete the following steps:
1. Ensure ASG launch instances into target group that is pointed by Application Load Balancer (ALB)
2. If Spot Instance is terminated with the two minute warning, ASG launches a replacement instance. The new Spot Instance will be bootstrapped just as your original Spot Instance was and then mount to EFS as configured in user data of “Launch Template”
3. Configure ASG from Launch Template (Sample UserData section as below)
#!/bin/bash
# Install all pending updates to the system
yum -y update
# Configure YUM to be able to access official Jenkins RPM packages
wget -O /etc/yum.repos.d/jenkins.repo https://pkg.jenkins.io/redhat-stable/jenkins.repo
# Import the Jenkins repository public key
rpm --import https://pkg.jenkins.io/redhat-stable/jenkins.io.key
# Configure YUM to be able to access contributed Maven RPM packages
wget http://repos.fedorapeople.org/repos/dchen/apache-maven/epel-apache-maven.repo -O /etc/yum.repos.d/epel-apache-maven.repo
# Update the release version in the Maven repository configuration for this mainline release of Amazon Linux
sed -i s/\$releasever/6/g /etc/yum.repos.d/epel-apache-maven.repo
# Install the Java 8 SDK, Git, Jenkins and Maven
yum -y install java-1.8.0-openjdk java-1.8.0-openjdk-devel git jenkins apache-maven
# Set the default version of java to run out of the Java 8 SDK path (required by Jenkins)
update-alternatives --set java /usr/lib/jvm/jre-1.8.0-openjdk.x86_64/bin/java
update-alternatives --set javac /usr/lib/jvm/java-1.8.0-openjdk.x86_64/bin/javac
# Mount the Jenkins EFS volume at JENKINS_HOME
mount -t nfs -o nfsvers=4.1,rsize=1048576,wsize=1048576,hard,timeo=600,retrans=2 $(curl -s http://169.254.169.254/latest/meta-data/placement/availability-zone).${EFSJenkinsHomeVolume}.efs.${AWSRegion}.amazonaws.com:/ /var/lib/jenkins
# Start the Jenkins service
service jenkins start
That’s it, you are now ready to run your Jenkins server on EC2 Spot Instances and save up to 90% compared to On-Demand price.
Conclusion
You are now ready to leverage the power and flexibility of EC2 Spot Instances.
With a few modifications to your deployment you can significantly reduce your compute costs or accelerate throughput by accessing 10x compute for the same cost.
For users getting started on their Amazon EC2 Spot Instances, we are here to help. Please also share any questions in the comments section below.
Here is where to begin in the Amazon EC2 Spot Instance console — and start transforming your Jenkins workloads today.
About the author

Rajesh Kesaraju is a Sr. Specialist SA for EC2 Spot with Amazon AWS. He helps customers to cost optimize their workloads by utilizing EC2 Spot instances in various types of workloads such as big data, containers, HPC, CI/CD, stateless applications, etc.