AWS Partner Network (APN) Blog
High Availability and Observability Using Red Hat Advanced Cluster Management for Kubernetes
By Vani Eswarappa, Partner Solutions Architect – AWS
By Mayur Shetty, Principal Solution Architect – Red Hat
 |
| Red Hat |
 |
As container usage increases in application modernization efforts, Kubernetes plays an important role in managing container-based applications. Enterprise organizations operating and serving customers at scale often require a multi-cluster approach to meet their growing demands and performance.
However, managing these multi-cluster life cycle, application deployments, and enforcing security policies across clusters is often challenging and time consuming.
Red Hat is an AWS Partner and leading provider of enterprise open source solutions, including high-performing Linux, cloud, container, and Kubernetes technologies.
Red Hat Advanced Cluster Management for Kubernetes (RH ACM) addresses the challenges associated with managing multiple clusters and meets the requirements of multiple personas.
For IT teams, responsible for the overall health of the clusters and root cause analysis of any issues, Red Hat Advanced Cluster Management helps manage the lifecycle of multiple clusters regardless of where they reside; for example, on premises or the public cloud. It can also help get to the root cause of failed components quickly and monitor usage across all clusters.
From a DevOps and SRE perspective, Red Hat Advanced Cluster Management automates provisioning of multiple clusters at the same time. It also presents a simplified understanding of the cluster health and the impact it may have on the applications. More importantly, it automates pushing of application updates from dev to production.
Also, Red Hat Advanced Cluster Management speeds up the application development pipeline and improves application availability by deploying on-prem or cloud-based applications across distributed kubernetes clusters.
For SecOps teams, Red Hat Advanced Cluster Management helps drive compliance across all clusters with defined policies. It allows teams to set and enforce security policies across diverse environments. Also, get alerted on configuration drift, so you can remediate.
In this post, we will demonstrate how to import any Kubernetes-based cluster, including Red Hat OpenShift or Amazon Elastic Kubernetes Service (Amazon EKS) clusters into Red Hat Advanced Cluster Management. We will also cover how to do a selective deployment based on customer defined criteria, and provide high availability (HA) to your application by deploying the application on multiple clusters with a single access point.
Finally, we will demonstrate the observability use case to show system alerts, application metrics, and over system health with integration of Grafana.
Solution Overview
In this walkthrough, we will install Red Hat Advanced Cluster Management on a Red Hat OpenShift Service on AWS (ROSA) cluster, and then import Amazon EKS and OpenShift clusters into it.
Next, we will deploy a simple web application to the three clusters using RH ACM’s application deployment feature. We will then route traffic to the application running on these three clusters using Amazon Route 53’s weighted routing policy, which provides high availability to the application in case of a cluster failure.
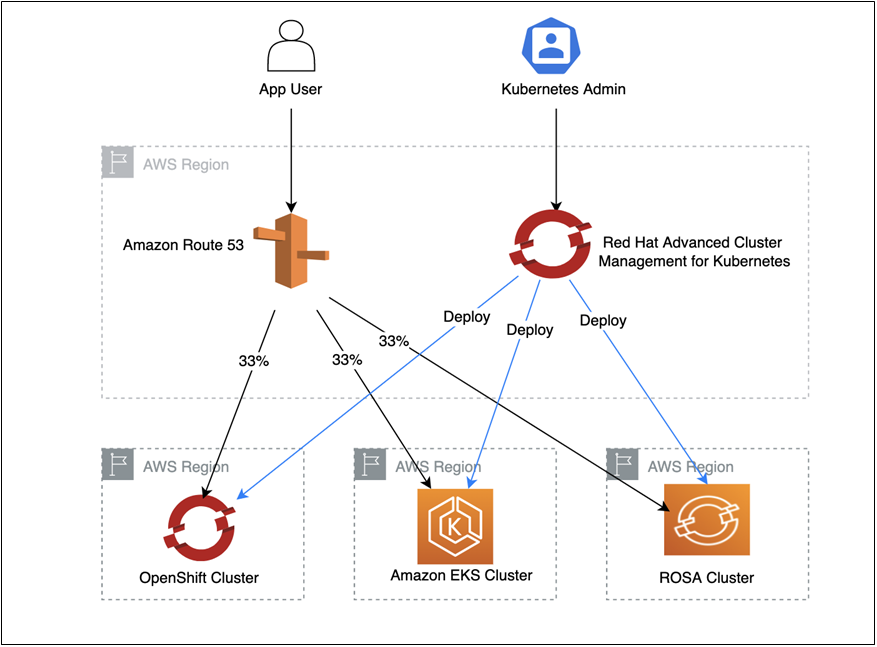
Figure 1 – Architecture overview.
Prerequisites
- Install Red Hat Advanced Cluster Management. For a step-by-step guide to installation, read this blog post.
- OpenShift cluster up and running.
- ROSA cluster up and running.
- Amazon EKS cluster up and running.
Importing Clusters
Red Hat Advanced Cluster Management allows users to import an existing cluster or create a new cluster. For this walkthrough, we will import an Amazon EKS cluster and an OpenShift cluster into Red Hat Advanced Cluster Management, running on the ROSA cluster.
To import an Amazon EKS cluster, toggle to the Advanced Cluster Management view in the OpenShift console of the ROSA cluster.
Log in to Red Hat Advanced Cluster Management. In the Clusters pane, the ROSA (hub) cluster is listed as local-cluster.
To import an existing cluster, select Import an existing cluster from the console. For import mode, select Run import commands manually.
For more details on importing an Amazon EKS cluster, read this blog post.
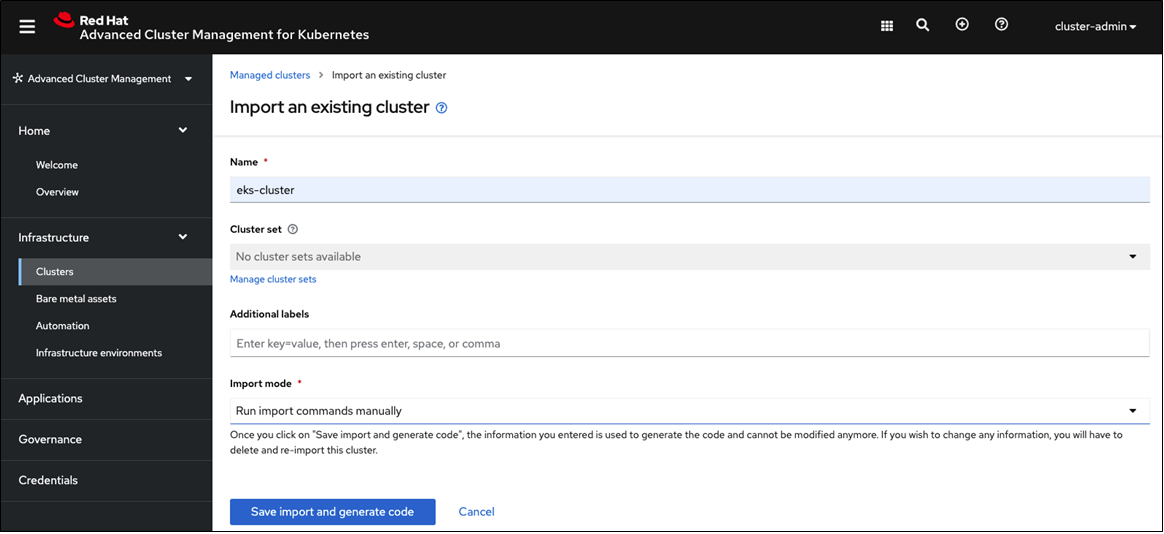
Figure 2 – Advanced Cluster Management for Kubernetes.
Next, log in to the target Amazon EKS cluster that you want to import into Red Hat Advanced Cluster Management. To start the import, paste the command generated in the command line and execute it as cluster-admin.
Similarly, to import the OpenShift cluster, log in to the target OpenShift cluster. Once the cluster import has completed, you will see the list of imported clusters under the Clusters tab.
Application Deployment Across Clusters
To create a new application, navigate to Applications.
Figure 3 below shows that book-import and packman have already been added.
To add a new application, select Create application. Then, select Subscription from the drop-down list.

Figure 3 – Create application flow.
Create an application called nginx in the helm-nginx Namespace. For Repository type, select Helm as shown in Figure 4 below.

Figure 4 – Create application flow Helm chart.
Next, in the URL field, enter https://charts.bitnami.com/bitnami and the rest of the fields as necessary.
Red Hat Advanced Cluster Management deploys the application to all the clusters (Amazon EKS, OpenShift) and the local cluster (hub cluster—in this case ROSA) based on input.
Figure 5 below shows that the nginx application is now active on two remote (OpenShift and Amazon EKS clusters) and one local (ROSA cluster).
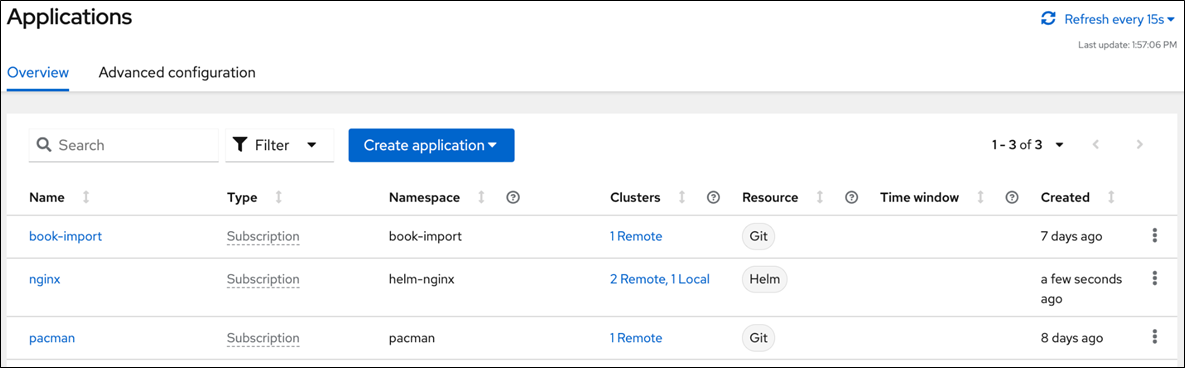
Figure 5 – nginx app deployment to clusters.
Select the application name, in this case nginx. On the resource topology, you will see the three cluster names on which this application has been deployed.
Select Service node, View resource YAML for the eks-cluster.
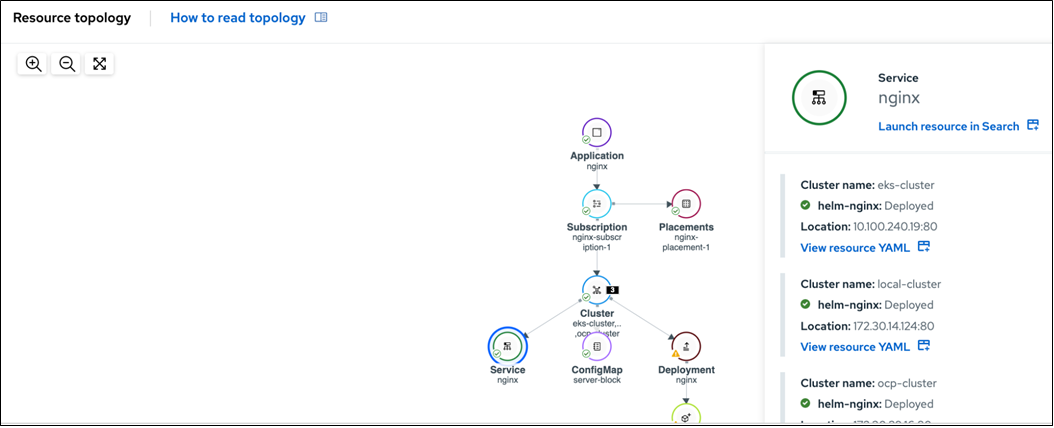
Figure 6 – Service view.
In a notepad, note down the hostname URL under loadbalancer->ingress entity and the hostname URL for nginx loadbalancer URL for OCP and ROSA clusters.
You will need these entries for Route 53 configurations.
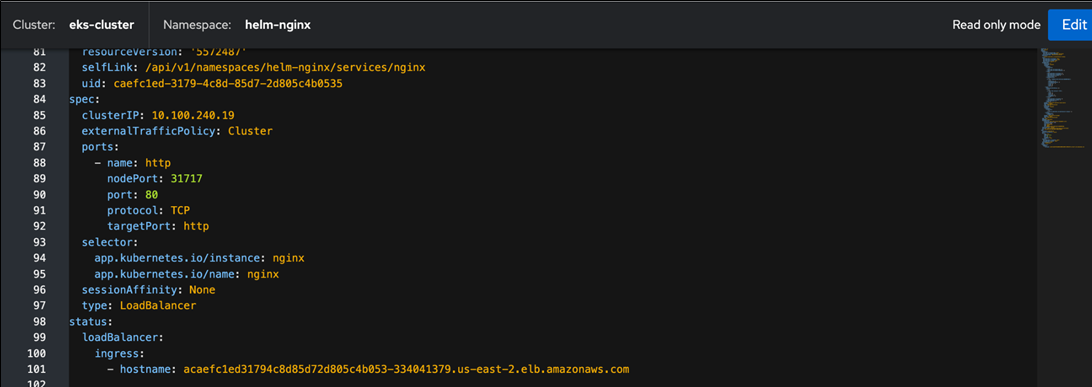
Figure 7 – Service view.
Routing Traffic
Now that the nginx application is deployed on the three clusters, we will configure an external traffic route to these three clusters using Amazon Route 53 to provide a disaster recovery (DR) solution to the cluster when the primary cluster fails.
In the AWS Management Console, for Domain name, enter octank-us.digital.
On the Route 53 service page, select hosted zones, Create hosted zone. Then, enter your application domain details.
Figure 8 below shows the hosted zone configuration where the Domain name is octank-us-digital and the Type is a Public hosted zone.

Figure 8 – Amazon Route 53 hosted zones.
To create additional records inside this domain, select the domain name.
In this walkthrough, we are using octank-us-digital domain, which was externally registered. Note the list of name servers from your domain provider.
In the Amazon Route 53 service page, select octank-us-digital NS record, Edit record and update the name servers list that you noted in the previous step.
The sample updated record is shown in Figure 9 below.
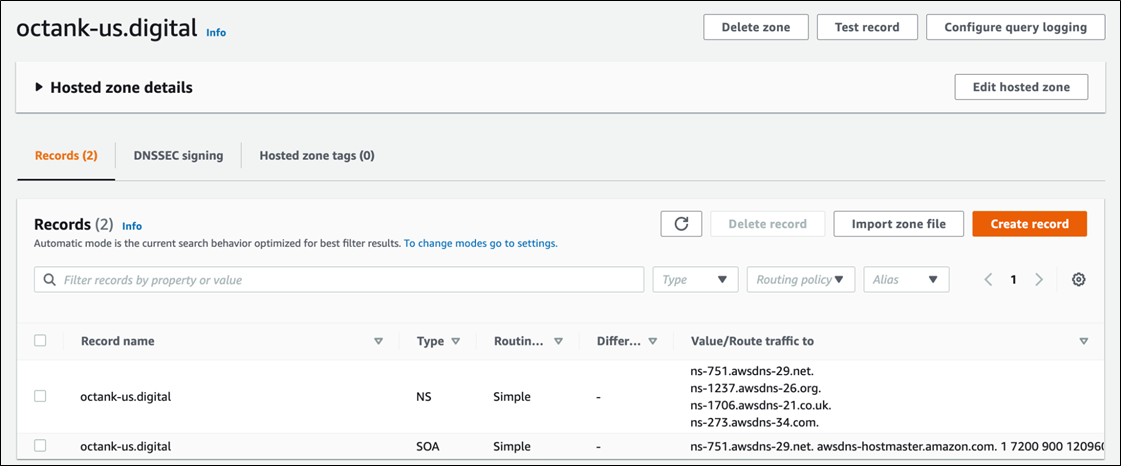
Figure 9 – Hosted zone.
Now, create three CNAME records under octank-us.digital record. Each CNAME record should point to the load balancer URL of the cluster that we imported into the Red Hat Advanced Cluster Management console.
To do this, select Create record and enter app in the Record name. Then, select CNAME from the Record type drop down.
For value, enter the load balancer URL of the first Kubernetes cluster. Select Add another record and repeat the previous steps.
The routing policy is weighted. The weight of 33 is used for each of the three records, so that the traffic is evenly distributed between the three clusters.

Figure 10 – Create records.
Figure 11 below shows the three new additions—all with record name app.octank-us.digital and routing policy weighted.

Figure 11 – Hosted zone details.
In the browser, for URL, enter app.octank-us.digital. A “Welcome to nginx!” message confirms the installation was successful.
Overview of Clusters on AWS
The overview page (Figure 12) shows three clusters, including the ROSA hub cluster where Red Hat Advanced Cluster Management is running.
The summary shows the number of applications running across all clusters. In this case, there are three applications running across three clusters, which includes a total of 15 nodes.
Selecting the numbers pulls up additional details on each of the items.

Figure 12 – Cluster overview.
Observability
For end-to-end visibility of clusters, like viewing system alerts, application metrics, and overall health of the system, integrate Grafana.
In this walkthrough, we installed RH ACM on the ROSA cluster. To start with the integration, create an Amazon Simple Storage Service (Amazon S3) bucket in the same AWS account. Using AWS CLI from the terminal, execute the following command: aws s3 mb s3://thanos-object-storage
Next, create a namespace open-cluster-management-observability in the ROSA (hub) cluster and copy the pull secret into the namespace.
Then, create a file called thanos-object-storage.yaml with the following content:
Next, create a secret for the object storage with the following content:
Apply the observability YAML to the ROSA (hub) cluster.
Lastly, in the Red Hat Advanced Cluster Management console, navigate to Overview.
To view detailed cluster metrics, select Grafana.
Conclusion
Managing the lifecycle of multiple Kubernetes clusters and creating an application development pipeline that improves application availability across the distributed Kubernetes clusters is challenging.
This post explores how to import three clusters (Amazon EKS, OpenShift, and ROSA) into Red Hat Advanced Cluster Management, with ROSA as the hub cluster. It walks through deploying an application using Red Hat Advanced Cluster Management onto all three clusters, and creating a disaster recovery solution (active-active) using Amazon Route 53.
Finally, it demonstrates how to observe all clusters using Red Hat Advanced Cluster Management as the single pane of glass and how to integrate Grafana for more end-to-end visibility of clusters—like viewing system alerts, application metrics, and overall health of the system.
To learn more about Red Hat Advanced Cluster Management, visit the website.
.

.
Red Hat – AWS Partner Spotlight
Red Hat is an AWS Partner and leading provider of enterprise open source solutions, including high-performing Linux, cloud, container, and Kubernetes technologies.
Contact Red Hat | Partner Overview | AWS Marketplace
*Already worked with Red Hat? Rate the Partner
*To review an AWS Partner, you must be a customer that has worked with them directly on a project.