AWS Partner Network (APN) Blog
Securing AWS Accounts with Azure Active Directory Federation
By Manuel Wimmer, Sr. Cloud Solutions Architect – T-Systems International
 |
| T-Systems |
 |
With AWS Identity and Access Management (IAM), Amazon Web Services (AWS) provides a central way to manage user identities and permissions. However, creating and managing the lifecycle of IAM users in AWS can be time-consuming.
Each time an employee joins a company, moves departments, or leaves a company, IAM users have to be created, permissions have to be changed to grant or remove access on AWS services, and finally, IAM users have to be removed to revoke access.
Many organizations already have a central identity management in place; for example, an on-premises Active Directory (AD) or the cloud service Microsoft Azure Active Directory (Azure AD). Instead of implementing user lifecycle processes in each environment, it’s easier, more reliable, and more secure to implement them in a central user identity store such as Azure AD.
This post explores how to authenticate users against Azure AD for access to one or multiple AWS accounts using SAML federation. This is possible by utilizing generic claims based on Azure AD groups. While AWS Single Sign-On (SSO) is the recommended solution for Azure AD integration across AWS organizations, the solution outlined in this post can be an alternative approach.
Additionally, the post includes a walkthrough on how to setup the federation across Azure AD and multiple AWS accounts.
As a Sr. Cloud Solutions Architect, I have years of experience in Microsoft’s on-premises solutions for large enterprises and hold expert and security certifications for both Azure and AWS clouds. I design and implement automated, scalable, and resilient solutions running in AWS or spanning across AWS, on-premises and Azure.
T-Systems International, an AWS Partner and independent providers of digital services, offers one-stop shopping: from secure operation of legacy systems and classical ICT services, transition to cloud-based services, as well as new business models and innovation projects in the Internet of Things (IoT).
Azure AD Federation Benefits
With Azure AD, employees can use their corporate credentials to authenticate and have a unique and seamless user experience. Additionally, conditional access can be utilized for user login, for example, to enforce multi-factor authentication (MFA) or to further restrict the access—for example, by group membership or geographical conditions—and eventually increase security.
In comparison to the Active Directory Connector, the on-premises domain controllers do not need to be reachable from the AWS network and the approach also scales seamlessly across multiple AWS accounts and roles.
Azure AD Federated Authentication Process
The diagram in Figure 1 shows the authentication process to AWS using Azure Active Directory as the identity provider.
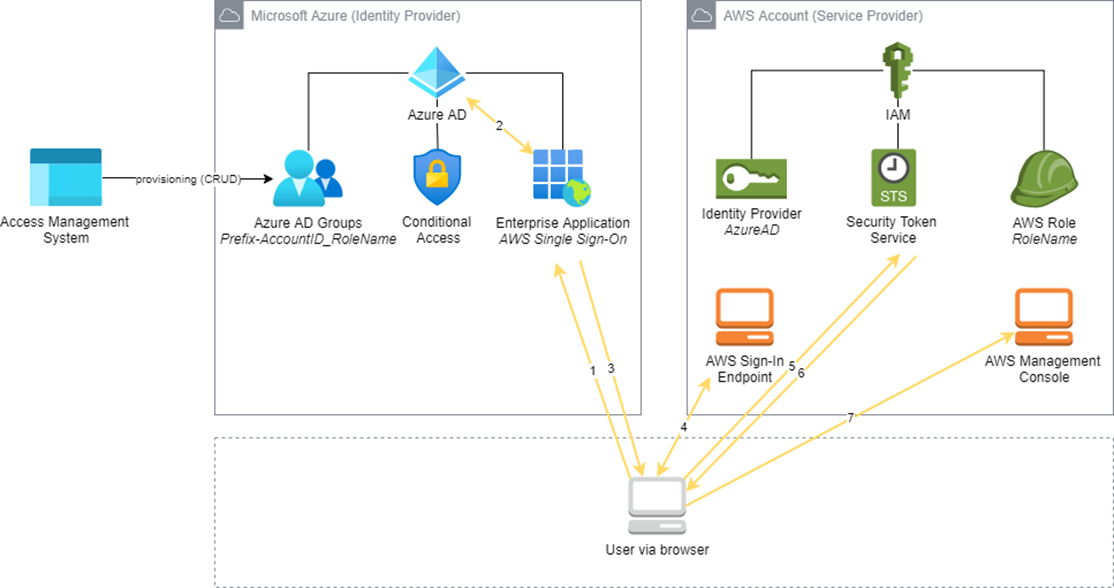
Figure 1 – Authentication process.
- A corporate user opens the sign-in URL of the Azure AD enterprise application in a browser.
- The Azure AD enterprise application authenticates against the Azure AD and validates the group memberships of the user. As an optional feature, users can protect the enterprise application with conditional access (for example, for multi-factor authentication or region-based access).
- The Azure AD enterprise app returns the SAML assertion.
- The corporate user is redirected to the AWS endpoint, presenting the SAML assertion.
- The corporate user chooses a pre-defined role, which invokes the Security Token Service with STS:AssumeRoleWithSAML.
- The AWS IAM role is assumed and a temporary IAM token is returned.
- The corporate user is redirected to the AWS Management Console for resource access.
Implementation Overview
To prepare the authentication against Azure AD, an enterprise application needs to be created in Azure AD. This serves as a login endpoint and provides the necessary user identity and group membership information through SAML to the identity provider of the target AWS account.
In addition to the identity provider, one or more AWS roles are needed with permissions in AWS. The AWS role is assumed by the user after successful authentication.
To automate the role assumption and scale across many AWS accounts, the Azure AD groups follow a specific naming convention (Prefix-AccountID_RoleName).
For example, with the prefix “AWS”, the Azure AD group “AWS-111111111111_ReadOnlyRole” would result in assuming the role ReadOnlyRole in the AWS account 111111111111. Consequently, the Azure AD group “AWS-999999999999_EC2Operator” would result in assuming the role EC2Operator in the AWS account 999999999999.
Ideally, the Azure AD groups are provisioned and managed with an external tool, like the organization’s access management system. The roles need to be created first in the corresponding AWS account and be trusted with the IAM identity provider for Azure AD.
Configure the Azure Enterprise Application
In the Azure portal, choose Azure Active Directory, Enterprise Applications.
Select Create your own application and specify the app name.

Figure 2 – Enterprise application creation.
Once the enterprise application has been created, in the navigation pane, choose Properties and note down the User access URL. You will need this URL to log in to AWS with Azure AD authentication.
Users have the option to define additional application owners to delegate access and administration to other users. Owners can generate new certificates or administrate metadata of the enterprise app.

Figure 3 – Enterprise application properties.
In the newly created enterprise application, choose Single sign-on (SSO).
For configuration, select SAML and upload the SAML metadata file from AWS, which can be downloaded from this XML file.

Figure 4 – Upload prompt for the metadata file.
Review the Basic SAML Configuration settings and select Save.
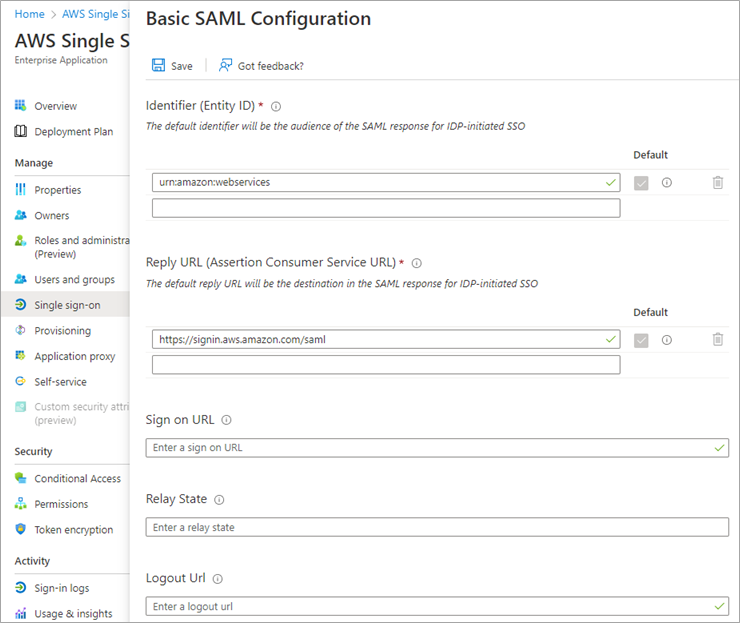
Figure 5 – Review screen of the metadata file upload.
Next, we will configure the following Attributes & Claims (as shown in Figure 6):
- RoleSessionName: The role name being displayed in the AWS console and logged into AWS CloudTrail. As source attribute, the user principal name in Azure AD is used.
- SessionDuration: Define the session duration in seconds as a constant.
- Role: The Amazon Resource Name (ARN) specifying the role, consisting of the AWS account ID and the AWS role name, both provided in the Azure AD group name and transformed through regular expression.
On the single sign-on page of the enterprise application, select edit.
Add a new claim with the following values:
- Name: RoleSessionName
- Namespace: https://aws.amazon.com/SAML/Attributes
- Source: Attribute
- Source attribute: user:userprincipalname
Before saving, make sure the new claim looks like Figure 6. To save the configuration, click Save.

Figure 6 – Claim configuration for RoleSessionName.
Add another new claim with the values:
- Name: SessionDuration
- Namespace: https://aws.amazon.com/SAML/Attributes
- Source: Attribute
- Source attribute: 1400
Enter the value without quotes; Azure should automatically add them so it looks like what’s shown in Figure 7. The value itself can be set to any number of seconds.
Before saving, make sure the new claim looks like Figure 7. To save the configuration, click Save.

Figure 7 – Claim configuration for SessionDuration.
Now, create a group claim:
- Select: All groups
- Select Source attribute: sAMAccountName
- Select Filter groups (Preview)
- Select Attribute to match: SAMAccountName
- Select Match with: Prefix
- Enter String: AWS-
This value corresponds to the prefix used for group names in Azure AD
Next, select Customize the name of the group claim:
- Enter Name: Role
- Enter Namespace: https://aws.amazon.com/SAML/Attributes
- Select Apply regex replace to groups claim content (Preview)
- Enter Regex pattern:
AWS-(?'accountid'[\d]{12})_
This value corresponds to the structure of group names in Azure AD: Prefix-AccountId_RoleName
Enter Regex replacement pattern: arn:aws:iam::{accountid}:saml-provider/AzureAD,arn:aws:iam::{accountid}:role/
Note that AzureAD in the value above needs to match the identity provider that will be created in the AWS console later.
Before saving, make sure the new claim looks like Figure 8. To save the configuration, click Save.

Figure 8 – Group claim configuration.
On the SAML Signing Certificate, edit the Notification Email to enter the email address of the security operations team. This ensures that all relevant parties are informed before the certificate expiration.
Finally, select Download next to the Federation Metadata XML. This XML file is needed during the AWS configuration.
This concludes the Azure setup.

Figure 9 – Certificate information.
Configure Target AWS Accounts
Now, we will configure the target AWS accounts for user access with single sign-on. Please note, the following configuration steps need to be implemented in each target AWS account, that should be enabled for the federated Azure AD authentication.
To get started, open the AWS console. In the navigation pane, under Identity and Access Management, choose Identity providers. For Provider type, choose SAML. For Provider name, enter AzureAD.
For Metadata document, upload the metadata XML file of the Azure AD enterprise application that was just downloaded and select Save.
The name of the identity provider (IdP) needs to be equal to the name you have given in the regular expression replacement pattern of the claim rule in the Azure AD configuration.

Figure 10 – IAM identity provider creation.
Next, create an IAM role.
For Type of trusted entity, choose SAML 2.0 federation.
For SAML provider, select the newly created SAML provider (in this case, AzureAD).
Select Allow programmatic and Management Console access. This will create a condition in the policy document.

Figure 11 – IAM role creation in the AWS console.
Alternatively, the role can be created with the following policy document:
Finally, select the necessary permissions (for example, ViewOnlyAccess) and insert a role name to save the IAM role. The role name needs to match with the corresponding group name in Azure AD (excluding the prefix and AWS account ID).

Figure 12 – IAM role permission assignment.
Repeat the role creation for all relevant roles. Note that every role associated with the SAML provider needs to have the trust policy edited.
With this, the AWS configuration is complete.
Integration Test
Once the setup is ready, single sign-on can be tested. To do this, open a browser and log in to the user access URL of the Azure AD enterprise application.
This will redirect you to either the AWS console, if only one role has been created, or prompt you to choose a role of an AWS account if multiple roles in one or different AWS accounts have been created.
Conclusion
Now, we have set up a single sign-on solution through Azure Active Directory, which scales across multiple AWS accounts. Users can log in with their corporate credentials and administrators can utilize conditional access for enhanced security.
If your organization already uses Azure AD as a central identity management, consider integrating it into AWS for a seamless user experience, reduced efforts in user lifecycle management, and advanced features, like conditional access.
Implementation does not require a lot of time, is straight forward, increases security, and is highly customizable.
To learn more, read these additional resources:
- AWS Federated Authentication with Active Directory Federation Services (AD FS)
- Use attribute-based access control with AD FS to simplify IAM permissions management
The content and opinions in this blog are those of the third-party author and AWS is not responsible for the content or accuracy of this post.
.
 .
.
T-Systems – AWS Partner Spotlight
T-Systems is an AWS Premier Tier Services Partner. As a leading independent provider of digital services, T-Systems offers secure operation of legacy systems and classical ICT services, transition to cloud-based services, as well as new business models and innovation projects in IoT.